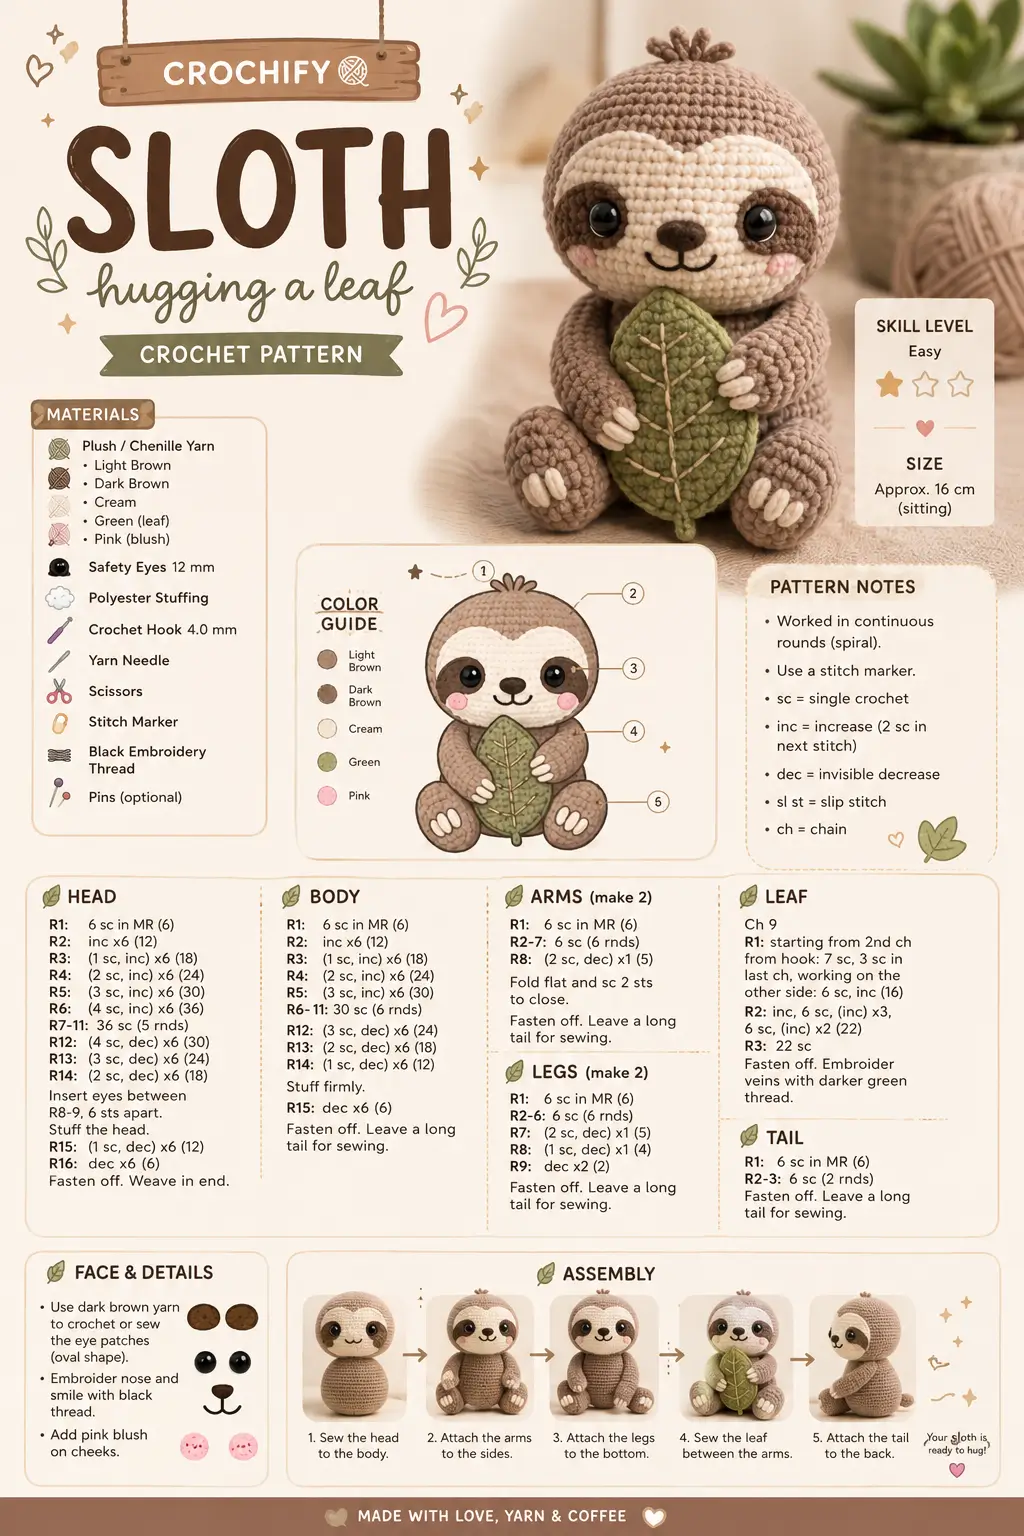
A sloth looks wrong the moment the eye mask sits too high. This sloth amigurumi crochet pattern uses plush chenille yarn, a 4.0 mm hook, and 12 mm eyes to build a 16 cm sitting toy with an easy construction path and a separate leaf prop. You can make it as a compact gift; the finished sloth also reads cleanly on a shelf or desk.
The Design: What Makes This Sloth Different
This build depends on three structural choices. First, the head stops at 36 stitches while the body stops at 30, which pushes the face forward and gives the cream mask enough width to read from a distance. Second, the arms stay narrow and lightly stuffed, so they can angle inward without adding bulk around the leaf. Third, the legs taper fast in the final rounds, which keeps the feet small enough for a seated pose instead of a squat blob. In a sloth crochet pattern, that ratio matters more than extra surface detail. A common mistake is to spread the eye patches too wide and too high. Then the face stops looking like an easy sloth amigurumi and starts reading like a bear.
Project Info at a Glance
| Skill Level | Time | Finished Size | Hook | Best For |
|---|---|---|---|---|
| Easy | Couple of hours to half day* | Approx. 16 cm sitting | 4.0 mm | Gift plush, shelf display, desk mascot |
*Comparable live search results range from “a couple hours” for small easy sloths to 12 hours for a much larger 21-inch sloth, so the exact time depends on pace and yarn bulk.
Materials and Tools
Yarn
- Light brown plush / chenille — bulky plush — about 75 g main body reference — Himalaya Dolphin Baby, YarnArt Dolce, or similar
- Cream plush / chenille — same weight — about 25 g for face mask and claws
- Dark brown plush / chenille — same weight — about 10 g for eye patches and nose
- Green plush / chenille — same weight — scrap amount for leaf
- Pink plush / chenille — same weight — scrap amount for blush patches
Tools
- Hook 4.0 mm
- 12 mm safety eyes
- Polyester stuffing
- Yarn needle
- Stitch markers
- Scissors
- Black embroidery thread
- Pins
Comparable compact sloth patterns and listings in the live search set commonly use 3.5–4.0 mm hooks and 7.5–12 mm eyes, with 4 mm and 12 mm appearing on current small plush sloth listings.
Abbreviations
MR = magic ring, sc = single crochet, inc = increase, dec = invisible decrease, sl st = slip stitch, ch = chain, BLO = back loop only.
Use invisible decrease through the front loops only, or the face and belly lines will show a hard ridge.
Pattern — Step by Step
Continuous spiral unless noted.
Face Mask (Make 1)
Yarn: cream plush / chenille — Source: user-provided image + standard amigurumi math.
Ch 9.
R1: starting from 2nd ch from hook: 7 sc, 3 sc in last ch, working on other side: 6 sc, inc (18)
R2: inc, 6 sc, inc x3, 6 sc, inc x2 (24)
R3: 24 sc (24)
Pin centered on the lower front of the head before sewing.
Fasten off. Leave 20 cm tail.
Eye Patches (Make 2)
Yarn: dark brown plush / chenille — Source: user-provided image + standard amigurumi math.
Ch 6.
R1: starting from 2nd ch from hook: 4 sc, 3 sc in last ch, working on other side: 3 sc, inc (12)
R2: inc, 3 sc, inc x3, 3 sc, inc x2 (18)
R3: 18 sc (18)
Keep both patches mirrored when pinning.
Fasten off. Leave 20 cm tail.
Blush Cheek Patches (Make 2)
Yarn: pink plush / chenille — Source: user-provided image + standard amigurumi math.
R1: 6 sc in MR (6)
R2: inc x6 (12)
R3: sl st around lightly if you want a firmer edge; do not increase (12)
These can sit partly under the eye patches or just below them.
Fasten off. Leave 12 cm tail.
Head (Make 1)
Yarn: light brown plush / chenille — Source: user-provided image.
R1: 6 sc in MR (6)
R2: inc x6 (12)
R3: (1 sc, inc) x6 (18)
R4: (2 sc, inc) x6 (24)
R5: (3 sc, inc) x6 (30)
R6: (4 sc, inc) x6 (36)
R7: 36 sc (36)
R8: 36 sc (36)
R9: 36 sc (36)
R10: 36 sc (36)
R11: 36 sc (36)
R12: (4 sc, dec) x6 (30)
R13: (3 sc, dec) x6 (24)
R14: (2 sc, dec) x6 (18)
R15: (1 sc, dec) x6 (12)
R16: dec x6 (6)
Insert eyes between R8 and R9, spaced 6 stitches apart. Stuff firmly before R15.
Fasten off. Weave in end.
Body (Make 1)
Yarn: light brown plush / chenille — Source: user-provided image.
R1: 6 sc in MR (6)
R2: inc x6 (12)
R3: (1 sc, inc) x6 (18)
R4: (2 sc, inc) x6 (24)
R5: (3 sc, inc) x6 (30)
R6: 30 sc (30)
R7: 30 sc (30)
R8: 30 sc (30)
R9: 30 sc (30)
R10: 30 sc (30)
R11: 30 sc (30)
R12: (3 sc, dec) x6 (24)
R13: (2 sc, dec) x6 (18)
R14: (1 sc, dec) x6 (12)
R15: dec x6 (6)
Stuff firmly after R13. Keep the lower half wider than the neck edge.
Fasten off. Leave 25 cm tail.
Arms / Front Legs (Make 2)
Yarn: light brown plush / chenille — Source: user-provided image.
R1: 6 sc in MR (6)
R2: 6 sc (6)
R3: 6 sc (6)
R4: 6 sc (6)
R5: 6 sc (6)
R6: 6 sc (6)
R7: 6 sc (6)
R8: 2 sc, dec (5)
Stuff only the upper third if you want a softer hug pose. Embroider 3 cream claws at the tip after sewing, about 5 mm long each.
Fold flat and sc 2 stitches to close.
Fasten off. Leave 25 cm tail.
Back Legs (Make 2)
Yarn: light brown plush / chenille — Source: user-provided image.
R1: 6 sc in MR (6)
R2: 6 sc (6)
R3: 6 sc (6)
R4: 6 sc (6)
R5: 6 sc (6)
R6: 6 sc (6)
R7: 2 sc, dec (5)
R8: 1 sc, dec (4)
R9: dec x2 (2)
Do not overstuff. Embroider 3 cream claws on each foot before attaching, spaced evenly across the front.
Fasten off. Leave 20 cm tail.
Leaf (Make 1)
Yarn: green plush / chenille — Source: user-provided image, with stitch count corrected to balance.
Ch 9.
R1: starting from 2nd ch from hook: 7 sc, 3 sc in last ch, working on other side: 6 sc, inc (18)
R2: inc, 6 sc, inc x3, 6 sc, inc x2 (24)
R3: 24 sc (24)
Embroider the center vein first, then two angled side veins on each half.
Fasten off. Leave 25 cm tail.
Tail (Make 1)
Yarn: light brown plush / chenille — Source: user-provided image.
R1: 6 sc in MR (6)
R2: 6 sc (6)
R3: 6 sc (6)
Keep this lightly stuffed or unstuffed.
Fasten off. Leave 15 cm tail.
Hair Tuft (Make 1 Bundle)
Yarn: light brown plush / chenille — Source: user-provided image.
Cut 6 strands, each 7 cm long. Fold each strand in half and latch them through the crown of the head. Tie once, trim to about 1.5 cm, and split the fibers slightly for a softer tuft.
Facial Embroidery
Yarn: dark brown and black embroidery thread — Source: user-provided image.
Embroider a small oval nose centered between the eye patches. Add a shallow curved smile directly below it. Stitch short dark eyebrow dashes above the cream mask if you want the slower, sleepy expression shown in the image.
Assembly
- Sew the cream face mask to the front of the head so the lower edge sits just above the chin curve and the upper edge lands below the crown.
- Pin the eye patches over the face mask, one on each side, angled slightly downward toward the nose.
- Push the 12 mm safety eyes through the eye patches and face mask between head rounds 8 and 9, with 6 stitches between them.
- Embroider the nose and smile, then tack the blush cheek patches under the outer lower corners of the eye patches.
- Sew the head to the body with the decrease opening centered over the top of the body, adding extra stuffing into the neck seam if needed.
- Attach the arms at the upper sides of the body, roughly spanning body rounds 8 to 11, and tilt them inward so both hands meet at center front.
- Sew the back legs to the lower front of the body, one on each side, so the sloth can sit without rocking backward.
- Attach the tail at the lower back center, just above the base line.
- Stitch the leaf between the two arms, then add a few hidden tacking stitches into the body so it stays vertical.
- Add the hair tuft at the crown, embroider the cream claws on hands and feet, and weave all tails deep into the body.
The seated toy should finish at about 16 cm tall when the stuffing density matches the source image.
7 Technical Tips
- Stitch marker drift: Move the marker every round on the head plateau, not every second round. One missed shift at 36 stitches can tilt the face mask by several millimeters.
- Stuffing firmness: Press the head with your thumb after round 14. A correct fill should compress only slightly, not collapse into the eye line.
- Invisible decrease: Work every dec through the front loops only. A standard two-loop decrease leaves a visible seam that reads clearly on chenille.
- Eye placement timing: Install the eyes only after the face mask and eye patches are pinned. If you set them first, patch placement becomes guesswork and the mask can bunch.
- Velvet tension: Watch the core thread between stitches on the arms and leaf. If the base thread starts showing, drop one hook size or tighten your pull slightly.
- Pinning order: Use at least four pins on the leaf before sewing. One pin at the top and one at the bottom lets the leaf twist and pulls the arms off-center.
- Tail weaving: Leave no tail shorter than 12 to 15 cm in chenille yarn. Short tails work loose faster because the pile hides weak anchoring.
Conclusion
This build stays readable because the face dominates the proportions, the arms stay narrow, and the leaf locks the pose at center front. Finish the sewing, compare both eye patch angles one last time, and photograph the sloth from straight on before you post it. Save this sloth amigurumi crochet pattern to Pinterest, then share your finished version on Instagram with #SlothHuggingLeafPattern. For the next revision, change only one variable at a time: claw length, leaf vein color, or patch angle. Did you keep the eye patches level, or did you tip them downward to get a more sloth-like expression?









