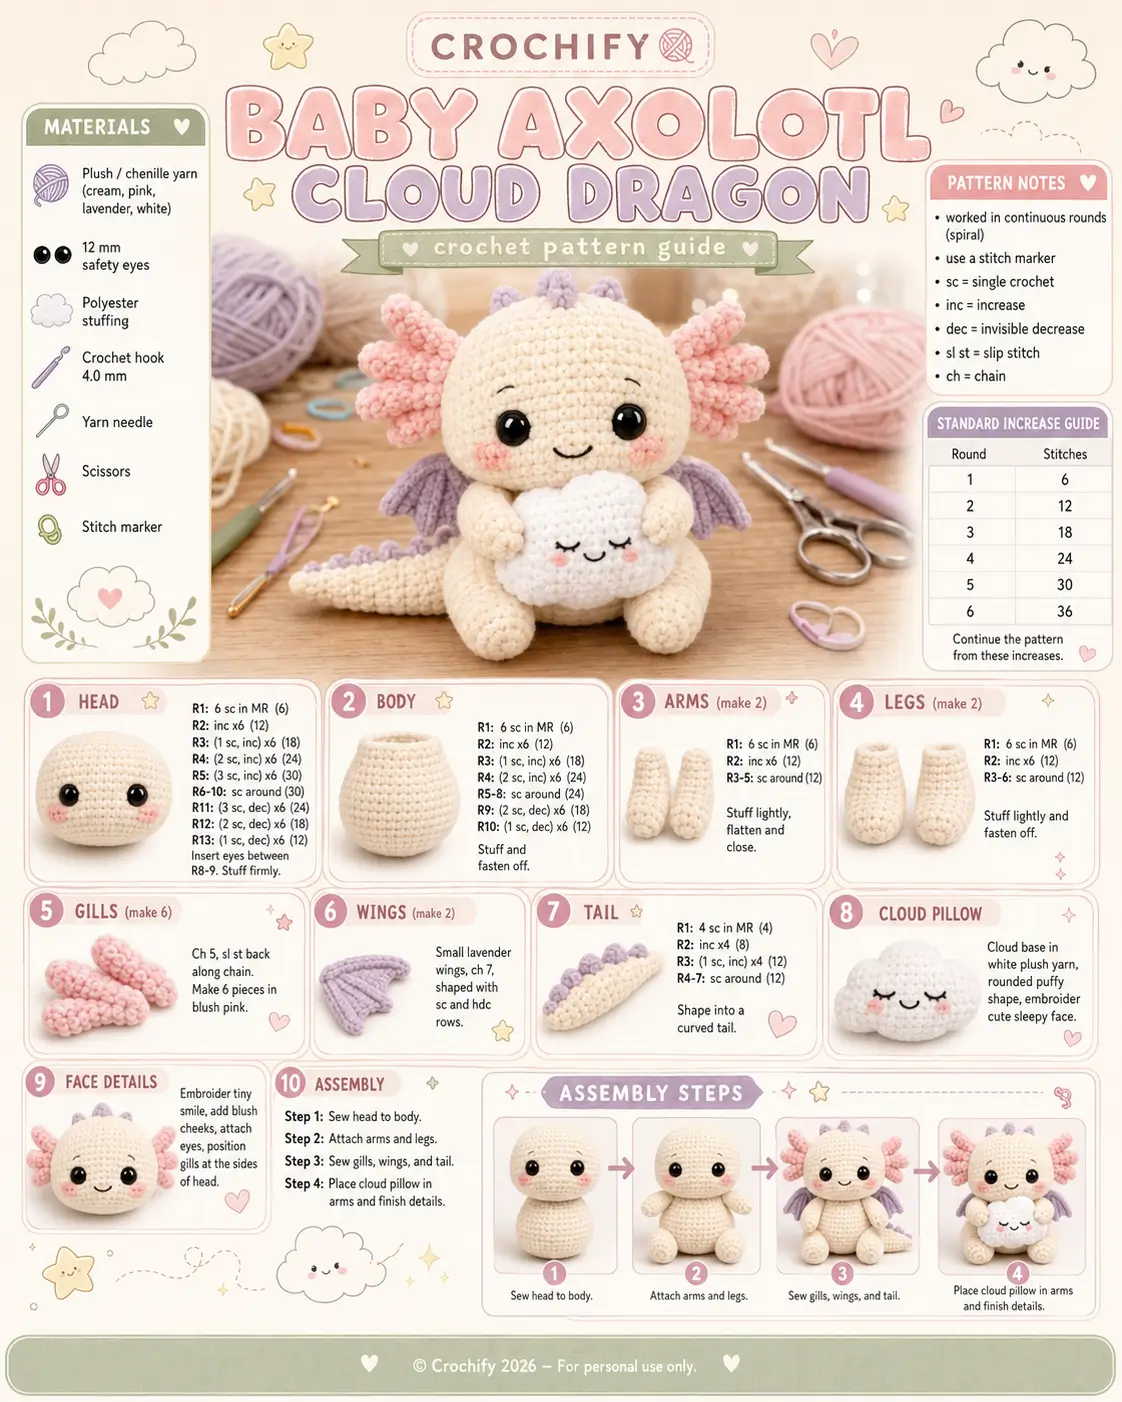
Axolotl gills should fan sideways while dragon wings sit behind them; this baby axolotl cloud dragon amigurumi pattern has to solve both planes at once. Use cream plush chenille, blush gills, lavender wings, a white cloud pillow, 12 mm eyes, and a 4.0 mm hook for an estimated 16 cm seated toy. The skill level is familiar beginner to intermediate. Make it as a display sample with clear silhouette.
The Design: What Makes This Axolotl Cloud Dragon Different
Two planes define this design: the axolotl gills spread horizontally from the head, while the crochet dragon wings sit farther back on the body. Separating those attachment lines keeps the profile readable instead of making one bulky side cluster. The head uses a 36-stitch medium plateau so the 12 mm eyes do not dominate the face. A smaller body under the head improves sitting balance, which matters once the cloud pillow is placed between the arms. The tail angles to one side rather than straight back because the toy is seated, not splooted. A common mistake in an axolotl dragon crochet pattern is attaching the gills too low; they need to frame the eyes, not the neck. This cloud dragon amigurumi also needs soft spikes, not sharp cones, so the baby proportions stay consistent.
Project Info at a Glance
| Skill Level | Time | Finished Size | Hook | Best For |
|---|---|---|---|---|
| Familiar beginner to intermediate | 5–7 hours | Approx. 16 cm seated | 4.0 mm | Display sample, gift table, photo prop |
Materials and Tools
Yarn
- Cream — plush/chenille velvet — 90 g — Hobbii Honey Bunny, Premier Parfait Chunky, or Himalaya Dolphin Baby
- Blush pink — plush/chenille velvet — 30 g — for gills and cheek patches
- Lavender — plush/chenille velvet — 18 g — for wings, head spikes, and tail bumps
- White — plush/chenille velvet — 15 g — for cloud pillow
- Black embroidery thread — small amount — for mouth, brows, and cloud face
Tools
- Hook 4.0 mm
- 12 mm black safety eyes
- Polyester stuffing
- Yarn needle
- Locking stitch markers
- Scissors
- Pins for assembly
Abbreviations
MR = magic ring; sc = single crochet; inc = increase; dec = invisible decrease; sl st = slip stitch; ch = chain; BLO = back loop only; st = stitch; sts = stitches; FO = fasten off.
Invisible decrease means catching the front loops of the next two stitches before drawing through both loops and completing one single crochet.
Pattern — Step by Step
Continuous spiral unless noted.
Head
Yarn: cream — Source: Standard amigurumi math
R1: 6 sc in MR (6)
R2: inc ×6 (12)
R3: (sc, inc) ×6 (18)
R4: (2 sc, inc) ×6 (24)
R5: (3 sc, inc) ×6 (30)
R6: (4 sc, inc) ×6 (36)
R7: sc around (36)
R8: sc around (36)
R9: sc around (36)
R10: sc around (36)
R11: sc around (36)
R12: sc around (36)
Insert 12 mm safety eyes between R9 and R10, 7 sts apart. Stuff the head firmly after the eyes are locked.
R13: (4 sc, dec) ×6 (30)
R14: (3 sc, dec) ×6 (24)
R15: (2 sc, dec) ×6 (18)
R16: (sc, dec) ×6 (12)
R17: dec ×6 (6)
Fasten off. Leave a 20 cm tail and close through the front loops.
Body
Yarn: cream — Source: Standard amigurumi math
R1: 6 sc in MR (6)
R2: inc ×6 (12)
R3: (sc, inc) ×6 (18)
R4: (2 sc, inc) ×6 (24)
R5: (3 sc, inc) ×6 (30)
R6: (4 sc, inc) ×6 (36)
R7: sc around (36)
R8: sc around (36)
R9: sc around (36)
R10: sc around (36)
R11: sc around (36)
R12: (4 sc, dec) ×6 (30)
R13: sc around (30)
R14: (3 sc, dec) ×6 (24)
R15: sc around (24)
Stuff the lower body enough to hold a seated pear shape. Do not overfill the neck edge.
R16: (2 sc, dec) ×6 (18)
R17: (sc, dec) ×6 (12)
R18: dec ×6 (6)
Fasten off. Leave a 25 cm tail for sewing to the head.
Arms / Front Legs Make 2
Yarn: cream — Source: Standard amigurumi math
R1: 6 sc in MR (6)
R2: inc ×6 (12)
R3: sc around (12)
R4: sc around (12)
R5: sc around (12)
R6: sc around (12)
Stuff only the lower half so the arm can fold over the cloud pillow.
R7: dec ×6 (6)
Fasten off. Leave a 20 cm tail.
Back Legs Make 2
Yarn: cream — Source: Standard amigurumi math
R1: 6 sc in MR (6)
R2: inc ×6 (12)
R3: (sc, inc) ×6 (18)
R4: sc around (18)
R5: sc around (18)
R6: sc around (18)
Stuff lightly. Flatten the upper edge before sewing.
R7: (sc, dec) ×6 (12)
R8: dec ×6 (6)
Fasten off. Leave a 25 cm tail.
Gills Make 6
Yarn: blush pink — Source: Standard amigurumi math
R1: 6 sc in MR (6)
R2: sc around (6)
R3: sc around (6)
R4: sc around (6)
R5: sc around (6)
Do not stuff. Roll the piece between fingers to form a soft tube.
Fasten off. Leave a 15 cm tail on each gill.
Make three gills for each side of the head. Place the center gill level with the eye line, the top gill one round above it, and the bottom gill one round below it.
Wings Make 2
Yarn: lavender — Source: Standard flat crochet shaping
Ch 7.
Row 1: sc in second ch from hook and across (6)
Row 2: ch 1, turn, inc, 4 sc, inc (8)
Row 3: ch 1, turn, sc across (8)
Row 4: ch 1, turn, inc, 6 sc, inc (10)
Row 5: ch 1, turn, sc across (10)
Row 6: ch 1, turn, dec, 6 sc, dec (8)
Border: ch 1, sl st evenly around the wing edge. Add two short surface chains from lower edge to top edge for wing ribs.
Fasten off. Leave a 25 cm tail for sewing.
Tail
Yarn: cream — Source: Standard amigurumi math
R1: 6 sc in MR (6)
R2: sc around (6)
R3: inc ×6 (12)
R4: sc around (12)
R5: sc around (12)
R6: (sc, inc) ×6 (18)
R7: sc around (18)
R8: sc around (18)
R9: sc around (18)
R10: sc around (18)
R11: sc around (18)
R12: (sc, dec) ×6 (12)
R13: sc around (12)
Stuff the base only. Leave the tip soft so it curves naturally.
Fasten off. Leave a 30 cm tail.
Head Spikes Make 4
Yarn: lavender — Source: Standard amigurumi math
R1: 6 sc in MR (6)
R2: sc around (6)
R3: sc around (6)
Do not stuff. Flatten the base before attaching.
Fasten off. Leave a 12 cm tail.
Tail Bumps Make 5
Yarn: lavender — Source: Standard amigurumi math
R1: 6 sc in MR (6)
R2: sc around (6)
Fasten off. Leave a 10 cm tail.
Sew the bumps along the top of the tail, starting near the body and spacing each bump one round apart.
Cheek Patches Make 2
Yarn: blush pink — Source: Standard amigurumi math
R1: 6 sc in MR (6)
R2: inc ×6 (12)
Sl st to first st (12).
Fasten off. Leave a 12 cm tail. Sew under the safety eyes, slightly outside the mouth curve.
Cloud Pillow
Yarn: white — Source: Standard amigurumi math
R1: 6 sc in MR (6)
R2: inc ×6 (12)
R3: (sc, inc) ×6 (18)
R4: (2 sc, inc) ×6 (24)
R5: (3 sc, inc) ×6 (30)
R6: sc around (30)
R7: sc around (30)
R8: sc around (30)
R9: (3 sc, dec) ×6 (24)
R10: (2 sc, dec) ×6 (18)
Stuff to a soft oval, not a ball. The pillow must sit between the arms without forcing them apart.
R11: (sc, dec) ×6 (12)
R12: dec ×6 (6)
Fasten off. Leave a 15 cm tail and close.
Cloud Puffs Make 4
Yarn: white — Source: Standard amigurumi math
R1: 6 sc in MR (6)
R2: inc ×6 (12)
R3: sc around (12)
Flatten each puff. Sew two along the top of the cloud pillow and one at each side.
Face Embroidery
Yarn: black embroidery thread — Source: visual drafting from submitted photo
Add a small U-shaped smile between the safety eyes, centered one round below the eye base. Add two short eyebrow stitches above the eyes. Embroider the cloud pillow with closed sleeping eyes and a small smile. Add two tiny blush stitches on the cloud if the main cheek patches do not cover the visual balance.
Assembly
- Sew the body to the underside of the head, centering the body under the eye line.
- Check that the head sits level before the seam is fully tightened.
- Sew the cheek patches under the eyes, leaving one stitch of cream yarn between each patch and the smile.
- Sew the arms to the upper body at R8–R10 so they angle forward.
- Sew the back legs to the lower body at R4–R6, with feet facing outward.
- Attach three blush gills to each side of the head, centered around R8–R10.
- Sew the lavender wings to the back body at R8–R11, behind the gills.
- Attach the tail to the lower back body at R5–R7 and curve it toward one side.
- Sew the head spikes along the top center line and the tail bumps along the tail ridge.
- Place the cloud pillow between the arms and tack each arm to the pillow with one hidden stitch.
The completed toy is a seated plush axolotl-dragon holding a separate cloud pillow.
7 Technical Tips
- Stitch marker drift: If the marker shifts more than 2 stitches by R6 on the head, the face will rotate off center. Re-count the 36-stitch plateau before inserting eyes.
- Stuffing firmness: The head should compress by about 1 cm when pressed between two fingers. More compression makes the safety eyes wobble in plush yarn.
- Invisible decrease gaps: Holes usually appear on R13–R17 when the hook catches both loops instead of front loops only. Keep the working loop low on the hook to stop chenille from stretching.
- Eye placement timing: Place the 12 mm eyes between R9 and R10 before closing past R13. After that point, the washer is difficult to seat flat inside the head.
- Velvet tension: A 4.0 mm hook should produce a dense fabric with no stuffing visible through the 36-stitch head. If white fiber shows between stitches, switch to 3.75 mm for the next part.
- Pinning gills: The three side gills should span about 3 rounds vertically. If the bottom gill drops below the cheek patch, the character reads as a frilled lizard instead of an axolotl.
- Tail weaving: Leave at least 12 cm after the final tail knot. Shorter tails can pull out of chenille yarn because the pile hides loose ends without locking them.
Conclusion
Block the final silhouette before the last tail is hidden: gills level, wings paired, cloud centered, and tail angled behind the right leg. The strongest next step is to make the head and body first, photograph them together, then pin every side feature before sewing. This keeps the axolotl identity readable after the dragon details are added. Save the finished baby axolotl cloud dragon amigurumi to Pinterest, then share a front and side view on Instagram with #BabyAxolotlCloudDragon. Which side-gill layout held its fan shape better on your version: three equal tubes or a taller center tube?









