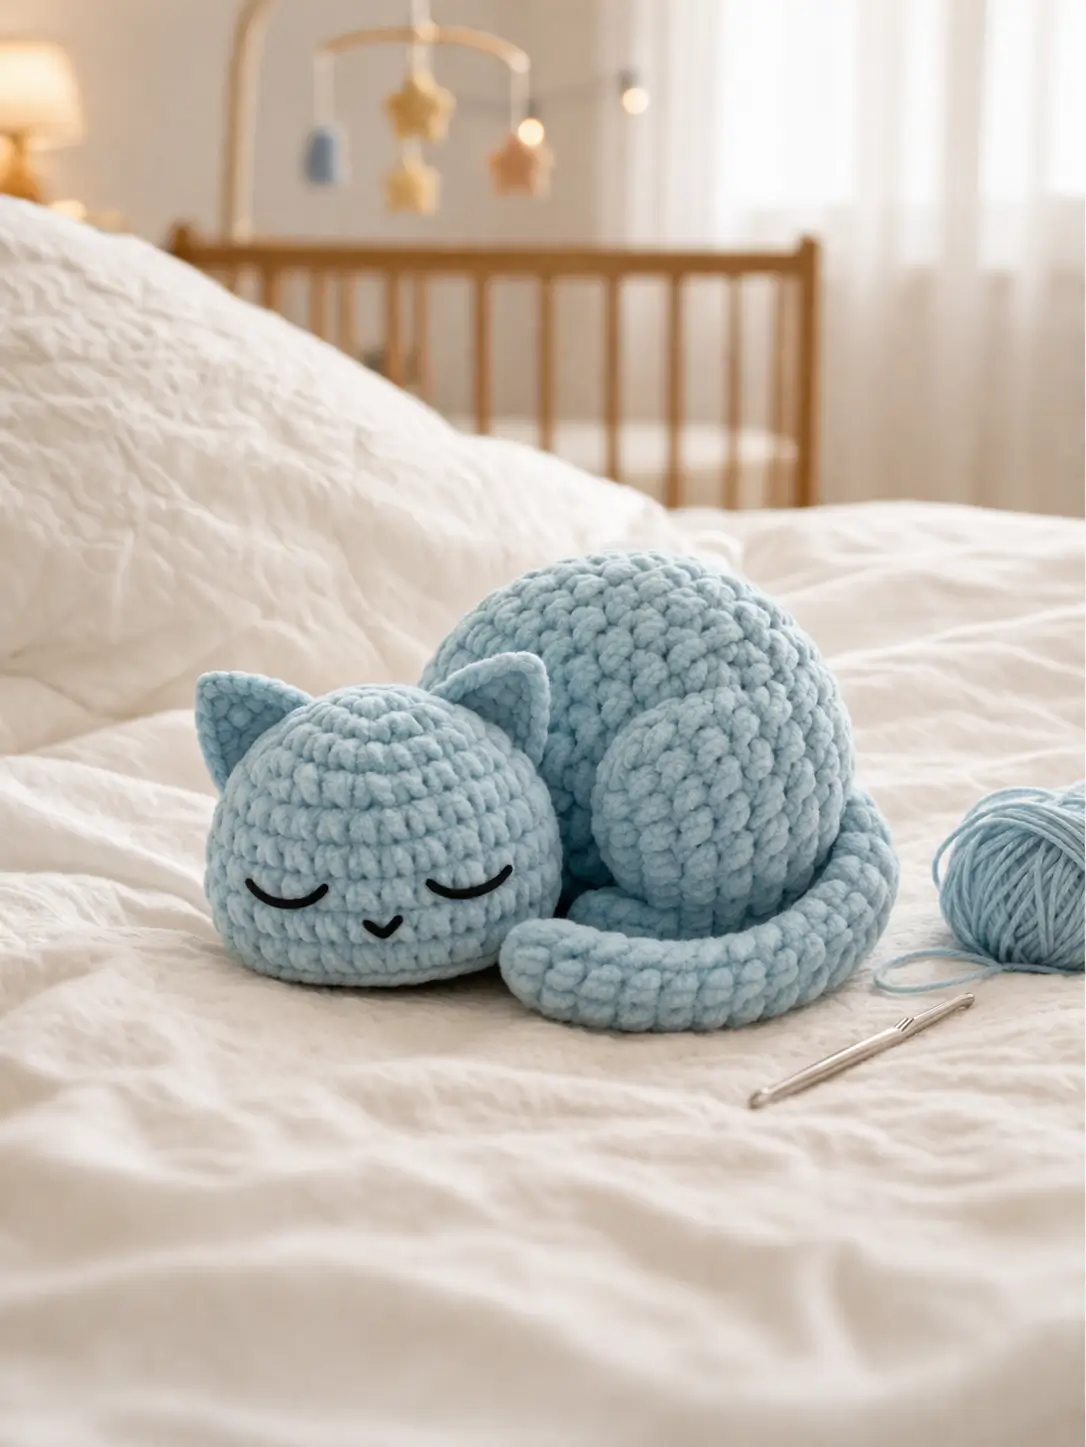
A sleeping cat only looks right when the head drops lower than the shoulder line. This sleeping cat amigurumi is built around that slope, using bulky chenille yarn, a 4.5 mm hook, embroidered eyes, and a medium-size body that finishes close to 17 cm long. It suits an advanced beginner and works well as nursery shelf decor because the closed-eye face reads clearly from a distance.
The Design: What Makes This Cat Different
You are not shaping a standard sitting kitten here. The key decision is the compressed head: wider than tall, slightly flattened at the base, then stitched forward into the body instead of stacked above it. That lowers the face into a resting position. The second decision is the oversized back half. A crochet sleeping cat plush needs visual weight behind the shoulders or the pose reads like a seated toy tipped over. The third decision is the tail wrap. It is not decorative first; it acts like a brace against the lower body. A common error in a chenille cat amigurumi is overstuffing the head and underfilling the rump, which lifts the face and breaks the sleeping line. The better silhouette is front-low, back-round, tail-tight.
Project Info at a Glance
| Skill Level | Time | Finished Size | Hook | Best For |
|---|---|---|---|---|
| Advanced beginner | 2.5–4 hours | 17 cm long × 10 cm tall | 4.5 mm | nursery decor, shelf plush, baby-room photo prop |
Materials and Tools
Yarn
- Pastel blue chenille yarn — bulky plush/velvet style — under 50 g for the main body — brand direction: Himalaya Dolphin Baby or comparable plush yarn
- Black embroidery thread — small amount — for sleeping eyes and nose/mouth
Tools
- Hook 4.5 mm
- Stuffing
- Yarn needle
- Stitch markers
- Scissors
Abbreviations
MR / sc / inc / dec / sl st / ch / BLO / FO
Use the invisible decrease by working through the front loops of the next two stitches so the closing rounds stay compact instead of ridged.
Pattern — Step by Step
Continuous spiral unless noted.
Head (Make 1)
Yarn: pastel blue
R1: 6 sc in MR (6)
R2: inc x6 (12)
R3: (sc, inc) x6 (18)
R4: (2 sc, inc) x6 (24)
R5: (3 sc, inc) x6 (30)
R6: (4 sc, inc) x6 (36)
R7-R10: sc around (36)
R11: (4 sc, dec) x6 (30)
R12: (3 sc, dec) x6 (24)
R13: sc around (24)
Do not overstuff. The lower face should stay slightly flat.
FO. Leave 25 cm tail.
Body (Make 1)
Yarn: pastel blue
R1: 6 sc in MR (6)
R2: inc x6 (12)
R3: (sc, inc) x6 (18)
R4: (2 sc, inc) x6 (24)
R5: (3 sc, inc) x6 (30)
R6: (4 sc, inc) x6 (36)
R7-R11: sc around (36)
R12: (4 sc, dec) x6 (30)
R13: sc around (30)
R14: (3 sc, dec) x6 (24)
R15: (2 sc, dec) x6 (18)
Stuff firmly at the back half only. Keep the chest softer.
FO. Leave 30 cm tail.
Front Paws (Make 2)
Yarn: pastel blue
R1: 6 sc in MR (6)
R2: (sc, inc) x3 (9)
R3-R4: sc around (9)
Flatten.
R5: 4 sc through both layers (4)
FO. Leave 18 cm tail.
Back Legs (Make 2)
Yarn: pastel blue
R1: 6 sc in MR (6)
R2: inc x6 (12)
R3-R4: sc around (12)
Flatten lightly.
R5: 6 sc through both layers (6)
FO. Leave 20 cm tail.
Ears (Make 2)
Yarn: pastel blue
R1: 6 sc in MR (6)
R2: (2 sc, inc) x2 (8)
R3: sc around (8)
Fold into a shallow triangle.
FO. Leave 15 cm tail.
Tail (Make 1)
Yarn: pastel blue
R1: 6 sc in MR (6)
R2: (sc, inc) x3 (9)
R3: (2 sc, inc) x3 (12)
R4-R15: sc around (12)
Stuff very lightly or not at all in the last 4 rounds so it bends around the front.
FO. Leave 28 cm tail.
Snout Panel (Make 1)
Yarn: pastel blue
R1: ch 5
R2: starting in 2nd ch from hook: 3 sc, 3 sc in last ch, working on opposite side 2 sc, inc (10)
R3: inc, 2 sc, 3 inc, 2 sc, 2 inc (16)
R4: sc around (16)
FO. Leave 20 cm tail.
Cheek Patches (Make 2)
Yarn: pastel blue
R1: 6 sc in MR (6)
R2: inc x6 (12)
FO. Leave 12 cm tail.
Face Embroidery
Yarn: black embroidery thread
Embroider each eye as a 5- to 6-stitch curved line. Place them one round above the snout panel and angle the outer corners slightly downward. Add a small V nose and one short joining stitch below it.
Accessory / Photo Styling Note
The photo shows no attached accessory. Keep the plush plain and rely on color plus pose rather than add-ons.
Assembly
- Sew the head to the front third of the body, not on top of it. The chin should rest low against the chest.
- Check the side profile before locking the final stitches. The forehead must slope backward into the body.
- Sew the snout panel to the lower front of the head and add a pinch of stuffing only at the center.
- Attach the cheek patches slightly below and outside the eye line.
- Embroider the closed eyes, then the nose and short mouth line.
- Sew the front paws together near their inner edges, then stitch that pair under the head so they read as tucked.
- Attach the back legs low on the body base, mostly hidden from the front.
- Sew the ears to the top sides of the head with a slight outward tilt.
- Attach the tail at the rear body, curve it around the right side, and tack the tip near the paws.
- Adjust stuffing through any remaining gap, close all seams, and brush the chenille lightly with your fingers to settle the nap.
The finished toy should stand visually as a curled sleeper without external support.
7 Technical Tips
- Marker drift: On chenille, the first stitch disappears fast. Move the marker every round or the face seam will rotate by 1–2 stitches before you notice it.
- Head firmness: Stop stuffing when the head still compresses by about 1 cm under finger pressure. A harder fill lifts the muzzle and ruins the sleeping angle.
- Invisible dec tension: Pull the first yarn-over snug, then relax on the final pull-through. That keeps decrease points from making a six-corner crown.
- Eye placement timing: Embroider the eyes after the head is sewn to the body. Closed eyes that look centered on a loose head often sit too high once the chin is anchored.
- Chenille drag: Use a hook with a clean throat and avoid splitting the core thread. Damaged chenille spots show as bald gaps on the head curve.
- Pinning order: Pin head, paws, then tail before sewing anything permanent. This cat depends on silhouette more than limb detail, so sequence changes the result.
- Tail weaving: Weave the tail-end through at least three direction changes inside the body. A wrapped tail is tensioned across the front and loosens faster than a straight tail.
Conclusion
This pattern takes the broad idea of a sleeping cat amigurumi and pushes it toward the curled chenille silhouette shown in the photo: low head, heavy back, tucked paws, wrapped tail. Start with the head and body first, then pin every part before stitching so the side profile stays controlled. For publishing, this version also photographs well from both the front and three-quarter angle. Save it to Pinterest, post your result on Instagram, and tag it with #SleepingCatAmigurumiPattern. One useful test remains: did your cat’s tail tip reach the front paws without forcing the curve?









