Introduction
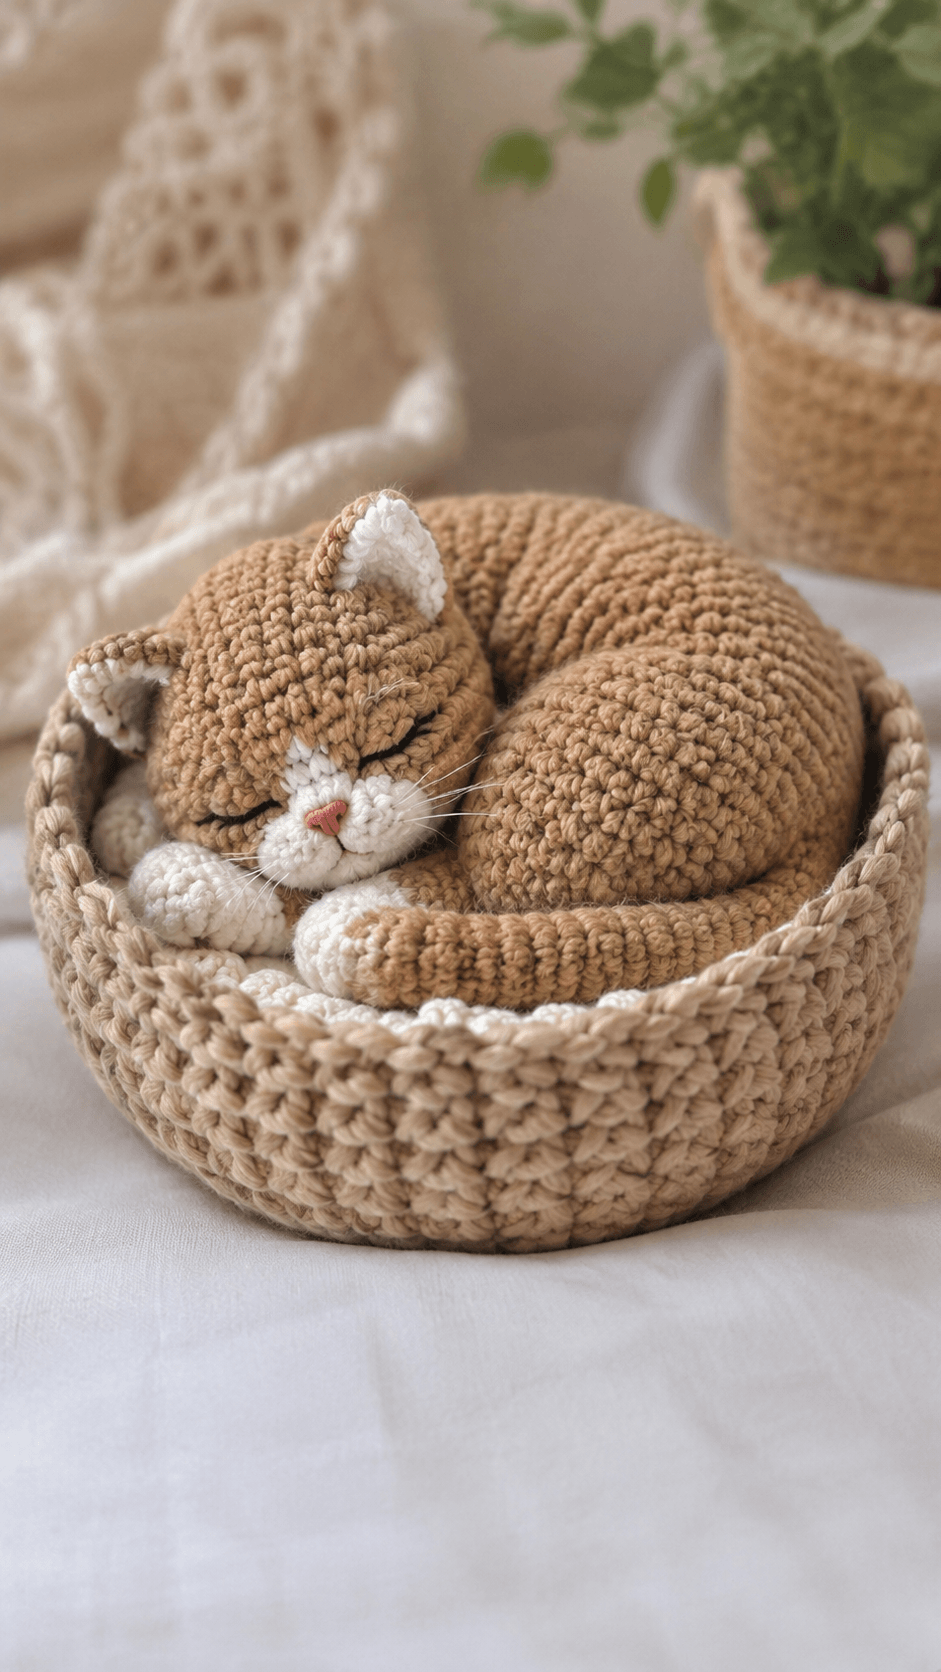
A sleeping cat’s spine forms a crescent, but its tail must complete the circle without covering the muzzle. This sleeping cat amigurumi crochet pattern uses worsted yarn, a 3.5 mm hook and embroidered closed eyes to make an approximately 25 cm curled cat. The advanced-intermediate project includes layered ears, shaped paws, a long tail and a fitted basket. The compact pose creates a stable decorative piece without internal wire.
The Design: What Makes Maple the Cat Different
Maple’s body reaches a 42-stitch plateau and extends through several unchanged rounds, producing the long oval required for a curled sleeping pose. The head remains smaller at 36 stitches so it can rest against the front paws without dominating the basket. Her back legs attach high on the outer curve, while the tail follows the lower edge and closes the circular silhouette. Cream muzzle pieces separate the nose from the brown face and provide a clear attachment point for the whiskers. A common error in a curled sleeping cat crochet pattern is sewing the head directly to the center of the body. That position creates a sitting cat rather than a sleeping one. In this realistic cat amigurumi, the head is attached near one shoulder and tilted downward until the muzzle touches the paws.
Project Info at a Glance
| Skill Level | Time | Finished Size | Hook | Best For |
|---|---|---|---|---|
| Advanced intermediate | 13–17 hours | Cat approximately 25 cm curled | 3.5 mm cat; 5 mm basket | Home display and cat-themed collections |
Published sleeping-cat patterns range from approximately 18 cm for a compact curled figure to 40–45 cm for Aran or plush-yarn versions. The measurement used here targets a medium worsted-weight project. :contentReference[oaicite:13]{index=13}
Materials and Tools
Yarn
- Caramel brown — worsted/category 4 — approximately 100 g — use a firm cotton or cotton-acrylic yarn with clear stitch definition.
- Warm cream — worsted/category 4 — approximately 35 g — required for the muzzle, inner ears, paws and cushion details.
- Dusty pink — DK or embroidery yarn — approximately 3 g — required for the nose and optional ear shading.
- Basket beige — bulky/category 5 cotton or cord yarn — approximately 180 g — required for the base and raised wall.
- Black embroidery thread — a small amount — required for the eyelids and mouth.
- Clear nylon filament — six short lengths — optional whiskers for an adult display piece.
Tools
- 3.5 mm crochet hook for the cat
- 5 mm crochet hook for the basket
- Polyester stuffing, approximately 100–120 g
- Blunt yarn needle
- Locking stitch markers
- Straight pins
- Scissors
- Optional plastic canvas, one circle approximately 24 cm across
The photographed cat uses embroidered eyelids rather than safety eyes. Nylon whiskers should be omitted when the finished object may be handled by a child.
Abbreviations
- MR — magic ring
- sc — single crochet
- inc — two single crochet in one stitch
- dec — single crochet two stitches together
- sl st — slip stitch
- ch — chain
- hdc — half double crochet
- dc — double crochet
- BLO — back loop only
- FLO — front loop only
For an invisible decrease, insert the hook beneath the front loops of the next two stitches and complete one single crochet through both loops.
Pattern — Step by Step
Work stuffed pieces in a continuous spiral unless a section states otherwise. Mark the first stitch of every round and recount after each increase or decrease round.
Head
Yarn: caramel brown — original photo-based shaping using standard six-stitch amigurumi expansion.
R1: 6 sc in MR (6)
R2: inc ×6 (12)
R3: (sc, inc) ×6 (18)
R4: (2 sc, inc) ×6 (24)
R5: (3 sc, inc) ×6 (30)
R6: (4 sc, inc) ×6 (36)
R7–R11: sc around (36)
R12: (4 sc, dec) ×6 (30)
R13: sc around (30)
R14: (3 sc, dec) ×6 (24)
R15: (2 sc, dec) ×6 (18)
R16: (sc, dec) ×6 (12)
R17: dec ×6 (6)
R18: dec ×3 (3)
Stuff the forehead firmly but keep the lower face moderately filled. Flatten the back-left area slightly so the head can rest against the body.
Fasten off. Leave a 30 cm tail and close the opening.
Body
Yarn: caramel brown — large 42-stitch plateau.
R1: 6 sc in MR (6)
R2: inc ×6 (12)
R3: (sc, inc) ×6 (18)
R4: (2 sc, inc) ×6 (24)
R5: (3 sc, inc) ×6 (30)
R6: (4 sc, inc) ×6 (36)
R7: (5 sc, inc) ×6 (42)
R8–R19: sc around (42)
R20: (5 sc, dec) ×6 (36)
R21–R22: sc around (36)
R23: (4 sc, dec) ×6 (30)
R24: (3 sc, dec) ×6 (24)
R25: (2 sc, dec) ×6 (18)
R26: (sc, dec) ×6 (12)
R27: dec ×6 (6)
Stuff firmly enough to preserve the long oval. Bend the body into a crescent while adding the final third of the stuffing, placing more fiber along the outer curve than the inner curve.
Fasten off. Leave a 35 cm tail and close the opening.
Front Legs and Paws (Make 2)
Begin with warm cream and change to caramel brown.
R1: 6 sc in MR (6)
R2: inc ×6 (12)
R3: (sc, inc) ×6 (18)
R4–R5: sc around (18)
R6: (sc, dec) ×6 (12)
Change to caramel brown.
R7–R11: sc around (12)
R12: (sc, dec) ×4 (8)
R13–R15: sc around (8)
R16: dec ×4 (4)
Stuff each paw firmly and add only a narrow strand of filling to the leg. Flatten the final four rounds.
Fasten off. Leave a 25 cm sewing tail.
Back Legs (Make 2)
Begin with warm cream and change to caramel brown.
R1: 6 sc in MR (6)
R2: inc ×6 (12)
R3: (sc, inc) ×6 (18)
R4: (2 sc, inc) ×6 (24)
R5: BLO sc around (24)
R6–R7: sc around (24)
R8: (2 sc, dec) ×6 (18)
Change to caramel brown.
R9–R12: sc around (18)
R13: (sc, dec) ×6 (12)
R14–R15: sc around (12)
R16: dec ×6 (6)
Pack the foot section firmly and keep the upper leg flexible. The leg on the outer side of the curl remains more visible than the second leg.
Fasten off. Leave a 30 cm tail.
Outer Ears (Make 2)
Yarn: caramel brown — triangular pieces worked in rounds.
R1: 6 sc in MR (6)
R2: (2 sc, inc) ×2 (8)
R3: (3 sc, inc) ×2 (10)
R4: (4 sc, inc) ×2 (12)
R5: (5 sc, inc) ×2 (14)
R6: (6 sc, inc) ×2 (16)
R7: sc around (16)
Fasten off. Leave a 25 cm sewing tail and flatten without stuffing.
Inner Ears (Make 2)
Yarn: warm cream — worked flat.
Row 1: ch 7, sc in second ch from hook and across (6)
Row 2: ch 1, turn, dec, 2 sc, dec (4)
Row 3: ch 1, turn, dec ×2 (2)
Row 4: ch 1, turn, dec (1)
Fasten off. Leave a 15 cm tail and sew one cream panel to the front of each brown ear.
Muzzle Patches (Make 2)
Yarn: warm cream — small stuffed domes.
R1: 6 sc in MR (6)
R2: inc ×6 (12)
R3: (sc, inc) ×6 (18)
R4: sc around (18)
R5: (sc, dec) ×6 (12)
Add a small amount of stuffing before sewing. Do not close the final opening.
Fasten off. Leave a 20 cm tail.
Cheek Patches (Make 2)
Yarn: warm cream — flat circles placed beneath the muzzle edges.
R1: 6 sc in MR (6)
R2: inc ×6 (12)
Join with a sl st. Fasten off and leave a 15 cm tail. Keep both patches flat.
Tail
Yarn: caramel brown — long flexible tube.
R1: 6 sc in MR (6)
R2: inc ×6 (12)
R3: (sc, inc) ×6 (18)
R4–R8: sc around (18)
R9: (4 sc, dec) ×3 (15)
R10–R18: sc around (15)
R19: (3 sc, dec) ×3 (12)
R20–R26: sc around (12)
R27: (2 sc, dec) ×3 (9)
R28–R30: sc around (9)
Stuff the first 18 rounds moderately. Use only a thin strand of fiber through the final 12 rounds so the tail can follow the basket rim.
Fasten off. Leave a 35 cm sewing tail.
Basket Base
Yarn: basket beige bulky cotton or cord — work in joined rounds with a 5 mm hook.
R1: 6 sc in MR; join (6)
R2: inc ×6; join (12)
R3: (sc, inc) ×6; join (18)
R4: (2 sc, inc) ×6; join (24)
R5: (3 sc, inc) ×6; join (30)
R6: (4 sc, inc) ×6; join (36)
R7: (5 sc, inc) ×6; join (42)
R8: (6 sc, inc) ×6; join (48)
R9: (7 sc, inc) ×6; join (54)
R10: (8 sc, inc) ×6; join (60)
R11: (9 sc, inc) ×6; join (66)
R12: (10 sc, inc) ×6; join (72)
R13: BLO sc around; join (72)
Place an optional plastic-canvas circle against the base after R13. Trim it 5 mm smaller than the crochet circle and cover all cut edges.
Basket Wall
Continue with basket beige.
R14–R21: sc around; join (72)
R22: (10 sc, dec) ×6; join (66)
R23: sc around; join (66)
Fasten off and weave in the tail.
Basket Rim
Yarn: basket beige held double.
Join at the rear center. Work one round of loosely spaced reverse single crochet around the 66-stitch opening. Keep the edge flexible enough to retain a circular shape.
Fasten off. Leave a 30 cm tail for reinforcing the rear section.
Basket Cushion
Yarn: warm cream worsted yarn held double.
R1: 6 sc in MR (6)
R2: inc ×6 (12)
R3: (sc, inc) ×6 (18)
R4: (2 sc, inc) ×6 (24)
R5: (3 sc, inc) ×6 (30)
R6: (4 sc, inc) ×6 (36)
R7: (5 sc, inc) ×6 (42)
R8: (6 sc, inc) ×6 (48)
R9: (7 sc, inc) ×6 (54)
R10: sc around (54)
Make a second circle through R9. Hold both panels together, sc through the layers and add a thin, even sheet of stuffing before closing.
Fasten off and leave a 25 cm tail for tacking the cushion to the basket base.
Assembly
- Curve the body into a broad crescent and pin the narrow end beneath the fuller back section. Add four concealed stitches along the inner curve.
- Attach the head near the front end of the body, tilting the forehead downward and turning the muzzle slightly toward the center of the curl.
- Sew the two muzzle patches beneath the center of the face. Embroider a dusty-pink triangular nose and one short black mouth line.
- Embroider one curved closed eyelid across each side of the face. Add three short lash stitches at each outer corner.
- Attach the layered ears to the crown, flattening the ear nearest the basket wall slightly more than the upper ear.
- Sew both front paws beneath the muzzle so they overlap by approximately 1 cm. Attach the cheek patches behind the outer muzzle edges.
- Position one back leg against the outer body curve and place the second beneath the torso. Sew both around their upper openings.
- Attach the tail at the rear of the body and curve it along the front edge. Tack it at three points without flattening the tubular shape.
- Place the stuffed cushion inside the basket and secure it with four concealed stitches spaced evenly around the base.
- Set the cat on the cushion, tilt the head toward the front paws and add two removable yarn ties beneath the body when a fixed display position is required.
The completed cat should retain its circular sleeping pose without relying on the basket wall to hold the head in place.
7 Technical Tips
- Round-marker drift: Losing the first stitch can rotate the head shaping by four or more stitches. Count every 36-stitch plateau round before continuing.
- Body flattening: A stuffing gap wider than 3 cm along the outer curve creates a visible hollow. Add small fiber pieces while bending the body rather than shaping it after closure.
- Decrease ridges: Conventional decreases form horizontal bars across the head and rear body. Work every decrease through the front loops only.
- Uneven eyelids: A vertical difference of one crochet round makes the sleeping face appear tilted. Mark both eyelid endpoints before inserting the embroidery needle.
- Tail buckling: Dense stuffing within the final 10 cm prevents a smooth curl. Fill that section with a fiber strand no thicker than 5 mm.
- Basket-wall flare: Loose tension after the BLO round can increase the opening by more than 2 cm. Measure the diameter after R16 and change to a 4.5 mm hook when the wall spreads outward.
- Weak pose tacking: One tail anchor allows the curl to open during handling. Sew the tail to the body at three points spaced approximately 5 cm apart.
Conclusion
Inspect the cat from above and both sides before trimming the final assembly tails. The muzzle should rest above the paws, the back leg must remain visible outside the body curve, and the tail should follow the front edge without covering the cream toes. Record the finished body length, basket diameter and three tail-anchor positions before making another version because worsted yarn thickness varies among manufacturers. The next step is to photograph the sleeping cat amigurumi crochet pattern from a low front angle and check that both embroidered eyelids remain visible. Save the project to Pinterest and share the finished basket on Instagram with #MapleSleepingCat. Did your cat hold a tighter curl with the tail attached before or after basket placement?









