Introduction
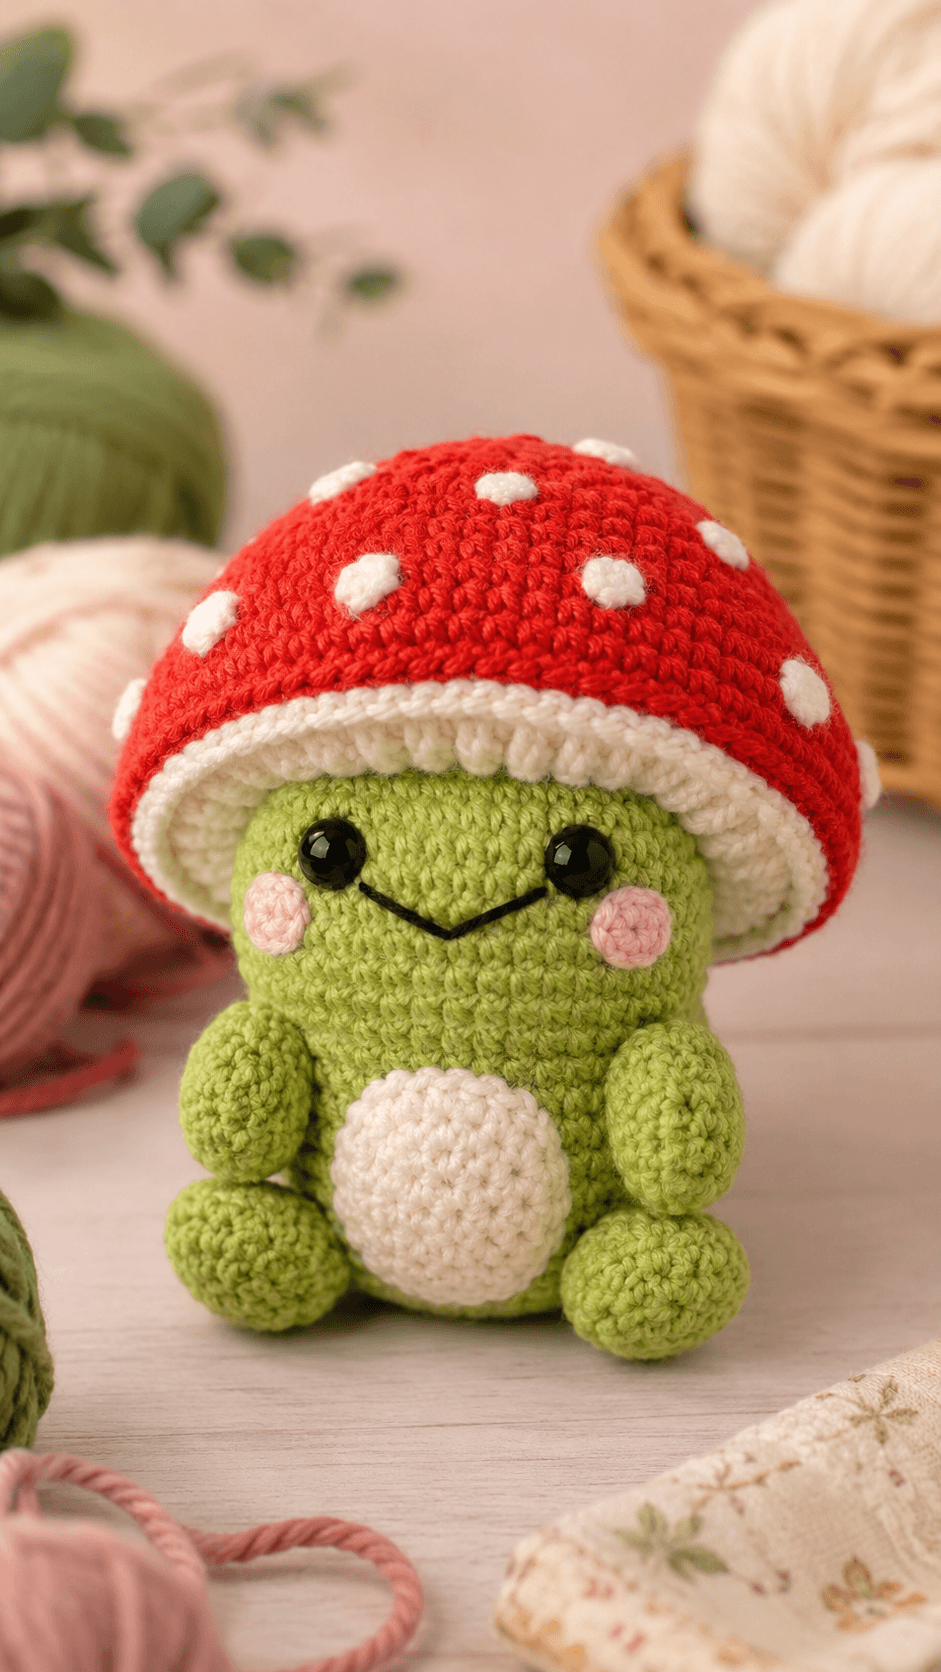
A frog under a mushroom cap needs enough brim clearance to keep both eyes visible. This frog amigurumi crochet pattern makes a 20–22 cm seated figure with a white belly, pink cheeks and a double-layer red toadstool hat. Use DK or light-worsted cotton, a 3.5 mm hook and 12 mm safety eyes. Intermediate skills are required. The wide back legs create a stable shelf display.
The Design: What Makes Sprout the Frog Different
Sprout uses a separate 36-stitch head and body because the oversized mushroom brim needs a firm crown rather than a flexible neckless shape. The head remains at its maximum count for seven rounds, leaving enough vertical space for the eyes, stitched smile and cheek patches. Compact arms sit against the belly, while broad back legs are flattened at their attachment points to create the photographed seated posture. The mushroom frog crochet pattern uses two cap layers. A shaped red dome supplies height; the white underside stabilizes the brim and hides the crown attachment stitches. One common error in a frog with mushroom hat design is sewing the cap before checking the eye line. A low brim covers the eyebrows, while a high brim exposes too much green crown. Pin the hat approximately 8 mm above the eyes before attaching either layer permanently.
Project Info at a Glance
| Skill Level | Time | Finished Size | Hook | Best For |
|---|---|---|---|---|
| Intermediate | 7–9 hours | Approximately 20–22 cm including hat | 3.5 mm | Woodland displays, nursery shelves and seasonal collections |
Materials and Tools
Yarn
- Leaf green — DK or light-worsted cotton — approximately 55–65 g — use for the head, body and limbs.
- Bright red — DK or light-worsted cotton — approximately 25–30 g — use for the mushroom-cap dome.
- White — DK cotton — approximately 15 g — use for the cap underside, spots and belly patch.
- Blush pink — DK cotton — under 4 g — use for both cheek patches.
- Black — embroidery thread — use for the mouth.
Tools
- 3.5 mm crochet hook
- 12 mm safety eyes
- Polyester stuffing
- Blunt tapestry needle
- Locking stitch markers
- Long sewing pins
- Flexible measuring tape
- Scissors
Use the same green yarn for every body section so the head, legs and arms retain matching stitch density. Replace the safety eyes with embroidered circles when the finished figure is intended for a child who may pull or mouth small components.
Abbreviations
- MR — magic ring
- sc — single crochet
- inc — two single crochet stitches in one stitch
- dec — single crochet two stitches together
- sl st — slip stitch
- ch — chain
- hdc — half double crochet
- dc — double crochet
- BLO — back loop only
- FLO — front loop only
For an invisible decrease, insert the hook through the front loops of the next two stitches and complete both loops as one single crochet.
Pattern — Step by Step
Work stuffed pieces in a continuous spiral unless joined rounds are specified. Mark the first stitch of every round. This medium seated frog uses a 36-stitch head and body plateau.
Head
Yarn: leaf green — Source basis: standard amigurumi mathematics.
R1: 6 sc in MR (6)
R2: inc ×6 (12)
R3: (sc, inc) ×6 (18)
R4: (2 sc, inc) ×6 (24)
R5: (3 sc, inc) ×6 (30)
R6: (4 sc, inc) ×6 (36)
R7–R13: sc around (36)
R14: (4 sc, dec) ×6 (30)
Insert the 12 mm eyes between R9 and R10 with eight visible stitches between the posts. Check that both eye centers are level before attaching the washers.
R15: (3 sc, dec) ×6 (24)
R16: (2 sc, dec) ×6 (18)
Stuff the crown firmly. Place small sections of filling behind the eyes to prevent recessed sockets.
R17: (sc, dec) ×6 (12)
R18: dec ×6 (6)
Fasten off. Leave a 30 cm tail and close the opening through the front loops.
Body
Yarn: leaf green — Source basis: standard amigurumi mathematics.
R1: 6 sc in MR (6)
R2: inc ×6 (12)
R3: (sc, inc) ×6 (18)
R4: (2 sc, inc) ×6 (24)
R5: (3 sc, inc) ×6 (30)
R6: (4 sc, inc) ×6 (36)
R7–R11: sc around (36)
R12: (4 sc, dec) ×6 (30)
R13–R14: sc around (30)
R15: (3 sc, dec) ×6 (24)
R16: sc around (24)
R17: (2 sc, dec) ×6 (18)
Pack the lower body firmly enough to resist compression from the legs. Leave the upper rounds moderately filled for the neck seam.
R18: (sc, dec) ×6 (12)
R19: dec ×6 (6)
Fasten off. Leave a 30 cm tail for attaching the body to the head.
Arms (Make 2)
Yarn: leaf green — Source basis: standard amigurumi mathematics.
R1: 6 sc in MR (6)
R2: inc ×6 (12)
R3–R5: sc around (12)
R6: (2 sc, dec) ×3 (9)
R7–R10: sc around (9)
R11: (sc, dec) ×3 (6)
Stuff R1–R6 lightly. Leave the upper section unstuffed so the arm can rest against the body.
Fasten off. Leave a 20 cm sewing tail.
Back Legs (Make 2)
Yarn: leaf green — Source basis: standard amigurumi mathematics.
R1: 6 sc in MR (6)
R2: inc ×6 (12)
R3: (sc, inc) ×6 (18)
R4–R6: sc around (18)
R7: (sc, dec) ×6 (12)
R8–R10: sc around (12)
R11: dec ×6 (6)
Stuff the rounded foot firmly. Use less filling near the final round so the leg can be flattened at the body seam.
Fasten off. Leave a 25 cm sewing tail.
White Belly Patch
Yarn: white — work in a continuous spiral.
R1: 6 sc in MR (6)
R2: inc ×6 (12)
R3: (sc, inc) ×6 (18)
R4: (2 sc, inc) ×6 (24)
R5: sc around (24)
Do not stuff. Flatten the circle and stretch it slightly into a vertical oval during pinning.
Fasten off. Leave a 30 cm sewing tail.
Cheek Patches (Make 2)
Yarn: blush pink — Source basis: standard flat-circle mathematics.
R1: 6 sc in MR (6)
R2: inc ×6 (12)
Join with a sl st. Fasten off and leave a 15 cm sewing tail.
Mushroom-Cap Dome
Yarn: bright red — work in a continuous spiral.
R1: 6 sc in MR (6)
R2: inc ×6 (12)
R3: (sc, inc) ×6 (18)
R4: (2 sc, inc) ×6 (24)
R5: (3 sc, inc) ×6 (30)
R6: (4 sc, inc) ×6 (36)
R7: (5 sc, inc) ×6 (42)
R8–R11: sc around (42)
R12: FLO (5 sc, inc) ×7 (49)
R13: sc around (49)
Do not stuff the brim. Place a thin layer of filling beneath the center of the dome only after joining the underside.
Fasten off. Leave a 45 cm tail for joining the brim layers.
Mushroom-Cap Underside
Yarn: white — work in a continuous spiral.
R1: 6 sc in MR (6)
R2: inc ×6 (12)
R3: (sc, inc) ×6 (18)
R4: (2 sc, inc) ×6 (24)
R5: (3 sc, inc) ×6 (30)
R6: (4 sc, inc) ×6 (36)
R7: (5 sc, inc) ×6 (42)
R8: (6 sc, inc) ×6 (48)
R9: 48 sc, inc (49)
Do not stuff. Check that the underside lies within the red brim without stretching either layer.
Fasten off. Leave a 40 cm sewing tail.
Hat Crown Opening
Yarn: white — work into the center underside after assembly.
Mark a 24-stitch circle around the center of the white underside. Join the yarn and work 3 rounds of sc around the marked opening (24).
The band should fit over the green crown with light tension. Add one round when the hat sits too high above the eyes.
Fasten off. Leave a 30 cm tail for tacking the band to the head.
Large Mushroom Spots (Make 4)
Yarn: white.
R1: 6 sc in MR (6)
R2: inc ×6 (12)
Join with a sl st. Fasten off and leave a 12 cm sewing tail.
Small Mushroom Spots (Make 4)
Yarn: white.
Work 6 sc in an MR and join with a sl st (6).
Fasten off. Leave a 10 cm sewing tail.
Smile
Thread a tapestry needle with doubled black embroidery thread.
Insert the needle below the left eye, exit at the center point two rounds lower, then enter below the right eye. Repeat the complete line once. Tack the center point downward with one 5 mm vertical stitch to form the shallow V-shaped smile.
Assembly
- Center the head over the body and sew twice around the neck seam through corresponding stitches.
- Pin the white belly patch over body R5–R14 and shape it into a vertical oval before sewing around the edge.
- Place the cheek patches below and slightly outside the safety eyes, keeping their inner edges clear of the smile.
- Embroider the black smile with its center point aligned directly between the two eye posts.
- Attach the arms beside body R12–R15 and angle both hands inward toward the belly patch.
- Pin the back legs between body R4 and R8, spacing them so both rounded feet touch the same flat surface.
- Center the white underside beneath the red mushroom dome and join the two layers around all 49 brim stitches.
- Add a thin layer of stuffing beneath the center of the red dome before closing the final 4 cm of the brim seam.
- Arrange four large and four small white spots unevenly across the red dome, keeping every spot at least 8 mm from the brim.
- Place the hat band over the crown, set the brim approximately 8 mm above the eyes and tack it to the head at four quarter points.
The finished frog should remain seated while the mushroom brim stays level above both eyes.
7 Technical Tips
- Round-marker drift: A missed first stitch rotates the eyes away from the belly center. Keep a locking marker through both loops and recount every 36-stitch head round.
- Recessed eye sockets: Sparse filling behind 12 mm eyes forms two visible hollows. Add stuffing in pieces smaller than 2 cm until both eye rims remain level with the surrounding fabric.
- Decrease gaps: Standard decreases can expose pale stuffing through the green yarn. Work through the front loops only and keep each completed loop close to the 3.5 mm hook shaft.
- Late eye placement: Installing the washers after head R15 leaves a restricted 24-stitch opening. Fit both eyes immediately after R14 and compare their height before locking either backing.
- Uneven hat brim: Joining the two cap layers without quarter markers can shift the white underside. Match four points first, then distribute the remaining 49 stitches between them.
- Off-center smile: A mouth midpoint more than one stitch from the facial center makes one cheek appear larger. Mark the center below the eye gap before inserting the black thread.
- Unstable seated base: Back legs attached at different heights tilt the body. Pin both legs simultaneously and test the frog on a level surface before completing either seam.
Conclusion
Check the brim height, eye visibility and seated balance before trimming the structural sewing tails. The next practical step is to crochet the 49-stitch mushroom underside and compare it with the red dome; a gauge difference of even 5 mm can curl the joined brim. Save this frog amigurumi crochet pattern to Pinterest and share front, side and back photographs on Instagram with #SproutMushroomFrog. Multiple views show the hat angle, leg placement and belly alignment more accurately than one frontal photograph. For this frog specifically, should the largest white spot sit above the left eye or move toward the back of the mushroom cap?









