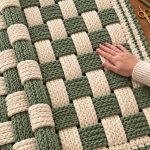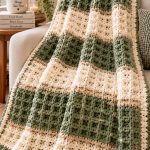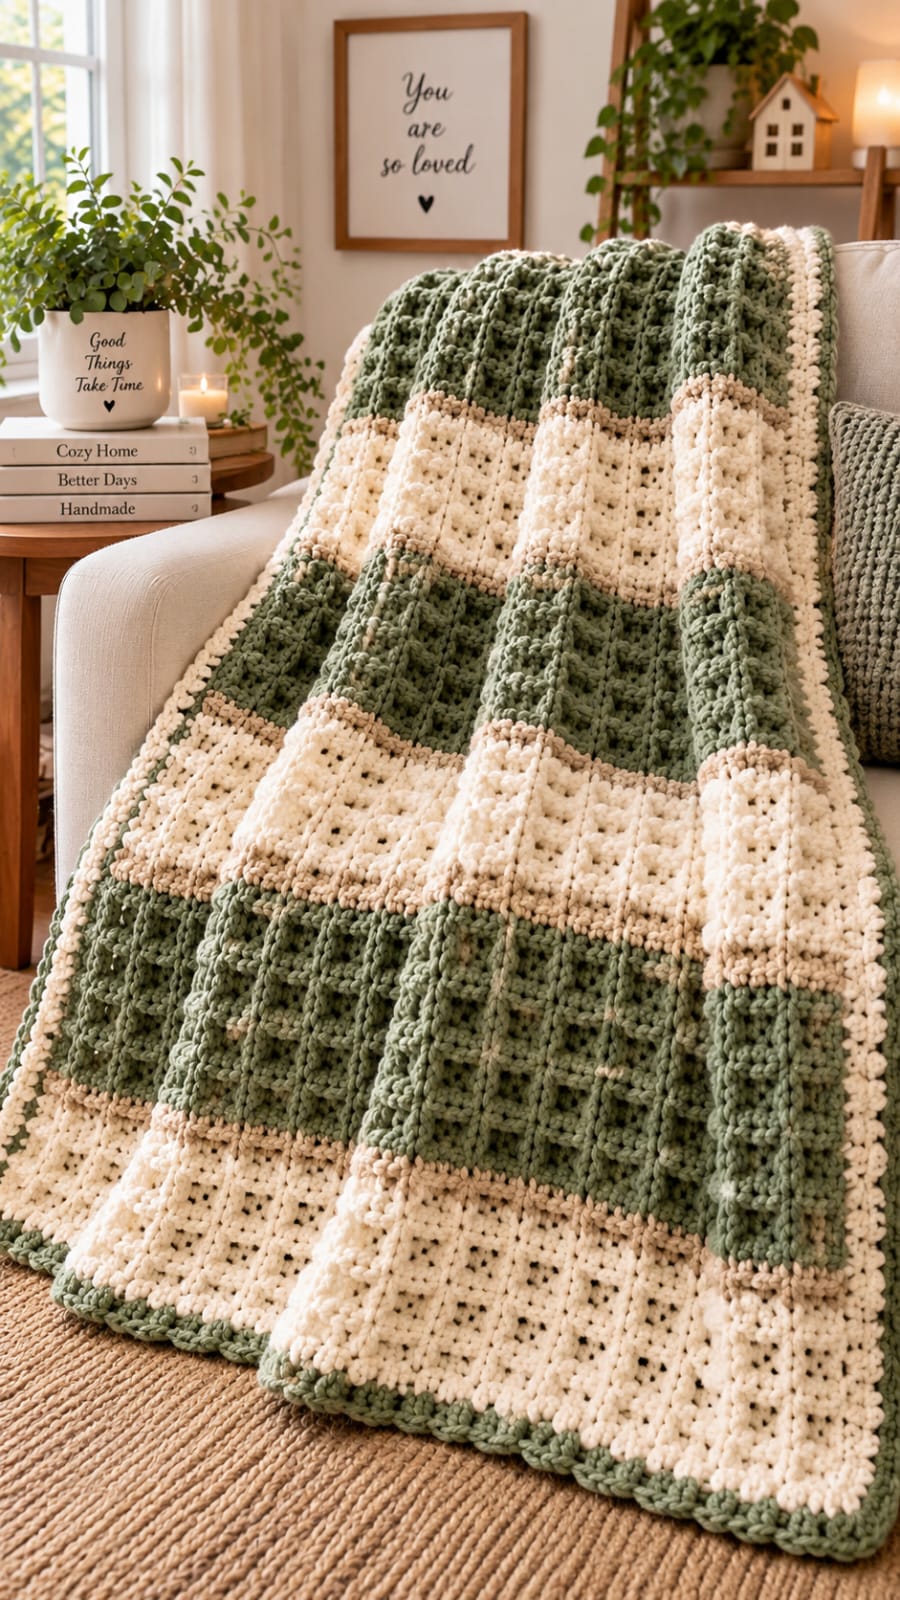
Wide cream bands interrupt the sage field at regular intervals, so a single misplaced color change is visible across the entire throw. This sage green crochet blanket pattern recreates the photographed blanket with chunky yarn, broad color blocks, narrow oatmeal transition rows, raised vertical texture and a framed border. The target finished size is approximately 127 × 152 cm using #6 super-bulky yarn and a 10 mm crochet hook.
The Design: What Makes This Sage Blanket Different
The blanket combines horizontal color blocking with vertical relief. Sage sections carry the strongest raised texture, while cream bands provide open visual breaks between them. Narrow oatmeal rows separate the two dominant colors and prevent the transitions from becoming visually heavy.
The photographed fabric also appears substantially thicker than a standard worsted-weight throw. Super-bulky yarn is therefore a practical match for the scale, and current chunky blanket references commonly pair category #6 yarn with hooks around 9–12 mm. :contentReference[oaicite:0]{index=0}
The primary construction risk is changing stitch counts while working the textured rows. One missing stitch gradually pulls the side inward, so this chunky striped crochet blanket uses fixed stitch counts and edge markers throughout.
Project Info at a Glance
| Skill Level | Time | Finished Size | Hook | Yarn Weight |
|---|---|---|---|---|
| Intermediate | 14–20 hours | Approx. 127 × 152 cm | 10 mm | Super Bulky #6 |
A 127 × 152 cm size corresponds to a common 50 × 60 inch throw proportion. Published chunky blanket guidance also uses approximately 1,500–1,800 metres as a broad estimate for a throw of this size, although textured crochet can change consumption substantially. :contentReference[oaicite:1]{index=1}
Materials and Tools
Yarn
- Sage green — Super Bulky #6 — approximately 800–900 m
- Warm cream — Super Bulky #6 — approximately 600–700 m
- Light oatmeal — Super Bulky #6 — approximately 120–160 m
- Sage green — additional 120–160 m reserved for the border
Plan for approximately 1,600–1,900 m total. Yarn consumption depends strongly on the actual yarn, gauge and relief stitches, so make a swatch before purchasing the final quantity. General yarn calculators likewise identify blanket dimensions, yarn weight, stitch pattern, hook size and personal tension as the main variables. :contentReference[oaicite:2]{index=2}
Tools
- 10 mm crochet hook
- Large tapestry needle
- Locking stitch markers
- Sharp scissors
- Tape measure
A 10 mm hook sits within the commonly recommended range for super-bulky blanket yarn and is also used in published #6 chunky throw patterns. :contentReference[oaicite:3]{index=3}
Abbreviations
- ch — chain
- sc — single crochet
- hdc — half double crochet
- dc — double crochet
- FPdc — front post double crochet
- BPdc — back post double crochet
- sl st — slip stitch
- st/sts — stitch/stitches
- RS — right side
- WS — wrong side
Post stitches are worked around the vertical post of the stitch below rather than through its top loops, which raises selected columns above or behind the main fabric.
Gauge and Finished Size
Make a test swatch before beginning the full blanket. A practical target with #6 yarn and a 10 mm hook is approximately 8 stitches × 6 rows per 10 cm, but the exact gauge depends on the chosen yarn and stitch tension.
One published chunky moss-stitch blanket reports 8 stitches and 6 rows per 10 cm with an 8 mm hook, illustrating how much individual yarn construction affects gauge. :contentReference[oaicite:4]{index=4}
This pattern targets approximately 127 cm wide × 152 cm long after the border.
If your swatch is significantly narrower than the target gauge, increase the hook size or add foundation stitches. If it is wider, reduce the hook size before committing to the full foundation row.
Color Layout
The photographed blanket uses large horizontal blocks rather than frequent narrow stripes. Work the body in the following sequence:
- Cream Section A — 12 rows
- Oatmeal Transition — 2 rows
- Sage Section A — 14 rows
- Oatmeal Transition — 2 rows
- Cream Section B — 12 rows
- Oatmeal Transition — 2 rows
- Sage Section B — 14 rows
- Oatmeal Transition — 2 rows
- Cream Section C — 12 rows
- Oatmeal Transition — 2 rows
- Sage Section C — 14 rows
The number of rows can be adjusted after measuring the first complete sage-and-cream repeat.
Sage Green and Cream Crochet Blanket Pattern
Foundation
Begin with warm cream yarn.
Ch 103.
Row 1: Hdc in the second chain from the hook and in every chain across. (102)
Ch 1 and turn. The turning chain does not count as a stitch throughout the pattern.
Cream Section A
Row 2: Hdc in each stitch across. (102)
Row 3: Hdc in first 3 sts, *FPdc around next st, hdc in next 5 sts*. Repeat from * across, adjusting the final repeat so the row ends with 3 hdc. (102)
Row 4: Hdc across. (102)
Row 5: Hdc in first 6 sts, *FPdc around next st, hdc in next 5 sts*. Repeat across. (102)
Row 6: Hdc across. (102)
Row 7: Repeat Row 3. (102)
Row 8: Hdc across. (102)
Row 9: Repeat Row 5. (102)
Row 10: Hdc across. (102)
Row 11: Repeat Row 3. (102)
Row 12: Hdc across. (102)
The staggered relief columns prevent the cream section from becoming a completely flat stripe while retaining the broad pale band visible in the photograph.
Oatmeal Transition A
Change to light oatmeal on the final yarn-over of the previous row.
Row 13: Sc in every stitch across. (102)
Row 14: Hdc in every stitch across. (102)
Change to sage green at the completion of Row 14.
Sage Textured Section A
Row 15: Hdc across. (102)
Row 16: Hdc in first 3 sts, *FPdc around next 2 sts, hdc in next 4 sts*. Repeat across, finishing with hdc as required. (102)
Row 17: Hdc across. (102)
Row 18: Hdc in first 6 sts, *FPdc around next 2 sts, hdc in next 4 sts*. Repeat across. (102)
Row 19: Hdc across. (102)
Row 20: Repeat Row 16. (102)
Row 21: Hdc across. (102)
Row 22: Repeat Row 18. (102)
Row 23: Hdc across. (102)
Row 24: Repeat Row 16. (102)
Row 25: Hdc across. (102)
Row 26: Repeat Row 18. (102)
Row 27: Hdc across. (102)
Row 28: Repeat Row 16. (102)
This alternating placement creates vertical and staggered raised lines across the sage field. Front-post crochet is useful for photo-inspired relief because it lifts selected stitches physically above the surrounding fabric.
Oatmeal Transition B
Row 29: Change to oatmeal. Sc across. (102)
Row 30: Hdc across. (102)
Cream Section B
Change to warm cream.
Rows 31–42: Repeat the 12-row Cream Section A sequence. (102 each row)
Oatmeal Transition C
Row 43: Sc across. (102)
Row 44: Hdc across. (102)
Sage Section B
Change to sage.
Rows 45–58: Repeat Sage Textured Section A. (102 each row)
Oatmeal Transition D
Row 59: Sc across. (102)
Row 60: Hdc across. (102)
Cream Section C
Change to cream.
Rows 61–72: Repeat Cream Section A. (102 each row)
Oatmeal Transition E
Row 73: Sc across. (102)
Row 74: Hdc across. (102)
Sage Section C
Change to sage.
Rows 75–88: Repeat Sage Textured Section A. (102 each row)
Measure the blanket before fastening off. If additional length is required, continue the established color sequence until the body reaches approximately 145–147 cm, leaving several centimeters for the border.
Optional Raised Vertical Columns
The photograph shows especially strong vertical relief in portions of the sage blocks. Surface crochet can increase that effect after the main body is finished.
Lay the blanket flat with the right side facing upward.
Join sage yarn near the bottom edge of a sage section. Work surface slip stitches vertically through the fabric, following one stitch column from the bottom to the top of that color block.
Repeat approximately every 8–10 cm.
Keep these stitches loose. Tight surface crochet shortens the blanket locally and causes the color block to buckle.
Optional Open Texture Rows
For more visible openings similar to the upper sections of the photographed blanket, replace one plain hdc row within each color block with the following:
Texture Row: Hdc in first 2 sts, *ch 1, skip 1 st, hdc in next 2 sts*. Repeat across.
Following Row: Hdc into every hdc and ch-1 space across while maintaining the original stitch-space count.
Use these rows sparingly. Too many open rows reduce the dense chunky appearance.
Border
The photographed blanket is framed by a relatively narrow sage outer edge with a pale inner line.
Round 1 — Cream
Join cream yarn at any corner.
Sc evenly around the entire blanket.
Along the row ends, place stitches at a rate that keeps the edge flat rather than forcing a fixed number into every row.
Work (sc, ch 2, sc) in each corner.
Join with sl st.
Round 2 — Cream
Ch 1.
Hdc in every stitch around.
Work (hdc, ch 2, hdc) in every corner space.
Join with sl st.
Round 3 — Sage
Change to sage.
Sc in every stitch around.
Work 3 sc into each corner space.
Join with sl st.
Round 4 — Sage Textured Edge
Ch 1.
*Sc in next 3 sts, FPsc around next st.* Repeat around.
At each corner, work (sc, ch 2, sc).
Join with sl st and fasten off.
Changing Colors Cleanly
Work the final stitch of the old color until two loops remain on the hook.
Complete the final yarn-over with the new color. Tighten both strands gently without pulling the edge inward.
Leave a tail of at least 15 cm for weaving.
Because the color bands are wide, carrying unused super-bulky yarn along the edge adds unnecessary thickness. Cut the yarn at major color changes and weave the tails securely instead.
Keeping the Blanket Edges Straight
Place a locking stitch marker in the first and last stitch of every row.
The blanket should maintain 102 stitches throughout the body. Count at least every fourth row.
A missing edge stitch is particularly noticeable in super-bulky yarn because each stitch occupies substantial width. Published chunky blanket instructions similarly warn that repeated stitch loss can quickly distort a rectangular blanket. :contentReference[oaicite:5]{index=5}
If the edge begins narrowing, locate the first incorrect row rather than compensating with an increase several rows later.
Adjusting the Blanket Width
Make the starting chain longer or shorter while keeping an even number of working stitches.
For approximately 100 cm width, begin with roughly 82 working stitches at the stated gauge.
For approximately 127 cm width, use the 102-stitch pattern.
For approximately 150 cm width, target roughly 120 working stitches and make a gauge swatch before committing to the foundation chain.
The raised stitch placements can be adjusted near the final six stitches of each row without changing the total stitch count.
Adjusting the Blanket Length
Length is controlled by repeating color sections.
For a lap blanket, stop after approximately two sage sections and two cream sections.
For a standard throw, continue to approximately 150–155 cm including the border.
For a longer sofa blanket, repeat another cream transition and sage section before working the border.
Published super-bulky patterns vary considerably in finished dimensions; examples include throws around 43 × 63 inches and 51 × 58 inches. :contentReference[oaicite:6]{index=6}
How to Make the Sage Texture More Pronounced
Use front-post stitches consistently around the same underlying stitch columns. The raised posts should sit clearly above the surrounding half-double crochet fabric.
A smaller hook increases definition but also produces a stiffer blanket. Test the fabric before reducing the hook more than 1 mm.
Surface slip-stitch columns can be added after the body is finished if the initial relief is too subtle.
Do not pull surface stitches tightly. The blanket should lie flat before and after the decorative columns are applied.
Making the Cream Sections Lighter
The pale blocks in the photograph appear more open than the darkest sage sections. You can reproduce that difference by inserting one or two chain-space rows into each cream band.
Another option is to use a slightly larger hook for cream sections, but changing hooks can alter the blanket width. Chain spaces are easier to control because the same 10 mm hook can remain in use throughout the project.
Measure after the first cream block. If it becomes wider than the sage section, remove the modification and use the standard hdc sequence.
Yarn Selection
Choose a smooth #6 yarn if raised stitch definition is the priority. Very fuzzy fibers can obscure post stitches and make the relief less distinct.
Super-bulky yarn is commonly used when a fast, thick throw is wanted, while acrylic offers practical washability for blankets receiving regular use. :contentReference[oaicite:7]{index=7}
Chenille can also produce the plush scale shown in the photograph, but simple stitches generally display more clearly than complex texture when worked in chenille. :contentReference[oaicite:8]{index=8}
Assembly and Finishing
- Complete all blanket rows while maintaining 102 stitches across every full-width row.
- Lay the unfinished blanket flat and measure both long sides; a difference greater than approximately 2 cm indicates inconsistent row tension.
- Add optional surface-crochet columns to the sage blocks before working the border.
- Weave color-change tails through stitches of the matching color rather than across contrasting sections.
- Work the first cream border round evenly around all four edges.
- Add the second cream round while checking that all four corners remain flat.
- Change to sage for the outer border and maintain extra stitches only at the corners.
- Complete the final textured sage edging without pulling the front-post stitches tightly.
- Weave each super-bulky tail in at least two directions so the thick ends cannot work free during use.
- Lay the completed blanket flat, shape it to approximately 127 × 152 cm and allow the stitches to settle before measuring the final dimensions.
The finished blanket should form a rectangular throw with broad sage and cream sections, narrow oatmeal transitions, raised linear texture and a defined sage outer frame.
7 Technical Tips for This Chunky Crochet Blanket
- Narrowing sides: Keep exactly 102 stitches in every body row. Mark both edge stitches because accidentally skipping one stitch repeatedly creates a visible diagonal side.
- Wavy color changes: Do not tighten the new color more firmly than the previous row. A transition row that is even 5–10% tighter can pull the full width inward.
- Weak raised texture: Insert the hook completely around the post when making FPdc stitches. Catching only part of the post prevents the column from projecting cleanly above the background.
- Rippling border: Reduce the number of stitches placed along the side edges. Excess border stitches accumulate fabric and create waves even when the body itself lies flat.
- Curling corners: Place additional stitches into every corner space. A border without sufficient corner expansion pulls diagonally across the blanket.
- Loose yarn tails: Leave at least 15 cm at each color change and weave the tail in multiple directions. Super-bulky ends can escape quickly if they are woven through only two or three stitches.
- Distorted surface columns: Keep vertical slip stitches loose enough that the fabric underneath remains at its original length. If the sage block shortens when the column is finished, remove it and repeat with less tension.
Blocking a Super-Bulky Blanket
Check the yarn label before applying heat or steam. Fiber type determines which blocking method is suitable.
For washable synthetic yarn, gentle wet blocking or careful shaping after washing may be sufficient. Lay the blanket flat and arrange all four edges into a rectangle.
Measure several positions rather than only the corners. The center width should be close to the measurements at the top and bottom.
Do not hang a wet super-bulky blanket to dry. Heavy chunky fabric can stretch significantly under its own weight.
Care and Storage
Follow the washing instructions printed on the chosen yarn label. Acrylic and many synthetic blanket yarns are designed for practical washing, while wool and specialty fibers can require different treatment.
Fold the blanket for storage rather than hanging it. Heavy chunky fabric can lengthen when suspended for extended periods.
Before storing, check the color-change areas and border joins for loose ends. Repairing a short tail before it escapes completely is easier than reconstructing an opened section later.
Conclusion
Make the gauge swatch first, then crochet one complete cream-to-sage repeat before judging the final proportions. That sample establishes the actual stripe depth, yarn consumption and amount of relief produced by your chosen #6 yarn. Keep 102 stitches across the body, mark both edges and add the sage border only after the blanket lies flat. This sage green crochet blanket pattern can then be resized by changing the foundation width or repeating complete color sections. Save the finished blanket to Pinterest or share it on Instagram with #SageCreamChunkyBlanket. Would you keep the narrow oatmeal transition rows or replace them with sage for a strict two-color version?