Introduction
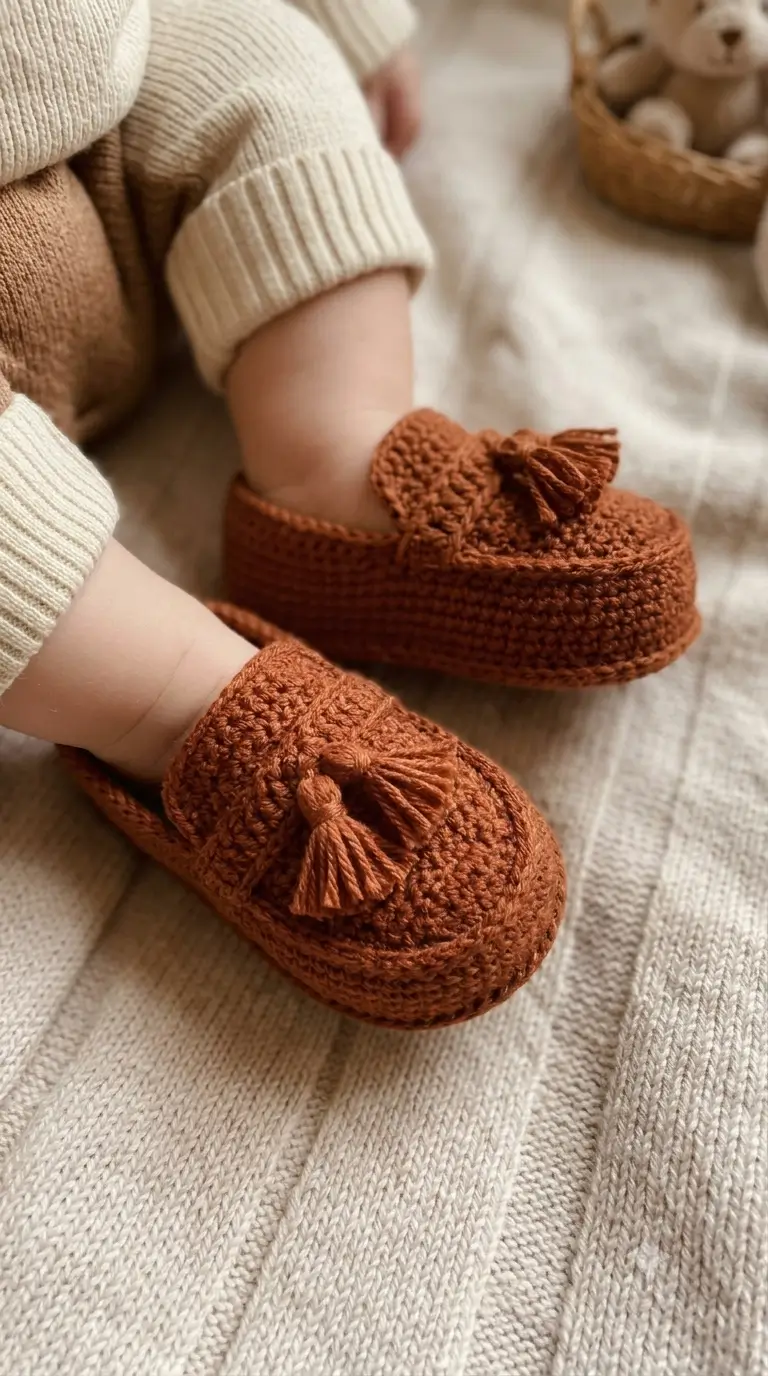
A loafer has to hold a flat oval sole under a baby’s foot without collapsing into a sock. This crochet baby loafers pattern targets a 10.2 cm sole using worsted cotton, a 3.75 mm hook, and an intermediate skill level. The rust terracotta upper and matching tassels copy the color shown in the reference photo. Make the pair for supervised pre-walking wear or as a fitted photo prop.
The Design: What Makes the Rust Tassel Loafers Different
The loafer shape depends on three structural decisions. First, the sole expands at both heel and toe instead of following circular amigurumi shaping; this keeps the footprint oval. Second, the sidewall rises from a BLO round, creating a defined turn between sole and upper and helping the shoe sit flatter. Third, the vamp is worked separately and sewn across the front opening, reproducing the broad top panel visible in the photo while leaving enough heel access for a pre-walking foot.
A common mistake is centering the vamp by eye before both sidewalls are counted. Even a two-stitch offset makes the toe look twisted. The crochet baby booties pattern uses the same rust color for the sole, upper, bridge cords, and tassels, while the baby loafer crochet pattern keeps decorative parts soft and lightweight.
Project Info at a Glance
| Skill Level | Time | Finished Size | Hook | Best For |
|---|---|---|---|---|
| Intermediate | About 3–4 hours | 10.16 cm sole | 3.75 mm / F | 3–6 month pre-walking wear or supervised photos |
The size and hook target follow published Traverse Bay measurements for a 3–6 month loafer: a 4-inch sole with an F/3.75 mm hook and medium worsted cotton.
Materials and Tools
Yarn
- Rust / burnt terracotta — medium #4 worsted cotton — approximately 28 g for the pair, including tassels
- Accent yarn — none; use the same rust terracotta yarn throughout
A firm cotton gives the sole and vamp more definition than a highly elastic fiber. If another yarn produces a sole longer than 10.3 cm after the third sole round, change the hook size instead of adding extra shaping rounds.
Tools
- 3.75 mm / F crochet hook
- Blunt yarn needle
- 2 stitch markers
- Scissors
- Ruler or flexible measuring tape
- 5 cm piece of stiff card for making tassels
- Safety eyes: none
- Stuffing: none
These booties are soft pre-walking footwear rather than walking shoes. Tassels can become detachable if they are not stitched securely, so inspect every attachment before use and use the shoes under adult supervision.
Abbreviations
sc — single crochet
inc — 2 sc in the same stitch
dec — single crochet 2 together
sl st — slip stitch
ch — chain
BLO — back loop only
st / sts — stitch / stitches
RS — right side
WS — wrong side
For an invisible decrease, insert the hook through the front loops of the next two stitches, yarn over, draw through both front loops, then finish one single crochet. This reduces bulk on the visible surface.
Pattern — Step by Step
Work the sole and sidewall in a continuous spiral unless a section specifically says it is worked in rows. Place a marker in the first stitch of every round.
This construction is based on the rust tassel loafers shown in the reference image and targets a finished sole of approximately 10.2 cm.
Sole and Sidewall — Make 2
Yarn: rust terracotta worsted cotton.
Foundation: Ch 12.
R1: Starting in second ch from hook, 2 sc in first ch, sc in next 9 ch, 5 sc in last ch. Rotate the work and continue along the unused loops on the opposite side of the foundation chain: sc in next 9, 3 sc in final chain. (28)
Do not join. Continue in a spiral.
R2: Inc in next 2, sc in next 9, inc in next 4, sc in next 1, sc in next 9, inc in next 2, sc in next 1. (36)
Check that the heel and toe remain centered.
R3: (sc, inc) ×4, sc in next 1, sc in next 9, (sc, inc) ×4, sc in next 1, sc in next 9. (44)
Measure the sole now. It should be approximately 10.0–10.3 cm long and about 4.8–5.2 cm wide across the toe.
R4: BLO sc around. (44)
R5: Sc around. (44)
R6: Sc around. (44)
R7: Sc around. (44)
R8: Sc around. (44)
At the end of R8, sl st in the next stitch.
Fasten off. Leave a 20 cm tail.
The unused front loops from R4 form the defined ridge visible between the sole and sidewall.
Vamp / Toe Panel — Make 2
Yarn: rust terracotta.
The vamp is worked flat. Its wider foundation edge faces the toe, while the narrower final edge points toward the ankle.
Foundation: Ch 16.
Row 1: Sc in second ch from hook and each ch across. Ch 1, turn. (15)
Row 2: Sc across. Ch 1, turn. (15)
Row 3: Sc across. Ch 1, turn. (15)
Row 4: Dec, sc in next 11, dec. Ch 1, turn. (13)
Row 5: Sc across. Ch 1, turn. (13)
Row 6: Dec, sc in next 9, dec. Ch 1, turn. (11)
Row 7: Sc across. Ch 1, turn. (11)
Row 8: Dec, sc in next 7, dec. (9)
Do not turn.
Vamp Border
Ch 1.
Work:
- Sc across the 9 stitches of Row 8
- 8 sc evenly down the first side
- 15 sc across the foundation edge
- 8 sc evenly up the second side
Total: 40 sts
Fasten off. Leave a 30 cm sewing tail.
Before sewing, place the vamp over the front of the shoe. The wide edge should cover roughly one third of the opening.
Decorative Bridge Cord — Make 2
Yarn: rust terracotta.
Row 1: Ch 11.
Starting in the second ch from hook, sl st in each chain across. (10)
Fasten off, leaving approximately 15 cm at each end for sewing.
The finished cord should measure about 4.5–5 cm without stretching.
Position it horizontally across the vamp.
Tassels — Make 4
Yarn: rust terracotta.
Cut one 20 cm tying strand and place it aside.
Wind the yarn 16 times around a piece of card measuring approximately 5 cm high.
Pass the reserved strand under the loops at the top and tie a firm double knot.
Slide the bundle from the card.
Cut through all loops at the bottom.
Cut another strand approximately 18 cm long. Wrap it around the tassel approximately 8 mm below the top knot five times.
Tie securely.
Thread the loose ends into the center of the tassel.
Trim the tassel to approximately 3 cm from the wrapped neck to the tips.
Make four identical tassels.
Optional Topline Stabilizing Round — Make 2
Join the rust yarn at the center back of the heel.
R1: Sl st loosely around all 44 top-edge stitches. (44)
Fasten off.
Do not pull the slip stitches tightly. A tight edge can reduce the ankle opening even when the sole size is correct.
Assembly
- Place both completed sole-and-sidewall pieces flat and check that each sole measures approximately 10.0–10.3 cm.
- Mark the exact center stitch at the toe of each shoe.
- Center the 15-stitch wide edge of the vamp over the front of the sidewall. Pin the center first, followed by the two outer corners.
- Sew the vamp to the sidewall using the long yarn tail. Keep each sewing stitch small so the seam remains flexible.
- Repeat on the second shoe. Place both shoes next to each other and check that the narrow ends of the vamps finish at the same distance from the heel.
- Position one 4.5–5 cm bridge cord horizontally across each vamp. Stitch the middle first, then secure both ends.
- Attach one tassel near each end of the bridge cord. Pass the sewing yarn through the tassel head, cord, and vamp at least three times.
- Trim all four tassels to a matching 3 cm drop after they have been attached.
- Weave every yarn tail through at least 4 cm of stitches, reverse direction, and weave through another 2–3 cm before trimming.
- Compare the finished pair from above. Check sole length, vamp position, heel height, bridge-cord angle, and tassel length.
The completed pair has a low loafer profile, an approximately 10.2 cm oval sole, a broad shaped vamp, and two rust tassels on each shoe.
7 Technical Tips
- Marker drift: Moving the stitch marker to the wrong stitch can rotate the shaping around the sole. Keep the marker in the first stitch of every continuous round until that round is complete.
- Sole measurement: Do not wait until the entire shoe is finished to check size. Measure immediately after R3 and correct hook size if the sole falls outside the 10.0–10.3 cm target.
- Decrease gaps: Standard decreases can create noticeable openings along the shaped vamp edge. Work front-loop invisible decreases when possible to keep the edge compact.
- Opening size: Pulling the optional slip-stitch edging too tightly can reduce the opening by more than 1 cm around the circumference. Keep each slip stitch loose enough for the hook shaft to pass through without resistance.
- Vamp alignment: A vamp shifted by only two sidewall stitches can make the toe appear twisted. Mark the exact toe center and pin the middle of the vamp before pinning either side.
- Tassel matching: Cutting tassels before attachment can produce uneven lengths because each tassel hangs differently after sewing. Attach all four first, then trim each to a 3 cm drop.
- Tail weaving: A short woven tail can work loose when the shoe flexes. Weave attachment tails through at least 4 cm, reverse direction, and continue for another 2–3 cm before cutting.
Conclusion
The rust tassel design is built around a 10.2 cm sole, #4 worsted cotton, and a 3.75 mm hook, with the same terracotta color carried through the sole, vamp, bridge cords, and tassels. Measure both soles after R3 and compare the vamps before permanent sewing so the finished pair remains symmetrical. The next step is to crochet both soles during the same session and place them side by side before beginning the uppers. Save the finished crochet baby loafers pattern to Pinterest and share the completed pair on Instagram with #RustTasselBabyLoafers. Would you keep the four tassels at 3 cm or shorten them slightly for a cleaner loafer profile?









