Introduction
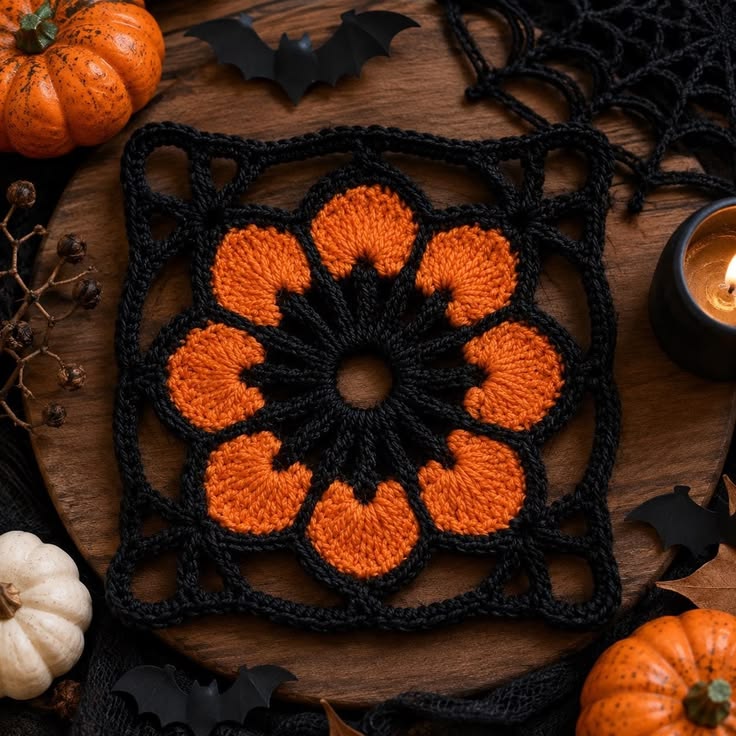
Eight orange petals only read as a Halloween flower when the black center points cut sharply between every petal. This Halloween flower granny square crochet pattern uses worsted yarn and a 4 mm hook to make an approximately 15 cm block. A circular open center, black radial rays, orange petals and wide corner arches create an intermediate motif suitable for blankets, bags, cushions and seasonal panels.
The Design: What Makes This Halloween Square Different
The square begins with an open black ring rather than a tightly closed center because the visible hole is part of the graphic structure. Eight black rays grow outward from that ring and divide the orange flower into equal sections. Each orange petal fills the space between two rays, then a black outline traces the petal edge before the motif is converted from a circle into a square. Large chain spaces form the four corners, producing the web-like negative space visible in the reference. This orange black granny square therefore depends more on controlled spacing than dense fabric. One common maker mistake is increasing the corner chains without increasing the side structure. The frame then stretches into four loose loops. Keep all four corners equal and distribute the side stitches symmetrically between them.
Project Info at a Glance
| Skill Level | Time | Finished Size | Hook | Best For |
|---|---|---|---|---|
| Intermediate | 60–90 minutes | Approx. 15 × 15 cm | 4.0 mm | Halloween blankets, cushions, bags and wall panels |
Materials and Tools
Yarn
- Pumpkin orange — worsted / Aran #4 — approximately 15–18 g per square — used for eight petals.
- Black — worsted / Aran #4 — approximately 18–22 g per square — used for the center, rays, petal outlines and square frame.
Choose two yarns with similar twist and thickness. A softer orange yarn can spread beyond the black outlines after blocking, while a heavier black yarn can reduce the open spaces between the petals and frame.
Tools
- 4.0 mm crochet hook
- Yarn needle
- Locking stitch marker
- Blocking mat
- Rust-resistant pins
- Scissors
- Measuring tape
Abbreviations
- ch — chain
- sl st — slip stitch
- sc — single crochet
- hdc — half double crochet
- dc — double crochet
- tr — treble crochet
- dtr — double treble crochet
- sp — space
- RS — right side
Keep chain spaces loose enough for the following round to enter them without stretching the surrounding stitches.
Pattern — Step by Step
Work the motif from the center outward with the right side facing unless stated otherwise. Join each completed round with a slip stitch and fasten off whenever a color change is specified.
Black Center Ring
Yarn: black — original reconstruction based on the eight-way radial symmetry visible in the photograph.
Ch 8.
Join with sl st in the first chain to form a ring.
Do not pull the center closed. The opening should remain approximately 12–15 mm across after the first rounds.
Round 1 — Eight Center Groups
Ch 1.
Work 16 sc into the center ring.
Join with sl st in the first sc. (16)
Place a marker after every second stitch. These eight two-stitch sections control the petal spacing.
Round 2 — Black Radial Rays
Ch 5.
Starting in the second chain from the hook, sl st in next ch, sc in next ch, hdc in next ch, dc in final ch.
Sl st in the second stitch of the center round.
Repeat the same pointed ray seven more times, working one ray across each two-stitch section.
You should have 8 black points.
Each point should project outward between two future orange petals. Correct the spacing now; later rounds will make an uneven ray difficult to move.
Orange Petal Foundations
Yarn: pumpkin orange.
Join orange at the base space between two black rays.
Ch 3.
Work 3 dc into the same space.
Ch 2.
Work 4 dc into the next space between black rays.
Continue around:
*Ch 2, 4 dc in next ray space; repeat from * until 8 orange groups are complete.
Join with sl st to the top of the beginning chain.
The eight orange groups are petal foundations. Keep each ch-2 gap directly above one black ray.
Orange Petal Expansion
Sl st across to the first ch-2 space.
In each ch-2 space work:
2 hdc,
3 dc,
2 tr,
3 dc,
2 hdc.
Sl st into the center of the next 4-dc foundation group.
Repeat around all eight sections.
The upper edge of every petal should be rounded. Keep the two treble stitches near the petal center rather than shifting them toward either side.
Orange Petal Height Round
Work around each petal individually.
Beginning at the lower left edge of one petal:
sc in next 2 sts,
hdc in next 2 sts,
dc in next 2 sts,
2 dc in each of next 2 center sts,
dc in next 2 sts,
hdc in next 2 sts,
sc in next 2 sts.
Sl st into the valley beside the black ray.
Repeat around all eight petals.
Do not add stitches in the valley. The black rays must remain visible between neighboring orange sections.
Fasten off orange.
Black Petal Outline
Yarn: black.
Join at the base of any petal.
Work sc evenly up the first petal side.
At the highest three stitches, work:
sc,
ch 1,
sc.
Continue sc down the opposite side.
At the valley, work one long sl st through the orange valley and into the nearest black ray base.
Repeat around all eight petals.
The black outline should trace the flower without covering more than approximately 3–4 mm of orange at the edge.
Black Inner Star Points
The supplied motif has additional black points extending over the lower section of the orange petals.
At the base of one petal, ch 5.
Starting in second chain from hook:
sl st,
sc,
hdc,
dc.
Attach the point approximately one-third of the way up the orange petal with sl st.
Sl st back toward the center through the nearest black stitches.
Repeat once on the opposite lower side of the same petal.
Continue around the motif.
Keep these points shorter than the orange petals. Their purpose is to create the jagged black star around the center, not cover the flower.
Round for Squaring the Flower
Yarn: black.
Identify Petals 1, 3, 5 and 7 as the four corner-direction petals.
Join black at the tip of Petal 1.
Ch 6.
Sl st into the tip of Petal 2.
Ch 6.
Sl st into the tip of Petal 3.
Ch 10.
Sl st into the tip of Petal 4.
Ch 6.
Sl st into the tip of Petal 5.
Ch 10.
Continue this sequence around, placing a ch-10 space at each future corner and a ch-6 space between corner sections.
You should finish with four large corner spaces and four shorter side spaces.
Corner Arches
Sl st into the first ch-10 corner space.
Work:
5 sc,
ch 5,
5 sc
into the same corner space.
In the next ch-6 side space work 7 sc.
Repeat around all four corners and four sides.
The ch-5 corner loops create the large open triangular spaces visible in the reference.
Square Frame Round
Ch 1.
Sc across the first side.
At the corner ch-5 space work:
3 sc,
ch 4,
3 sc.
Sc across the next side.
Repeat around all four corners.
Join with sl st.
Check that every side contains the same number of stitches before starting the final outline.
Final Black Outline
Ch 1.
Sc in every stitch across each side.
At each ch-4 corner space work:
2 sc,
ch 3,
2 sc.
Join with sl st in the first sc.
The outside edge should remain flexible. If the square begins to cup, replace one sc near the middle of each side with a slip stitch.
Fasten off. Leave a 15 cm tail.
Optional Corner Reinforcement
If the motif will be used in a blanket or bag, join black yarn in one corner.
Work one additional round of sc around the complete square.
At every corner work:
sc,
ch 2,
sc
in the corner space.
Skip this round when the open black frame already measures approximately 15 cm and you want to preserve the lace-like outer edge.
Blocking
Soak or lightly dampen the completed square according to the yarn-care instructions. Press out excess moisture without twisting.
Pin the four outer corners first to approximately 15 × 15 cm. Add pins at the midpoint of every side, then shape the eight orange petals with your fingers.
Keep the central hole circular and leave the four large corner arches open.
Do not stretch the black frame farther than the orange flower can support. Excessive blocking makes the petals appear too small for the square.
Joining Multiple Squares
For a Halloween blanket, place two blocked squares with wrong sides together.
Join using black yarn and slip stitch through the outer loops only.
Work one joining stitch in every corresponding side stitch.
Leave the corner chain spaces unjoined until all neighboring blocks are attached.
Where four motifs meet, pass the joining yarn through all four corner spaces once before continuing.
This keeps the black framing continuous and leaves the orange flowers visually separate.
Assembly and Finishing
- Complete the black center ring and verify that all eight marked sections are equal before forming the radial rays.
- Work eight black points and check that each one projects outward at approximately 45-degree intervals.
- Add the eight orange petal foundations, keeping every ch-2 valley directly above a black ray.
- Build all eight petals to equal height before adding the black outline around the flower.
- Add the shorter black inner points only after the orange petal shape is stable.
- Mark four opposite petals as corner directions and create four identical large corner chain spaces.
- Complete the side arches and black square frame, counting every side before working the final outline.
- Weave each yarn tail through at least 4–5 cm of stitches in its own color and reverse direction once before trimming.
- Block the square to approximately 15 cm, keeping the center round and all four corner openings symmetrical.
- When joining several blocks, align every orange flower in the same orientation before seaming the black frames together.
The completed block should measure close to 15 cm square with eight orange petals, a visible black star around the open center and four matching open corner sections.
7 Technical Tips
- Unequal petals: One extra stitch in a petal can shift its highest point by 5–10 mm. Count every petal before moving to the next section and keep the two tallest treble stitches centered.
- Center hole collapsing: Pulling the starting ring tight removes the open center visible in the reference. Keep the initial 8-chain ring approximately 12–15 mm wide after the first black round.
- Black rays disappearing: Orange stitches worked into the ray itself can bury the separation lines. Place each orange foundation group in the space between rays and leave the black point uncovered.
- Flower becoming octagonal: Eight stiff petal outlines can flatten the rounded petal tops. Keep the outline single crochet tension slightly looser over the highest 20–25 mm of each orange section.
- Corner loops stretching: A ch-10 corner left unsupported can become 20 mm longer than its opposite corner. Count every corner chain and block all four corners to equal diagonal measurements.
- Square cupping: Too few side stitches pull the outer frame toward the flower. Lay the motif flat after each black frame round and add one stitch near the midpoint of a side if that edge lifts more than approximately 5 mm.
- Open frame losing shape: Joining blanket blocks through every chain in the corner closes the web-like space. Seam the straight sides and pass through each corner space only once where neighboring squares meet.
Conclusion
Check the eight petal tips before working the square frame because the black arches will make any radial spacing error more visible. The next practical step is to block one finished motif to 15 cm and record its exact side-stitch count before making a full blanket set. That gives every later square the same joining edge. Share the finished Halloween flower granny square crochet pattern project on Pinterest with a flat overhead image, then post a close view of the orange petals and black radial points on Instagram using #HalloweenFlowerGrannySquare. For this motif specifically, would you keep the petals pumpkin orange or alternate orange and deep purple around the black center?









