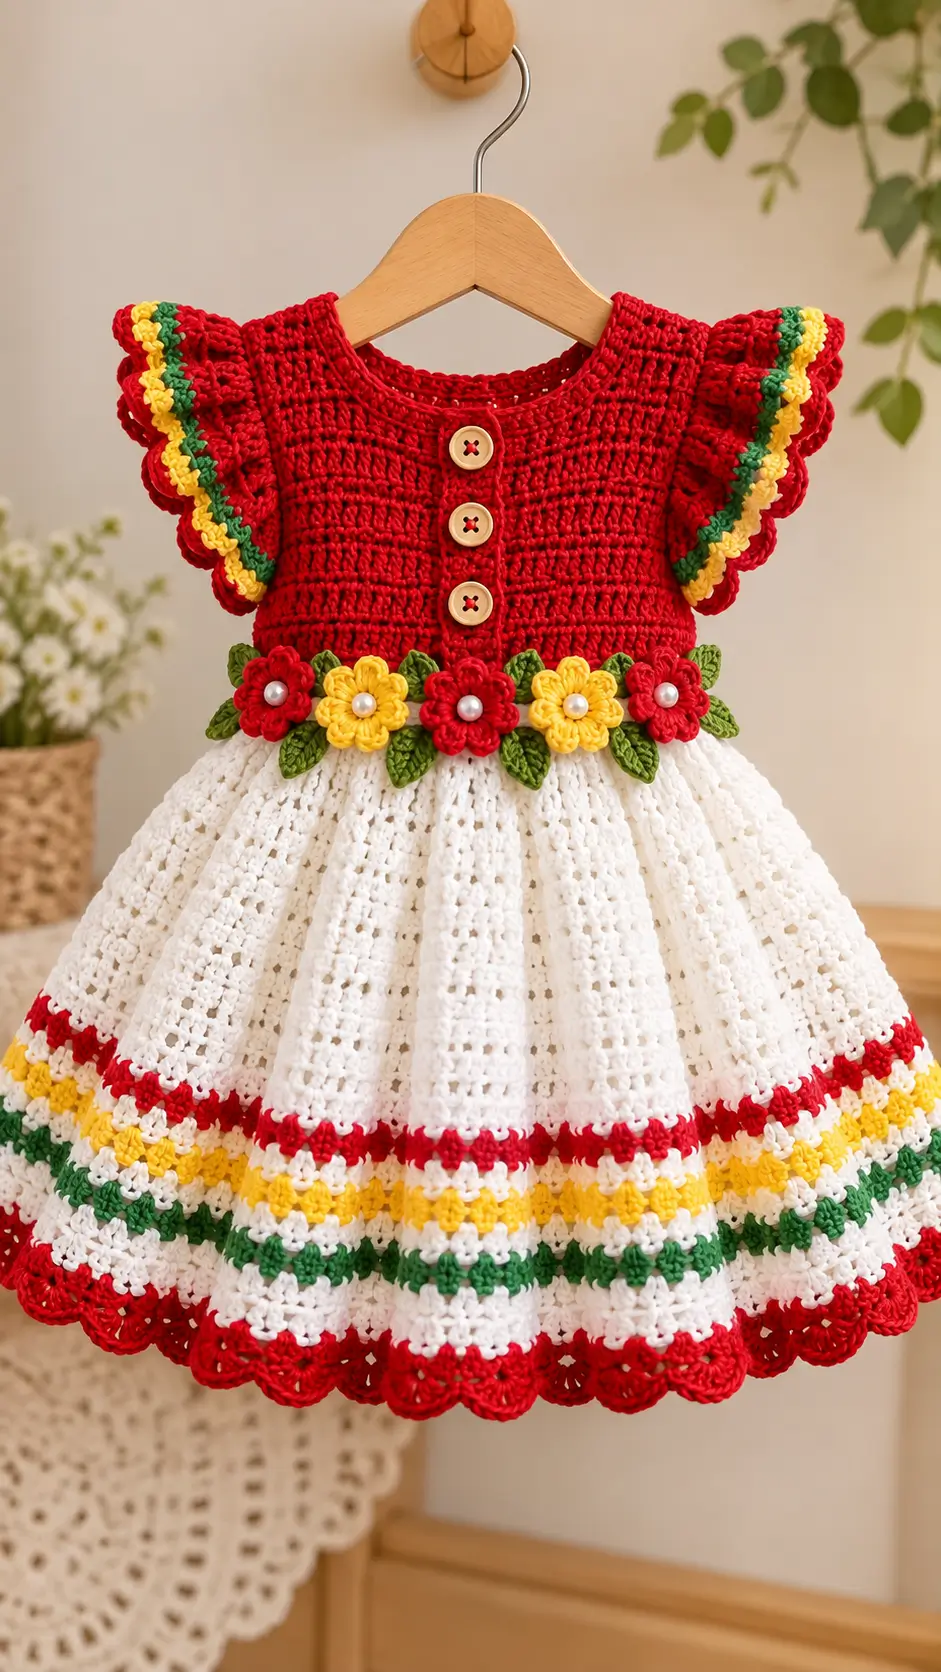
Five flowers have to carry the visual transition between this dress’s solid red bodice and its wide white skirt. This red and white crochet toddler flower dress pattern recreates that structure with Sport/light DK yarn, a 3.5 mm hook and a roughly 56.5 cm length benchmark. The intermediate construction combines garment shaping, appliqués and openwork, making it particularly useful for practicing controlled skirt expansion.
The Design: What Makes This Flower Dress Different
The waist is the structural center. Instead of hiding the bodice-to-skirt transition, five dimensional flowers and multiple leaves deliberately emphasize it. That arrangement allows the dense red upper section and much lighter white skirt to read as separate layers.
The second decision is sleeve volume. A ruffle sleeve crochet dress needs enough flare to resemble the photographed double flutter without producing a rigid armhole. Short foundation sections therefore carry increased shells around the outside edge.
Finally, the skirt expands before the decorative bands begin. This leaves sufficient circumference for the lower openwork and scallops. A common mistake when constructing a crochet dress with flower appliqués is sewing every flower through the center only; the petals can then rotate or curl away from the waistband.
Project Info at a Glance
| Skill Level | Time | Finished Size | Hook | Best For |
|---|---|---|---|---|
| Intermediate | Approx. 14–20 hours | Approx. 56.5 cm long; 59 cm waist benchmark | 3.5 mm | Toddler/preschool dress |
The 56.5 cm length and 59 cm waist are published measurements for a comparable 3–4-year crochet toddler dress, not measurements extracted from the photograph.
Materials and Tools
Yarn
- White — Sport/light DK — approximately 250–300 g — cotton or cotton-blend yarn that reaches gauge
- Red — Sport/light DK — approximately 150–200 g — same yarn family
- Green — Sport/light DK — approximately 25 g — leaves and decorative stripe
- Yellow — Sport/light DK — approximately 20–25 g — flowers and decorative stripe
Tools
- 3.5 mm crochet hook
- 3 buttons, approximately 15–18 mm
- Yarn needle
- Locking stitch markers
- Measuring tape
- Scissors
- Dressmaker pins
- Optional pearl-style flower centers
For a garment intended for a child who may mouth the decorations, omit detachable pearl-style beads and work secure yarn centers instead. Buttons and other small components should be firmly attached and selected according to the intended age and use.
Gauge
Target approximately 20 dc × 8 rows = 10 cm × 10 cm after blocking. Change hook size when necessary to reach the required dimensions rather than forcing the fabric to match a specific hook size.
Abbreviations
- ch — chain
- sc — single crochet
- hdc — half double crochet
- dc — double crochet
- inc — increase
- dec — decrease
- sl st — slip stitch
- st/sts — stitch/stitches
- sp — space
- RS — right side
- WS — wrong side
- rep — repeat
Invisible decrease is primarily an amigurumi technique and is not required for the main garment; shaped decreases here are worked as dc2tog or sc2tog.
Pattern — Step by Step
Pattern note: This is an original photo-inspired construction based on the visible garment. Work to the child’s actual chest, shoulder-to-waist and finished-length measurements.
Red Bodice
Yarn: red
Foundation: Ch 82.
Row 1: Dc in 3rd ch from hook and across. (80)
Row 2: Ch 2, turn, dc in each st across. (80)
Row 3: Ch 2, turn, dc in each st across. (80)
Row 4: Ch 2, turn, dc in each st across. (80)
Row 5: Ch 2, turn, dc across. (80)
Row 6: Ch 2, turn, dc across. (80)
Row 7: Ch 2, turn, dc across. (80)
Row 8: Ch 2, turn, dc across. (80)
Row 9: Ch 2, turn, dc across. (80)
Row 10: Ch 2, turn, dc across. (80)
Check the width against the intended wearer before continuing. The bodice should reach approximately from the upper chest to the waist without depending on excessive stretching.
Join the short back edges if making a back-opening version, or retain an opening according to the selected closure arrangement.
The photographed garment presents three buttons at the center front. They can be used as decorative elements while a separate back opening provides practical dressing access.
Neckline
Join red yarn at the back neckline.
Round 1: Sc evenly around the neckline, keeping the fabric flat.
Round 2: Ch 1, sc in each st around.
Round 3: Work (sl st, ch 1) evenly around for a compact decorative finish.
Fasten off and weave in the yarn end.
Front Button Band
With red yarn, mark the vertical center of the bodice.
Row 1: Work approximately 4 sc across a 2 cm-wide vertical band.
Rows 2–14: Ch 1, turn, sc across. (4)
Fasten off with a long sewing tail. Stitch the band vertically to the center front of the bodice.
Sew three buttons at equal spacing. Treat the buttons as decorative unless the garment opening has specifically been constructed to use them as closures.
Flutter Sleeves — Make 2
Yarn: red with green and yellow edging
Foundation: Ch 22.
Row 1: 2 dc in 3rd ch from hook and 2 dc in each remaining ch. (40)
Row 2: Ch 2, turn, work (dc, 2 dc in next st) across. Adjust the final repeat if necessary to keep both sleeves symmetrical.
Row 3: Ch 1, turn, sc across.
Change to green.
Row 4: Ch 1, sc across. Place an extra sc approximately every sixth stitch if more flare is required.
Change to yellow.
Row 5: Repeat (sl st, ch 3, sl st in same st, sl st in next 2 sts) across.
Fasten off and leave approximately 25 cm of yarn for sewing.
Pin the straight foundation edge around the armhole before attaching it permanently. Keep the ruffled edge pointing outward.
White Skirt
Yarn: white
Join white yarn evenly around the lower edge of the bodice.
Round 1: Ch 2, work approximately 120 dc evenly around the waist. Join. (120)
Round 2: Ch 2, dc around. (120)
Round 3: (Dc in next 19 sts, 2 dc in next st) ×6. (126)
Round 4: Dc around. (126)
Round 5: (Dc in next 20 sts, 2 dc in next st) ×6. (132)
Round 6: Dc around. (132)
Round 7: (Dc in next 21 sts, 2 dc in next st) ×6. (138)
Round 8: Dc around. (138)
Round 9: (Dc in next 22 sts, 2 dc in next st) ×6. (144)
Round 10: Dc around. (144)
Round 11: (Dc in next 23 sts, 2 dc in next st) ×6. (150)
Round 12: Dc around. (150)
Openwork Skirt Section
Round 13: Ch 3, repeat (dc in next 3 sts, ch 1, skip 1 st) around.
Round 14: Work dc into each dc and 1 dc into each ch-1 space. (150)
Round 15: Repeat Round 13.
Round 16: Repeat Round 14.
Round 17: (Dc in next 24 sts, 2 dc in next st) ×6. (156)
Round 18: Dc around. (156)
Round 19: (Dc in next 25 sts, 2 dc in next st) ×6. (162)
Round 20: Dc around. (162)
Continue alternating one openwork round with one solid dc round until the skirt measures approximately 8–10 cm less than the required finished length.
Red Decorative Stripe
Change to red yarn.
Round 1: Sc around without increasing.
Round 2: Repeat (sc in next 2 sts, ch 1, skip 1 st) around. Modify the final repeat slightly at the back seam if necessary.
Change back to white.
Rounds 3–5: Dc around while maintaining the established circumference.
Yellow Decorative Stripe
Change to yellow.
Round 1: Sc around.
Round 2: Repeat (ch 3, skip 1 st, sc in next st) around.
Change to white.
Rounds 3–5: Dc around.
Green Decorative Stripe
Change to green.
Round 1: Sc around.
Round 2: Repeat (ch 3, skip 1 st, sc in next st) around.
Change to white.
Rounds 3–6: Continue the established openwork sequence.
Measure the garment from the shoulder to the current lower edge. Reserve approximately 3–4 cm for the final red scalloped border.
Red Scalloped Hem
Join red yarn.
Round 1: Sc evenly around.
Round 2: Repeat (skip 2 sts, 7 dc in next st, skip 2 sts, sc in next st) around.
If the final shell does not align correctly with the first one, distribute one or two skipped stitches across the final quarter of the round rather than forcing an uneven last scallop.
Round 3: Sl st to the center dc of the next shell. Work (sc, ch 2, sc) in the center dc of each shell around.
Fasten off and weave in the yarn end.
Waist Flowers — Make 5
Make 3 red flowers and 2 yellow flowers.
Round 1: Work 6 sc into a magic ring. (6)
Change to the petal color.
Round 2: Form five evenly spaced petals using groups of (sl st, ch 2, 3 dc, ch 2, sl st).
Fasten off and leave approximately 20 cm for sewing.
For a yarn-only center, embroider compact knots or satin stitches instead of attaching a bead.
Green Leaves — Make 10–12
Ch 8.
Row 1: Sl st in second ch from hook, sc in next ch, hdc in next ch, dc in next 2 ch, hdc in next ch, 3 sc in final ch.
Continue along the opposite side of the foundation chain: hdc, dc in next 2 sts, hdc, sc, sl st.
Fasten off with approximately 15 cm of yarn for sewing.
Each leaf should measure approximately 4–5 cm depending on gauge.
Waist Flower Band
Arrange the five flowers across the front waist in this sequence:
Red – Yellow – Red – Yellow – Red
Position two green leaves between adjacent flowers and add leaves at the outside edges where needed.
Pin every motif before sewing. Attach each flower through its center and at least three petal bases. This prevents the flower from rotating after washing or during wear.
Sew each leaf primarily along its center spine, allowing the outside edges to remain slightly raised.
Assembly
- Block the bodice and skirt lightly to the selected garment measurements before attaching the dimensional decorations.
- Finish the bodice opening and check that the neckline either passes comfortably over the child’s head or opens sufficiently.
- Center the decorative red button band and stitch it to the bodice without puckering the front fabric.
- Attach the three buttons at equal vertical intervals. Replace them with embroidered details when small detachable components are unsuitable.
- Pin both flutter sleeves to their armholes and compare their positions before sewing either sleeve permanently.
- Sew the sleeves through their foundation edges while keeping the gathered outer rows free.
- Position the five waist flowers across the front and place the central red flower directly on the garment centerline.
- Add the green leaves between and behind the flowers, keeping the motifs above the first white skirt round.
- Weave every yarn tail through at least two changes of direction instead of cutting the tail directly beside a seam.
- Measure the final shoulder-to-hem length and inspect the scalloped border for an even lower edge.
The completed garment should have a dense red upper section, a clearly defined floral waist and a substantially wider white openwork skirt.
7 Technical Tips for a Cleaner Crochet Dress
- Mark the skirt seam on every round. Losing the seam by one stitch repeatedly can rotate the red, yellow and green stripe joins several centimetres away from the intended back position.
- Check the bodice at 80 stitches before attaching the skirt. If the blocked circumference differs from the required measurement by more than approximately 2 cm, correct the gauge or stitch count first.
- Control the skirt increases in six evenly spaced positions. Clustering several increases together creates a visible wedge instead of an even circular flare.
- Pin both sleeves before sewing. A difference of only 1 cm in attachment depth can make one flutter sleeve hang visibly lower than the other.
- Attach every waist flower through at least three petal bases. A flower secured only through its center can rotate and expose its attachment stitches.
- Keep the scallop foundation relaxed. Tight single crochet directly above a seven-dc shell border can pull the skirt inward and distort the hem.
- Weave each yarn tail for at least 5 cm with a direction change. Short tails worked in only one direction can migrate toward the surface after laundering.
Final Measurements and Finishing
Use approximately 56.5 cm finished length and 59 cm waist as a reference for a comparable 3–4-year toddler size, but base the final garment on the intended wearer’s measurements. Crochet fabric can change dimensions after washing, particularly when cotton or cotton-blend yarn is used.
Measure the blocked bodice before committing to the full skirt. Check the neckline, armhole depth, waist circumference and shoulder-to-waist length separately. The skirt length can then be extended or shortened through the white openwork rounds without changing the flower band or upper bodice.
Conclusion
Measure the blocked bodice against the intended wearer before committing to the skirt, because the 56.5 cm reference length should not replace actual body measurements. The next step is to crochet and wash a gauge swatch, then calculate the finished circumference produced by the 80-stitch bodice with your selected yarn.
Photograph the flower placement before sewing so the red-yellow sequence can be reproduced accurately. Save the finished red and white crochet toddler flower dress pattern to Pinterest and share the front view on Instagram with #RedWhiteFlowerDress. Which detail would you repeat on another version: the five-flower waist or the three-color striped hem?









