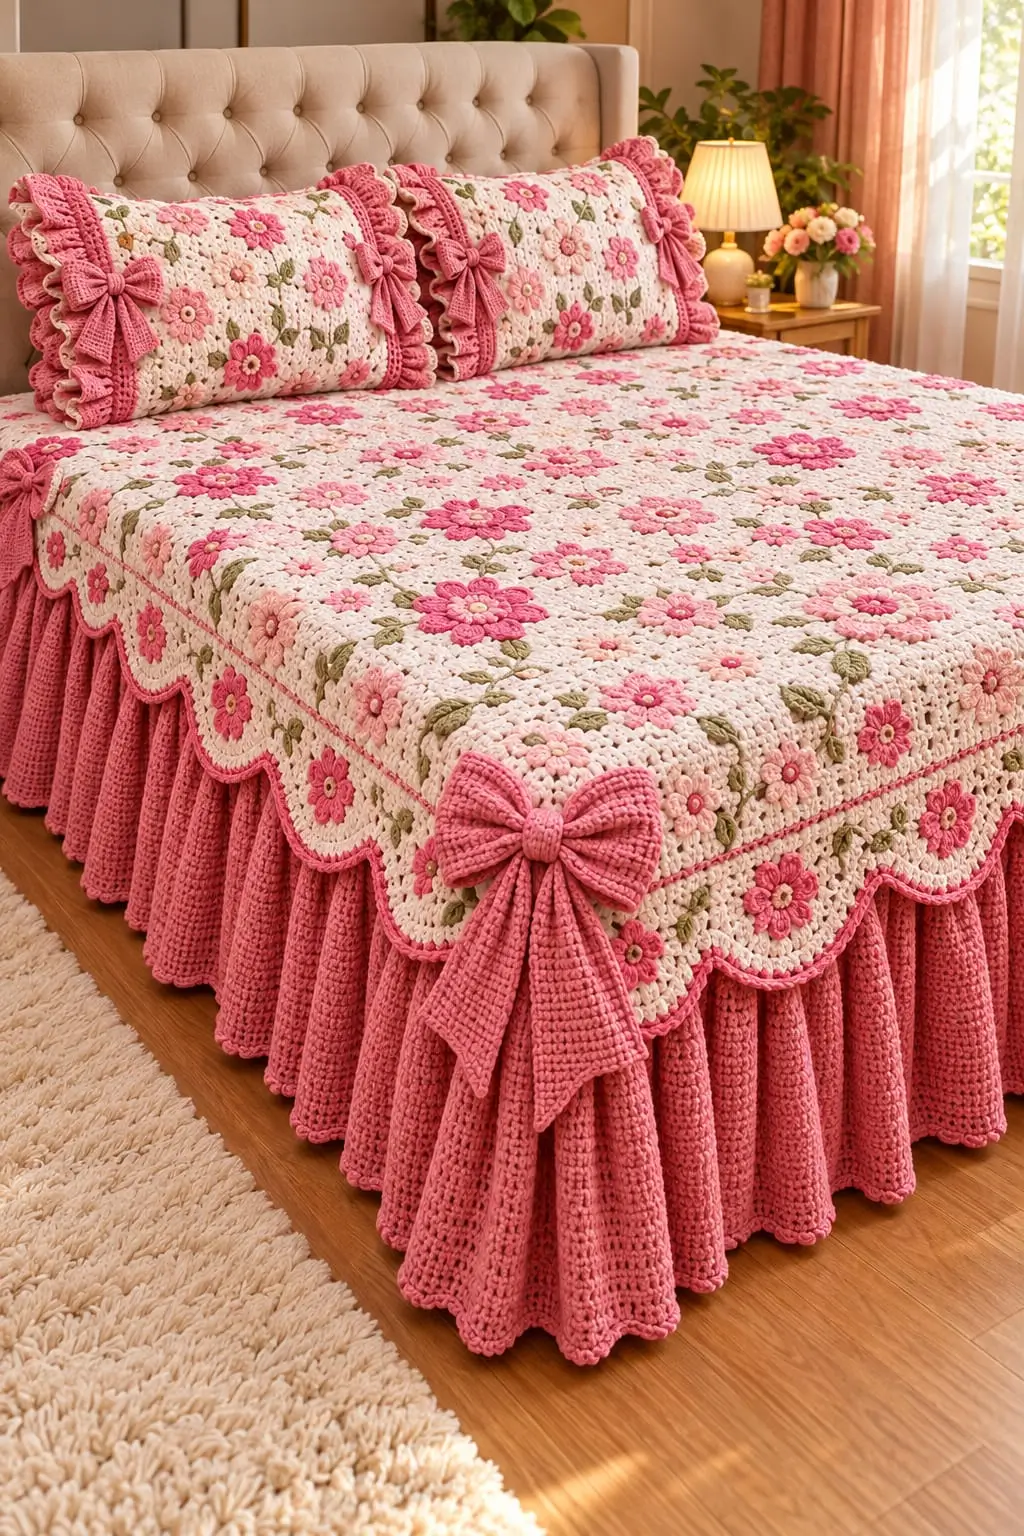
Crochet Floral Bedspread Pattern with 3D Flowers, Ruffles and Bows
Introduction
A bedspread covered with raised pink blossoms has one structural problem a flat floral blanket does not: every flower must project from the surface without pulling the ivory ground out of square. This crochet floral bedspread pattern uses DK yarn, a 4.5 mm hook and modular floral panels for an approximately 160 × 210 cm cover. It is an intermediate project designed so damaged flowers, bows or border sections can be repaired individually.
The Design: What Makes This Floral Bedspread Different
The photographed bedspread combines three different depths: a relatively flat ivory field, raised flowers and leaves, then a much deeper lower ruffle. Separating those structures prevents the decorative weight from distorting the main panel.
The second decision concerns color. Pink occupies the flowers, narrow border lines, bows and skirt, while sage is restricted mainly to foliage. That distribution keeps a pink crochet bedspread readable instead of turning the surface into equal-sized blocks of competing colors.
Third, the large bows are made separately and attached after the border is complete. A common mistake in a 3D flower crochet blanket is sewing every appliqué edge down. That flattens the petals and can make the background pucker. Attach flowers primarily through their centers and selected inner petal points.
Project Info at a Glance
| Skill Level | Time | Finished Size | Hook | Best For |
|---|---|---|---|---|
| Intermediate | 70–100 hours | Approx. 160 × 210 cm, adjustable | 4.5 mm | Decorative full-bed cover |
The finished measurement is the target for this photo-inspired version. Measure your mattress and make a blocked test square before calculating the final number of motifs.
Materials and Tools
Yarn
The quantities below are planning allowances for an approximately 160 × 210 cm version.
- Warm ivory — DK cotton or cotton-blend yarn — approximately 2,000–2,400 g — main field and scalloped border
- Dusty rose — DK — approximately 900–1,100 g — ruffle, bows and border accents
- Medium pink — DK — approximately 250 g — large flowers
- Blush pink — DK — approximately 200 g — secondary flowers
- Sage green — DK — approximately 300 g — leaves and stems
- Pale cream or yellow — DK — approximately 75 g — flower centers
Tools
- 4.5 mm crochet hook
- Yarn needle
- Locking stitch markers
- Rust-resistant blocking pins
- Blocking mats
- Scissors
- Tape measure
Make one complete test motif and block it before purchasing the entire yarn quantity. For this version, the target blocked square is 20 × 20 cm.
Abbreviations
- MR — magic ring
- sc — single crochet
- hdc — half double crochet
- dc — double crochet
- tr — treble crochet
- inc — two stitches in one stitch
- sl st — slip stitch
- ch — chain
- BLO — back loop only
- sp — space
- st/sts — stitch/stitches
An invisible decrease is mainly an amigurumi technique and is not required in the flat blanket field. Shaping here is controlled through corner spaces, skipped stitches and decreases inside accessories.
Pattern — Step by Step
The bedspread is assembled from repeating square units rather than a continuous amigurumi spiral. Make enough blocked squares to reach the required mattress dimensions. A 20 cm motif gives eight squares across for approximately 160 cm.
Ivory Background Square
Yarn: warm ivory
R1: Ch 4 and join to form a ring. Ch 3, work 2 dc into ring, ch 2; work 3 dc, ch 2 three times. Join with sl st.
R2: Sl st to first corner. Ch 3, 2 dc, ch 2, 3 dc in corner; ch 1. Repeat the same corner group in each remaining corner, placing ch 1 between groups.
R3: Work 3 dc, ch 1 into each side ch-1 space. In every corner work 3 dc, ch 2, 3 dc.
R4–R8: Continue the granny-square structure, adding one additional 3-dc group to each side on every round.
R9: Sc around, placing 1 sc in each dc and ch-1 space and 3 sc in each corner.
Fasten off and block to 20 × 20 cm.
Large Raised Flower
Yarn: medium pink with pale cream center
R1: With cream, work 6 sc in MR. Join. (6)
R2: Inc ×6. (12)
R3: Change to pink. Sl st in next st, ch 3, 3 dc in next st, ch 3, sl st in next st. Repeat around to form six raised petal sections.
R4: Working behind the petals, ch 4 and anchor with sl st between adjacent petals six times.
R5: In each ch-4 space work sc, hdc, 4 dc, hdc, sc. Repeat six times.
Fasten off, leaving a 25 cm sewing tail.
Sew through the flower center first. Add one small securing stitch beneath the inner edge of each outer petal only where required.
Small Blush Flower
Yarn: blush pink and pale cream
R1: 6 sc in MR. (6)
R2: Inc ×6. (12)
R3: Change to blush. In each alternate stitch work sl st, ch 2, 2 dc, ch 2, sl st to form six compact petals.
Fasten off. Leave a 20 cm tail.
These smaller flowers fill spaces between the dominant motifs without adding the same surface weight.
Leaf
Yarn: sage green — make as required
Foundation: Ch 8.
Row 1: Beginning in second ch from hook, sc, hdc, dc, 2 tr, dc, hdc. Work 3 sc into final chain.
Continue down the opposite side of the foundation chain: hdc, dc, 2 tr, dc, hdc, sc.
Sl st to close. Fasten off with a 20 cm tail.
For a pointed leaf, pull the final sewing stitch through the tip and tension it lightly before weaving the tail through the reverse side.
Curved Stem
Yarn: sage green
Foundation: Ch 12–25 according to the required stem length.
Row 1: Sl st into second ch and every remaining chain.
Fasten off.
Pin the stem into a shallow curve before sewing. Attach through every second or third stitch rather than stretching the chain.
Small Flat Flower Center
Yarn: pale cream
R1: 6 sc in MR. (6)
R2: Inc ×6. (12)
R3: Sc, inc ×6. (18)
Fasten off. Sew centrally over a larger flower when a more pronounced center is required.
Joining the Squares
Arrange blocked squares on a flat surface before joining. Alternate large-flower, small-flower and lighter foliage areas so identical dense motifs do not form accidental vertical stripes.
With ivory yarn, hold two squares wrong sides together.
Row 1: Join through corresponding back loops with sl st from corner to corner.
Repeat horizontally to create strips, then join the strips vertically.
Pink Divider Band
Yarn: dusty rose
Join yarn at any corner of the completed main panel.
R1: Sc evenly around, working 3 sc in each corner.
R2: Ch 1, sc in each st; work 3 sc in each corner stitch.
R3: Change to ivory and repeat R2.
R4: Change to dusty rose and repeat R2.
Fasten off.
The three-color-line treatment creates the narrow pink frame positioned above the deeper lower section.
Scalloped Floral Border
Yarn: ivory and pink
R1: With ivory, sc evenly around the panel.
R2: Skip 2 sts, 7 dc in next st, skip 2 sts, sl st in next. Repeat along each side. Adjust the spacing by one stitch near corners when necessary rather than forcing a ripple into the border.
R3: With pink, work sl st along the outer edge of each scallop.
Fasten off.
If the scallops cup upward, they contain too few stitches for the circumference. If they flare excessively, reduce the number of dc in each shell from seven to five.
Deep Pink Ruffle
Yarn: dusty rose
Attach yarn to the underside of the divider band.
R1: Work 2 dc in each available base stitch around the three visible bed sides. Do not ruffle the headboard edge unless a four-sided bedspread is required.
R2: Dc in every stitch.
R3–R12: Repeat R2.
R13: Sc, ch 2, sc in every third stitch for a compact picot finish.
Fasten off.
The initial 2:1 increase creates the gathered skirt. For heavier cotton, a ratio of approximately 1.6:1 may hang more cleanly. Test a 20 cm section before completing the full perimeter.
Large Crochet Bow
Yarn: dusty rose
Bow Panel
Foundation: Ch 31.
Row 1: Hdc in second ch and across. (30)
Rows 2–14: Ch 1, turn, hdc across. (30)
Fasten off.
Fold the rectangle so the short ends meet at the center back. Sew them together. Pinch the middle into three accordion folds.
Center Band
Foundation: Ch 8.
Row 1: Sc in second ch and across. (7)
Rows 2–10: Ch 1, turn, sc across. (7)
Wrap the band around the pinched bow center and sew at the back.
Bow Tails — Make 2
Foundation: Ch 13.
Row 1: Hdc across. (12)
Rows 2–22: Hdc across.
For the final four rows, decrease one stitch at each outer edge until the lower end tapers.
Fasten off and sew both tails behind the bow center.
Attach the bows after the border and ruffle have been blocked. This prevents the bow fabric from being stretched during wet finishing.
Pillow Sham Panel
Yarn: ivory
Make a rectangular panel sized to the pillow form. For a 50 × 75 cm pillow, crochet the front slightly smaller than the finished measurement if the chosen yarn relaxes substantially during blocking.
Work the same granny-cluster structure or a plain dc mesh. Add flowers and leaves only after the panel has been blocked.
Create the back from two overlapping rectangular panels. Join around all four edges with sc.
Pillow Ruffle
Yarn: dusty rose
R1: Sc evenly around the sham edge.
R2: Work 2 dc into each sc.
R3–R5: Dc around without increasing.
Finish with the same compact picot used on the bed skirt.
Add one bow near each outer side to reproduce the visual rhythm of the reference design.
Assembly
- Block every ivory square to the same 20 × 20 cm target measurement before arranging the bedspread.
- Lay the full grid on a flat surface and distribute large pink flowers so neighboring squares do not repeat the same orientation.
- Join squares into horizontal strips with ivory yarn, then join the strips vertically.
- Pin flowers, leaves and stems to the finished panel before sewing any appliqué permanently.
- Sew flower centers firmly and tack only selected petal points so the outer layers remain raised.
- Attach leaves through their center line, leaving the outer leaf edges comparatively free.
- Work the pink divider band around the completed panel and check that all four corners remain square.
- Crochet the scalloped ivory border, then add the pink outer edging and deep ruffle.
- Block the bedspread before attaching the large bows; block pillow panels separately before adding their ruffles.
- Sew bows at the lower corners and pillow edges, then weave each structural tail through at least 5 cm of reverse-side stitches.
The completed construction should lie flat through the ivory field while the flowers, scallops, ruffle and bows project in separate layers.
7 Technical Tips for a Floral Crochet Bedspread
- Control square-size drift: A 3 mm difference repeated across eight motifs creates 24 mm of accumulated width error. Block every square to the same 20 cm measurement before joining.
- Check ruffle flare: A 2:1 first-row increase can produce excessive volume in heavy cotton. Test a 20 cm section and reduce the ratio toward 1.6:1 if the upper edge buckles.
- Prevent flower puckering: Sewing around the entire circumference of a raised flower pulls the ivory field inward. Secure the center plus selected inner petal points instead.
- Avoid leaf distortion: Stretching a chain stem while sewing causes the blanket to contract when released. Pin each stem in its resting curve before making the first attachment stitch.
- Prevent bow collapse: A large bow made from loose dc fabric can fold under its own weight. Use hdc at a firm gauge and make the center band tight enough to preserve three distinct folds.
- Correct border corner cupping: A scalloped border needs additional circumference at each 90-degree turn. Add spacing at the corner instead of pulling a standard shell tightly around it.
- Stop woven tails from escaping: Short ends can migrate out of cotton crochet after laundering. Leave approximately 15–20 cm for ordinary color-change tails and 25 cm for load-bearing appliqué attachments.
How to Adjust the Bedspread Size
The simplest way to resize this crochet floral bedspread pattern is to change the number of 20 cm squares rather than altering individual motifs. Measure the mattress width and the desired side drop first.
For example, eight 20 cm squares produce a nominal 160 cm panel before borders. Nine squares produce approximately 180 cm, while ten produce approximately 200 cm. Actual dimensions depend on blocked gauge.
Measure the finished test square rather than relying on the theoretical measurement. If one blocked square measures 19.5 cm, eight motifs will produce approximately 156 cm before joining and edging.
The bed skirt is calculated separately. Measure vertically from the edge of the main panel to the desired lower position, then work enough non-increase rows to reach that depth.
Flower Placement and Color Distribution
A controlled irregular layout works better for this design than a strict checkerboard. Place the largest medium-pink flowers first. Keep approximately one motif width between dominant blossoms, then fill the remaining areas with blush flowers, smaller centers, stems and sage leaves.
Avoid concentrating all dark pink flowers in the center. The visual weight should extend toward the lower and side edges because the deep dusty-rose skirt already creates a strong band beneath the ivory panel.
Before sewing, photograph the complete arrangement from directly above. Use that image as a placement reference while individual motifs are removed and attached.
Blocking and Finishing
Block the main panel before adding the deepest ruffle. Pin the four corners first, then measure the diagonals. Matching diagonal measurements indicate that the panel is square.
Continue pinning along the sides without stretching individual motifs beyond their established blocked dimensions. Allow the panel to dry completely before removing the pins.
The ruffle can then be lightly blocked separately. Do not flatten its gathers. Position pins only where necessary to correct twisted sections or inconsistent lower-edge length.
Large bows should be shaped independently and attached last. Keep the center tightly gathered while allowing the two loops to remain broad and symmetrical.
Conclusion
Measure and block one 20 cm test square before committing yarn to the full bedspread; that measurement controls the grid, finished width and border calculations. Once the sample is stable, calculate the required square count for your mattress and record the final blocked gauge. This crochet floral bedspread pattern can then be scaled without changing the flower, leaf, scallop or bow proportions. Save the finished layout to Pinterest and share the completed bed treatment on Instagram with #PinkFloralBedspread. Before joining the first row, decide whether the largest dark-pink flowers should form a regular repeat across the bed or remain deliberately scattered like the reference image.









