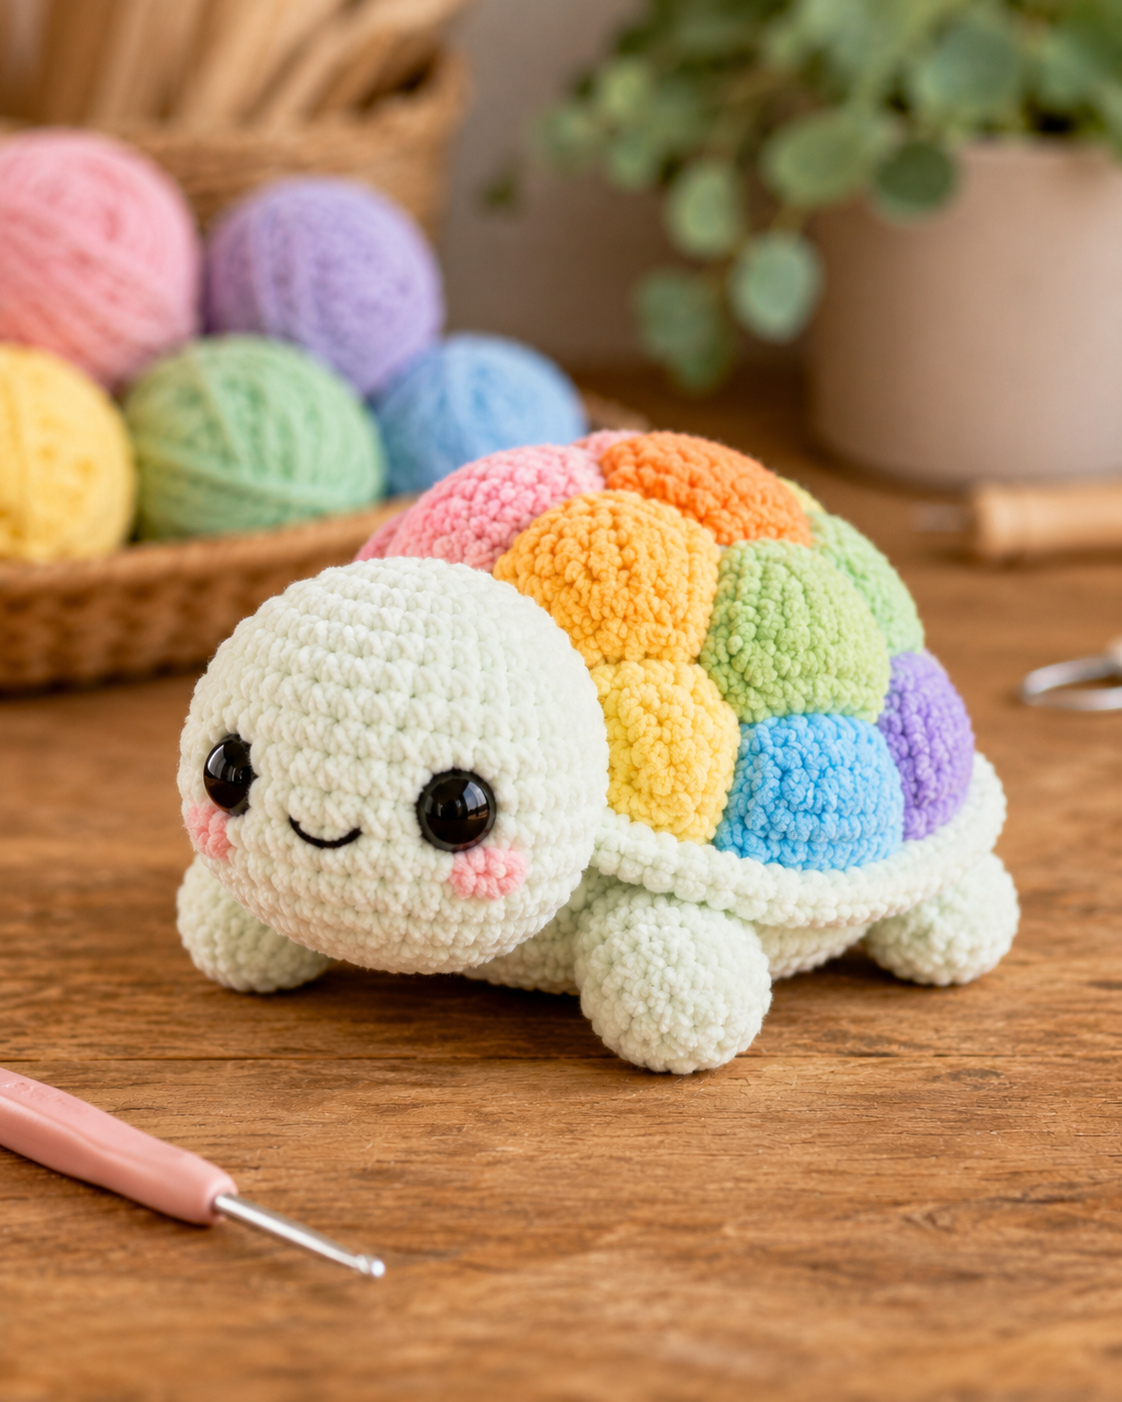
Turtles carry the shell seam where other toys hide a back curve. This turtle amigurumi crochet pattern uses chunky chenille, a 4.5 mm hook, 12 mm safety eyes, and a low, medium-size body about 15 cm long. The build fits an advanced beginner who can control tight single crochet. Make it for a nursery shelf, market bin, or color-practice sample where the rainbow scutes must stay even.
The Design: What Makes This Turtle Different
A turtle reads correctly only when the shell is wider than the head and the legs sit low enough to touch the table. This design uses a round cream head, squat belly, and raised rainbow scutes so the shell has height without tipping the toy backward. The shell rim is worked as a separate cream cord because chenille yarn can blur color edges when too many color changes share one round. The cheeks are flat circles, not embroidered dots, which keeps the face visible beside large plastic eyes. A common maker mistake is placing the legs at the middle of the body; that makes the turtle look like a beetle. For this rainbow turtle crochet pattern, the legs stay under the rim, while the plush turtle amigurumi shell remains the visual center.
Project Info at a Glance
| Skill Level | Time | Finished Size | Hook | Best For |
|---|---|---|---|---|
| Advanced beginner | 3–4 hours | About 15 cm long | 4.5 mm | Chenille plush, market makes, color layout practice |
Materials and Tools
Yarn
- Cream chunky chenille — super bulky / chunky — 27 g — Premier Parfait Chunky, Himalaya Dolphin Baby, or similar.
- Pastel pink chunky chenille — shell scute + cheeks — 3 g — Premier Parfait Chunky or similar.
- Pastel yellow chunky chenille — shell scute — 3 g — same yarn family.
- Pastel orange chunky chenille — shell scute — 2 g — same yarn family.
- Pastel green chunky chenille — shell scute — 2 g — same yarn family.
- Pastel blue chunky chenille — shell scute — 2 g — same yarn family.
- Pastel purple chunky chenille — shell scute — 2 g — same yarn family.
- Black cotton or embroidery thread — mouth — under 1 g.
The yarn amounts follow published plush turtle material data using 27 g for the body and 12 g for the shell in Premier Parfait Chunky or similar yarn.
Tools
- 4.5 mm crochet hook
- 12 mm safety eyes
- Polyester stuffing
- Yarn needle
- Locking stitch markers
- Pins
- Scissors
- Black embroidery needle
Abbreviations
MR = magic ring; sc = single crochet; inc = 2 sc in one stitch; dec = invisible decrease over 2 stitches; sl st = slip stitch; ch = chain; BLO = back loop only; FLO = front loop only; FO = fasten off.
For invisible decrease, insert the hook through the front loops of the next two stitches, yarn over, pull through both front loops, yarn over again, and pull through both loops on the hook.
Pattern — Step by Step
Work in a continuous spiral unless a joined round is named. Use stitch markers on every piece because chenille hides the first stitch.
Head
Yarn: cream — Source: Standard amigurumi math
R1: 6 sc in MR (6)
R2: inc ×6 (12)
R3: (1 sc, inc) ×6 (18)
R4: (2 sc, inc) ×6 (24)
R5: (3 sc, inc) ×6 (30)
R6: (4 sc, inc) ×6 (36)
R7–R12: sc around (36)
R13: (4 sc, dec) ×6 (30)
R14: (3 sc, dec) ×6 (24)
R15: (2 sc, dec) ×6 (18)
Place safety eyes between R9 and R10, about 8 stitches apart. Start stuffing the head firmly, keeping the front round.
R16: (1 sc, dec) ×6 (12)
R17: dec ×6 (6)
FO. Close the hole and bury the tail.
Body / Belly
Yarn: cream — Source: Standard amigurumi math
R1: 6 sc in MR (6)
R2: inc ×6 (12)
R3: (1 sc, inc) ×6 (18)
R4: (2 sc, inc) ×6 (24)
R5: (3 sc, inc) ×6 (30)
R6: (4 sc, inc) ×6 (36)
R7–R11: sc around (36)
R12: (4 sc, dec) ×6 (30)
R13: sc around (30)
R14: (3 sc, dec) ×6 (24)
R15: (2 sc, dec) ×6 (18)
Stuff lightly. The belly must stay oval and low, not spherical.
R16: (1 sc, dec) ×6 (12)
R17: dec ×6 (6)
FO. Close the hole. Leave no long tail unless the body will be sewn from the underside.
Shell Dome
Yarn: cream base — Source: Standard amigurumi math
R1: 6 sc in MR (6)
R2: inc ×6 (12)
R3: (1 sc, inc) ×6 (18)
R4: (2 sc, inc) ×6 (24)
R5: (3 sc, inc) ×6 (30)
R6: (4 sc, inc) ×6 (36)
R7: (5 sc, inc) ×6 (42)
R8–R13: sc around (42)
R14: BLO sc around (42)
FO. Leave a 35 cm tail for sewing to the body.
This shell uses a 42-stitch plateau because the photographed turtle has an oversized shell compared with its head.
Raised Rainbow Shell Scutes
Yarn: pastel shell colors — Source: Standard amigurumi math
Make 9 total: 1 pink, 1 orange, 2 yellow, 2 green, 1 blue, 1 purple, 1 extra color to balance the back row.
R1: 6 sc in MR (6)
R2: inc ×6 (12)
R3: (1 sc, inc) ×6 (18)
R4–R5: sc around (18)
R6: (1 sc, dec) ×6 (12)
FO. Leave a 20 cm tail. Stuff each scute with a pea-sized amount only.
Arrange three scutes across the top row, three across the middle, and three across the lower shell. Pin before sewing.
Shell Rim Cord
Yarn: cream — Source: Standard amigurumi math
R1: 6 sc in MR (6)
R2–R58: sc around (6)
FO. Leave a 25 cm tail.
Stop earlier or add rounds until the cord fits around the shell edge without stretching. Sew it into the BLO ridge from the shell dome.
Front Legs
Yarn: cream — Source: Standard amigurumi math
Make 2.
R1: 6 sc in MR (6)
R2: inc ×6 (12)
R3: (1 sc, inc) ×6 (18)
R4–R6: sc around (18)
R7: (1 sc, dec) ×6 (12)
R8: sc around (12)
FO. Leave a 20 cm tail. Stuff the paw end only.
Back Legs
Yarn: cream — Source: Standard amigurumi math
Make 2.
R1: 6 sc in MR (6)
R2: inc ×6 (12)
R3–R5: sc around (12)
R6: dec ×6 (6)
FO. Leave a 20 cm tail. Stuff lightly.
Tail
Yarn: cream — Source: Standard amigurumi math
R1: 6 sc in MR (6)
R2–R4: sc around (6)
FO. Do not stuff. Leave a 15 cm tail.
Cheek Patches
Yarn: blush pink — Source: Standard amigurumi math
Make 2.
R1: 6 sc in MR (6)
R2: inc ×6 (12)
sl st to first stitch (12)
FO. Leave a 12 cm tail.
Smile Embroidery
Yarn/thread: black — Source: Standard amigurumi placement
Insert the needle below the left eye, form a shallow curve over 4 stitches, and exit below the right eye. Anchor with one tiny vertical stitch at the center if the mouth lifts from the fabric.
Assembly
- Pin the head to the front of the body across R7–R11 of the body, then sew twice around the neck join.
- Center the shell dome on top of the body with the BLO ridge facing outward.
- Sew the shell dome to the body through R14 of the shell and the upper body stitches.
- Sew the shell rim cord around the shell edge, hiding the body-shell seam.
- Pin the safety-eye face upright, then sew the cheek patches beside the eyes between R10 and R12 of the head.
- Embroider the smile after the cheeks are secure.
- Sew the front legs under the front shell rim, angled slightly forward.
- Sew the back legs under the rear shell rim, angled slightly outward.
- Attach the tail at the back center, tucked under the rim.
- Sew the rainbow scutes onto the shell from center outward, then weave every tail into the shell interior.
The finished turtle should sit flat with all four legs touching the surface.
7 Technical Tips
- Stitch marker drift: Chenille spirals can shift the first stitch by 1–2 stitches over ten rounds. Move the marker only after counting the full round, not by visual seam position.
- Stuffing firmness: Overstuffing the body past a firm oval will lift the legs off the table. Stop stuffing when the body compresses about 5 mm under finger pressure.
- Invisible decrease gaps: Standard decreases leave white stuffing dots in chunky yarn. Use front-loop invisible decreases on R13–R17 of the head and pull the working loop snug after each decrease.
- Eye placement timing: Safety eyes must go in before R16 closes the head. Place them between R9 and R10, with 8 stitches between posts for the wide turtle face.
- Velvet tension loss: Chenille can worm loose at sewn seams. Leave at least 20 cm tails on legs and scutes, then weave each tail through three separate stitch paths.
- Pinning failure mode: Raised scutes slide toward the rim if sewn without pinning. Pin the center scute first, then place the outer scutes 1 round apart so the rainbow layout stays even.
- Tail weaving measurement: A 12 cm tail is too short for plush yarn joins. Use 20–35 cm tails on shell and limb pieces so each seam can be stitched twice.
Conclusion
This turtle works because the proportions stay disciplined: round head, low body, wide shell, and raised scutes placed in rows instead of random spots. The chunky chenille makes every round visible, so count before shaping and pin every shell piece before sewing. For the next step, crochet all shell scutes first and arrange the rainbow order under the same lighting as the final photo. Save the turtle amigurumi crochet pattern to Pinterest, post the finished shell layout on Instagram, and tag it with #RainbowShellTurtle. Which scute color should sit at the exact center of this turtle’s shell: yellow, green, or pink?









