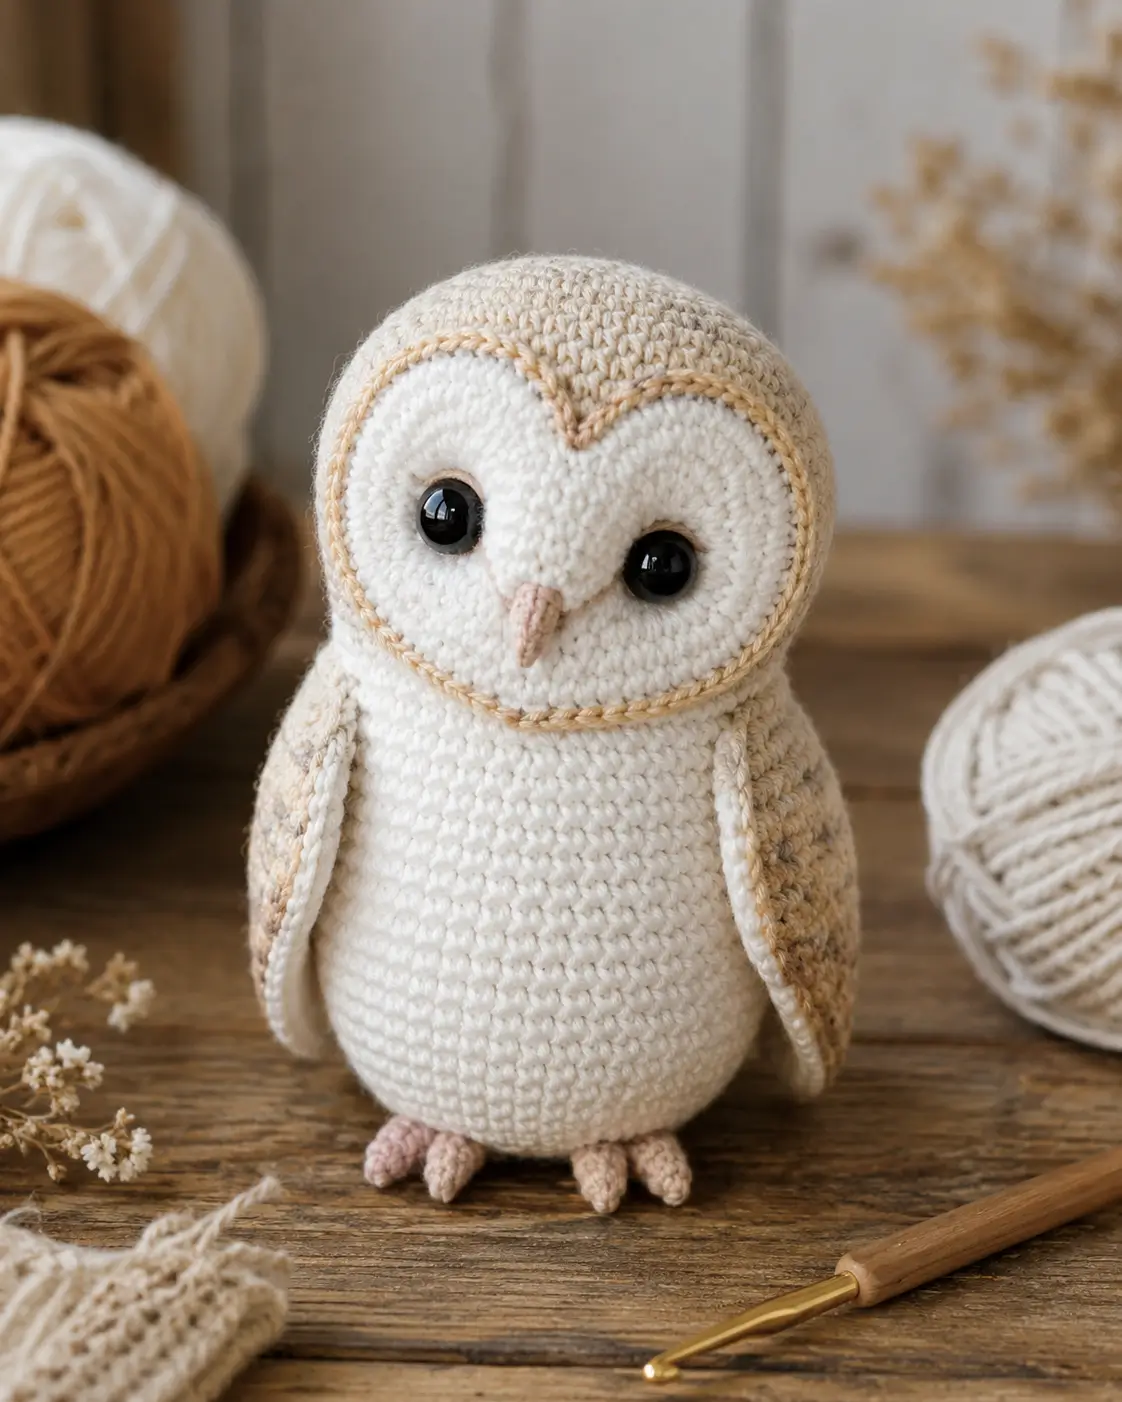
A barn owl’s heart-shaped face is not decoration; it is the load-bearing shape in this barn owl amigurumi crochet pattern. You will build a 15 cm worsted-weight owl with a 3.5 mm hook, 12 mm safety eyes, folded wings, talons, and a small yarn-ball display prop. Skill level is intermediate because the face is pinned, bordered, and sewn in layers. The finished piece works as shelf decor.
The Design: What Makes This Barn Owl Different
Build the owl around the facial disc first. Barn owls are identified by a pale heart-shaped facial disc and dark eyes, so this design uses two flat white cheek patches instead of one oval muzzle. The maker then pins a tan cord around both circles to create the cleft at the top and the tapered point near the beak. Folded wings are worked flat so the sides stay narrow; a bulky wing would push the body into a duck shape. The body stays on a 36-stitch plateau, matching a medium amigurumi owl pattern size. The common mistake is placing the eyes into the head before the face patches are pinned. For a realistic owl amigurumi or a free barn owl crochet pattern, eye placement must serve the facial disc, not the other way around.
Project Info at a Glance
| Skill Level | Time | Finished Size | Hook | Best For |
|---|---|---|---|---|
| Intermediate | Not listed in cited sources | 15 cm | 3.5 mm | Shelf display, woodland decor, pattern photography |
Materials and Tools
Yarn
- Cream white — worsted weight — 50 g — Paintbox Simply Aran, Stylecraft Special Aran, or similar smooth acrylic/cotton blend
- Oatmeal tan — worsted weight — 20 g — same yarn family for head cap and wings
- Warm beige — worsted weight — 10 g — raised facial outline and optional embroidery
- Pale blush — worsted weight — 5 g — beak and talons
- Scrap cream or tan — worsted weight — 5 g — optional yarn-ball display prop
Tools
- Hook 3.5 mm
- 12 mm black safety eyes
- Polyester stuffing
- Tapestry needle
- Locking stitch markers
- Pins
- Scissors
- Embroidery needle
Abbreviations
- MR = magic ring
- sc = single crochet
- inc = 2 sc in the same stitch
- dec = invisible decrease unless stated otherwise
- sl st = slip stitch
- ch = chain
- BLO = back loop only
- sc3tog = single crochet 3 stitches together
- st/sts = stitch/stitches
- R = round or row
An invisible decrease is worked through front loops only, which reduces holes on the closing rounds.
Pattern — Step by Step
Continuous spiral unless noted. Counts appear at the end of every round or row.
Head
Yarn: oatmeal tan.
R1: 6 sc in MR (6)
R2: inc ×6 (12)
R3: (sc 1, inc) ×6 (18)
R4: (sc 2, inc) ×6 (24)
R5: (sc 3, inc) ×6 (30)
R6: (sc 4, inc) ×6 (36)
R7: sc around (36)
R8: sc around (36)
R9: sc around (36)
R10: sc around (36)
R11: sc around (36)
R12: sc around (36)
R13: sc around (36)
R14: (sc 4, dec) ×6 (30)
R15: (sc 3, dec) ×6 (24)
R16: (sc 2, dec) ×6 (18)
Stuff firmly. The face patches and eyes are attached during assembly, not here.
R17: (sc 1, dec) ×6 (12)
R18: dec ×6 (6)
Fasten off. Close the hole and hide the tail inside the head.
Body
Yarn: cream white.
R1: 6 sc in MR (6)
R2: inc ×6 (12)
R3: (sc 1, inc) ×6 (18)
R4: (sc 2, inc) ×6 (24)
R5: (sc 3, inc) ×6 (30)
R6: (sc 4, inc) ×6 (36)
R7: sc around (36)
R8: sc around (36)
R9: sc around (36)
R10: sc around (36)
R11: sc around (36)
R12: sc around (36)
R13: sc around (36)
R14: sc around (36)
R15: sc around (36)
Stuff the lower body first. Keep the neck area firm enough to hold the head without tilting.
R16: (sc 4, dec) ×6 (30)
R17: sc around (30)
R18: sc around (30)
R19: (sc 3, dec) ×6 (24)
R20: (sc 2, dec) ×6 (18)
R21: (sc 1, dec) ×6 (12)
R22: dec ×6 (6)
Fasten off. Leave a 30 cm tail for sewing the body to the head.
Cheek Patches
Make 2. Yarn: cream white.
R1: 6 sc in MR (6)
R2: inc ×6 (12)
R3: (sc 1, inc) ×6 (18)
R4: (sc 2, inc) ×6 (24)
R5: (sc 3, inc) ×6 (30)
R6: sl st around loosely (30)
Fasten off. Leave a 35 cm tail on each patch.
Raised Heart Face Outline
Yarn: warm beige.
Row 1: ch 58 (58)
Row 2: sl st in 2nd ch from hook, sl st across (57)
Fasten off. Leave a 45 cm tail. Pin the cord around both cheek patches in a heart shape, with the dip centered above the beak.
Beak
Yarn: pale blush.
R1: 6 sc in MR (6)
R2: sc around (6)
R3: (sc 1, inc) ×3 (9)
R4: sc around (9)
R5: (sc 2, inc) ×3 (12)
Fasten off. Leave a 25 cm tail. Do not overstuff; the beak should stay narrow.
Folded Wings / Front Limbs
Make 2. Yarn: oatmeal tan.
Row 1: ch 10, sc in 2nd ch from hook, sc across (9)
Row 2: inc, sc 7, inc (11)
Row 3: sc across (11)
Row 4: inc, sc 9, inc (13)
Row 5: sc across (13)
Row 6: sc across (13)
Row 7: sc across (13)
Row 8: dec, sc 9, dec (11)
Row 9: sc across (11)
Row 10: dec, sc 7, dec (9)
Row 11: dec, sc 5, dec (7)
Row 12: dec, sc 3, dec (5)
Row 13: dec, sc 1, dec (3)
Row 14: sc3tog (1)
Fasten off. Leave a 35 cm tail. Embroider 5–7 short beige feather marks down each wing.
Feet and Talons
Make 2 foot pads and 6 toes. Yarn: pale blush.
Foot Pad
R1: 6 sc in MR (6)
R2: inc ×6 (12)
R3: sc around (12)
R4: sc around (12)
R5: (sc 2, dec) ×3 (9)
Fasten off each pad. Flatten lightly.
Toe
R1: 6 sc in MR (6)
R2: sc around (6)
R3: (sc 1, dec) ×2 (4)
R4: sc around (4)
Fasten off each toe. Leave 15 cm tails. Sew three toes to each pad.
Small Tail
Yarn: cream white.
R1: 6 sc in MR (6)
R2: inc ×6 (12)
R3: sc around (12)
R4: sc around (12)
R5: (sc 2, dec) ×3 (9)
R6: sc around (9)
Fasten off. Flatten the tail and leave a 25 cm sewing tail.
Mini Yarn Ball Display Prop
Yarn: scrap cream or tan.
R1: 6 sc in MR (6)
R2: inc ×6 (12)
R3: (sc 1, inc) ×6 (18)
R4: sc around (18)
R5: sc around (18)
R6: sc around (18)
R7: (sc 1, dec) ×6 (12)
R8: dec ×6 (6)
Fasten off and close. Wrap a 60 cm strand around the ball in crossing lines, then knot and hide the end.
Assembly
- Sew the body to the lower center of the head, matching the head’s closing point to the body’s top center.
- Pin both cheek patches to the front of the head so they overlap slightly at the center.
- Insert the 12 mm eyes through the cheek patches and head before locking the washers.
- Sew the cheek patches down, shaping the upper overlap into a shallow heart dip.
- Pin the beige outline cord around both cheek patches and stitch it down with small hidden stitches.
- Sew the beak below the eye line, centered between the two cheek patches.
- Attach the wings to the sides of the body, starting one round below the neck seam.
- Sew the feet under the body, with three toes visible from the front.
- Attach the small tail at the back base, angled slightly downward.
- Add the yarn-ball prop beside the owl for display photography.
The finished owl should sit upright with the heart outline centered above the beak.
7 Technical Tips
- Stitch marker drift will twist the face by 2–3 stitches after ten rounds. Move the marker at the end of every round and check that R14 decreases line up with the back of the head.
- Stuffing failure shows as a flat crown or a neck crease. The head should resist a 5 mm finger dent before the final six stitches are closed.
- Invisible decrease holes appear most often on R16–R22 of the body. Work through front loops only and pull the working yarn tight after each decrease.
- Eye placement has a narrow window. Keep 10 stitches between the eye posts after the cheek patches are pinned, then lock the washers.
- Velvet substitution changes the scale fast. Use a 5 mm hook only if you accept a finished owl closer to 22 cm instead of 15 cm.
- Pinning failure makes the wing tips point forward. Place each wing top one round below the neck seam and keep the tapered point aligned with the lower body.
- Tail weaving needs length. Leave at least 15 cm on face and wing tails, then pass each tail through three different internal paths before trimming.
Conclusion
This build keeps the barn owl readable from the front: pale body, tan crown, black eyes, and a raised heart border. Block the face before final sewing, then photograph the owl from eye level so the two cheek patches form a clean point above the beak. For the next concrete step, make one cheek patch and test it against your safety eyes before crocheting the second. Save this barn owl amigurumi crochet pattern to Pinterest, then post the finished owl on Instagram with #BarnOwlHeartFace. Which edge gave you the sharper barn-owl profile: a sewn chain border or surface crochet directly into the head?










I have to check your web site everyday to make sure I don’t miss something. Thank you so much for sharing your wonder work and patterns.