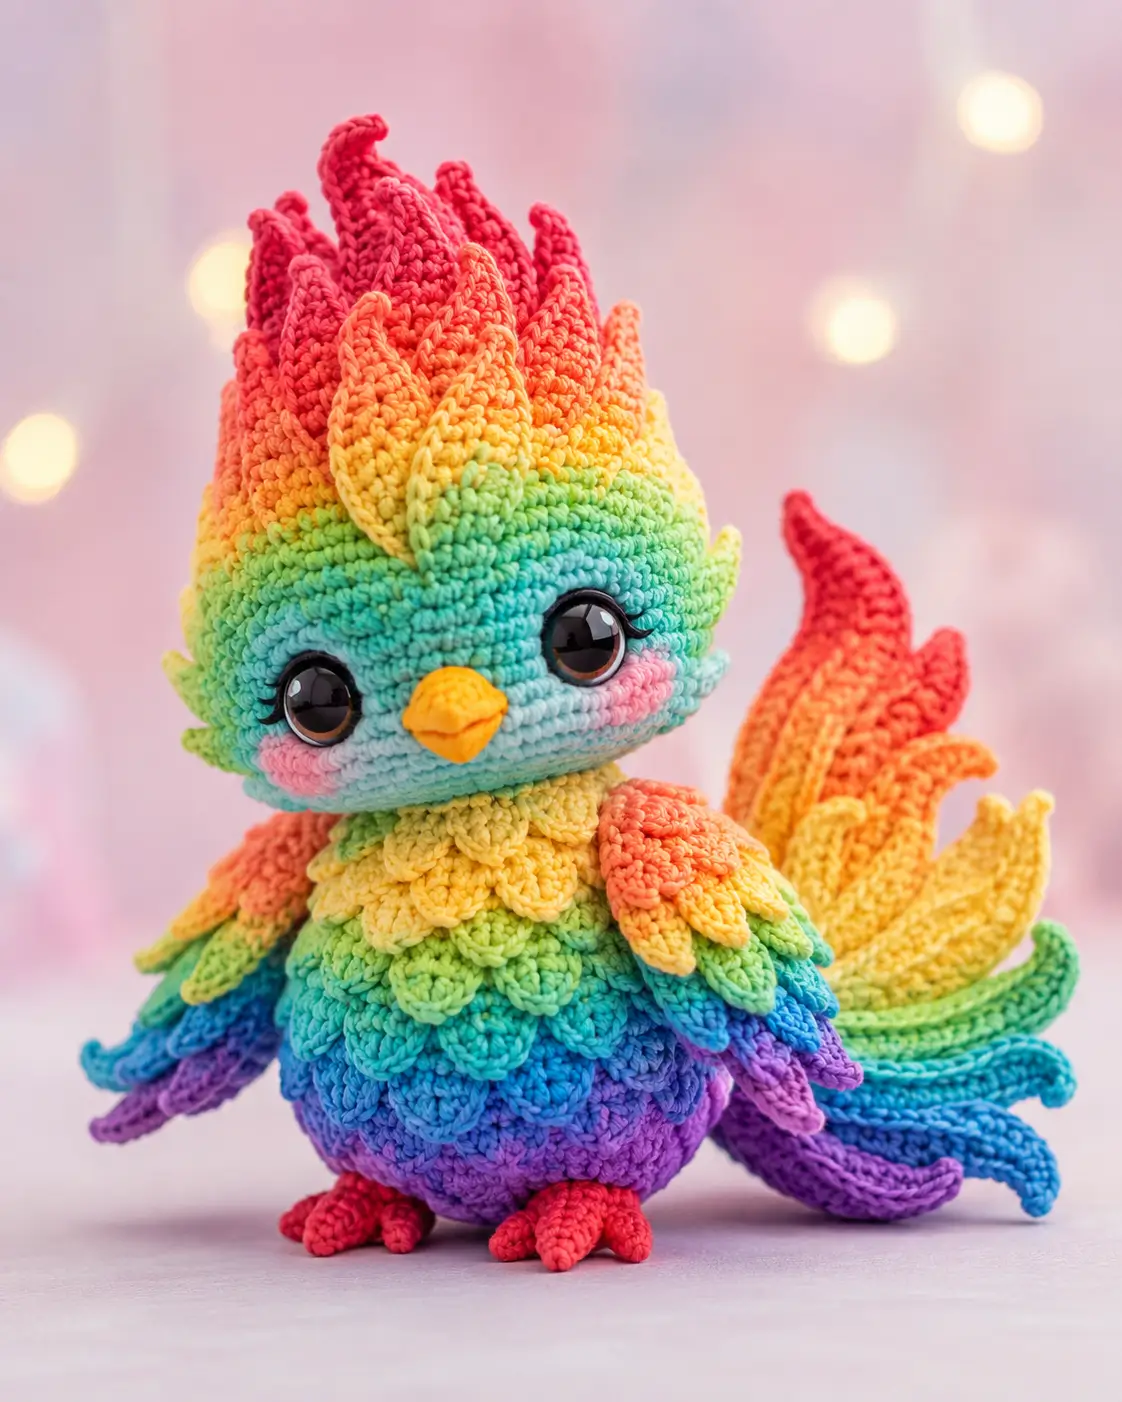
A phoenix has to look like it is burning upward while sitting still. This phoenix amigurumi crochet pattern builds that effect with worsted cotton, a 2.75 mm hook, 18 mm safety eyes, and stacked rainbow feathers. The finished bird measures about 20 cm and suits an intermediate maker. Work it for a fantasy shelf piece that stays upright without wire.
The Design: What Makes This Phoenix Different
The design uses a large 42-stitch head because the face carries the bird identity: wide eyes, short beak, and pink cheek patches. A smaller head would make the crown flames read as hair instead of plumage. The body stays rounded at 42 stitches, then gains separate half-circle scales so the rainbow gradient can step from yellow at the throat to violet at the belly. Side wings are flat, not stuffed, because thick wings push a sitting phoenix forward.
Comparable phoenix designs frequently highlight wired wings, layered tails, and customizable feathers; this version solves a different problem with non-wired stacked color. Many phoenix crochet pattern layouts miss cheek spacing and place the beak too low. For this rainbow phoenix crochet build, set the beak center between the eyes before sewing the collar.
Project Info at a Glance
| Skill Level | Time | Finished Size | Hook | Best For |
|---|---|---|---|---|
| Intermediate | 7–9 hours | 20 cm | 2.75 mm | Fantasy decor, rainbow amigurumi, photo display |
Comparable phoenix sources support 20 cm scale, worsted/aran yarn, and 2.75 mm hook selection for a dense fabric.
Materials and Tools
Yarn
- Aqua turquoise — worsted/aran cotton or cotton-blend — 35 g — YarnArt Jeans, Paintbox Cotton Aran, or similar
- Yellow — worsted/aran — 15 g — for beak, collar, and upper feathers
- Orange — worsted/aran — 15 g — for crest, wings, and tail flames
- Red — worsted/aran — 18 g — for crown tips, feet, and tail tips
- Lime green — worsted/aran — 12 g — for body scales and tail transition
- Blue — worsted/aran — 12 g — for lower feathers and tail
- Purple — worsted/aran — 12 g — for belly and tail ends
- Pink — worsted/aran — 5 g — for cheek patches
The gram plan is scaled from verified phoenix listings that give 35 g as the main-color amount and 15 g / 10 g for accent colors.
Tools
- Hook 2.75 mm
- 18 mm black safety eyes
- Polyester stuffing
- Yarn needle
- Stitch markers
- Pins
- Scissors
Abbreviations
- MR = magic ring
- sc = single crochet
- inc = 2 sc in one stitch
- dec = single-crochet decrease
- sl st = slip stitch
- ch = chain
- BLO = back loop only
- FLO = front loop only
- inv-dec = invisible decrease
Invisible decrease uses the front loops of the next two stitches so the closing rounds lose six stitches without exposed bars.
Pattern — Step by Step
Continuous spiral unless noted. Flat feathers are worked in rows.
Head
Yarn: aqua turquoise — Source: Standard amigurumi math
R1: 6 sc in MR (6)
R2: inc ×6 (12)
R3: [sc, inc] ×6 (18)
R4: [2 sc, inc] ×6 (24)
R5: [3 sc, inc] ×6 (30)
R6: [4 sc, inc] ×6 (36)
R7: [5 sc, inc] ×6 (42)
R8–R15: sc around (42)
R16: [5 sc, dec] ×6 (36)
R17: [4 sc, dec] ×6 (30)
R18: [3 sc, dec] ×6 (24)
R19: [2 sc, dec] ×6 (18)
R20: [sc, dec] ×6 (12)
R21: dec ×6 (6)
Insert eyes between R11 and R12, 9 stitches apart. Stuff firmly after R17 and finish stuffing before R20.
Fasten off. Leave 20 cm tail.
Body
Yarn: rainbow gradient, starting yellow at top and ending purple at base — Source: Standard amigurumi math
R1: 6 sc in MR (6)
R2: inc ×6 (12)
R3: [sc, inc] ×6 (18)
R4: [2 sc, inc] ×6 (24)
R5: [3 sc, inc] ×6 (30)
R6: [4 sc, inc] ×6 (36)
R7: [5 sc, inc] ×6 (42)
R8–R12: sc around (42)
R13: [5 sc, dec] ×6 (36)
R14–R15: sc around (36)
R16: [4 sc, dec] ×6 (30)
R17: sc around (30)
R18: [3 sc, dec] ×6 (24)
R19: [2 sc, dec] ×6 (18)
R20: [sc, dec] ×6 (12)
R21: dec ×6 (6)
Stuff the lower half more firmly than the shoulder area so the tail does not pull the bird backward.
Fasten off. Leave 25 cm tail.
Layered Body Feather Scales
Yarn: yellow, green, blue, purple — Source: Standard amigurumi math
Make 24 half-circle scales.
R1: 6 sc in MR (6)
R2: inc ×6 (12)
R3: [sc, inc] ×6 (18)
Fold each circle in half with the wrong sides touching. Sew only the straight edge to the body so the rounded edge sits loose like a feather.
Fasten off. Leave 15 cm tail on each scale.
Color order: 6 yellow for upper chest, 6 green for middle chest, 6 blue for lower body, 6 purple for belly base.
Side Wings / Front Limbs
Yarn: rainbow gradient, mirrored pair — Source: Standard amigurumi math
Make 2.
R1: 6 sc in MR (6)
R2: inc ×6 (12)
R3: [sc, inc] ×6 (18)
R4: [2 sc, inc] ×6 (24)
R5–R7: sc around (24)
R8: [2 sc, dec] ×6 (18)
R9: [sc, dec] ×6 (12)
R10: sc around (12)
Flatten the wing without stuffing. Through both layers, work the edge feather row: [sl st, ch 7, sc in second ch from hook and next 5 chains, sl st in next stitch] ×6.
Fasten off. Leave 30 cm tail.
Back Feet / Legs
Yarn: red — Source: Standard amigurumi math
Make 2.
R1: 6 sc in MR (6)
R2: inc ×6 (12)
R3–R5: sc around (12)
R6: dec ×6 (6)
Flatten the foot. Add toes across the front edge: [ch 4, sl st in second ch from hook, sl st in next 2 chains, sl st into foot edge] ×3.
Fasten off. Leave 20 cm tail.
Crown Flame Plumes
Yarn: red, orange, yellow — Source: Standard shaped rows
Make 7: 3 tall red/orange flames, 2 medium orange/yellow flames, 2 side green-yellow flames.
Row 1: ch 5, sc in second ch from hook and next 3 chains (4)
Row 2: ch 1, turn, inc, sc 2, inc (6)
Rows 3–5: ch 1, turn, sc across (6)
Row 6: ch 1, turn, dec, sc 2, dec (4)
Row 7: ch 1, turn, sc across (4)
Row 8: ch 1, turn, dec ×2 (2)
Row 9: ch 1, turn, dec (1)
For taller center flames, repeat Rows 3–5 once more before Row 6.
Fasten off. Leave 25 cm tail.
Beak
Yarn: golden yellow — Source: Standard shaped rows
Make 2, one upper piece and one lower piece.
Row 1: ch 3, sc in second ch from hook and next chain (2)
Row 2: ch 1, turn, inc ×2 (4)
Row 3: ch 1, turn, sc across (4)
Row 4: ch 1, turn, dec ×2 (2)
Place the two diamonds together at the wide edge and sew only the side edges. Leave the base open for stitching to the face.
Fasten off. Leave 20 cm tail.
Cheek Patches
Yarn: pink — Source: Standard amigurumi math
Make 2.
R1: 6 sc in MR (6)
R2: inc ×6 (12)
Sl st to first stitch (12)
Do not stuff. Flatten with the yarn tail at the upper inside edge.
Fasten off. Leave 15 cm tail.
Flame Collar Accessory Ruff
Yarn: yellow, lime, and green — Source: Standard shaped rows
Make 10 petals.
Row 1: ch 4, sc in second ch from hook and next 2 chains (3)
Row 2: ch 1, turn, inc, sc, inc (5)
Row 3: ch 1, turn, sc across (5)
Row 4: ch 1, turn, dec, sc, dec (3)
Row 5: ch 1, turn, sc across (3)
Row 6: ch 1, turn, sc3tog (1)
Arrange the petals around the neck with points facing downward.
Fasten off. Leave 18 cm tail.
Long Tail Feathers
Yarn: red, orange, yellow, green, blue, purple — Source: Standard shaped rows
Make 7 feathers: 1 center tall, 2 upper medium, 2 side medium, 2 lower curved feathers.
Row 1: ch 7, sc in second ch from hook and next 5 chains (6)
Row 2: ch 1, turn, inc, sc 4, inc (8)
Row 3: ch 1, turn, sc across (8)
Row 4: ch 1, turn, inc, sc 6, inc (10)
Rows 5–7: ch 1, turn, sc across (10)
Row 8: ch 1, turn, dec, sc 6, dec (8)
Row 9: ch 1, turn, sc across (8)
Row 10: ch 1, turn, dec, sc 4, dec (6)
Row 11: ch 1, turn, sc across (6)
Row 12: ch 1, turn, dec, sc 2, dec (4)
Row 13: ch 1, turn, dec ×2 (2)
Row 14: ch 1, turn, dec (1)
For the center feather, add two extra 10-stitch rows after Row 7. For lower curved feathers, sew the base at a slight angle instead of changing the stitch count.
Fasten off. Leave 35 cm tail.
Assembly
- Pin the head to the body with the head centered over body R1–R7.
- Sew around the neck twice, then pull the yarn tail through the body and trim it at the base.
- Compress the body base against the table before adding tail pieces; the bird must sit without support.
- Set the beak between the eyes, with the beak center aligned between head R12 and R14.
- Sew cheek patches below the eye line, one stitch away from the beak edge.
- Attach the side wings between body R8 and R13, with feather points angled downward.
- Sew the red feet to the lower front of the body between body R17 and R20.
- Place the seven crown flames from tallest center to shortest sides along head R1–R5.
- Anchor the tail feathers to the back of the body between R8 and R14, tallest feather in the center.
- Sew the body scales from top to bottom, add the flame collar last, weave every tail through at least 3 cm of fabric, and trim.
The finished phoenix stands as a non-wired rainbow firebird with a layered crest, ruff, wings, scales, feet, cheeks, beak, and tail.
7 Technical Tips
- Stitch marker drift: A spiral marker that leans more than 3 stitches by R12 will shift the beak off center. Move the visual face center with pins instead of trusting the marker line.
- Stuffing firmness: A soft body collapses when the seven tail feathers are added. Pack the lower body to about 85% firmness before closing R18, then add small tufts through R20.
- Invisible decrease gaps: Front-facing holes appear when decreases are worked through both loops on the head. Work inv-dec through FLO only on R16–R21.
- Eye placement timing: The 18 mm washers become hard to install after the head drops below 30 stitches. Insert eyes after R15 and before starting R16.
- Velvet tension substitution: Velvet yarn can enlarge the crown flames by 20–30% compared with cotton. Drop the hook by 0.5 mm and test one flame before making all seven.
- Pinning failure: The tail will pull the phoenix backward if all feathers sit above body R8. Pin the center tail base across body R10–R14 and test the balance on a flat table.
- Tail weaving: Rainbow ends show through when they are woven straight across a color change. Weave each end into the matching color for at least 3 cm, then change direction once.
Conclusion
Run a final count before sewing: 42 stitches at the widest head round, 42 at the body round, two flat wings, two red feet, two cheeks, seven crown flames, seven tail feathers, and twenty-four body scales. Block the tail under a towel for ten minutes if the feathers twist. Next, photograph the bird from a three-quarter angle so the crest and tail both show, then save the pattern notes with yarn brands and eye size. Share the finished phoenix amigurumi crochet pattern project on Pinterest and Instagram with #RainbowPhoenixAmigurumi. Which tail row should carry the hottest red: the center feather or the upper left flame?










Disculpe no tendría el vídeo tutorial así me sería más fácil verificar si voy bien y aprendo mejor. Sobre todo cuando uso cadena ahí me equivoqué.po favor