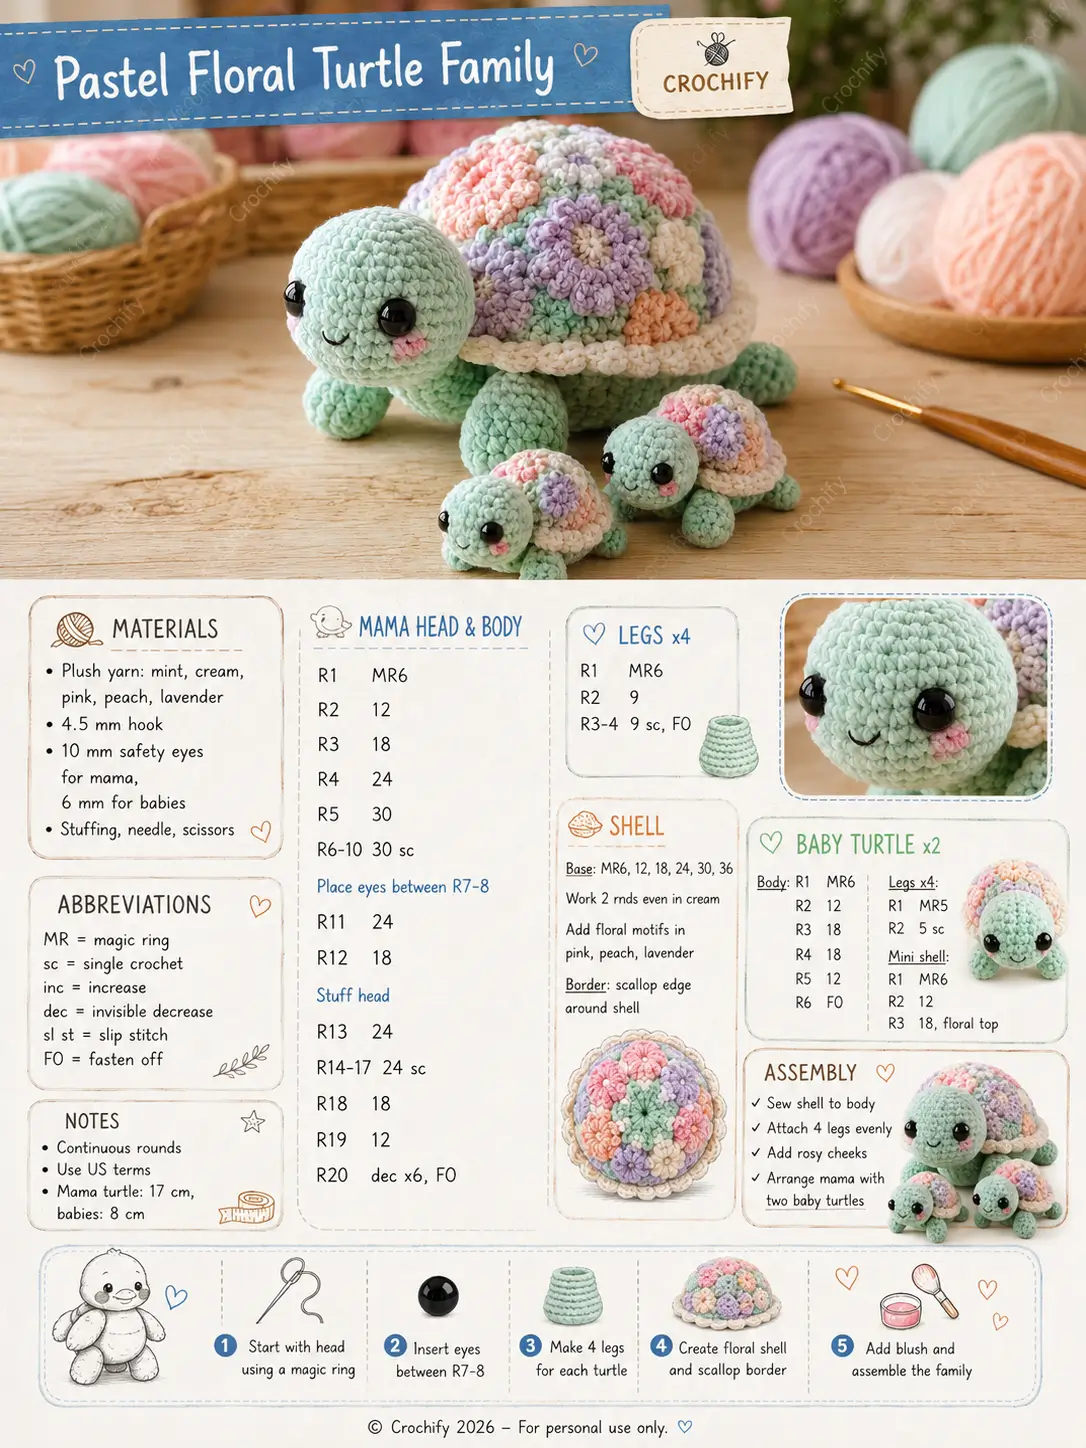
A turtle pattern breaks visually when the shell dome outruns the neck opening. This floral turtle amigurumi crochet pattern uses plush yarn, a 4.5 mm hook, and compact shaping to keep the face visible under a floral shell. The mother turtle finishes around 17 cm and the babies around 8 cm. The set suits an easy-intermediate maker who needs a matched display trio, gift set, or spring market sample.
The Design: What Makes This Turtle Different
You are balancing three proportions at once: a low shell, a forward head, and legs that keep the dome off the table. In this pastel turtle crochet pattern, the head widens to 30 stitches, then drops before the body expands again; that break creates a neck instead of a round ball with feet. The cream scallop rim matters too, because plush flower shapes blur into the mint body without a hard edge. The turtle reads correctly only when the shell stays broad and shallow. A second decision is family scaling. The baby turtle crochet pattern repeats the same silhouette in fewer rounds, so the babies look related rather than generic minis. One common failure shows up fast: too much stuffing in the shell top lifts the back edge and hides the head in side view.
Project Info at a Glance
| Skill Level | Time | Finished Size | Hook | Best For |
|---|---|---|---|---|
| Easy-intermediate | Weekend family set | Mama 17 cm; babies 8 cm | 4.5 mm | Shelf trio, spring gift, market sample |
Materials and Tools
Yarn
- Mint plush chenille — super bulky / velvet feel — about 60–80 g for the mother body and 15–20 g total for two babies — brand suggestion: Sweet Snuggles Lite or Parfait Chunky
- Cream plush chenille — same weight — about 20–25 g — shell rim and edging
- Pink plush chenille — same weight — about 8–10 g — floral shell accents
- Peach plush chenille — same weight — about 8–10 g — floral shell accents
- Lavender plush chenille — same weight — about 8–10 g — floral shell accents
Tools
- Hook 4.5 mm
- 10 mm safety eyes for mama
- 6 mm safety eyes for babies
- Polyester stuffing
- Yarn needle
- Stitch markers
- Small scissors
Abbreviations
MR / sc / inc / dec / sl st / ch / BLO / FO
Use invisible decrease through the front loops only so the closing rounds stay compact and the plush fabric does not split open at the seam line.
Pattern — Step by Step
Continuous spiral unless noted.
Head (Make 1)
Yarn: mint plush
R1: 6 sc in MR (6)
R2: inc ×6 (12)
R3: (sc, inc) ×6 (18)
R4: (2 sc, inc) ×6 (24)
R5: (3 sc, inc) ×6 (30)
R6: sc around (30)
R7: sc around (30)
R8: sc around (30)
R9: sc around (30)
R10: sc around (30)
Insert 10 mm safety eyes between R7 and R8, about 6 stitches apart. Add the embroidered smile now if you want the mouth centered before stuffing.
R11: (3 sc, dec) ×6 (24)
R12: (2 sc, dec) ×6 (18)
Stuff the head firmly before moving into the body section.
Do not fasten off.
Body (Continue from Head)
Yarn: mint plush
R13: (2 sc, inc) ×6 (24)
R14: sc around (24)
R15: sc around (24)
R16: sc around (24)
R17: sc around (24)
R18: (2 sc, dec) ×6 (18)
R19: (sc, dec) ×6 (12)
R20: dec ×6 (6)
Finish stuffing before the last two decreases. Close the opening with a tapestry needle if needed for a flatter underside.
Fasten off. Leave an 18 cm tail.
Front Legs (Make 2)
Yarn: mint plush
R1: 6 sc in MR (6)
R2: (inc, sc) ×3 (9)
R3: sc around (9)
R4: sc around (9)
Light stuffing only in the toe end keeps the leg round without lifting the shell.
Fasten off. Leave a 12 cm tail.
Back Legs (Make 2)
Yarn: mint plush
R1: 6 sc in MR (6)
R2: (inc, sc) ×3 (9)
R3: sc around (9)
R4: sc around (9)
Flatten lightly before sewing so the legs sit lower at the base.
Fasten off. Leave a 12 cm tail.
Tail (Make 1)
Yarn: mint plush
R1: 6 sc in MR (6)
R2: sc around (6)
Do not stuff. Flatten into a short wedge.
Fasten off. Leave a 10 cm tail.
Cheek Patches (Make 2)
Yarn: pale pink
R1: 6 sc in MR (6)
sl st to first st (6)
These sit beside the eyes, not under them. Keep the circles small so they do not cover the smile line.
Fasten off. Leave a short sewing tail.
Shell Base (Make 1)
Yarn: cream for the last two rounds; pastel colors for motif placement
R1: 6 sc in MR (6)
R2: inc ×6 (12)
R3: (sc, inc) ×6 (18)
R4: (2 sc, inc) ×6 (24)
R5: (3 sc, inc) ×6 (30)
R6: (4 sc, inc) ×6 (36)
R7: sc around in cream (36)
R8: sc around in cream (36)
This creates the stable shell disc. Keep the disc flat; any curling here will distort the dome once the flowers are added.
Fasten off. Leave a 25 cm tail.
Floral Motifs (Make 7)
Yarn: pink, peach, lavender, cream
R1: 6 sc in MR (6)
Join with sl st (6)
R2: (sl st in next st, ch 2, 2 dc, ch 2, sl st in same st) ×6 (6 petals)
Make one cream-centered motif, then vary the other six in pink, peach, and lavender. Arrange one in the center and six around it before sewing.
Fasten off. Leave a 10 cm tail on each motif.
Scallop Border (Work Around Shell Base)
Yarn: cream
Join cream to the outer edge of the shell base.
Edging Round: (sl st in next st, skip 1 st, 5 dc in next st, skip 1 st) repeat around (12 scallops)
If the edge starts to cup, your dc stitches are too tight. Relax the last pull-through on each dc so the scallops stay open.
Fasten off. Weave in the starting tail.
Baby Turtle Body (Make 2)
Yarn: mint plush
R1: 6 sc in MR (6)
R2: inc ×6 (12)
R3: (sc, inc) ×6 (18)
R4: sc around (18)
R5: (sc, dec) ×6 (12)
R6: dec ×6 (6)
Insert 6 mm eyes between R3 and R4, about 4 stitches apart. Stuff lightly before R6 so the baby head stays soft and low.
Fasten off. Leave a 15 cm tail.
Baby Legs (Make 8)
Yarn: mint plush
R1: 6 sc in MR (6)
R2: sc around (6)
Do not stuff. Flatten slightly before sewing.
Fasten off. Leave an 8 cm tail.
Baby Mini Shell (Make 2)
Yarn: cream + pastel accents
R1: 6 sc in MR (6)
R2: inc ×6 (12)
R3: (sc, inc) ×6 (18)
Add 3 mini floral motifs or embroider simple petal clusters in pink, peach, and lavender. Finish with a small cream scallop border if you want the babies to match the mother exactly.
Optional Mini Border: (sl st in next st, skip 1 st, 3 dc in next st, skip 1 st) repeat around (6 scallops)
Fasten off. Leave a 15 cm tail.
Assembly
- Close the mother body opening and shape the neck with your fingers so the head tilts slightly forward.
- Sew the two cheek patches beside the eyes and add the small smile if you did not embroider it earlier.
- Attach the front legs low on the body, roughly aligned with the lower edge of the head.
- Attach the back legs evenly behind the front pair so the body sits level.
- Sew the tail at the back center between the rear legs.
- Pin the shell base on the back at four points: front, back, left, and right.
- Stitch the shell base down first, then sew the seven floral motifs onto the top in a centered cluster.
- Work or secure the cream scallop border so it sits just proud of the shell edge.
- Assemble each baby by attaching four mini legs, then sewing the mini shell onto the back.
- Position both babies beside the mother, check that all three heads face forward, and trim any loose chenille bloom around the eyes.
The family set is complete when the shell rim sits flat and all three turtles stay upright without rolling.
7 Technical Tips
- Marker drift: If your stitch marker shifts by one stitch during the mother body, the shell will sit off-center and the legs will look uneven. Reset the marker at every increase or decrease round instead of trusting the original placement.
- Stuffing firmness: Overfilling the head makes the neck line vanish after the shell goes on. Stop when the head feels full but still compresses by about 1 cm under thumb pressure.
- Invisible decrease: Plush yarn opens fast on standard decreases, especially at R18–R20 on the mother body. Work front-loop-only decreases and tighten the final pull-through after every second decrease.
- Eye placement timing: Put the mother eyes in before R11 and the baby eyes before R5. If you wait until the closing rounds, the washers are harder to seat and the face angle shifts downward.
- Velvet tension: Chenille hides stitches, which makes shell rounds easy to overwork. Count after every round on the shell base or the 36-st edge will not divide cleanly for the scallops.
- Pinning order: Pin the shell at 12, 3, 6, and 9 o’clock before sewing anything permanent. That keeps the dome centered and stops one side from creeping forward by a full stitch.
- Tail weaving: A short tail can pull loose if you only knot it at the seam. Run the yarn end 3–4 cm through the body center, then back out one stitch over before trimming.
Conclusion
Next, cut the mint body yarn for all three turtles before you start the first magic ring, then batch the legs so the family keeps one scale and one tension. Photograph the finished trio from above, save that image to Pinterest, and post the set on Instagram with #PastelFloralTurtleFamily. Add the hook size and eye size in the caption so the proportions read clearly to other makers. The last pass is mechanical: check rim symmetry, confirm the babies match the mother’s face angle, and trim any fiber bloom around the eye stems. That gives you a clean floral turtle amigurumi crochet pattern with a readable family likeness. Did you place the shell flowers as six around one center, or did you stagger them for a fuller dome?









