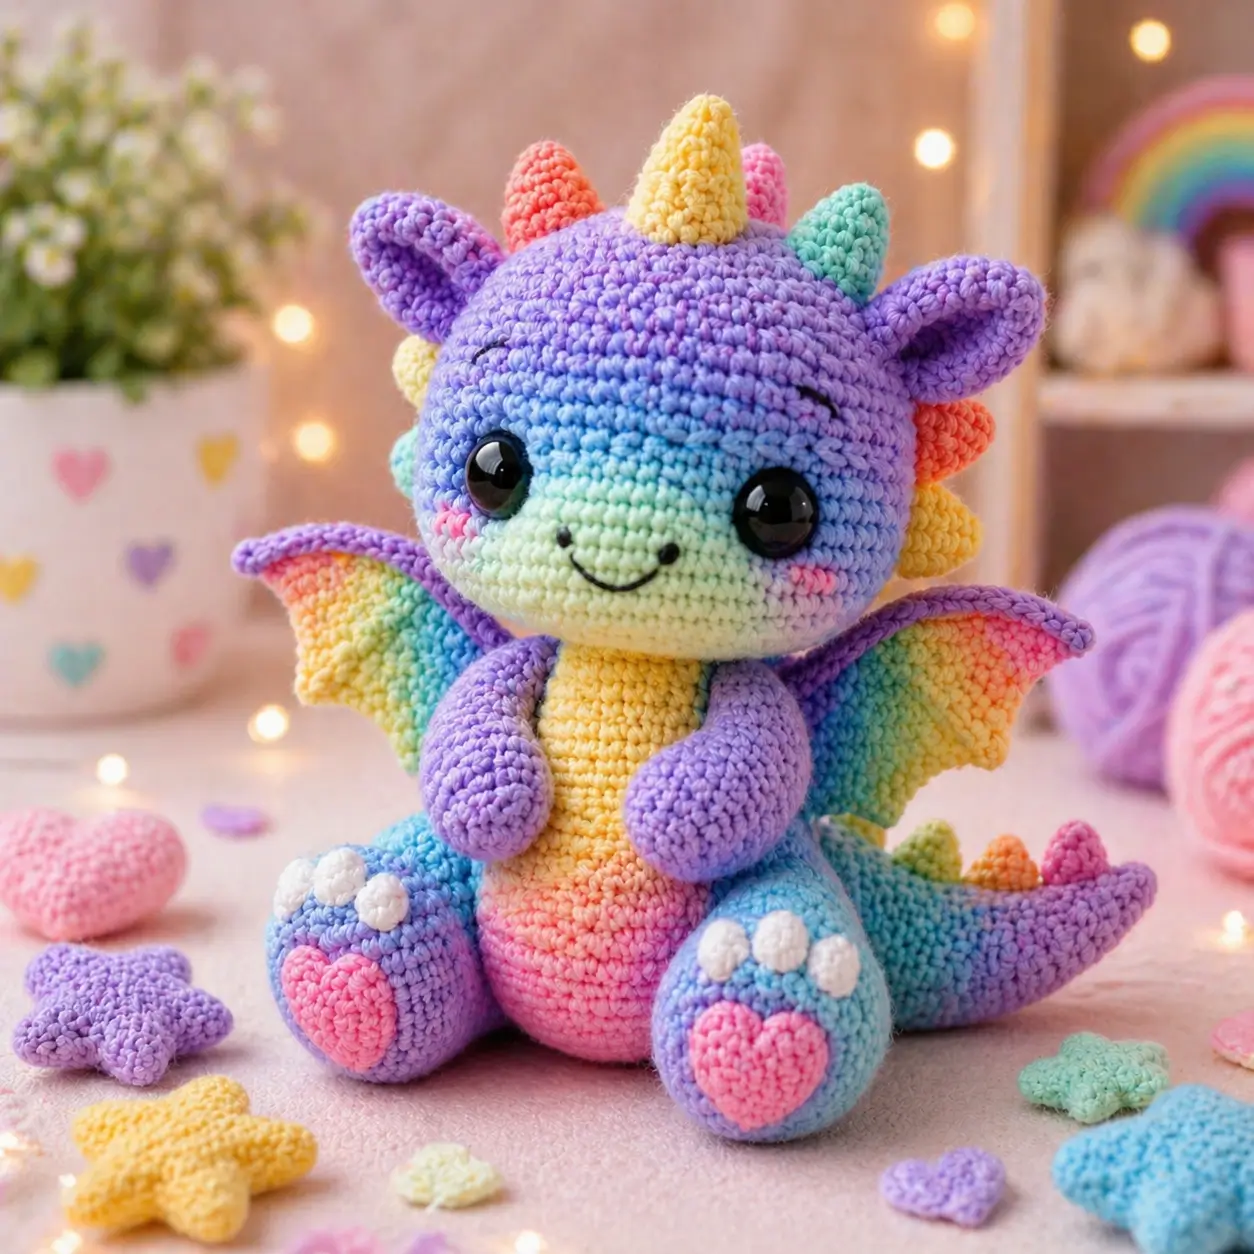
A rainbow dragon amigurumi crochet pattern has one unusual constraint: the yellow horn, candy spikes, and bat wings must balance a heavy lavender head. This build uses DK cotton, a 2.5 mm hook, and 12 mm eyes to make an 18–20 cm seated dragon at intermediate level. Make it when you need a photo-ready fantasy toy with stable legs, visible wing membranes, and a tail that supports the back.
The Design: What Makes This Dragon Different
This pastel dragon amigurumi needs three structural decisions before the first round. First, the head stays wider than the body, but it stops at a 36-stitch plateau so the ears, horn, and spikes do not drag it backward. Next, the wings are folded circles with a purple border; that gives a crochet dragon with wings enough surface area without wire. Finally, the back legs carry heart pads and toe beans, so they must sit forward enough to show in front-view photos. A common maker mistake is treating the tail as decoration. The tail is a third balance point. The maker should pin it before sewing the wings, because wing weight changes the seated angle.
Project Info at a Glance
| Skill Level | Time | Finished Size | Hook | Best For |
|---|---|---|---|---|
| Intermediate | 6–8 hours | 18–20 cm | 2.5 mm | Display toy, nursery shelf, photo prop |
Materials and Tools
Yarn
- Lavender-blue main color — sport/DK cotton — 50–56 g — Yarn and Colors Must-Have, Scheepjes Catona, or Schachenmayr Catania.
- Yellow belly and horn — sport/DK cotton — 12–25 g — use a clean pastel yellow.
- Pink paw hearts and cheeks — sport/DK cotton — 8–12 g — choose a firm cotton for applique edges.
- Mint, teal, coral, and purple accents — sport/DK cotton — 24–35 g combined — split across spikes, wings, and tail.
- White toe beans — sport/DK cotton — 4–6 g — keep the same yarn weight as the feet.
- Black embroidery thread — mouth and nostrils — one short strand is enough.
Tools
- Hook 2.5 mm
- 12 mm black safety eyes
- Polyester stuffing
- Tapestry needle
- Locking stitch markers
- Pins
- Scissors
Abbreviations
- MR = magic ring
- sc = single crochet
- inc = 2 sc in one stitch
- dec = invisible decrease
- sl st = slip stitch
- ch = chain
- BLO = back loop only
- FLO = front loop only
- hdc = half double crochet
- dc = double crochet
Work invisible decreases through the front loops only so the fabric closes without a raised bar.
Pattern — Step by Step
Continuous spiral unless noted. Counts are written in brackets.
Head
Yarn: lavender-blue main color.
R1: 6 sc in MR (6)
R2: inc ×6 (12)
R3: (sc, inc) ×6 (18)
R4: (2 sc, inc) ×6 (24)
R5: (3 sc, inc) ×6 (30)
R6: (4 sc, inc) ×6 (36)
R7–R13: sc around (36)
R14: (4 sc, dec) ×6 (30)
R15: sc around (30)
R16: (3 sc, dec) ×6 (24)
R17: (2 sc, dec) ×6 (18)
R18: (sc, dec) ×6 (12)
R19: dec ×6 (6)
Insert 12 mm safety eyes between R9 and R10, 8 stitches apart. Stuff firmly after R16.
Fasten off. Leave a 20 cm tail.
Body
Yarn: lower body pink, upper body lavender-blue, optional yellow belly patch added later.
R1: 6 sc in MR with pink (6)
R2: inc ×6 (12)
R3: (sc, inc) ×6 (18)
R4: (2 sc, inc) ×6 (24)
R5: (3 sc, inc) ×6 (30)
R6–R8: sc around (30)
R9: change to lavender-blue, sc around (30)
R10–R11: sc around (30)
R12: (3 sc, dec) ×6 (24)
R13: sc around (24)
R14: (2 sc, dec) ×6 (18)
R15: (sc, dec) ×6 (12)
R16: dec ×6 (6)
Stuff the lower body firmly and the neck area lightly.
Fasten off. Leave a 25 cm tail for sewing.
Arms / Front Legs
Make 2. Yarn: lavender with optional purple tip.
R1: 6 sc in MR (6)
R2: inc ×6 (12)
R3–R7: sc around (12)
R8: dec ×6 (6)
Stuff the lower half only. Flatten the top before sewing.
Fasten off. Leave a 20 cm tail on each arm.
Back Legs
Make 2. Yarn: blue-lavender gradient.
R1: 6 sc in MR (6)
R2: inc ×6 (12)
R3: (sc, inc) ×6 (18)
R4–R6: sc around (18)
R7: (sc, dec) ×6 (12)
R8–R9: sc around (12)
R10: dec ×6 (6)
Stuff each foot firmly at the front and lightly at the top.
Fasten off. Leave a 25 cm tail on each leg.
Side Ears
Make 2. Yarn: purple outer, lavender inner optional.
R1: 6 sc in MR (6)
R2: inc ×6 (12)
R3: (sc, inc) ×6 (18)
R4–R5: sc around (18)
R6: (sc, dec) ×6 (12)
Do not stuff. Fold flat so the ear forms a soft oval triangle.
Fasten off. Leave a 20 cm tail.
Wings
Make 2. Yarn: yellow, mint, teal, coral, and purple border.
R1: 6 sc in MR with yellow (6)
R2: inc ×6 (12)
R3: change to mint, (sc, inc) ×6 (18)
R4: change to teal, (2 sc, inc) ×6 (24)
R5: change to coral, (3 sc, inc) ×6 (30)
R6: change to yellow, (4 sc, inc) ×6 (36)
Fold the circle in half with the right side facing out. Join purple at the fold edge.
Border: sc through both layers across 18 stitches, then work ch 3, sl st into the next stitch at each valley along the curved edge (18 edge stitches).
Do not stuff. Keep both wings the same color order.
Fasten off. Leave a 30 cm tail.
Tail
Yarn: teal at base, lavender-purple toward tip.
R1: 6 sc in MR with purple (6)
R2: sc around (6)
R3: inc ×6 (12)
R4–R5: sc around (12)
R6: change to teal, (sc, inc) ×6 (18)
R7–R14: sc around (18)
Stuff lightly from the base only. The tip should bend upward.
Fasten off. Leave a 30 cm tail.
Horn and Back Spikes
Center Horn
Yarn: yellow.
R1: 6 sc in MR (6)
R2: sc around (6)
R3: inc ×6 (12)
R4: sc around (12)
R5: (sc, inc) ×6 (18)
R6: sc around (18)
Stuff lightly so the horn keeps a blunt cone shape.
Fasten off. Leave a 20 cm tail.
Back Spikes
Make 7. Yarn: coral, pink, mint, teal, purple, and yellow.
R1: 6 sc in MR (6)
R2: sc around (6)
R3: inc ×6 (12)
R4: sc around (12)
Flatten each spike. Do not stuff.
Fasten off. Leave a 15 cm tail on each spike.
Cheek Patches
Make 2. Yarn: pink.
R1: 6 sc in MR (6)
R2: inc ×6 (12)
Sl st to close (12).
Fasten off. Leave a 12 cm sewing tail.
Heart Paw Pads and Toe Beans
Heart Paw Pads
Make 2. Yarn: pink.
R1: 6 sc in MR (6)
R2: inc ×6 (12)
R3: sc, 3 hdc in next st, sc 2, sl st, sc 2, 3 hdc in next st, sc 3, sl st (16 edge stitches)
Pinch the lower point with one stitch when sewing.
Fasten off. Leave a 15 cm tail.
Toe Beans
Make 6. Yarn: white.
R1: 6 sc in MR (6)
Sl st to close (6).
Fasten off. Leave a 10 cm tail on each toe bean.
Belly Patch
Yarn: yellow.
R1: ch 7, sc in 2nd ch from hook, 4 sc, 3 sc in last ch, work underside, 4 sc, inc in final base stitch (14)
R2: inc, 4 sc, inc ×3, 4 sc, inc ×2 (20)
R3: sc around (20)
Fasten off. Leave a 30 cm tail.
Table Stars and Heart Props
Yarn: scrap yellow, purple, mint, and pink.
Six-Point Star
R1: 6 sc in MR (6)
R2: inc ×6 (12)
R3: *sl st, ch 3, sc in 2nd ch from hook, hdc in next ch, sl st in next base stitch* ×6 (6 points)
Fasten off. Weave ends.
Small Heart
R1: 6 sc in MR (6)
R2: inc ×6 (12)
R3: sc, 3 hdc in next st, sc 2, sl st, sc 2, 3 hdc in next st, sc 3, sl st (16 edge stitches)
Fasten off. Weave ends.
Assembly
- Sew the head to the body with the face centered over the yellow belly area.
- Check that the neck seam holds the head upright before adding the ears.
- Sew the cheek patches below the eyes, one round outside each eye line.
- Embroider two small nostrils and a curved mouth with black thread.
- Attach the arms to the upper body at the shoulder line, angled toward the belly.
- Sew the back legs to the lower front of the body so the heart pads face forward.
- Attach the tail to the lower back and test the seated angle on a flat surface.
- Sew the horn between the top-center head stitches, then add side ears.
- Sew the spikes from forehead to tail in a rainbow order.
- Attach the wings two rounds below the neck seam, then place the loose stars and hearts around the finished toy.
The completed toy is a seated pastel dragon with visible wings, balanced tail support, and front-facing heart paw pads.
7 Technical Tips
- Marker drift: If the marker moves more than 2 stitches across the face by R13, the eye line will slant. Move the marker only after counting 36 stitches.
- Stuffing hollow: A head that dents under light finger pressure will pull the safety eyes inward after the washers lock. Add pea-sized tufts until R17 holds a smooth sphere, then stop before R18.
- Invisible decrease ridge: Back-loop decreases create a raised stripe across the forehead close. Work each dec through the front loops on R14–R19.
- Eye placement timing: Installing 12 mm safety eyes after R14 leaves too little space for the washers. Place them between R9 and R10, 8 stitches apart, before the head narrows.
- Wing curl: A wing edge that flips more than 1 cm forward means the purple border is too tight. Add one extra chain at each scallop valley on the second wing.
- Pinning mismatch: If the left back leg sits one round higher than the right, the toy tilts toward its tail. Pin both back legs across body R6–R8 before sewing.
- Tail weaving: A tail end shorter than 15 cm can pull out of DK cotton after handling. Leave 20 cm and weave through three separate stitch paths inside the body.
Conclusion
Treat the finished dragon as a proportion test, not only a color project. Check the head balance, wing symmetry, horn angle, and tail contact before weaving the last ends. For the next sample, keep the same 36-stitch head but change the spike order from yellow-pink-teal to teal-pink-yellow so the back reads cleanly in photos. This rainbow dragon amigurumi crochet pattern is ready for a WordPress pattern card, a Pinterest process pin, and an Instagram carousel showing the wing edge close-up. Share it with #RainbowDragon. Which detail should carry the strongest color: the center horn, the cheek patches, or the heart paw pads?









