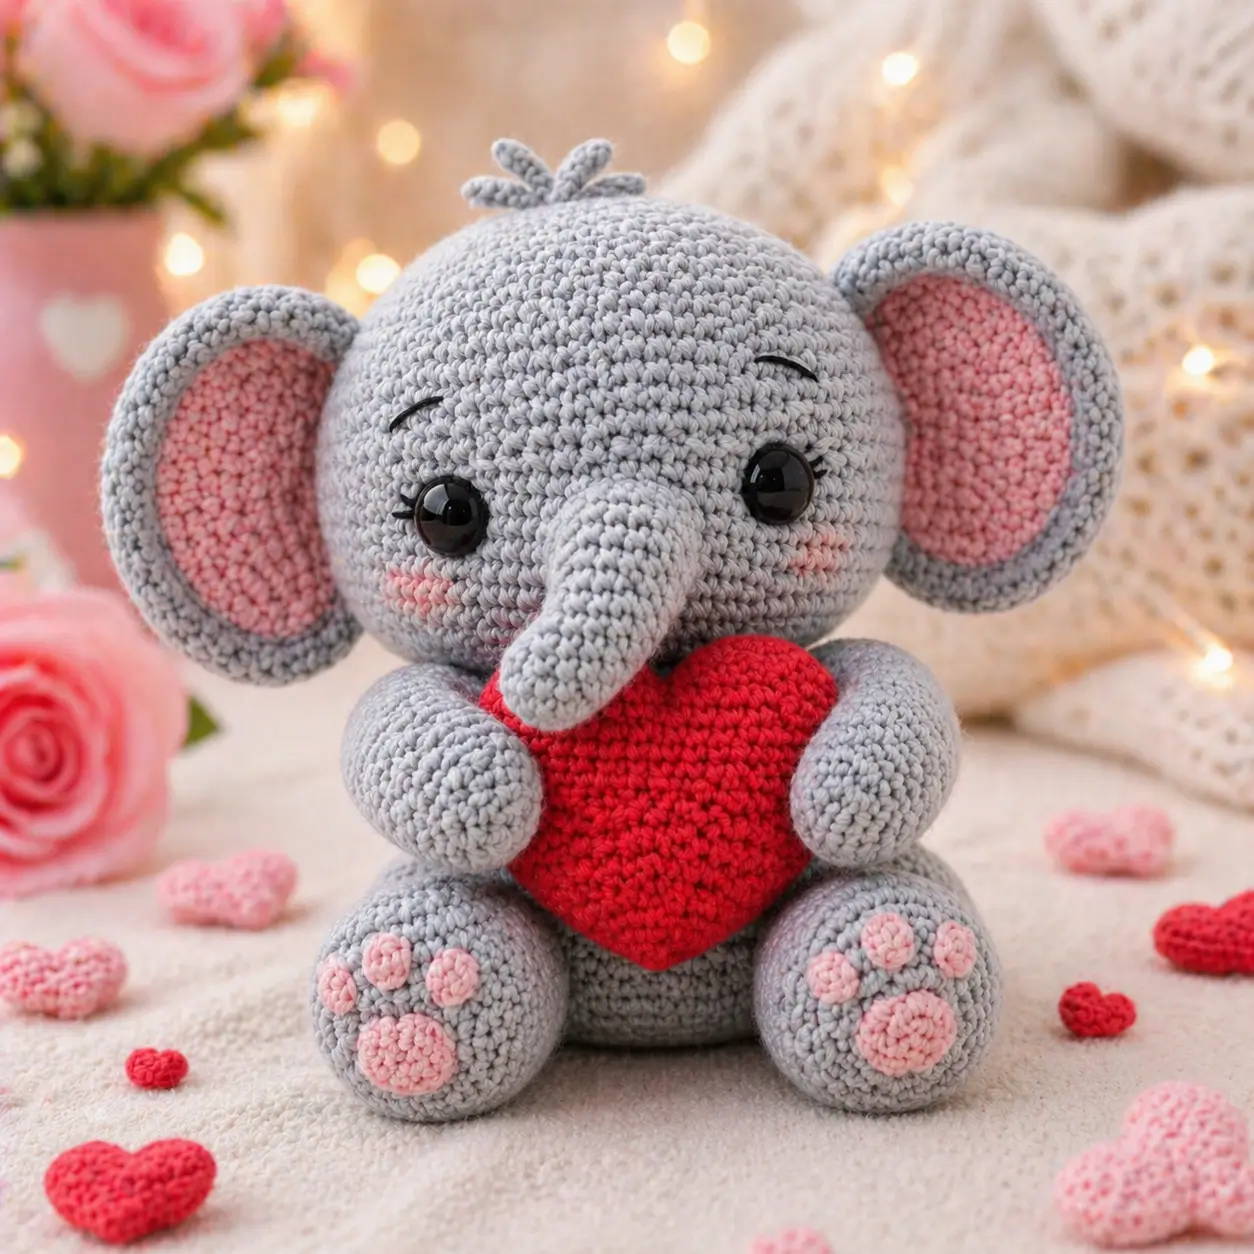
An elephant’s trunk changes the center line before the face is finished. This elephant amigurumi crochet pattern builds a gray sitting toy with pink ears, paw pads, a red heart, and embroidered lashes. Use worsted yarn, a 3.5 mm hook, 12 mm eyes, and intermediate shaping for an 18–20 cm sitter. Make it when the project needs a Valentine prop without changing the animal’s base form.
The Design: What Makes This Elephant Different
You control three proportions first: ear diameter, trunk width, and the distance between the feet. The ears need almost the same visual width as the head, so the outer ear reaches a 36-stitch round while the inner ear stops smaller. That leaves a gray rim like the photo. The trunk stays narrow for six rounds, then flares at the base so it reads as elephant anatomy instead of a short snout. Small choice. Large effect. For this crochet elephant with heart, the body remains compact because the red heart covers the chest and would hide a long torso. A common maker mistake is placing ears too low; the amigurumi elephant pattern then tilts backward because the head carries too much side weight.
Project Info at a Glance
| Skill Level | Time | Finished Size | Hook | Best For |
|---|---|---|---|---|
| Intermediate | 2 sessions | 18–20 cm sitting | 3.5 mm | Valentine display, nursery shelf, market table sample |
The size and hook choice align with published elephant ranges from 16–20 cm for sport/DK and larger 12-inch worsted builds; this version uses a medium 36-stitch plateau to match the photo scale.
Materials and Tools
Yarn
- Light gray — worsted #4 or firm DK/light-worsted — 100–121 g — Paintbox Cotton DK, Stylecraft Special DK, or Loops & Threads Impeccable
- Soft pink — same yarn weight — 16–25 g — inner ears, cheek patches, paw pads
- Red — same yarn weight — 10–15 g — chest heart
- Black embroidery thread — small amount — lashes and brows
Tools
- Hook 3.5 mm
- 12 mm black safety eyes
- Polyester stuffing
- Yarn needle
- Stitch markers
- Pins
- Scissors
- Disappearing fabric marker
Abbreviations
MR = magic ring; sc = single crochet; inc = increase; dec = decrease; sl st = slip stitch; ch = chain; BLO = back loop only; st = stitch; R = round.
Invisible decrease works through the front loops of the next two stitches and reduces bulk on closing rounds.
Pattern — Step by Step
Continuous spiral unless noted. Use a stitch marker at the first stitch of every round.
Head
Yarn: light gray
R1: 6 sc in MR (6)
R2: inc ×6 (12)
R3: (sc, inc) ×6 (18)
R4: (2 sc, inc) ×6 (24)
R5: (3 sc, inc) ×6 (30)
R6: (4 sc, inc) ×6 (36)
R7–R14: sc around (36)
R15: (4 sc, dec) ×6 (30)
R16: sc around (30)
R17: (3 sc, dec) ×6 (24)
Place eyes between R10 and R11, 8–9 stitches apart. Do not lock the backs until the trunk is pinned.
R18: (2 sc, dec) ×6 (18)
R19: (sc, dec) ×6 (12)
Stuff firmly, especially around the eye line and lower face.
R20: dec ×6 (6)
Fasten off. Leave 20 cm tail and close the hole.
Body
Yarn: light gray
R1: 6 sc in MR (6)
R2: inc ×6 (12)
R3: (sc, inc) ×6 (18)
R4: (2 sc, inc) ×6 (24)
R5: (3 sc, inc) ×6 (30)
R6: (4 sc, inc) ×6 (36)
R7–R12: sc around (36)
R13: (4 sc, dec) ×6 (30)
R14: sc around (30)
R15: (3 sc, dec) ×6 (24)
R16: sc around (24)
R17: (2 sc, dec) ×6 (18)
R18: sc around (18)
R19: (sc, dec) ×6 (12)
Stuff the base firmly and the neck area medium-firm so the head sits upright.
R20: dec ×6 (6)
Fasten off. Leave 30 cm tail for sewing.
Arms / Front Legs
Yarn: light gray
Make 2.
R1: 6 sc in MR (6)
R2: inc ×6 (12)
R3: (sc, inc) ×6 (18)
R4–R5: sc around (18)
R6: (sc, dec) ×6 (12)
R7–R10: sc around (12)
Stuff the rounded paw firmly. Leave the upper arm lightly filled.
Flatten the top and sc through both layers across 6 sts (6).
Fasten off. Leave 22 cm tail.
Back Legs / Feet
Yarn: light gray
Make 2.
R1: 6 sc in MR (6)
R2: inc ×6 (12)
R3: (sc, inc) ×6 (18)
R4: (2 sc, inc) ×6 (24)
R5–R7: sc around (24)
R8: (2 sc, dec) ×6 (18)
R9: (sc, dec) ×6 (12)
Stuff firmly enough to hold a seated base.
R10: dec ×6 (6)
Fasten off. Leave 25 cm tail and close.
Outer Ears
Yarn: light gray
Make 2.
R1: 6 sc in MR (6)
R2: inc ×6 (12)
R3: (sc, inc) ×6 (18)
R4: (2 sc, inc) ×6 (24)
R5: (3 sc, inc) ×6 (30)
R6: (4 sc, inc) ×6 (36)
R7: sc around (36)
Sl st to finish. Fasten off with a 35 cm tail.
Inner Ear Patches
Yarn: soft pink
Make 2.
R1: 6 sc in MR (6)
R2: inc ×6 (12)
R3: (sc, inc) ×6 (18)
R4: (2 sc, inc) ×6 (24)
R5: (3 sc, inc) ×6 (30)
Sl st to finish. Fasten off with a 30 cm tail.
Sew each pink patch centered on an outer ear, leaving one gray round visible.
Trunk
Yarn: light gray
R1: 6 sc in MR (6)
R2–R6: sc around (6)
R7: inc ×6 (12)
R8–R10: sc around (12)
Stuff only the base. Leave the tip unstuffed so it angles downward without a hard point.
Fasten off. Leave 25 cm tail.
Cheek Patches
Yarn: soft pink
Make 2.
R1: 6 sc in MR (6)
R2: inc ×6 (12)
Sl st to finish. Fasten off with 15 cm tail.
Flatten before sewing; these are blush patches, not stuffed circles.
Foot Paw Pads
Yarn: soft pink
Large pads: make 2.
R1: 6 sc in MR (6)
R2: inc ×6 (12)
R3: (sc, inc) ×6 (18)
Sl st to finish. Fasten off with 20 cm tail.
Toe pads: make 6.
R1: 6 sc in MR (6)
Sl st to finish. Fasten off with 12 cm tail.
Sew three toe pads above each large pad.
Heart Accessory
Yarn: red
Make first lobe.
R1: 6 sc in MR (6)
R2: inc ×6 (12)
R3: sc around (12)
Fasten off.
Make second lobe.
R1: 6 sc in MR (6)
R2: inc ×6 (12)
R3: sc around (12)
Do not fasten off.
Join the lobes.
R4: sc around second lobe, then sc around first lobe (24)
R5: sc around (24)
R6: (2 sc, dec) ×6 (18)
R7: sc around (18)
R8: (sc, dec) ×6 (12)
Stuff lightly; the heart should stay flat enough for the arms to hold it.
R9: dec ×6 (6)
Fasten off. Leave 30 cm tail and close.
Hair Tuft
Yarn: light gray
Make 4 strands.
Ch 7. Starting in second ch from hook, 2 sc in each ch across (12).
Fasten off. Repeat until 4 curls are made.
Tie the four tails together at the base and sew to the top center of the head between R1 and R2.
Eyebrows and Lashes
Yarn/thread: black embroidery thread
Make two shallow brow lines above the eyes, each 3 stitches wide. Add two short lash stitches at the outside edge of each eye. Keep the thread tension light; a tight pull will dent the eye socket more than the photo shows.
Assembly
- Pin the head to the body with the trunk line centered over the body’s front decrease line.
- Sew the body to the head using the body tail, passing through both closed surfaces in small ladder stitches.
- Pin the trunk between the eyes with the top edge around R12 and the lower edge around R15.
- Sew the trunk base flat, leaving the narrow tip loose and pointing downward.
- Sew cheek patches below the eye line, one on each side of the trunk.
- Sew ears to the sides of the head from about R7 to R13, with the pink patches facing forward.
- Attach arms at the upper body sides so they angle inward over the heart.
- Sew back legs to the lower front body, then add the large paw pads and three toe pads to each foot.
- Place the heart between the arms and stitch it to the body at four hidden points: top, bottom, left, and right.
- Sew on the hair tuft, embroider brows and lashes, then weave every tail through at least 3 cm of fabric.
The finished toy is a seated gray elephant with pink ear panels, visible paw pads, and a held red heart.
7 Technical Tips
- Marker drift failure: A spiral round shifts right by about one stitch every few rounds. Move the marker to the visual center before pinning the trunk, or the trunk will sit 3–4 mm off line.
- Stuffing firmness failure: Understuffed feet collapse under the body and tilt the elephant backward. Pack each back foot to about 80% firmness before R9 closes.
- Invisible decrease ridge: Standard decreases leave a diagonal bar on R18–R20 of the head. Use front-loop invisible decreases on those rounds so the face stays smooth.
- Eye placement timing: Place the eyes between R10 and R11 before closing past R17. The spacing should be 8–9 stitches, measured across the front between posts.
- Velvet tension substitution: Velvet or chenille yarn can worm out if the stitch height changes by more than 1 mm. Drop to a smaller hook and test a 12-stitch tube before making the trunk.
- Ear pinning failure: Large ears sag when attached only at the top. Pin a 6-round ear along a 7-round head span, then sew from top to bottom and back up again.
- Heart rotation failure: A single top stitch lets the heart swing sideways. Anchor the heart at four points and weave the final red tail 3 cm upward inside the body.
Conclusion
Block the ears first, then sew the heart after both arms are attached; that order keeps the front view balanced. The next practical step is to make a gray 6-round swatch with the chosen hook and check for gaps before starting the head. Share the finished front-facing photo on Pinterest and post a side-view reel on Instagram so the ear thickness and trunk angle are visible. Use #ElephantWithHeart. This elephant amigurumi crochet pattern depends on one design choice more than the others: should the trunk hang straight over the heart, or curve slightly toward one cheek?









