Introduction
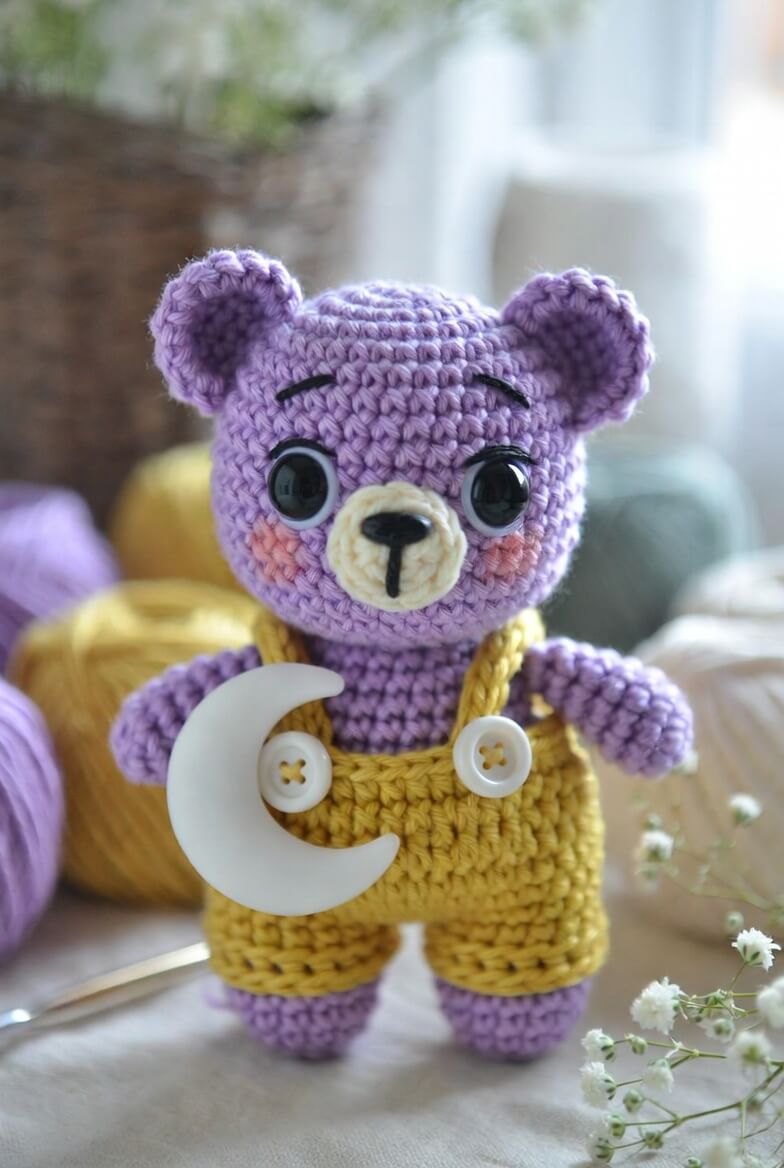
A crescent moon covers one overall strap unless its inner curve is aligned with the bear’s chest. This purple teddy bear amigurumi crochet pattern sets the moon, bib and buttons as one measured assembly. Use DK yarn, a 3 mm hook and 15 mm safety eyes. The finished bear stands approximately 25 cm tall and is an intermediate project designed for stable feet, removable clothing and controlled facial placement.
The Design: What Makes Luna the Bear Different
Luna’s head reaches 42 stitches, giving the large eyes enough surrounding fabric without producing a narrow forehead. The muzzle is attached separately and remains shallow, which keeps the nose close to the face rather than projecting like a snout. Round ears are sewn high on the sides so their lower edges remain visible above the overall straps.
The body uses a 36-stitch lower section with short, broad legs. That proportion creates four reliable support points when the bear stands. Mustard overalls are made separately and pulled over the completed legs, allowing the fit to be adjusted before the bib is attached. A frequent mistake in a teddy bear in overalls crochet pattern is sewing both straps before positioning the crescent. The accessory then hides a button or twists the bib. Pin the moon first, mark both button locations and attach the straps around those coordinates.
Project Info at a Glance
| Skill Level | Time | Finished Size | Hook | Best For |
|---|---|---|---|---|
| Intermediate | 9–11 hours | Approximately 25 cm standing | 3 mm | Nursery displays, celestial collections and dressed amigurumi sets |
Materials and Tools
Yarn
- Lavender purple — DK or light-worsted yarn — approximately 100 g — for the head, body, ears and limbs
- Mustard yellow — DK or light-worsted yarn — approximately 55 g — for the overalls
- Cream white — DK yarn — approximately 20 g — for the muzzle and crescent moon
- Blush pink — DK yarn or embroidery thread — approximately 3 g — for the cheek patches
- Black — embroidery floss — a small quantity for the mouth, eyebrows and eyelashes
- White — embroidery floss — a small quantity for optional eye highlights
Yarn consumption changes with tension and overall length. Keep at least 10 g of additional mustard yarn available when the straps need to be extended around a deeper body.
Tools
- 3 mm crochet hook
- 15 mm safety eyes
- 10–12 mm safety nose
- Two white buttons measuring 18–20 mm
- Polyester stuffing
- Yarn needle
- Locking stitch markers
- Dressmaking pins
- Scissors
- Row counter
- Optional plastic canvas foot inserts
Plastic eyes, noses and detachable buttons are not suitable for a toy intended for a child under three. Replace those elements with firmly embroidered details.
Abbreviations
- MR — magic ring
- sc — single crochet
- inc — two single crochets in one stitch
- dec — invisible decrease over the next two stitches
- sl st — slip stitch
- ch — chain
- BLO — back loop only
- FLO — front loop only
- hdc — half double crochet
- dc — double crochet
- st/sts — stitch or stitches
An invisible decrease is worked through the front loops of the next two stitches before completing one single crochet.
Pattern — Step by Step
Work in a continuous spiral unless a section states otherwise. Place a marker in the first stitch of every round.
Head
Yarn: lavender purple — standard six-stitch amigurumi shaping.
R1: 6 sc in MR (6)
R2: inc ×6 (12)
R3: (sc, inc) ×6 (18)
R4: (2 sc, inc) ×6 (24)
R5: (3 sc, inc) ×6 (30)
R6: (4 sc, inc) ×6 (36)
R7: (5 sc, inc) ×6 (42)
R8–R15: sc around (42)
Place the safety-eye posts between R12 and R13 with approximately nine visible stitches between them. Do not install the washers until the muzzle has been pinned.
R16: (5 sc, dec) ×6 (36)
R17: (4 sc, dec) ×6 (30)
R18: (3 sc, dec) ×6 (24)
R19: (2 sc, dec) ×6 (18)
Stuff the crown and sides firmly. Add small pieces around the eye posts to prevent deep circular dents.
R20: (sc, dec) ×6 (12)
R21: dec ×6 (6)
Fasten off. Leave a 20 cm tail and close the opening through the front loops.
Muzzle
Yarn: cream white.
R1: 6 sc in MR (6)
R2: inc ×6 (12)
R3: (sc, inc) ×6 (18)
R4: BLO sc around (18)
R5: sc around (18)
Insert the safety nose between R3 and R4. Stuff the muzzle lightly so it forms a shallow oval rather than a sphere.
Fasten off. Leave a 30 cm sewing tail.
Body
Yarn: lavender purple.
R1: 6 sc in MR (6)
R2: inc ×6 (12)
R3: (sc, inc) ×6 (18)
R4: (2 sc, inc) ×6 (24)
R5: (3 sc, inc) ×6 (30)
R6: (4 sc, inc) ×6 (36)
R7–R13: sc around (36)
R14: (4 sc, dec) ×6 (30)
R15–R17: sc around (30)
R18: (3 sc, dec) ×6 (24)
R19–R21: sc around (24)
R22: (2 sc, dec) ×6 (18)
Stuff the lower body firmly and keep its base flat. Add denser stuffing around the final neck rounds.
R23: (sc, dec) ×6 (12)
R24: dec ×6 (6)
Fasten off. Leave a 35 cm tail for joining the body to the head.
Arms — Make 2
Yarn: lavender purple.
R1: 6 sc in MR (6)
R2: inc ×6 (12)
R3: (sc, inc) ×6 (18)
R4–R6: sc around (18)
R7: (sc, dec) ×6 (12)
R8–R14: sc around (12)
Stuff each paw firmly. Leave the upper four rounds lightly filled so the arm hangs close to the body.
Flatten the opening and work 6 sc through both layers (6).
Fasten off. Leave a 30 cm sewing tail.
Legs — Make 2
Yarn: lavender purple.
R1: 6 sc in MR (6)
R2: inc ×6 (12)
R3: (sc, inc) ×6 (18)
R4: (2 sc, inc) ×6 (24)
R5–R7: sc around (24)
R8: 6 sc, dec ×6, 6 sc (18)
R9: 3 sc, dec ×6, 3 sc (12)
R10–R14: sc around (12)
Insert an optional plastic canvas oval after R7. Stuff the foot firmly and keep the ankle straight.
Flatten the upper opening and work 6 sc through both layers (6).
Fasten off. Leave a 35 cm sewing tail.
Outer Ears — Make 2
Yarn: lavender purple.
R1: 6 sc in MR (6)
R2: inc ×6 (12)
R3: (sc, inc) ×6 (18)
R4: sc around (18)
R5: (sc, dec) ×6 (12)
Do not stuff. Flatten each ear into a shallow cup.
Fasten off. Leave a 25 cm sewing tail.
Cheek Patches — Make 2
Yarn: blush pink.
R1: 6 sc in MR (6)
R2: inc ×6 (12)
Join with a sl st. Fasten off, leaving a 20 cm tail.
Flatten each patch and stretch it sideways until it measures approximately 2.5 cm across.
Eyebrows
Yarn: black embroidery floss.
Embroider one shallow curved line above each eye. Each eyebrow should cover approximately four head stitches and sit two rounds above the eye post.
Eyelashes
Yarn: black embroidery floss.
Make two short angled stitches at the outer edge of each eye. Keep every eyelash between 4 and 5 mm long.
Overall Leg Openings — Make 2
Yarn: mustard yellow. Work in joined rounds.
Ch 30. Join with a sl st, taking care not to twist.
R1: Ch 1, sc around, join with sl st (30)
R2–R5: sc around, join with sl st (30)
Fasten off the first opening. Do not fasten off the second.
Joining the Overall Shorts
Continue with mustard yellow.
Place both leg openings beside each other.
R6: Sc in 30 stitches of the second opening, then sc in 30 stitches of the first opening (60)
R7: (8 sc, dec) ×6 (54)
R8: sc around (54)
R9: (7 sc, dec) ×6 (48)
R10: sc around (48)
R11: (6 sc, dec) ×6 (42)
R12: sc around (42)
R13: (5 sc, dec) ×6 (36)
R14–R16: sc around (36)
Join with a sl st and fasten off. Test the shorts on the completed bear before making the bib.
Overall Bib
Yarn: mustard yellow — worked in turning rows.
Join yarn to the central 16 stitches at the front of R16.
Row 1: 16 sc (16). Ch 1 and turn.
Rows 2–8: sc across (16). Ch 1 and turn after Rows 2–7.
Fasten off and weave in the tail.
Overall Straps — Make 2
Yarn: mustard yellow.
Ch 25.
Starting in the second ch from the hook, 24 sc (24).
Fasten off. Leave a 25 cm sewing tail.
Measure each strap from the rear waistband to the upper bib corner. Add or remove chains when the strap cannot lie flat without stretching.
Crescent Moon — Make 2 Panels
Yarn: cream white — worked in joined rounds.
R1: 6 sc in MR, join with sl st (6)
R2: inc ×6, join with sl st (12)
R3: (sc, inc) ×6, join with sl st (18)
R4: (2 sc, inc) ×6, join with sl st (24)
R5: (3 sc, inc) ×6, join with sl st (30)
R6: (4 sc, inc) ×6, join with sl st (36)
Fasten off the first panel. Leave a 40 cm tail on the second.
Place the two circles together. Mark 14 consecutive stitches along one side of both panels. Sew those stitches inward toward the opposite edge, creating a deep curved cutaway. Whipstitch the remaining outer edges together and insert a thin layer of stuffing before closing the final 3 cm.
The finished crescent should measure approximately 9 cm from tip to tip. Shape both points with two additional tightening stitches.
Optional Moon Attachment Loop
Yarn: cream white.
Ch 14. Join with a sl st to form a loop.
Fasten off and sew the loop to the rear center of the crescent. Slip it over one overall button when a removable moon is required.
Assembly
- Center the body beneath the head and pin the neck at four equal points. Sew around the join twice through complete stitches.
- Pin the muzzle between R13 and R18 of the head. Its upper edge should sit one round below the eye posts.
- Lock the safety-eye and nose washers after checking that the muzzle remains centered. Add a small amount of stuffing before closing the final 2 cm of its seam.
- Sew the cheek patches one round below the eyes and approximately one stitch outside the muzzle edge. Add the eyebrows, eyelashes and a vertical mouth line.
- Attach the ears across approximately R5–R10 of the head. Angle their open faces slightly forward so both interiors remain visible.
- Sew the legs to the body base with approximately six body stitches between them. Test the standing position before reinforcing each seam.
- Attach the arms across R16–R20 of the body. Keep their lower ends level with the upper edge of the overall bib.
- Pull the shorts over the legs and position the waistband around R13 of the body. Tack the back waistband in three places when permanent clothing is preferred.
- Sew each strap from the rear waistband to one upper bib corner. Attach one 18–20 mm white button over the end of each strap.
- Place the crescent across the bear’s left side, with its inner curve surrounding the left button. Attach the optional loop or sew the rear panel directly to the bib.
The completed bear should stand with both foot bases level and the crescent positioned without covering the muzzle or left eye.
7 Technical Tips
- Eye-height mismatch: A difference of one round becomes obvious with 15 mm eyes. Insert both posts between R12 and R13 and count nine visible stitches between their inner edges.
- Forward-falling head: A lightly filled neck cannot support a 42-stitch head. Pack the final 3 cm of the body until the neck resists moderate finger pressure.
- Rotated feet: Legs attached more than one stitch off the front-center line can point in different directions. Draw a temporary yarn line through the center of both feet before pinning them.
- Tight overall openings: A 30-stitch opening that stretches beyond 10 percent can compress the leg stuffing. Add two stitches to each opening rather than forcing the shorts over the feet.
- Twisted straps: Sewing a strap before checking its chain edge can leave one side facing outward. Lay both 24-stitch straps flat and mark their front surfaces before attaching them.
- Uneven crescent points: A difference greater than 5 mm makes the moon appear tilted. Count the same number of edge stitches on both sides of the cutaway and tighten each tip separately.
- Loose button attachment: A button held by one yarn pass can rotate under the moon’s weight. Sew through all button holes three times and knot the yarn inside the bib.
Conclusion
Fit the shorts before attaching the legs permanently, because the foot width determines whether each 30-stitch opening will pass without distortion. Next, pin the bib, straps, buttons and crescent together and inspect their alignment from the front. The moon’s upper point should remain below the muzzle, while its lower point may extend across the left leg opening. Save this purple teddy bear amigurumi crochet pattern to Pinterest, then share the completed bear on Instagram with #LunaMoonBear. Did you make the crescent removable from the left button, or sew it permanently across the mustard overalls?









