Introduction
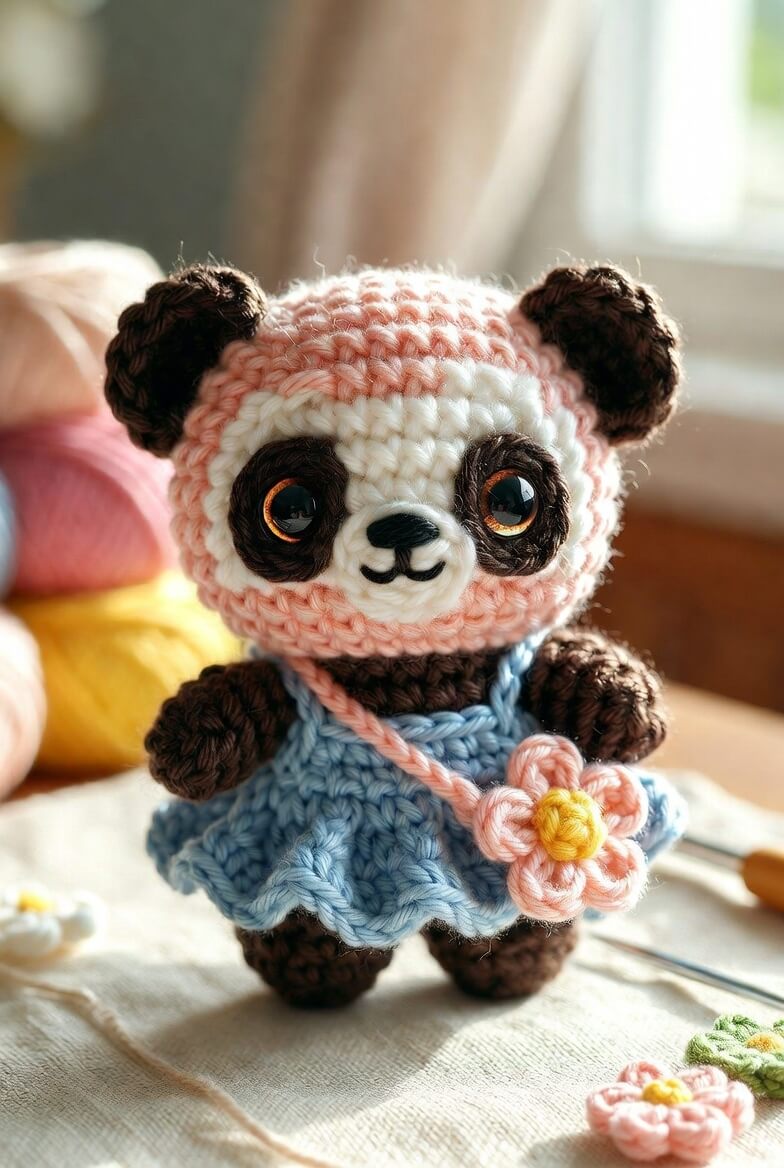
A panda’s dark eye patches must remain separate from the edge of its pink hood or the face loses its defining contrast. This panda amigurumi crochet pattern uses DK cotton, a 3 mm hook and 15 mm safety eyes to create a standing figure approximately 19–21 cm tall. The intermediate project includes a fitted hood, flared blue dress and removable flower purse for a complete display figure.
The Design: What Makes Petal the Panda Different
Petal uses a white facial panel over a pink head rather than changing colors within the main sphere. That construction produces an even hood border and avoids a stepped color-change line around the face. Separate brown eye patches sit beneath the safety eyes, preserving the wide oval markings associated with a panda. The blue ruffle dress begins with a fitted bodice, then expands rapidly at the waist so the skirt clears the legs. One arm hangs beside the body while the other lifts toward the purse strap, giving the dressed panda crochet doll an asymmetrical pose. A frequent error in a panda in a dress crochet pattern is sewing the ears too low. The hood then covers their bases and makes the head appear unusually wide. Pin each ear above the facial midpoint and fit the hood before completing either seam.
Project Info at a Glance
| Skill Level | Time | Finished Size | Hook | Best For |
|---|---|---|---|---|
| Intermediate | 10–12 hours | Approximately 19–21 cm standing | 3 mm | Dressed-animal collections and shelf displays |
Materials and Tools
Yarn
- Dusty pink — DK cotton or cotton-acrylic blend — approximately 40 g — YarnArt Jeans, Scheepjes Catona or Paintbox Cotton DK.
- White — matching weight — approximately 25 g — used for the facial panel and muzzle.
- Dark brown — matching weight — approximately 25 g — used for the ears, eye patches, arms and legs.
- Pale blue — matching weight — approximately 30 g — used for the dress.
- Yellow — matching weight — approximately 5 g — used for the flower centre.
- Black — smooth embroidery yarn — less than 1 g — used for the nose and mouth.
Tools
- 3 mm crochet hook
- 15 mm safety eyes
- Polyester stuffing
- Yarn needle
- Locking stitch markers
- Sewing pins
- Scissors
Replace plastic eyes with embroidered eyes and attach the bag permanently when making the figure for a child under three.
Abbreviations
- MR — magic ring
- sc — single crochet
- inc — two single crochet stitches in one stitch
- dec — invisible decrease over two stitches
- sl st — slip stitch
- ch — chain
- hdc — half double crochet
- dc — double crochet
- BLO — back loop only
- FLO — front loop only
- FO — fasten off
For an invisible decrease, insert the hook through the front loops of the next two stitches and complete one single crochet through both loops.
Pattern — Step by Step
Work all stuffed pieces in continuous spirals unless rows or joined rounds are specified. Place a locking marker in the first stitch of every round.
Head
Yarn: dusty pink. Original 36-stitch medium amigurumi construction.
R1: 6 sc in MR (6)
R2: inc × 6 (12)
R3: (sc, inc) × 6 (18)
R4: (2 sc, inc) × 6 (24)
R5: (3 sc, inc) × 6 (30)
R6: (4 sc, inc) × 6 (36)
R7–R14: sc around (36)
R15: (4 sc, dec) × 6 (30)
R16: (3 sc, dec) × 6 (24)
R17: (2 sc, dec) × 6 (18)
Stuff the crown and sides firmly. Keep the front surface smooth because the facial panel will be sewn over it.
R18: (sc, dec) × 6 (12)
R19: dec × 6 (6)
Fasten off. Draw the final stitches closed and weave the tail through the head.
Body
Yarn: dark brown. Original six-stitch expansion.
R1: 6 sc in MR (6)
R2: inc × 6 (12)
R3: (sc, inc) × 6 (18)
R4: (2 sc, inc) × 6 (24)
R5: (3 sc, inc) × 6 (30)
R6: (4 sc, inc) × 6 (36)
R7–R12: sc around (36)
R13: (4 sc, dec) × 6 (30)
R14–R16: sc around (30)
R17: (3 sc, dec) × 6 (24)
R18–R19: sc around (24)
R20: (2 sc, dec) × 6 (18)
Stuff the base firmly and the upper body moderately.
R21: (sc, dec) × 6 (12)
R22: dec × 6 (6)
Fasten off. Leave a 35 cm tail for the head seam.
Arms — Make 2
Yarn: dark brown. Comparable panda patterns use separate flattened arms.
R1: 6 sc in MR (6)
R2: inc × 6 (12)
R3–R6: sc around (12)
R7: (sc, dec) × 4 (8)
R8–R11: sc around (8)
Stuff the lower half only. Flatten the opening.
R12: 4 sc through both layers (4)
Fasten off. Leave a 25 cm sewing tail.
Back Legs — Make 2
Yarn: dark brown. Work both legs to the same tension.
R1: 6 sc in MR (6)
R2: inc × 6 (12)
R3: (sc, inc) × 6 (18)
R4–R6: sc around (18)
R7: (sc, dec) × 6 (12)
R8–R12: sc around (12)
Stuff the feet firmly. Add less stuffing near the upper openings.
R13: dec × 6 (6)
Fasten off. Leave a 30 cm tail and close the final opening.
Ears — Make 2
Yarn: dark brown. Circular panda ears are used by multiple published patterns.
R1: 6 sc in MR (6)
R2: inc × 6 (12)
R3: (sc, inc) × 6 (18)
R4: (2 sc, inc) × 6 (24)
R5: sc around (24)
R6: (2 sc, dec) × 6 (18)
Do not stuff. Flatten each ear into a shallow semicircle.
Fasten off. Leave a 30 cm sewing tail.
White Facial Panel
Yarn: white. Work as a flat oval around a foundation chain.
R1: ch 9; starting in the second ch, 7 sc, 3 sc in the last ch, work along the opposite side with 6 sc, inc (18)
R2: inc, 6 sc, inc × 3, 6 sc, inc × 2 (24)
R3: (sc, inc), 6 sc, (sc, inc) × 3, 6 sc, (sc, inc) × 2 (30)
R4: (2 sc, inc), 6 sc, (2 sc, inc) × 3, 6 sc, (2 sc, inc) × 2 (36)
Fasten off. Leave a 40 cm tail. Block the oval to approximately 8 cm wide and 6 cm high.
Eye Patches — Make 2
Yarn: dark brown. Work flat.
R1: 6 sc in MR (6)
R2: inc × 6 (12)
R3: (sc, inc) × 6 (18)
R4: 4 sc, 4 hdc, 6 sc, 4 hdc (18)
Fasten off. Leave a 20 cm tail. Stretch each patch into a vertical oval.
Push one safety-eye stem through the centre of each patch before attaching the eye to the facial panel.
Muzzle
Yarn: white. Work flat.
R1: 6 sc in MR (6)
R2: inc × 6 (12)
R3: (sc, inc) × 6 (18)
R4: sc around (18)
Fasten off. Leave a 25 cm tail. Add a thin layer of stuffing during attachment.
Nose and Mouth
Yarn: black embroidery yarn.
Embroider a horizontal satin-stitch nose approximately 12 mm wide across the upper third of the muzzle. Bring one vertical stitch down by 6 mm, then add two curved mouth lines, each spanning approximately two muzzle stitches.
Cheek Patches — Make 2
Yarn: dusty pink. These low-contrast circles sit partly against the pink hood edge.
R1: 6 sc in MR (6)
R2: inc × 6 (12)
Fasten off. Leave a 15 cm tail. Press each patch flat.
Pink Hood
Yarn: dusty pink. Work from the crown downward in joined rounds.
R1: 6 sc in MR, join (6)
R2: inc × 6, join (12)
R3: (sc, inc) × 6, join (18)
R4: (2 sc, inc) × 6, join (24)
R5: (3 sc, inc) × 6, join (30)
R6: (4 sc, inc) × 6, join (36)
R7–R9: sc around, join (36)
R10: 7 sc, ch 22, skip 22, 7 sc, join (36 including chains)
R11: 7 sc, 22 sc across the chain, 7 sc, join (36)
Fasten off. Weave in the tail. The 22-chain opening frames the facial panel.
Dress Bodice
Yarn: pale blue. Work in joined rounds from the waist upward.
R1: ch 31, join without twisting; 30 sc around (30)
R2–R4: sc around, join (30)
R5: (3 sc, dec) × 6, join (24)
R6–R7: sc around, join (24)
R8: 4 sc, ch 5, skip 4, 8 sc, ch 5, skip 4, 4 sc, join (26 including chains)
R9: sc in each stitch and chain around, join (26)
R10: work 13 dec evenly around, join (13)
Fasten off. Check that the neckline passes over the body before weaving in the tail.
Ruffled Skirt
Yarn: pale blue. Join to the lower edge of the bodice.
R1: Join yarn to the 30-stitch waist edge; work inc in every stitch (60)
R2: (4 sc, inc) × 12 (72)
R3–R5: sc around (72)
R6: (sc, hdc, 3 dc, hdc, sc) repeated across the round to form the scalloped hem.
Fasten off. Block the skirt so the scallops rest at an even height.
Flower Bag Centre
Yarn: yellow.
R1: 6 sc in MR (6)
R2: inc × 6 (12)
R3: sc around (12)
Fasten off. Leave a 20 cm tail and add a small amount of stuffing.
Flower Petals — Make 5
Yarn: dusty pink.
R1: 6 sc in MR (6)
R2: inc × 6 (12)
R3–R4: sc around (12)
R5: dec × 6 (6)
Stuff each petal lightly and flatten the final opening.
Fasten off. Leave a 20 cm tail.
Flower Bag Back
Yarn: dusty pink.
R1: 6 sc in MR (6)
R2: inc × 6 (12)
R3: (sc, inc) × 6 (18)
R4: (2 sc, inc) × 6 (24)
Fasten off. Leave a 30 cm sewing tail.
Arrange the five petals around the yellow centre. Sew the assembly to the front of the bag back while leaving the upper edge partly open.
Crossbody Strap
Yarn: dusty pink.
Ch 61, or continue until the relaxed chain measures approximately 29–31 cm. Starting in the second chain, sl st across (60)
Fasten off. Sew one end to each upper side of the flower bag.
Assembly
- Sew the white facial panel to the front of the pink head, keeping its upper edge approximately two rounds below the crown.
- Position the brown eye patches on the white panel, place the eyes 7–8 visible stitches apart and attach the safety-eye washers.
- Sew the muzzle below the eyes, add a thin layer of stuffing and embroider the nose and divided mouth.
- Attach the cheek patches below the outer edges of the eye patches, keeping most of each circle outside the muzzle.
- Sew the ears between head R4 and R10, then fit the hood and pull both ears through the upper sides.
- Join the head to the body with the facial centre aligned over the body’s front midpoint.
- Attach the legs to the lower body and test the panda on a level surface before tightening the seams.
- Fit the dress over the body, align its armholes and attach one arm downward and the other at a raised angle.
- Assemble the five-petal flower bag, attach the strap and place it diagonally from one shoulder to the opposite hip.
- Weave each remaining tail through three internal stitch paths, reshape the dress hem and trim the ends.
The finished panda should stand approximately 19–21 cm tall, with the flower bag resting at the upper edge of the skirt.
7 Technical Tips
- Hidden eye patches: Placing the hood opening less than 5 mm from a brown eye patch reduces the visible white border. Pin the hood after the facial panel is complete and preserve one full white stitch around both patches.
- Rotated facial panel: A panel shifted by two stitches makes the muzzle appear off-centre. Mark the vertical centre of the head before sewing the first quarter of the oval.
- Flattened ears: Stuffing the ears removes their compact panda shape. Leave them empty and attach only the lower 3 cm of each flattened edge.
- Unstable legs: A finished leg difference greater than 3 mm causes the figure to lean. Compare both pieces after every plateau round and add equal amounts of stuffing.
- Restricted armholes: An opening narrower than 3.5 cm compresses the arm seam. Pass the widest part of each arm through the chain opening before completing the bodice.
- Uneven ruffle: Missing one increase in the 60-stitch skirt round creates a raised section at the hem. Count the full round before working the 72-stitch expansion.
- Sliding bag strap: A strap longer than 31 cm may cross the muzzle instead of the chest. Shorten it until the flower centre rests level with the first skirt round.
Conclusion
Set the finished panda on a flat surface and compare the ear height, eye-patch angle and skirt hem before cutting the final yarn tails. The white facial panel should show evenly inside the hood, while the brown patches must remain separate from its pink edge. Record the finished height, strap length and actual yarn quantities in the project notes. Save the completed panda amigurumi crochet pattern project to Pinterest, then post front and side views on Instagram with #PetalPursePanda. The next practical step is to test the flower bag opening with a removable stitch marker. Should Petal wear the flower at hip level or closer to the raised paw?









