Introduction
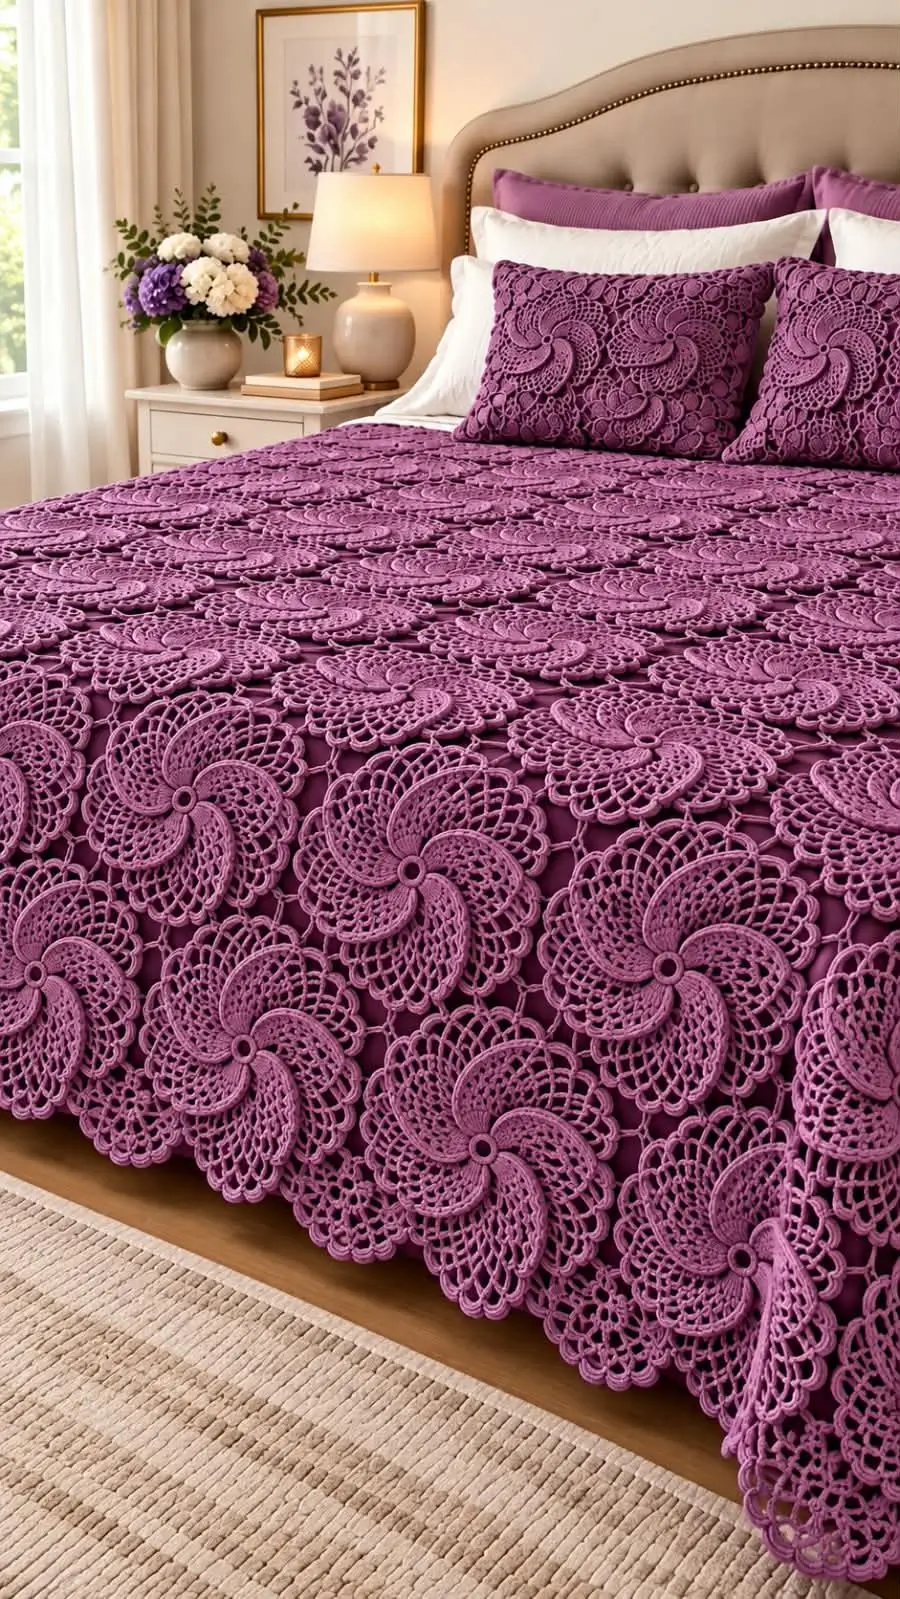
The plum flowers in this bedspread appear to rotate around raised centers, while open lace separates the petals from their neighbors. This purple floral crochet bedspread pattern translates that structure into repeatable, eight-petal squares with matching cushion fronts. Plan for smooth DK cotton, a 4.5 mm starting hook, and an approximately 220 × 237 cm sample layout if your blocked squares measure 17 cm. The project suits intermediate crocheters because the joins must remain uniform.
The Design: What Makes the Plum Pinwheel Bedspread Different
Three decisions govern this photo-inspired construction. First, each flower sits above its square framework: the petal round is worked on the front, while the chain bridges attach to an earlier round behind it. That separation prevents the raised petals from collapsing into the mesh.
Second, eight petal anchors divide into four corners and four straight sides, so the square blocks join without irregular filler shapes. Third, a restrained scalloped border repeats the curved outline at the bed’s perimeter rather than covering the motifs.
The photographed flowers twist more strongly; this motif is not a stitch-for-stitch copy. A common mistake is measuring the unblocked center rather than the outer edge. The joins then pull out of alignment. Test a complete motif, block it, and use that measurement for the final layout.
Project Info at a Glance
| Project Detail | Specification |
|---|---|
| Skill Level | Intermediate to Advanced |
| Finished Size | Approximately 220 × 237 cm (sample target) |
| Hook Size | 4.5 mm starting hook |
| Recommended Yarn | DK Cotton |
| Main Color | Dusty Plum / Mauve Purple |
| Construction | Joined Floral Crochet Squares |
| Main Panel | 156 Squares |
| Pillow Fronts | 18 Additional Squares |
| Best For | Decorative Bedspread and Matching Pillows |
Note: Measurements and yarn quantities are planning estimates, not verified measurements of the photographed bedspread. The pattern is photo-inspired and has not been physically tested.
Materials and Tools
Yarn
- Dusty plum or muted mauve DK cotton: Main yarn for floral motifs and lace framework. A smooth cotton such as Bendigo Woollen Mills Cotton 8 Ply can be used as a reference yarn.
- Matching plum yarn: Reserve additional yarn for joining and the scalloped border.
- Optional darker mauve: Can be used for flower centers or petal accents.
For example, 174 motifs weighing 16 g each consume 2,784 g before joins, borders, and pillow backs. An illustrative full-project budget is approximately 3,745 g including backing yarn and reserve. Weigh a completed sample before purchasing the total quantity.
Tools
- 4.5 mm crochet hook
- Tapestry needle
- Stitch markers
- Scissors
- Measuring tape
- Digital scale
- Blocking pins or wires
- Two 50 × 50 cm pillow inserts
- Fabric or crochet backing panels
Crochet Abbreviations
- MR: Magic Ring
- sc: Single Crochet
- hdc: Half Double Crochet
- dc: Double Crochet
- tr: Treble Crochet
- sl st: Slip Stitch
- ch: Chain
- sp: Space
- st: Stitch
- RS: Right Side
- rep: Repeat
- BLO: Back Loop Only
- FO: Fasten Off
All instructions use US crochet terminology. An invisible decrease works through the front loops of two adjacent stitches, but this flat lace pattern does not require decreases.
Gauge, Dimensions, and Yarn Calculation
The working sample assumes a 17 × 17 cm blocked square. Make one complete square through Round 13, wet-block it according to the yarn label, and allow it to dry completely.
Measure between opposite outer corners and along both straight edges. A square measuring 16 cm requires a different total motif count from one measuring 18 cm.
For a sample bed covering, arrange 12 squares across and 13 squares down.
- Width: 12 × 17 = 204 cm
- Length: 13 × 17 = 221 cm
- Border allowance: Approximately 8 cm on each side
- Target finished size: 220 × 237 cm
The main panel requires 156 floral squares. Each matching pillow front uses nine additional squares, giving 18 pillow squares and a project total of 174.
If each finished motif weighs 16 g, the motifs require 2,784 g. Adding an illustrative 300 g for joins and edging plus 320 g for crocheted pillow backs brings the subtotal to 3,404 g. A 10% reserve gives approximately 3,745 g.
Replace these estimates with measured swatch quantities before purchasing yarn.
Pattern — Step by Step
Construction note: This original, photo-inspired motif is worked in joined rounds, not a continuous spiral. Starting chains do not count as stitches unless stated otherwise. The stitch counts have been checked mathematically, but the complete pattern requires physical sample testing.
A. Raised Eight-Petal Flower Center (Make 174)
Yarn: Dusty Plum DK Cotton
R1: Make an MR, ch 1, work 8 sc into the ring, and join with sl st to first sc. (8 sc)
R2: Ch 1, make 2 sc in each sc, and join. (16 sc)
R3: Ch 1, repeat [sc in next sc, ch 3, skip next sc] eight times; join. (8 sc, 8 ch-3 spaces)
R4: Sl st into the first ch-3 space. In each of the eight spaces work [sc, hdc, 2 dc, tr, dc, sc]. Join to the first petal stitch. (8 petals × 7 stitches = 56 petal stitches)
The taller treble crochet near one side causes each petal to lean in the same direction. Leave the front of each flower free because the square framework will attach behind it.
B. Behind-Petal Foundation and Square Frame
R5: With RS facing, insert the hook behind the petal layer and join at one of the eight R3 sc anchors. Repeat [ch 4, sl st into the next R3 sc anchor] eight times, ending at the initial anchor. (8 ch-4 loops)
R6: In the first loop work [3 dc, ch 2, 3 dc] for a corner. Work 5 dc in the next loop. Repeat the corner-plus-side sequence around the remaining six loops; join. (44 dc, 4 ch-2 corner spaces)
R7: Work [2 dc, ch 2, 2 dc] in each corner space and one dc into every dc between corners. Join. (60 dc, 4 ch-2 corners; 15 dc along each side)
R8: Work [2 dc, ch 2, 2 dc] in each corner space. Across each 15-stitch side, repeat [dc in next dc, ch 1, skip next dc] seven times, then dc in the final dc. Join. (48 dc, 28 ch-1 spaces, 4 ch-2 corners)
R9: In every corner space work [2 dc, ch 2, 2 dc]. Along each side, make one dc in each of the 19 dc-or-ch-1 positions between corner spaces. Join. (92 dc, 4 ch-2 corners; 23 dc per side)
R10: Repeat the R8 corner treatment. Across each 23-stitch side, repeat [dc in next dc, ch 1, skip next dc] eleven times, then dc in the final stitch. Join. (64 dc, 44 ch-1 spaces, 4 ch-2 corners)
R11: In each corner work [2 dc, ch 2, 2 dc]. Make one dc into each of the 27 stitch-or-chain-space positions along every side. Join. (124 dc, 4 ch-2 corners; 31 dc per side)
R12: Repeat the R8 corner treatment. Across each 31-stitch side, repeat [dc in next dc, ch 1, skip next dc] fifteen times, then dc in the final stitch. Join. (80 dc, 60 ch-1 spaces, 4 ch-2 corners)
R13: In each corner work [2 dc, ch 2, 2 dc]. Make one dc in each of the 35 stitch-or-chain-space positions along the side. Join. (156 dc, 4 ch-2 corners; 39 dc per side)
Fasten off and leave a 25 cm sewing tail on motifs intended for seaming.
Make one complete square and verify the blocked size before producing the remaining motifs. If the flower lies backward, attach the R5 chains to the wrong-side anchors rather than working across the petal tops.
C. Joining the Bedspread Panel
Arrange 156 finished squares in 13 rows of 12. Keep the taller portion of each petal facing clockwise so neighboring flowers repeat a consistent directional rhythm.
Pin together the first two squares with their right sides facing up. Use a tapestry needle to whipstitch corresponding edge stitches through their back loops.
Each R13 side has 39 double crochet stitches between corner spaces, providing a consistent seam reference.
Join one row at a time, then join the long rows. At a four-square intersection, secure the corner chain spaces without pulling them into a tight knot.
A join shorter than the unseamed edges causes rippling, while an oversized bridge creates visible holes.
Measure across three joined squares and compare that span with three separate blocked squares before completing the remaining joins.
For a more open appearance, use a slip-stitch join along paired back loops. This alternative creates a visible ridge, so sample both methods and use one consistently across the bedspread.
D. Scalloped Lace Perimeter
Border R1: Join plum yarn at a corner. Work sc evenly around the whole panel, placing 3 sc in each outside corner. Bridge square-to-square joins with an additional sc where required to maintain a level edge. Count each straight side and adjust evenly so its stitch count is divisible by six.
Border R2: Ch 1, sc in each sc around, placing 3 sc in the central corner stitch at each corner. Join.
Border R3: On each straight section repeat [skip 2 sc, 5 dc in next sc, skip 2 sc, sc in next sc] for a six-stitch scallop repeat. At each corner, work a larger seven-dc fan in the center corner stitch, then resume along the next side.
Border R4: Work one sc in each fan-top dc and a sl st in the valley sc between fans. Fasten off and block the perimeter so the fans open evenly.
These four rounds give a narrow finish. To approach an 8 cm side border, add extra mesh-and-fan rounds based on your blocked sample. The exact border depth and corner fit must be tested before repeating them around the entire bedspread.
E. Matching Floral Pillow Fronts (Make 2)
For each pillow, crochet nine additional squares using R1–R13 and join them into a 3 × 3 arrangement.
At a blocked 17 cm per square, the nominal front measures 51 × 51 cm before seam take-up, making it a starting point for a 50 × 50 cm insert.
Compare the actual crocheted front with the pillow insert. Avoid stretching an undersized lace front over a firm cushion.
For fabric backing, cut a panel to match the blocked front with an appropriate seam allowance. Tightly woven cotton helps prevent the insert from showing through the openwork.
For a fully crocheted backing, make a plain double crochet rectangle to the same finished measurements using your own stitch and row gauge.
Place the floral front over the backing and pin the corners. Stitch the sides and lower edge using matching thread or yarn.
Install a zipper or envelope opening along the remaining edge. Repeat for the second cushion.
The photograph confirms matching floral pillow fronts, but the backs and closures are not visible.
Assembly — Ten Steps
- Make one test square. Check the stitch counts, especially the eight petal anchors and four corner spaces.
- Block and measure the sample. Record its finished width, height, and weight.
- Calculate the final layout. Divide the desired bedspread dimensions by the blocked square measurements.
- Crochet the required squares. Prepare 156 bedspread squares and 18 pillow-front squares for the sample layout.
- Sort and orient the motifs. Keep every raised flower facing the same direction.
- Join the bedspread rows. Match all 39 edge stitches on neighboring squares.
- Join the rows into one panel. Inspect intersections for holes, gathers, or twisted flowers.
- Work and block the border. Keep the scallop repeats balanced along every side.
- Assemble the pillows. Attach backing panels and install removable closures.
- Finish and inspect. Weave remaining tails beneath several stitches, wash according to the fiber label, dry flat, and measure the finished textile.
The project is complete when the border lies flat and both pillow fronts match the blocked bedspread motifs.
7 Technical Tips for Better Crochet Lace
- Misplaced stitch marker: Mark the first dc after every corner ch-2 space in R7–R13. A marker moved one stitch shifts the lace repeat and leaves the next side short.
- Overstuffed appearance: Do not add stuffing beneath a flat flower motif. The raised effect comes from the stitch heights in R4 and the foundation anchors in R5.
- Incorrect decrease: An invisible decrease is not part of this pattern. Adding one to pull a corner inward changes the required 39-stitch joining edge.
- Wrong attachment timing: Check all eight R3 anchors before closing R5 behind the petals. Missing one anchor produces seven bridges and distorts the square.
- Loose velvet-style tension: Velvet and chenille obscure the open mesh and increase motif thickness. If substituting plush yarn, make a complete gauge sample rather than assuming the same hook will work.
- Unpinned joins: Pin the four corners of each square before sewing the 39 edge stitches. A seam that shifts by two stitches creates a diagonal pull through the adjoining row.
- Short woven tails: Leave at least a 25 cm tail where a seam will carry weight. Pass the end through neighboring stitches and reverse direction before trimming.
Troubleshooting, Care, and Fit
Why Do the Flower Petals Twist in Different Directions?
The treble crochet in R4 belongs in the same relative position within every petal group. Photograph the first completed square and keep it as an orientation reference.
Why Are the Crochet Squares Cupping?
Compare the completed R6 count of 44 dc and four corners with your work. If the counts match, try a larger hook or a softer blocking method rather than adding undocumented increases.
What If the Bedspread Does Not Cover the Mattress?
A top-only panel and a full-drop bedspread require different dimensions. Measure the mattress width plus both side drops, and its length plus the desired foot drop. Add rows or columns before making the border.
Why Does the Bedding Show Through the Lace?
This is a decorative lace covering rather than an opaque quilt. Place it over a solid-color coverlet or sheet when the floral relief needs a consistent background.
How Should a Crochet Lace Bedspread Be Washed?
Follow the yarn manufacturer’s fiber-care instructions. Support the wet textile when lifting it, dry it flat or across a wide surface, and avoid hanging its full weight from one edge.
Store the matching pillows without compression so the raised petals maintain their shape.
Related Crochet Patterns
- Flower Queen Bedspread: A vintage three-dimensional flower design. View Flower Queen Bedspread.
- High-Art Bedspread: A historical design combining round motifs and square fillers. View High-Art Bedspread.
- Starfish Flower Blanket: A floral motif design with layered petals. View Starfish Flower Blanket.
- Crochet Flower Blanket Tutorial: A free video demonstrating joined floral motifs. Watch the Flower Blanket Tutorial.
Conclusion
Measure and block one completed motif before buying yarn for the full bedspread. Record its width, weight, and hook size, then calculate the required number of blocks for your mattress and preferred drop. Make the pillow fronts from the same motif and join them at the same tension as the large panel.
The finished purple floral crochet bedspread pattern is an adaptable textile design, not a verified reproduction of the reference image. Photograph the blocked motifs from above for Pinterest and share the completed bed-and-pillow arrangement on Instagram with #PlumPinwheelBedspread.
Which part of the photographed pinwheel would you alter first: the sloping petals or the openwork rings?
Pattern References and Resources
- Splendour Flower Beds Blanket — Ravelry
- Craft Yarn Council — Yarn Weight Standards
- High-Art Bedspread — Ravelry
- Flower Join-As-You-Go Tutorial
- Crochet Flower Blanket Tutorial
Pattern disclosure: This is an original, photo-inspired interpretation. Stitch arithmetic has been checked, but physical testing, border fit, yarn consumption, and gauge must be verified before describing the pattern as fully tested.









