Introduction
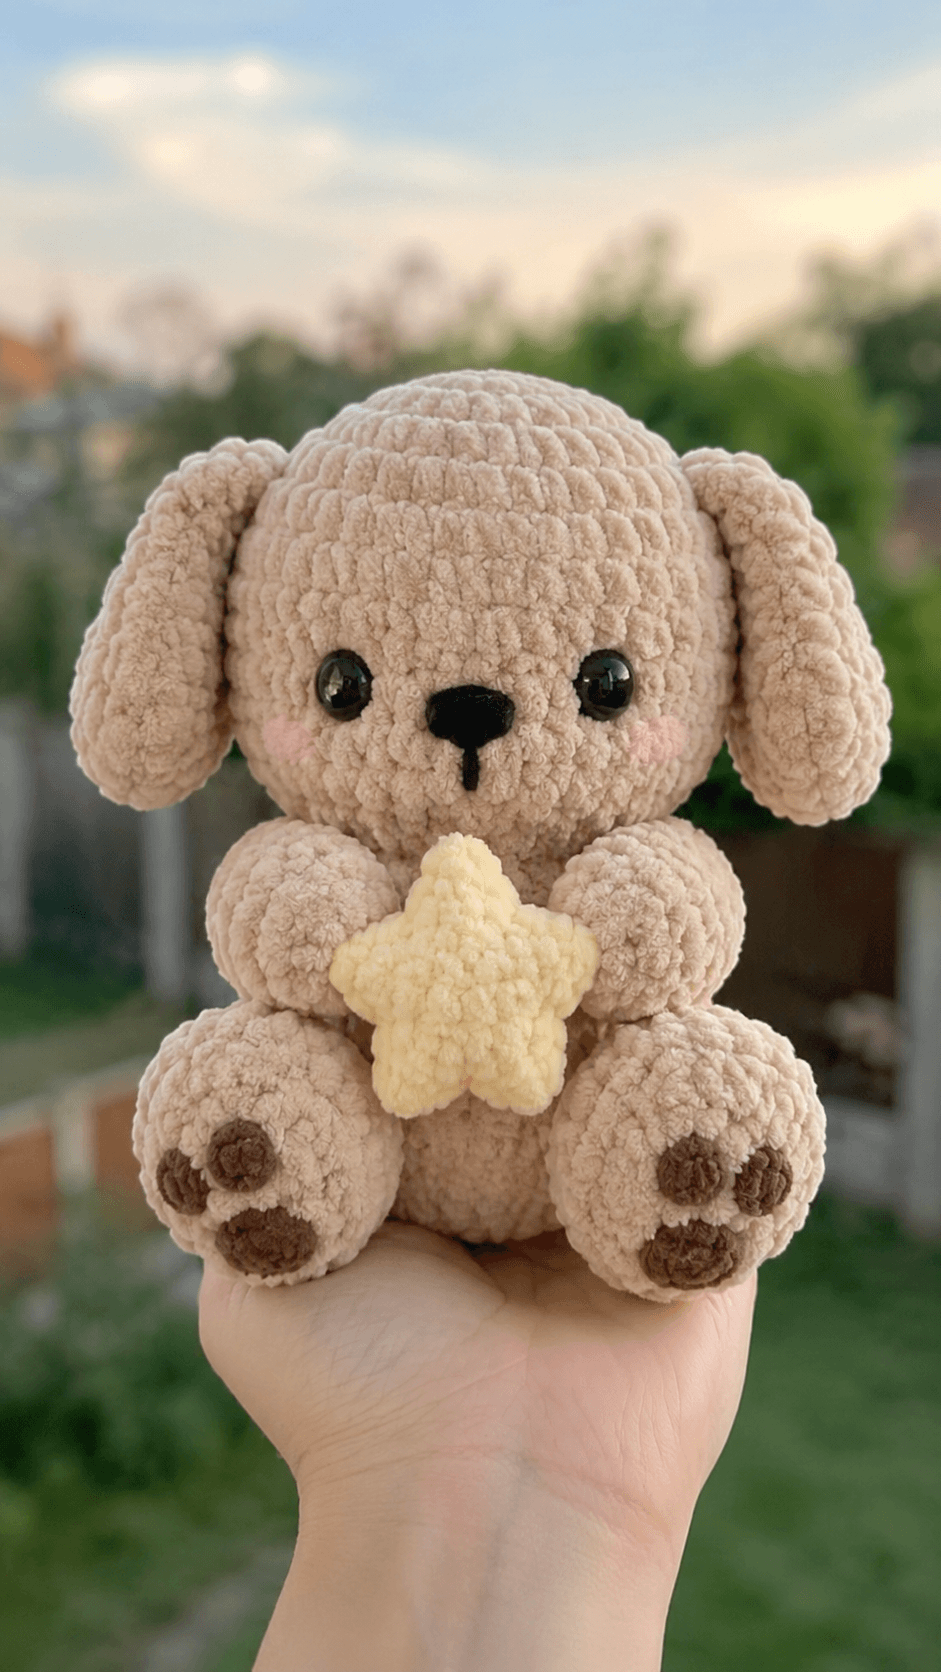
A puppy’s ear base must remain narrow while the lower ear gains enough width to hang beside the jaw. This puppy amigurumi crochet pattern combines long unstuffed ears, chunky chenille yarn and a structured five-point star. Use a 5 mm hook to make an intermediate-level puppy measuring approximately 20–22 cm tall. Its forward-facing feet create a stable sitting position for shelf displays and photographed gift arrangements.
The Design: What Makes This Puppy Different
The 36-stitch head is kept almost spherical so the long ears, rather than an extended muzzle, establish the dog silhouette. A separate shallow muzzle supports the embroidered nose without producing a long canine snout. Each ear is widest near its rounded end and folded at the attachment edge, which places the weight below the eye line.
The back legs have enlarged feet that face the viewer and display separate paw pads. Low attachment points let the feet and lower body form a stable base. Meanwhile, the arms remain lightly stuffed so they can curve around the accessory. This structure distinguishes the chenille puppy crochet pattern from narrow standing dogs. A frequent mistake in a puppy holding a star is sewing the arms before positioning the accessory. That sequence can leave the star too high, covering the muzzle, or too low to touch both paws.
Project Info at a Glance
| Skill Level | Time | Finished Size | Hook | Best For |
|---|---|---|---|---|
| Intermediate | 6–8 hours | Approximately 20–22 cm seated | 5 mm | Nursery shelves, dog-themed gifts and display photography |
Materials and Tools
Yarn
- Light taupe beige — super-bulky chenille or velvet yarn — approximately 150 g — Himalaya Dolphin Baby, YarnArt Dolce or Premier Parfait Chunky.
- Pale yellow — matching chenille yarn — approximately 25 g — use for the stuffed star.
- Dark brown — smooth DK or worsted yarn — less than 10 g — use for the paw pads.
- Black — smooth DK cotton or acrylic — less than 5 g — use for the nose and mouth.
- Pale pink — smooth DK yarn — less than 5 g — use for the cheek patches.
- Optional sewing yarn — strong taupe acrylic — use for structural seams if the chenille core sheds during assembly.
Tools
- 5 mm crochet hook
- 12–14 mm safety eyes
- Polyester fiberfill
- Yarn needle
- Embroidery needle
- Locking stitch markers
- Long straight pins
- Scissors
Substitute embroidered eyes for plastic safety eyes when the finished puppy will be handled by a child younger than three years.
Abbreviations
- MR — magic ring
- sc — single crochet
- inc — two single crochets in one stitch
- dec — invisible decrease over two stitches
- sl st — slip stitch
- ch — chain
- BLO — back loop only
- st/sts — stitch/stitches
Work an invisible decrease through the front loops of the next two stitches to reduce the opening that can expose fiberfill.
Pattern — Step by Step
Work in continuous spirals unless a section states otherwise. Mark the first stitch of every round. The head reaches a 36-stitch plateau, matching the medium component scale required for this sitting puppy.
Head
Yarn: light taupe beige — standard six-stitch amigurumi shaping.
R1: 6 sc in MR (6)
R2: inc ×6 (12)
R3: (sc, inc) ×6 (18)
R4: (2 sc, inc) ×6 (24)
R5: (3 sc, inc) ×6 (30)
R6: (4 sc, inc) ×6 (36)
R7–R13: sc around (36)
Insert the safety eyes between R10 and R11. Leave seven visible stitches between the eye posts. Pin the muzzle beneath them before attaching the washers.
R14: (4 sc, dec) ×6 (30)
R15: (3 sc, dec) ×6 (24)
Begin stuffing the crown and side walls. Place smaller pieces around the eye posts to prevent shallow depressions.
R16: (2 sc, dec) ×6 (18)
R17: (sc, dec) ×6 (12)
Add stuffing until the head remains round without stretching the spaces between stitches.
R18: dec ×6 (6)
R19: sc around (6)
R20: dec ×3 (3)
Fasten off. Leave a 15 cm tail, pass it through the remaining front loops and close the opening.
Body
Yarn: light taupe beige — standard six-stitch amigurumi shaping.
R1: 6 sc in MR (6)
R2: inc ×6 (12)
R3: (sc, inc) ×6 (18)
R4: (2 sc, inc) ×6 (24)
R5: (3 sc, inc) ×6 (30)
R6–R10: sc around (30)
R11: (3 sc, dec) ×6 (24)
R12–R13: sc around (24)
R14: (2 sc, dec) ×6 (18)
R15–R16: sc around (18)
Stuff the lower body firmly. Press the starting ring against a table to establish a level sitting surface.
R17: (sc, dec) ×6 (12)
R18: dec ×6 (6)
Fasten off. Leave a 30 cm tail for sewing the body to the head.
Arms and Front Legs — Make 2
Yarn: light taupe beige — standard six-stitch amigurumi shaping.
R1: 6 sc in MR (6)
R2: inc ×6 (12)
R3: (sc, inc) ×6 (18)
R4–R6: sc around (18)
R7: (sc, dec) ×6 (12)
Stuff the rounded paw. Leave the upper arm lightly filled so it can bend toward the star.
R8–R12: sc around (12)
R13: (sc, dec) ×4 (8)
R14: sc around (8)
Flatten the opening and work 4 sc through both layers (4).
Fasten off. Leave a 25 cm tail for sewing.
Back Legs and Feet — Make 2
Yarn: light taupe beige — standard six-stitch amigurumi shaping.
R1: 6 sc in MR (6)
R2: inc ×6 (12)
R3: (sc, inc) ×6 (18)
R4: (2 sc, inc) ×6 (24)
R5–R7: sc around (24)
R8: (2 sc, dec) ×6 (18)
R9: (sc, dec) ×6 (12)
Stuff the front half of the foot firmly. Reduce the filling near the attachment opening so the leg can lie against the body.
R10–R12: sc around (12)
R13: dec ×6 (6)
Fasten off. Leave a 30 cm sewing tail.
Floppy Ears — Make 2
Yarn: light taupe beige — elongated unstuffed construction.
R1: 6 sc in MR (6)
R2: inc ×6 (12)
R3: (sc, inc) ×6 (18)
R4–R8: sc around (18)
R9: (sc, dec) ×6 (12)
R10–R12: sc around (12)
R13: (sc, dec) ×4 (8)
R14: sc around (8)
Do not stuff. Flatten the ear and fold the two lower corners toward the center, overlapping them by approximately 5 mm.
Fasten off. Leave a 25 cm sewing tail.
Muzzle
Yarn: light taupe beige — shallow circular construction.
R1: 6 sc in MR (6)
R2: inc ×6 (12)
R3: (sc, inc) ×6 (18)
R4: sc around (18)
Fasten off. Leave a 25 cm tail. Add a thin layer of stuffing while sewing so the muzzle projects approximately 8–10 mm.
Nose and Mouth
Yarn: black DK yarn — embroidered facial feature.
Embroider a rounded triangular nose approximately 14 mm wide and 9 mm high. Fill the shape with parallel horizontal passes. Add one vertical mouth stitch measuring 10 mm from the lower nose point, matching the simple mouth line visible in the photograph.
Cheek Patches — Make 2
Yarn: pale pink DK yarn — flat-circle construction.
R1: 6 sc in MR (6)
Sl st into the first sc.
Fasten off. Leave a 12 cm tail. Flatten each patch before sewing it one round below the eye and two visible stitches outside the muzzle edge.
Large Paw Pads — Make 2
Yarn: dark brown DK or worsted yarn — flat-circle construction.
R1: 6 sc in MR (6)
R2: inc ×6 (12)
Sl st into the first stitch.
Fasten off. Leave a 15 cm tail. Sew one large pad near the lower center of each back foot.
Toe Pads — Make 6
Yarn: dark brown DK yarn — flat-circle construction.
R1: 6 sc in MR (6)
Sl st into the first sc.
Fasten off. Leave a 10 cm tail. Place three toe pads in a shallow arc above each large pad.
Star Center Panels — Make 2
Yarn: pale yellow chenille — flat-circle base.
R1: 6 sc in MR (6)
R2: inc ×6 (12)
R3: (sc, inc) ×6 (18)
R4: (2 sc, inc) ×6 (24)
R5: (3 sc, inc) ×6 (30)
Sl st into the first stitch. Do not fasten off until all five points have been worked.
Star Points — Make 5 on Each Panel
Yarn: pale yellow chenille — turned-row shaping across each six-stitch segment.
Row 1: sc across the next 6 perimeter stitches, ch 1 and turn (6)
Row 2: dec, 2 sc, dec, ch 1 and turn (4)
Row 3: dec ×2, ch 1 and turn (2)
Row 4: dec (1)
Fasten off the point and rejoin the yarn at the next unused perimeter stitch. Repeat Rows 1–4 until five points surround the center. Leave a 35 cm tail on the second completed panel.
Join and Stuff the Star
Place both star panels with their wrong sides together. Sew around the edge with pale-yellow yarn, matching each point and valley. Insert small pieces of stuffing into the points before closing the final two edges. Keep the center flatter than the points so the arms can hold it without spreading outward.
Assembly
- Center the head above the body opening and secure it with four pins. Sew through one complete stitch from each component, tightening the seam after every four stitches.
- Position the muzzle between the eyes with its upper edge approximately one round below the eye posts. Add a thin layer of filling before closing the seam.
- Embroider the nose and vertical mouth line. Check that the mouth follows the center between the eyes rather than the natural slant of the spiral.
- Sew the pink cheek patches level with the lower half of the muzzle. Match their distances from the muzzle seam.
- Pin the ears across head rounds 6–9. Angle each folded base downward so the ear hangs beside the cheek instead of projecting horizontally.
- Attach the back legs between body rounds 4 and 9. Move the feet forward until the puppy balances on both feet and the lower body.
- Place the stuffed star against the torso. Its top point should stop below the mouth, and its lower points should remain above the sitting surface.
- Curve the arms around the star and pin their upper edges between body rounds 12 and 15. Sew the arms to the body before adding hidden holding stitches through the star.
- Attach the large paw pads and three toe pads to each foot. Compare the complete left and right layouts before burying any brown yarn tails.
- Remove every pin and pass each structural tail through at least 4 cm of stuffed fabric, reverse direction once and trim the yarn close to the surface.
The completed puppy should sit without rear support while both front paws contact the stuffed star.
7 Technical Tips
- Round-marker drift: Chenille can conceal the first stitch and shift the shaping by one position. Place a locking marker through both loops of every first stitch and recount each increase or decrease round.
- Collapsing neck: Loose filling in the top 2 cm of the body allows the oversized head to lean. Pack that section until finger pressure produces only a shallow indentation.
- Visible decrease holes: A conventional sc2tog can expose the fiberfill between plush stitches. Work through the front loops only and tighten the completed decrease before making the next sc.
- Incorrect eye placement: Plastic-eye washers cannot be repositioned after the head closes. Pin the muzzle first and confirm a seven-stitch eye gap before pressing the backs into place.
- Stripped chenille: Excessive tension can pull the pile away from its internal thread. Keep the working loop approximately 1–2 mm wider than the 5 mm hook shaft.
- Uneven ear length: A one-round difference becomes visible at the lower tips. Count both ears after R8, R12 and R14, then place their folded bases at matching head rounds.
- Rotating star: One holding stitch allows the accessory to tilt after handling. Add two hidden attachment stitches at each paw, spaced approximately 12 mm apart.
Conclusion
Photograph the pinned puppy from the front before completing the ear, leg and arm seams. Compare the ear tips, paw-pad centers and star points against the vertical line running through the nose. The next practical step is to record the yarn brand, eye spacing and finished height because chenille-core thickness can alter all three measurements. Share the completed puppy on Pinterest and Instagram with #StarHoldingPuppy, and include the hook size in the caption. This puppy amigurumi crochet pattern can be repeated in cream, gray or warm brown without changing the shaping. Should the next puppy hold the five-point star upright, or rotate it so one point faces each paw?
Technical Sources
- Grace and Yarn: Puppy Size, Yarn Quantity, Hook and Eye Specifications
- Ravelry: Approximately 19 cm Puppy Pattern
- DIY Fluffies: Chenille Yarn and Hook Guidance
- Craft Passion: Puppy Components and Accessory Construction
- Etsy: Floppy-Ear Puppy Construction Reference









