Introduction
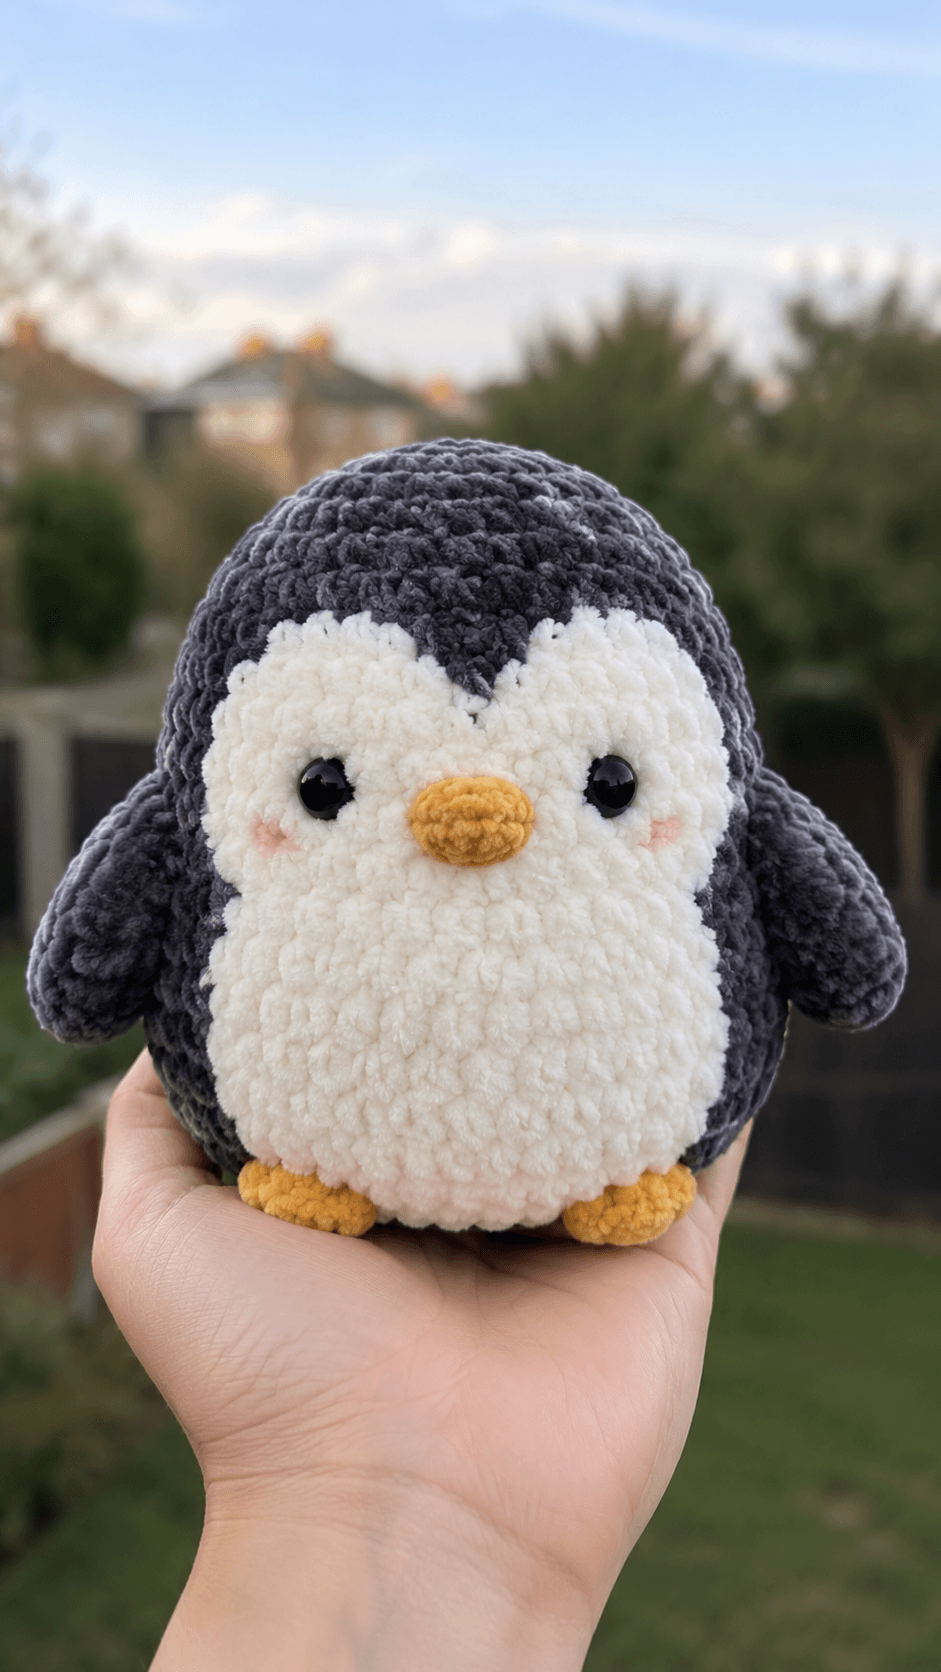
A penguin’s white face must meet beneath a dark forehead point without leaving a gray gap above the beak. This penguin amigurumi crochet pattern uses super-bulky chenille, a 4 mm hook and 15 mm safety eyes to create a chick approximately 21 cm tall. The project suits an intermediate beginner comfortable with spiral rounds and sewn appliqués. Its broad oval body stands securely for display and product photography.
The Design: What Makes This Penguin Different
The photographed penguin uses a vertical egg silhouette rather than separate spherical head and torso proportions. This pattern preserves that outline by giving the body a long 36-stitch plateau and placing a wide head directly above it. Two overlapping ivory face panels form the rounded cheeks, while a small charcoal triangle creates the central forehead point. That construction produces cleaner boundaries than frequent chenille color changes. The wings sit low and nearly horizontal, keeping the chubby penguin crochet pattern visually wide through its middle. Small flattened feet support the front edge without lifting the body away from the surface. A common error in a chenille penguin amigurumi is positioning the white belly too high. The panel then crowds the beak and hides the lower face. Here, its upper edge begins below the muzzle and its widest section follows the center of the torso.
Project Info at a Glance
| Skill Level | Time | Finished Size | Hook | Best For |
|---|---|---|---|---|
| Intermediate beginner | 6–8 hours | Approximately 21 cm | 4 mm | Display, gifting and plush photography |
The stated measurement assumes super-bulky chenille, tight single crochet and firm stuffing. Published penguin projects vary substantially in size according to the selected yarn and hook. :contentReference[oaicite:15]{index=15}
Materials and Tools
Yarn
- Dark charcoal gray — super-bulky polyester chenille — approximately 100–120 g — Premier Parfait Chunky, Hobbii Honey Bunny, Himalaya Dolphin Baby or a comparable plush yarn.
- Ivory white — matching super-bulky chenille — approximately 55–70 g — used for the face panels and belly.
- Mustard yellow — matching super-bulky chenille — approximately 15–20 g — used for the beak and feet.
- Pale pink — DK cotton or embroidery floss — under 5 g — used for the cheek marks.
Tools
- 4 mm crochet hook
- Two 15 mm black safety eyes
- Polyester stuffing, approximately 80–100 g
- Large-eye yarn needle
- Embroidery needle
- Locking stitch marker
- Straight pins
- Sharp scissors
Use embroidered eyes instead of plastic components when the finished penguin is intended for a child under three years old.
Abbreviations
- MR — magic ring
- sc — single crochet
- inc — two single crochets in one stitch
- dec — invisible decrease over two stitches
- sl st — slip stitch
- ch — chain
- BLO — back loop only
For an invisible decrease, insert the hook through the front loops of the next two stitches, yarn over, pull through both front loops, then complete one single crochet.
Pattern — Step by Step
Work in continuous spirals unless a section states otherwise. Mark the first stitch of every round and move the marker only after the round is complete.
Head
Yarn: dark charcoal chenille. Construction source: standard six-stitch amigurumi shaping adapted to the photographed proportions.
R1: 6 sc in MR (6)
R2: inc ×6 (12)
R3: (sc, inc) ×6 (18)
R4: (2 sc, inc) ×6 (24)
R5: (3 sc, inc) ×6 (30)
R6: (4 sc, inc) ×6 (36)
R7–R14: sc around (36)
R15: (4 sc, dec) ×6 (30)
R16: (3 sc, dec) ×6 (24)
Do not insert the safety eyes yet. Their posts must pass through the separate ivory face panels and the head fabric.
R17: (2 sc, dec) ×6 (18)
R18: (sc, dec) ×6 (12)
Stuff the crown and sides firmly. Leave a shallow area at the center front so the face panels do not project excessively.
Fasten off. Leave a 40 cm tail for attaching the head to the body.
Body
Yarn: dark charcoal chenille.
R1: 6 sc in MR (6)
R2: inc ×6 (12)
R3: (sc, inc) ×6 (18)
R4: (2 sc, inc) ×6 (24)
R5: (3 sc, inc) ×6 (30)
R6: (4 sc, inc) ×6 (36)
R7–R15: sc around (36)
R16: (4 sc, dec) ×6 (30)
R17–R18: sc around (30)
R19: (3 sc, dec) ×6 (24)
R20: sc around (24)
R21: (2 sc, dec) ×6 (18)
R22: (sc, dec) ×6 (12)
Stuff the lower half firmly, concentrating filling around the outer wall. Keep the upper opening slightly softer so it can spread beneath the head.
Fasten off. Close only loose gaps around the opening and leave a 40 cm sewing tail.
Face Panels — Make Two
Yarn: ivory white chenille. Work in joined rounds.
R1: 6 sc in MR (6)
R2: inc ×6 (12)
R3: (sc, inc) ×6 (18)
R4: (2 sc, inc) ×6 (24)
Join with a sl st. Fasten off and leave a 35 cm tail.
Flatten each circle into a gentle oval by stretching it vertically. Overlap the inner edges by approximately 15 mm beneath the forehead point.
Forehead Point
Yarn: dark charcoal chenille. Work in turned rows.
Ch 7.
Row 1: Starting in the second ch from the hook, 6 sc (6)
Row 2: ch 1, turn, dec, 2 sc, dec (4)
Row 3: ch 1, turn, dec ×2 (2)
Row 4: ch 1, turn, dec (1)
Fasten off. Leave a 25 cm tail. The narrow end points downward between the two white facial lobes.
Belly Panel
Yarn: ivory white chenille. Work in turned rows.
Ch 7.
Row 1: Starting in the second ch from the hook, 6 sc (6)
Row 2: ch 1, turn, inc, 4 sc, inc (8)
Row 3: ch 1, turn, inc, 6 sc, inc (10)
Row 4: ch 1, turn, inc, 8 sc, inc (12)
Row 5: ch 1, turn, inc, 10 sc, inc (14)
Row 6–Row 7: ch 1, turn, 14 sc (14)
Row 8: ch 1, turn, dec, 10 sc, dec (12)
Row 9: ch 1, turn, dec, 8 sc, dec (10)
Row 10: ch 1, turn, dec, 6 sc, dec (8)
Fasten off. Leave a 45 cm tail for sewing.
Place the wider half across the lower torso. Stretch the panel no more than 5 mm during pinning or the surrounding charcoal fabric will pucker.
Wings — Make Two
Yarn: dark charcoal chenille. Published penguin fins commonly expand into narrow tubes before being decreased and flattened. :contentReference[oaicite:16]{index=16}
R1: 6 sc in MR (6)
R2: (sc, inc) ×3 (9)
R3: (2 sc, inc) ×3 (12)
R4: (3 sc, inc) ×3 (15)
R5–R7: sc around (15)
R8: (3 sc, dec) ×3 (12)
R9–R10: sc around (12)
R11: (2 sc, dec) ×3 (9)
Add a light strip of stuffing through the rounded lower half. Leave the attachment end empty.
Flatten the opening and crochet 4 sc through both layers, placing one additional sc through the final edge stitch (5).
Fasten off. Leave a 30 cm sewing tail.
Feet — Make Two
Yarn: mustard-yellow chenille.
R1: 6 sc in MR (6)
R2: inc ×6 (12)
R3: (sc, inc) ×6 (18)
R4–R5: sc around (18)
R6: (sc, dec) ×6 (12)
Insert a small amount of stuffing and press it toward the toe edge. The rear half must remain flat against the body.
R7: Flatten the opening and crochet 6 sc through both layers (6).
Fasten off. Leave a 30 cm tail.
Beak
Yarn: mustard-yellow chenille.
R1: 6 sc in MR (6)
R2: inc ×6 (12)
R3: (sc, inc) ×6 (18)
R4: sc around (18)
R5: (sc, dec) ×6 (12)
Add a small pinch of stuffing. Flatten the opening horizontally to produce an oval approximately 35 mm wide.
Fasten off. Leave a 30 cm sewing tail.
Cheek Patches — Make Two
Yarn: pale pink DK cotton or embroidery floss held double.
R1: 6 sc in MR (6)
R2: inc ×6 (12)
Join with a sl st. Fasten off and leave a 15 cm tail. For the lighter marks shown in the photograph, replace the circles with six short horizontal embroidery stitches.
Tail
Yarn: dark charcoal chenille.
R1: 6 sc in MR (6)
R2: inc ×6 (12)
R3–R4: sc around (12)
R5: (sc, dec) ×4 (8)
Add a small pinch of stuffing and flatten the open edge.
Fasten off. Leave a 25 cm sewing tail.
Assembly
- Pin the head directly above the body, centering the two 12-stitch openings and checking the vertical profile from both sides.
- Sew the head to the body with small mattress stitches, adding stuffing around the seam before closing the final 25 mm.
- Overlap the ivory face panels at the center and pin them across the lower front half of the head.
- Insert each 15 mm safety eye through its face panel and the head between the equivalent of R10 and R11, leaving seven visible stitches between the posts.
- Lock the washers, sew both panels around their outer edges and attach the charcoal forehead point over the central overlap.
- Position the beak directly below the forehead point and sew around its flattened rear edge.
- Attach the pink cheek patches one round below and two stitches outside the eyes.
- Center the ivory belly panel on the torso, keeping its upper edge approximately 15 mm below the beak, then sew around the perimeter.
- Sew the wings to the sides, place the feet at the front base and attach the tail low on the rear body.
- Bury each yarn tail through at least 4 cm of stuffed fabric, trim it and move the surrounding stitches until the cut end retracts.
The completed penguin should stand without support, with the belly centered and both feet touching the surface evenly.
7 Technical Tips
- Face-panel separation: A gap wider than 5 mm between the ivory circles exposes charcoal yarn above the beak. Overlap the inner edges by approximately 15 mm before inserting the eye posts.
- Rotated round center: Marker drift can move the front axis by one stitch during every round. Recount all increase and decrease rounds and align the forehead point with the body seam.
- Visible decrease holes: Standard decreases can expose stuffing through dark chenille. Work through the front loops only and keep the working loop close to the 4 mm hook shaft.
- Late eye insertion: Safety-eye washers cannot be added after the face panels are fully sewn. Insert both posts while the panels are pinned and compare their height before fitting the backs.
- Stripped chenille pile: Reworking one stitch more than two or three times can expose the internal thread. Test the hook and tension during the first four head rounds before continuing.
- Crooked belly panel: An upper edge shifted by 10 mm makes the entire penguin appear rotated. Mark the torso center at the top and bottom, then align the panel with both markers.
- Unbalanced feet: A foot sewn 8–10 mm higher than the other produces a visible lean. Pin both feet, place the penguin on a level table and test the contact points before sewing.
Conclusion
Complete the face before attaching the wings because the eye spacing, forehead point and beak establish the penguin’s vertical center. Next, pin the belly panel and check its alignment from directly in front. Test the body on a level surface before securing the feet and rear tail. Record the chenille brand, hook size, eye diameter and finished height beside this penguin amigurumi crochet pattern so a second chick can be matched accurately. Share a vertical finished photograph on Pinterest and post the front and side views on Instagram with #PebbleBellyPenguin. Should the next penguin keep the charcoal crown shown here, or use a blue-gray outer body?









