Introduction
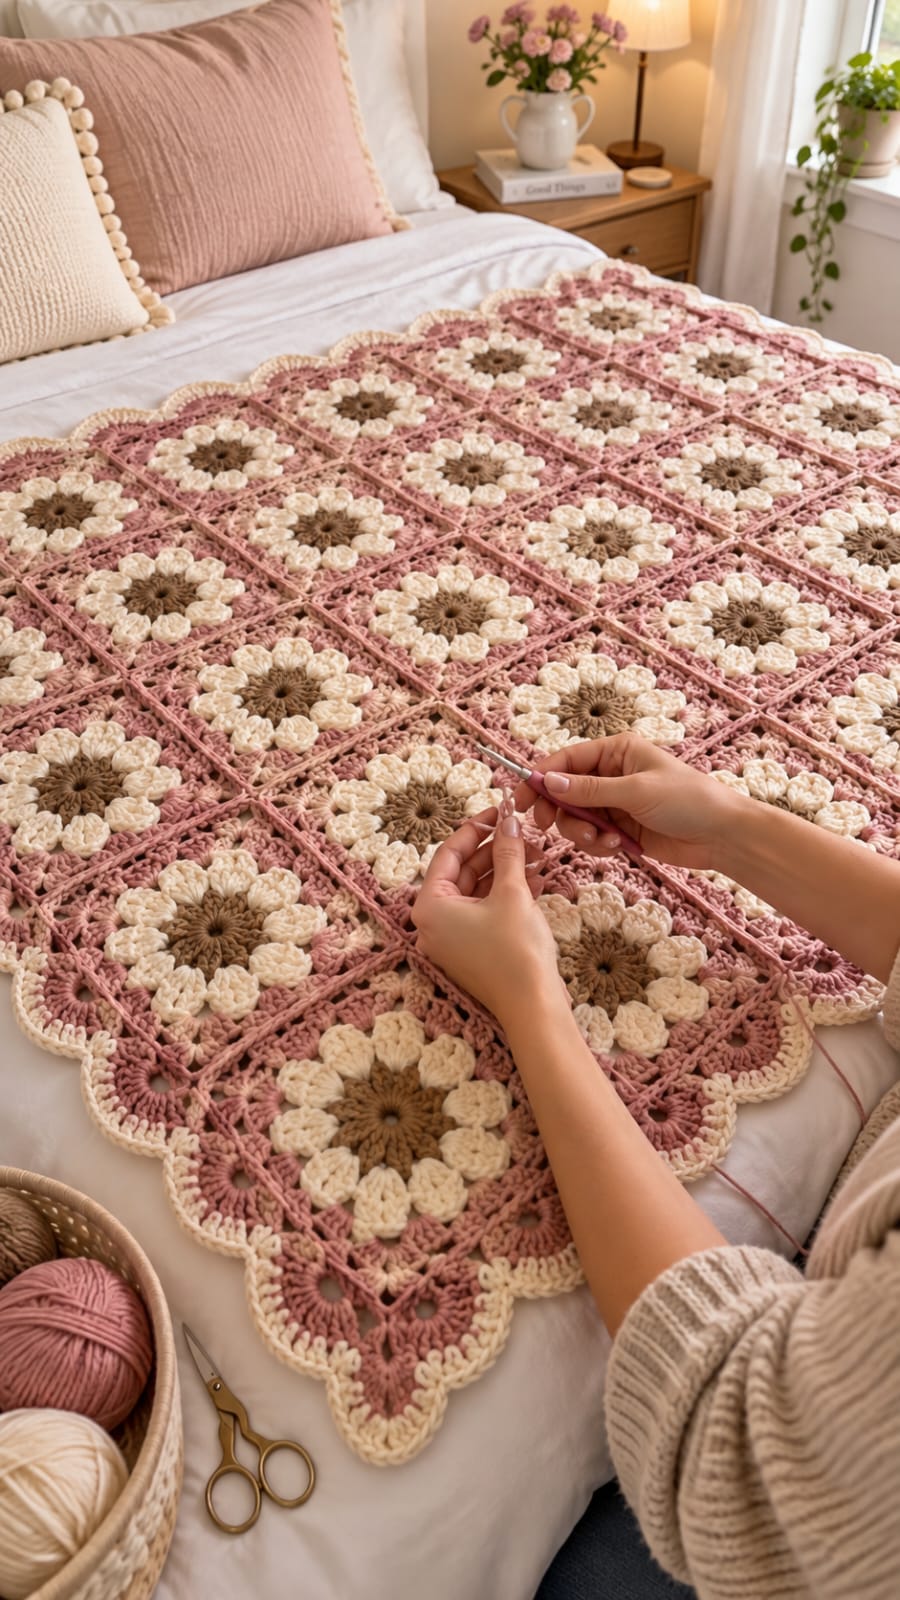
Thirty raised cream daisies need enough pink space around them to stay distinct when the squares become one large bed throw. This pink daisy granny square crochet blanket pattern uses DK yarn, a 4 mm hook, taupe centers, puffed cream petals, dusty-pink backgrounds, and a cream scalloped border. The intermediate reconstruction targets approximately 120 × 150 cm and uses modular construction for accurate sizing.
The instructions below are an original photo-inspired reconstruction based on visible structure; published patterns cited later are used only for sizing, gauge, and material benchmarks.
The Design: What Makes This Daisy Blanket Different
The reference combines dimensional flowers with unusually open square backgrounds. Each motif starts with a compact taupe center, adds twelve raised cream petals, then moves into dusty-pink granny clusters whose chain spaces keep the blanket lighter than a solid floral afghan. Cream joins form narrow grid lines between motifs, separating the pink backgrounds without competing with the flowers. A broad pink outer section and cream scalloped crochet blanket border finish the perimeter. The reconstruction uses thirty motifs in a 5 × 6 layout because that arrangement matches the visible rectangular proportions while keeping every flower evenly spaced. A common mistake with a daisy granny square blanket is joining motifs before checking their diagonals. Small differences accumulate across five squares and can pull the finished blanket noticeably out of square.
Project Info at a Glance
| Skill Level | Time | Finished Size | Hook | Best For |
|---|---|---|---|---|
| Intermediate | Approx. 28–36 hours | Reconstruction target: approx. 120 × 150 cm | 4 mm | Bed throws, sofa blankets, floral bedroom decor |
The finished dimensions are reconstruction targets inferred from the photographed proportions rather than measurements of an identified commercial pattern. Published flower-blanket references vary substantially: Made by Gootie’s DK flower granny blanket measures approximately 106 × 136 cm and uses a 4.5 mm hook, while A Crafty Concept reports daisy squares measuring approximately 4.25 inches / 10.8 cm after blocking. Adore Crea uses a documented 6 × 8 arrangement of 48 squares for a daisy baby blanket.
Materials and Tools
Yarn
- Dusty rose / muted pink — DK #3 — approximately 850–950 g
- Warm cream / ivory — DK #3 — approximately 500–600 g
- Warm taupe / medium brown — DK #3 — approximately 180–220 g
Plan approximately 1,530–1,770 g total for the 120 × 150 cm reconstruction, including joining and border allowance. Actual consumption depends on fiber, square size, petal density, and tension. Made by Gootie’s published DK throw provides a useful quantity benchmark: its 106 × 136 cm blanket specifies eight 100 g skeins for the background plus up to one 100 g skein for each of five flower colors.
Tools
- 4 mm crochet hook
- 4.5 mm hook — optional if the squares work too densely
- Tapestry needle
- Locking stitch markers
- Blocking mats
- Rust-resistant blocking pins
- Scissors
- Measuring tape
Abbreviations
- MR — magic ring
- ch — chain
- sc — single crochet
- hdc — half double crochet
- dc — double crochet
- tr — treble crochet
- sl st — slip stitch
- sp — space
- st/sts — stitch/stitches
- 3-tr-cl — three-treble cluster
- RS — right side
- WS — wrong side
An invisible decrease is not used because every component is worked flat in complete rounds rather than shaped by decreasing amigurumi stitches.
Blanket Layout
Make 30 complete daisy squares.
Arrange them 5 squares across × 6 squares down.
The reconstruction uses larger motifs than many traditional granny-square blankets. Target approximately 21–22 cm per blocked square. Five joined motifs therefore create approximately 105–110 cm of central width before the outer border, while six motifs create approximately 126–132 cm of central length.
The broad pink-and-cream perimeter then brings the finished blanket toward the 120 × 150 cm target.
Gauge and Square Size
Make one complete test motif before starting all thirty.
Target approximately 21–22 cm square after blocking.
If the square is smaller than 20 cm, move up 0.5 mm or add one additional granny round. If it exceeds 23 cm, reduce the hook size or omit the final background round.
More important than exact stitch gauge is consistency: all thirty blocked motifs should match within approximately 5 mm.
Pattern — Step by Step
Taupe Daisy Center — Make 30
Yarn: warm taupe — original reconstruction using a twelve-position floral center supported by published daisy-square construction benchmarks.
R1: Make MR. Ch 3, then work 11 dc into ring. Join with sl st to top of beginning ch-3. (12 dc)
Pull the ring closed firmly but leave the central opening relaxed enough that the stitches do not buckle.
Fasten off taupe.
A twelve-stitch center is a well-established daisy-square structure. Both Adore Crea and A Crafty Concept document 12 dc in the first round before forming twelve raised petals.
Cream Raised Petals
Yarn: warm cream.
R2: Join cream in any dc. Ch 3, yarn over twice, insert hook into same st, yarn over and draw up a loop, complete the first stages of the treble while leaving the final loop on the hook; repeat once more in the same stitch, then yarn over and draw through all remaining loops to complete the first 3-tr-cl.
Ch 2.
In each remaining dc, work 3-tr-cl, ch 2.
Join to the top of the first cluster. (12 petal clusters, 12 ch-2 spaces)
Fasten off cream.
The cluster petals should sit slightly above the taupe center. Do not press them flat while working the next round.
First Dusty-Pink Squaring Round
Yarn: dusty rose.
R3: Join pink in any ch-2 space.
In the first space work ch 3, 2 dc, ch 2, 3 dc. This forms Corner 1.
In each of the next two ch-2 spaces work 3 dc, ch 1.
In the next space work 3 dc, ch 2, 3 dc, ch 1 for Corner 2.
Repeat the sequence of two side clusters followed by one corner around the flower.
Join to the top of the beginning ch-3.
The twelve petal spaces divide exactly into four corners with two side spaces between each corner.
Second Pink Granny Round
R4: Sl st into the nearest corner ch-2 sp. Ch 3, 2 dc, ch 2, 3 dc in the same corner.
Work ch 1, 3 dc in each ch-1 space across the side.
At every corner work ch 1, 3 dc, ch 2, 3 dc.
Continue around. Ch 1 and join to the beginning ch-3.
Third Pink Granny Round
R5: Repeat the granny-square structure established in R4, adding one 3-dc group to each side because the previous round created an additional space.
Work 3 dc, ch 2, 3 dc in every corner and one 3-dc group in every side ch-1 space.
Join.
Fourth Pink Granny Round
R6: Repeat R5 using the newly created spaces.
Maintain ch 1 between neighboring side clusters and ch 2 at each corner.
Join.
Fifth Pink Granny Round
R7: Repeat the established granny-square round once more.
At this stage, measure the motif.
If it is approaching the required 21–22 cm after light blocking, proceed to the cream frame. If the motif remains substantially smaller, add one additional dusty-pink granny round using the same corner and side logic.
Cream Framing Round
Change to cream.
R8: Join cream in any corner. Ch 1. Work 2 sc, ch 2, 2 sc in the corner.
Sc in every dc and ch-1 space across the side.
At each corner work 2 sc, ch 2, 2 sc.
Continue around and join with sl st.
Fasten off with a 25 cm tail.
Checking the First Motif
Block the first square before making the remaining twenty-nine.
Target 21–22 cm along each side.
Measure both diagonals as well. They should differ by no more than approximately 5 mm.
If the square is correctly sized, use it as the physical template for every later motif rather than relying only on row counts.
Making the Remaining 29 Squares
Repeat the complete eight-round motif.
Keep the taupe center, cream petals, dusty-pink background, and cream final frame identical across all thirty squares.
Batch production reduces unnecessary yarn changes. One practical sequence is to crochet all thirty taupe centers, then all cream petal rounds, followed by the pink backgrounds and final cream frames.
Weave ends before joining.
Blocking All 30 Squares
Pin every square to the same template.
Set the corners first, then pin the midpoint of each side.
Do not stretch the raised cream petals.
Instead, shape only the pink background and cream outer frame.
Let the motifs dry completely before removing them from the blocking surface.
5 × 6 Layout
Place five motifs across and six down.
Rotate every square so the starting joins occupy the same relative corner, or deliberately alternate them if the joins remain visible.
Stand several steps away from the arrangement before joining. Check that no taupe center appears substantially darker or larger than the others.
Cream Raised Join
The photograph shows visible narrow lines separating the pink motifs.
Place two squares with wrong sides together.
Using cream, insert the hook through corresponding outer loops on both squares.
Work a relaxed sl st through both layers.
Continue across the entire edge.
Join all five motifs into six horizontal strips first.
Then join the six strips along their long edges.
Do not tighten the slip stitches. The joined seam should remain flexible enough to fold without creating a hard ridge.
Alternative Flat Join
If a raised cream seam is not wanted, use mattress stitch.
Place motifs side by side with right sides facing upward.
Pass the needle beneath corresponding outer loops, alternating between squares.
Pull the seam closed every 4–5 cm rather than after every stitch.
This produces a flatter surface while preserving the visible cream grid.
Blanket Border — Foundation Round
Yarn: dusty rose.
Join pink in any outside corner.
Border R1: Ch 1 and sc evenly around the complete blanket.
Place approximately one sc in each stitch along horizontal motif edges. Along joined row ends, distribute stitches evenly enough that the border lies flat.
At each blanket corner work 3 sc.
Join.
Pink Openwork Border
Border R2: Ch 3. Dc in each stitch around, working 5 dc in each corner stitch. Join.
Border R3: Ch 4, skip 1 st, dc in next st, *ch 1, skip 1 st, dc in next st*. Repeat around, adjusting the final repeat before each corner so the openwork remains centered.
At each corner work dc, ch 2, dc in the corner space.
Join.
Border R4: Ch 1. Sc in each dc and each ch-1 sp around. Work 3 sc in each corner ch-2 sp. Join.
Cream Scalloped Border
Change to cream.
Border R5: Ch 1 and sc around once, working 3 sc in each corner. Join.
Border R6: *Skip 2 sts, work 5 dc in next st, skip 2 sts, sl st in next st.* Repeat around.
At the corners, adjust the preceding skipped stitches if necessary so one full shell sits directly over each corner rather than forcing a partial shell around the turn.
Fasten off cream.
A Crafty Concept documents the same basic shell-border arithmetic—skip two stitches, five double crochet in the next stitch, skip two, then slip stitch—for its daisy granny blanket.
Assembly
- Crochet one complete taupe, cream, and dusty-pink test motif and block it to the reconstruction target of approximately 21–22 cm square.
- Make the remaining 29 motifs with the same hook, yarn, round count, and tension so all thirty squares follow the dimensions of the approved test square.
- Weave all motif tails, then block every square and confirm that corresponding sides match within approximately 5 mm before any joining begins.
- Arrange the thirty motifs in a 5 × 6 rectangle and inspect the complete color and flower-center distribution from several steps away.
- Using cream yarn, join five squares into each of six horizontal strips with relaxed slip stitches through corresponding outer loops.
- Join the six completed strips along their long edges, matching every square intersection precisely so the cream seam lines cross at right angles.
- Work one dusty-pink foundation round around the complete blanket, correcting minor edge irregularities through stitch spacing rather than stretching the motifs.
- Add the dusty-pink solid and openwork border rounds, keeping the corner increases centered and checking after each round that the blanket remains flat.
- Change to cream for the stabilizing border round and final five-double-crochet scallops, centering one complete shell at every outside corner.
- Weave each remaining tail through at least 6 cm of matching fabric, lightly block the finished blanket to approximately 120 × 150 cm, and shape every cream scallop before drying.
The finished blanket should form a rectangular 5 × 6 floral grid with thirty taupe-centered cream daisies, dusty-pink openwork backgrounds, visible cream joins, and a continuous cream scalloped perimeter.
7 Technical Tips
- The flower center cups upward: keep exactly 12 double crochets in the taupe center and avoid pulling the magic ring until the stitches overlap. A center that already forms a bowl in Round 1 will push the cream petals upward unevenly.
- The cream petals disappear into the pink background: keep each of the 12 cluster petals raised while working Round 3 behind them. Catching the top loops of a petal in the background round can flatten that petal permanently.
- The squares finish at different sizes: block every motif to the same 21–22 cm template and reject differences greater than approximately 5 mm. Thirty small discrepancies can create several centimeters of distortion across the assembled blanket.
- The cream joining seams pucker: make each joining slip stitch at least as relaxed as the outer loops it connects. A seam shortened by even 1 cm across each square can contract an entire six-square column.
- The blanket ripples after the first border: reduce stitches along the long edges rather than adding another corrective round. Excess border stitches compound outward and become more visible once the cream shells are added.
- The scallops do not meet the corner correctly: count the final cream foundation round before beginning the shells and adjust one skip interval near the corner. Never force half of a five-dc shell around a 90-degree turn.
- The finished throw pulls diagonally: measure both complete blanket diagonals before final blocking. If they differ by more than approximately 2 cm, reshape the motif intersections first instead of stretching only the shorter outer corner.
Published Daisy Square Construction Benchmark
Adore Crea’s Daisy Granny Square Baby Blanket provides a directly relevant construction reference. Its motif begins with 12 double crochets in the center, followed by 12 treble-cluster petals separated by chain spaces.
The documented blanket uses 48 squares arranged 6 across × 8 down. That demonstrates how the twelve-petal flower can be repeated consistently in a modular blanket while allowing the final dimensions to be controlled through the number of motifs.
Published Puff Daisy Benchmark
A Crafty Concept’s free daisy blanket uses 42 squares. Each motif starts with 12 center double crochets and adds 12 popcorn-style petals.
The published squares measure approximately 4 inches unblocked and 4.25 inches after blocking. The same pattern finishes its blanket with a single-crochet round followed by five-double-crochet shells, providing a useful technical precedent for the scalloped edge used in this reconstruction.
DK Flower Blanket Benchmark
Made by Gootie’s flower granny blanket is particularly useful for yarn and finished-size comparison because it specifies DK #3 yarn and a 4.5 mm hook.
The published finished size is approximately 41 × 53 inches / 106 × 136 cm. Its listed background quantity is eight 100 g skeins, with additional flower colors.
The photo-inspired blanket here is larger, includes raised petals on every motif, and carries a substantial perimeter, so the reconstruction quantity is intentionally higher.
Ravelry Puff Flower Benchmarks
The Adelia Puff Flower Square Blanket on Ravelry uses worsted-weight yarn with either a 4 or 5 mm hook and produces a published blanket approximately 33–34 inches square. The design combines raised flower squares with a join-as-you-go braided joining technique.
Joanita Theron’s Puff Flower Granny Square also uses a 4 mm hook and approximately 95–110 m for its published square pattern. Both provide useful comparisons for raised floral texture, though neither is the source of the reconstruction instructions.
Choosing the Dusty-Pink Yarn
The reference pink is muted rather than bright bubblegum. Look for color names such as dusty rose, antique rose, blush mauve, old pink, or muted peony.
A matte yarn photographs closer to the reference than a highly glossy acrylic because the shadows around the raised cream petals remain visible.
Buy the pink yarn in one dye lot when possible. It occupies most of the blanket surface, so a small shade difference can become obvious when neighboring squares are joined.
Choosing the Taupe Center
The flower center should contrast with both cream and pink without becoming almost black.
Medium taupe, mushroom brown, warm mocha, or light chestnut are suitable starting points.
The reference uses a neutral brown that visually recedes beneath the cream petals. Very dark chocolate creates a stronger sunflower-like appearance and changes the overall character of the motif.
Why the Petals Use Cream
Cream provides the strongest repeated light area in the blanket.
It also connects the flower petals to the joining seams and outer scallops. Repeating one pale color in those three structural positions prevents the large pink field from becoming visually continuous.
Use the same cream dye lot for petals, joins, and border whenever possible.
Making a Smaller Baby Blanket
Use 20 motifs in a 4 × 5 layout.
At 21 cm per blocked motif, the central panel will measure approximately 84 × 105 cm before joining allowance and border.
Add a narrower three-round border rather than the full reconstruction border if the target is a compact baby blanket.
Check current safe-sleep guidance before using any handmade blanket in an infant sleep environment.
Making a Larger Bed Throw
Use 42 motifs in a 6 × 7 layout.
At approximately 21 cm per motif, the central field approaches 126 × 147 cm before the perimeter.
The completed blanket will therefore be substantially larger than the reconstruction target.
Calculate additional yarn from a finished test square rather than multiplying the original gram estimate blindly. Weigh one complete blocked motif and multiply by the new motif count, then add yarn for joins and border.
Using Worsted Yarn Instead
Worsted #4 will increase motif size if the round count stays unchanged.
Jo to the World reports flower granny squares made with size 4 yarn at approximately 5.75 inches after Round 4 and 7 inches after Round 5. Its documented yardage also rises as rounds are added.
Make a complete test square before deciding the blanket layout. A worsted version may need fewer than thirty motifs to reach the same finished dimensions.
Using a 5.5 mm Hook
A larger hook creates more open chain spaces and greater drape.
Joanna’s Crochet specifies a 5.5 mm hook with worsted yarn for a contemporary daisy granny blanket and gives a gauge of four double crochets per inch in the granny section.
That combination is useful for a lighter, more open throw, but it will not reproduce the relatively compact DK texture shown in the reference as closely as the 4 mm setup.
Changing the Flower Center Color
Mustard gives the blanket a classic daisy appearance. Sage creates a softer botanical palette, while pink centers produce a lower-contrast flower.
Keep the center darker than the cream petals if you want the radial petal arrangement to remain immediately visible.
Changing only the center requires very little additional yarn planning because Round 1 is the smallest color section.
Making the Petals More Dimensional
Replace the 3-tr-cl with a puff or popcorn stitch if stronger relief is required.
A Crafty Concept uses 12 popcorn petals, while Kathryn Macdonald’s Flower Puff Granny Square is specifically designed around a raised puff-stitch flower and uses DK yarn.
Make one sample first because thicker petals consume more yarn and can increase the diameter of the flower round.
Making the Blanket Flatter
Use 3-tr clusters rather than dense popcorns.
Block the flowers face down on a padded blocking mat, but do not pin the petals outward.
The goal is to flatten the square background while retaining a small amount of petal relief.
A flatter flower is useful when the blanket will be used regularly rather than primarily displayed.
Joining as You Go
Join-as-you-go can reduce finishing time, but all motifs still need to match in size.
Work the final cream frame until the first joining point, connect it to the neighboring completed square, then continue around.
Complete one row of five squares before beginning the next.
The traditional post-block joining method remains easier to correct if individual squares vary slightly.
Maintaining Straight Grid Lines
Place a stitch marker at every four-square intersection before joining long rows.
Match those intersections first.
Then distribute the stitches between markers.
This prevents a small discrepancy in one motif from shifting every subsequent square and creating diagonal seam lines.
Planning Yarn from a Test Square
Weigh one fully finished and blocked motif on a digital kitchen scale.
Multiply that weight by 30.
Then add approximately 15–20% for joins and the broad border.
This project-specific measurement is more reliable than generic yardage because cluster height and square dimensions vary significantly with individual tension.
Correcting a Cupped Center
Confirm that Round 1 contains exactly 12 dc.
If the count is correct but the center still cups, remake the round with slightly looser tension or a hook 0.5 mm larger.
Do not attempt to force a strongly cupped center flat during final blanket blocking. The surrounding pink rounds can distort as the center tries to return to its original shape.
Correcting Uneven Petals
Every petal uses one center stitch as its working position.
Count twelve completed clusters before fastening off.
If one petal is shorter, compare the number of partial treble stitches inside the cluster.
Correct it immediately because the pink squaring round will make later access difficult.
Correcting Rounded Square Corners
Each granny corner requires two clusters separated by a ch-2 space.
A missing cluster shortens that corner; an extra side cluster widens it.
Count the spaces on all four sides before beginning the next round.
A properly constructed square should lie nearly flat even before blocking.
Correcting a Wavy Outer Border
Lay the blanket flat after every border round.
Waves indicate excess circumference.
Remove stitches evenly from the problem edge rather than waiting for the next round to correct the excess.
The final cream shells magnify existing waves because five tall stitches are concentrated into each shell.
Correcting Tight Corners
A corner that curls inward needs additional turning space.
Check that the openwork border contains the full corner sequence and that the cream foundation round has three stitches at the turn.
Do not solve a tight corner by stretching it aggressively during blocking. Correcting the stitch distribution produces a more stable result after washing.
Care and Storage
Follow the care instructions for the selected yarn.
Wash the blanket in a manner appropriate to its fiber and support its weight when wet. Large granny-square blankets can stretch at joins if lifted from one corner.
Reshape the rectangle while damp and arrange the cream scallops individually.
For storage, fold along motif seams rather than through the centers of the raised flowers. This reduces prolonged compression of the cream petals.
Sources
Adore Crea — Crochet Daisy Granny Square Baby Blanket — documents a 12-dc center, 12 treble-cluster petals, dusty-rose squaring round, and a 6 × 8 layout totaling 48 squares.
A Crafty Concept — Daisy Granny Square Blanket — uses 42 daisy squares, reports approximately 4-inch unblocked and 4.25-inch blocked motifs, and documents a five-double-crochet shell border.
Made by Gootie — Flower Granny Square Blanket — DK #3 yarn, 4.5 mm hook, published finished size approximately 41 × 53 inches / 106 × 136 cm, with detailed throw-size yarn quantities.
Ravelry — Adelia Puff Flower Square Blanket — worsted yarn, 4 or 5 mm hook, raised puff-flower squares, braided joining, and a published 33–34-inch square blanket size.
Ravelry — Puff Flower Granny Square by Joanita Theron — raised floral granny motif using a 4 mm hook and approximately 95–110 m of yarn.
Ravelry — Flower Puff Granny Square by Kathryn Macdonald — DK puff-flower motif measuring approximately 11 × 11 cm in the published version.
Jo to the World Creations — Flower Granny Square Blanket — provides measured square sizes and per-square yardage benchmarks for medium #4 yarn.
Raffamusa Designs — Crochet Daisy Granny Square — DK yarn and 4 mm hook reference for a cluster-petal daisy motif, with size comparisons for different yarn and hook combinations.
Conclusion
The thirty-square grid controls this blanket more than the border does, so complete and block one 21–22 cm test motif before committing yarn to the remaining twenty-nine. Keep every taupe center at twelve stitches, form twelve cream petals, and verify the pink corners before adding another round. Once the 5 × 6 grid is joined, check both diagonals before beginning the scalloped perimeter. Save this pink daisy granny square crochet blanket pattern to Pinterest or share the completed throw on Instagram with #PinkDaisyGrannyBlanket. Your next step is the first test square: would you keep the warm taupe flower centers shown in the reference or replace them with muted mustard?









