Introduction
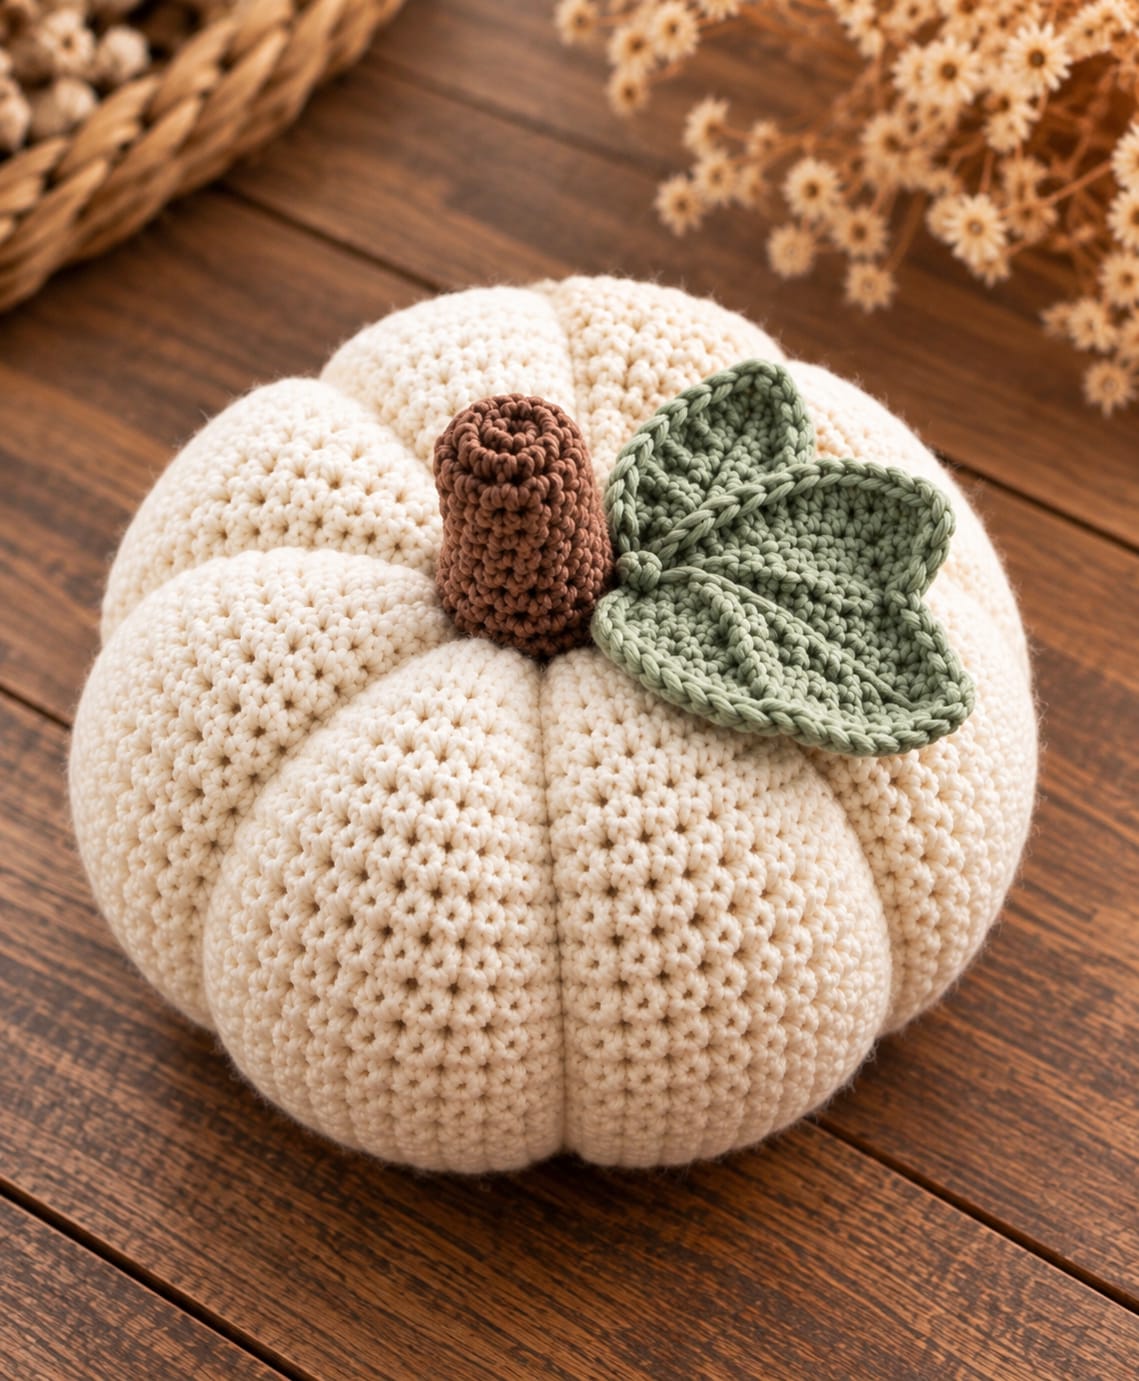
Eight broad cream lobes must converge beneath one short brown stalk without turning the pumpkin into an ordinary stuffed sphere. This large cream crochet pumpkin pattern uses worsted-weight yarn, a 4–5 mm hook, fiberfill, external sculpting, a tubular stem, and one large sage leaf. The intermediate reconstruction targets roughly 20 cm wide and makes substantial tabletop fall decor without requiring rigid internal structure.
The instructions below are an original photo-inspired reconstruction based on visible structure; published patterns cited later are used only for sizing, gauge, and material benchmarks.
The Design: What Makes This Cream Pumpkin Different
The reference depends on post-stuffing shaping rather than decorative surface stitches. A smooth single-crochet shell supplies the volume, then eight external strands compress it into broad vertical lobes that converge at a recessed crown and flattened base. Second, the brown stem is deliberately thick and short; a narrow stalk would look undersized against the broad body. Finally, one oversized sage crochet pumpkin leaf covers part of the crown and uses a raised center vein plus two side lobes to create the three-point silhouette visible in the image. The most common mistake with this form is overstuffing before sculpting. A shell packed until rigid resists the shaping strands, producing thin surface lines instead of deep rounded channels between the lobes.
Project Info at a Glance
| Skill Level | Time | Finished Size | Hook | Best For |
|---|---|---|---|---|
| Intermediate | Approx. 5–7 hours | Reconstruction target: approx. 20 cm wide × 14–16 cm high | 4–5 mm | Tabletop fall decor, shelves, centerpieces |
The dimensions above are reconstruction targets inferred from the photographed proportions, not measurements from an identifiable published design. Published worsted-weight pumpkin references provide useful scale checks: Crafty Crochet Castle reports a large version at approximately 5 inches high × 6.5 inches wide with worsted yarn and a 5 mm hook, while Laura Brian’s 2026 Fall Pumpkins pattern specifies worsted yarn, a 5 mm hook, and a large finished size around 5 inches wide × 3 inches high.
Materials and Tools
Yarn
- Warm cream / ivory — worsted #4 — approximately 120–150 g
- Chocolate brown — worsted #4 — approximately 20–25 g
- Muted sage green — worsted #4 — approximately 25–35 g
Choose a smooth matte yarn with enough twist to keep individual single-crochet stitches defined. Cotton-acrylic blends work particularly well for the leaf because they hold the pointed outline more firmly than very soft plush yarn.
Tools
- 4 mm crochet hook for dense amigurumi fabric
- 5 mm crochet hook if the selected worsted yarn works too tightly at 4 mm
- Polyester fiberfill — approximately 120–170 g
- Long tapestry needle
- Locking stitch marker
- Scissors
- Measuring tape
- Blocking pins for the leaf
Abbreviations
- MR — magic ring
- sc — single crochet
- inc — 2 sc in one stitch
- dec — invisible single-crochet decrease
- sl st — slip stitch
- ch — chain
- hdc — half double crochet
- dc — double crochet
- tr — treble crochet
- BLO — back loop only
- st/sts — stitch/stitches
For an invisible decrease, insert the hook through the front loops of the next two stitches, yarn over and pull through both front loops, then complete one single crochet.
Pattern — Step by Step
Work the pumpkin body and stem in continuous spirals unless a section states otherwise. Move the stitch marker after every completed round.
Pumpkin Body — Make 1
Yarn: warm cream — original reconstruction using standard six-stitch amigurumi expansion.
R1: 6 sc in MR. (6)
R2: Inc ×6. (12)
R3: (1 sc, inc) ×6. (18)
R4: (2 sc, inc) ×6. (24)
R5: (3 sc, inc) ×6. (30)
R6: (4 sc, inc) ×6. (36)
R7: (5 sc, inc) ×6. (42)
The 42-stitch plateau is the large-size maximum used for this reconstruction.
R8: Sc around. (42)
R9: Sc around. (42)
R10: Sc around. (42)
R11: Sc around. (42)
R12: Sc around. (42)
R13: Sc around. (42)
R14: Sc around. (42)
R15: Sc around. (42)
R16: Sc around. (42)
R17: Sc around. (42)
R18: (5 sc, dec) ×6. (36)
R19: (4 sc, dec) ×6. (30)
R20: (3 sc, dec) ×6. (24)
Begin stuffing. Add small pieces around the outer circumference first and leave the center slightly softer.
R21: (2 sc, dec) ×6. (18)
R22: (1 sc, dec) ×6. (12)
Add the remaining stuffing. Keep the pumpkin firm but compressible.
R23: Dec ×6. (6)
Fasten off with a 100 cm tail. Thread through the front loops of the six remaining stitches and close the opening.
Creating the Flattened Pumpkin Shape
The crocheted shell initially resembles a rounded ball. The photographed pumpkin is substantially wider than it is tall, so the body needs vertical compression before the individual ribs are made.
Thread a long cream strand through the bottom center and push the needle vertically through the stuffing until it exits at the crown.
Return the needle through the center to the base.
Pull gradually until the pumpkin loses approximately 2–3 cm of height.
Repeat once and knot securely inside the base depression.
Eight External Sculpting Ribs
Cut approximately 250 cm of cream yarn.
Bring the needle from the bottom center to the crown.
Run the yarn down the outside of the body and insert the needle into the bottom center.
Pull until the first broad groove forms.
Return through the center and make the next pass approximately 45 degrees from the first.
Continue until eight shaping passes divide the body into eight approximately equal lobes.
Do not fully tighten the first pass before all eight positions are established.
Second Sculpting Pass
The photographed channels are deeper than a single loose strand normally creates.
Inspect the pumpkin from above.
When all eight sections are balanced, run a second pass through each existing groove.
Pull only until the shaping yarn sinks between the lobes.
The finished channels should be broad depressions, not narrow cords cutting visibly across the crochet surface.
Brown Stem — Make 1
Yarn: chocolate brown. Published pumpkin patterns commonly use narrow continuous-round tubes for crocheted stems.
R1: 6 sc in MR. (6)
R2: Inc ×6. (12)
R3: Sc around BLO. (12)
R4: Sc around. (12)
R5: Sc around. (12)
R6: Sc around. (12)
R7: Sc around. (12)
R8: Sc around. (12)
R9: Sc around. (12)
R10: Sc around. (12)
Add a small amount of stuffing. Keep the upper opening slightly hollow to reproduce the recessed top visible in the reference.
R11: Working BLO, sc around. (12)
Fasten off with a 40 cm tail.
Target a finished stem approximately 6–7 cm tall. The 12-stitch circumference creates the substantial stalk required for a pumpkin of this diameter.
Creating the Rolled Stem Top
The reference stem has a visible circular opening rather than a pointed cap.
Do not close the final round.
Fold the upper 5–7 mm of the stem slightly inward.
Use the brown yarn tail to tack the fold at three or four points.
This creates a compact rolled rim while leaving the center recessed.
Large Sage Three-Lobed Leaf — Make 1
Yarn: muted sage green — original photo-inspired reconstruction.
The leaf is built from a central base with three separately shaped lobes. Each lobe returns to the same lower junction, producing the broad three-point form visible beside the stem.
Center Lobe
Ch 15.
Starting in second ch from hook: sc in next 2 ch, hdc in next 2 ch, dc in next 3 ch, tr in next 4 ch, dc in next 2 ch, 5 dc in final ch.
Rotate to work down the opposite side of the foundation chain.
Dc in next 2 ch, tr in next 4 ch, dc in next 3 ch, hdc in next 2 ch, sc in final 2 ch.
Sl st at the base.
Left Lobe
From the same base, ch 12.
Starting in second ch from hook: sc in next 2 ch, hdc in next 2 ch, dc in next 3 ch, tr in next 3 ch, 5 dc in final ch.
Working down the opposite side: tr in next 3 ch, dc in next 3 ch, hdc in next 2 ch, sc in final 2 ch.
Sl st at the common base.
Right Lobe
Repeat the left-lobe instructions.
Do not fasten off.
Leaf Outline
Work one round of sc around the entire three-lobed perimeter.
At each lobe tip work sc, ch 2, sc into the tip stitch.
At the valleys between lobes, use one sl st to pull the edge inward.
Continue around all three lobes and join at the base.
This edging defines the pointed silhouette and gives the outer edge enough weight to remain flat.
Raised Leaf Veins
Fasten off the perimeter yarn and rejoin sage at the leaf base.
Surface sl st along the center foundation chain of the middle lobe.
Return to the base and repeat along the foundation chain of each side lobe.
These three raised lines reproduce the strong vein structure visible on the photographed leaf.
Fasten off with a 35 cm sewing tail.
Blocking the Leaf
Dampen the sage leaf according to the yarn-care instructions.
Pin the center lobe straight and spread the two side lobes at approximately 45–55 degrees from the center vein.
Target an overall width around 12–14 cm.
Let the piece dry completely before sewing it to the pumpkin.
Attaching the Stem
Position the brown stem over the crown depression.
The lower edge should cover the point where the eight sculpting grooves converge.
Sew around the stem base through approximately every second stitch.
Pass the needle deeply into the stuffed body rather than catching only surface loops.
Before making the final knot, check the stem from the front and side. It should stand nearly vertical with a slight natural lean.
Attaching the Sage Leaf
Place the leaf beside the stem so its base disappears beneath the brown stalk.
The three points should extend across approximately one-quarter to one-third of the pumpkin’s upper surface.
Sew the base securely.
Add two or three small tacking stitches along the lower section of the center vein.
Leave the outer halves of all three lobes unattached so they retain their dimensional shape.
Assembly
- Crochet the cream body through Round 23, stuff it firmly but keep enough compression for the shaping strands to sink between the future lobes.
- Close the six-stitch opening and run a separate vertical strand through the body center to reduce the height by approximately 2–3 cm.
- Mark eight positions around the crown at approximately 45-degree intervals before making any permanent external shaping passes.
- Run the first eight cream sculpting strands from crown to base, using moderate tension until all eight lobes have approximately equal width.
- Make a second pass through the existing grooves and tighten gradually until the channels become deep without exposing the shaping yarn prominently.
- Crochet the 12-stitch brown stem, lightly stuff its lower section, and leave the final opening unclosed to retain the rolled hollow top.
- Crochet and block the three-lobed sage leaf, setting the side lobes approximately 45–55 degrees from its raised center vein.
- Sew the stem directly over the crown depression, passing the needle deeply into the stuffed body so the stalk cannot pivot at its base.
- Position the sage leaf beside the stem, sew its base and lower center vein, and leave the three pointed outer sections free from the pumpkin surface.
- Weave all tails through at least 6 cm of dense crochet, push the base center slightly inward, and redistribute the stuffing until all eight lobes rest evenly on a flat table.
The finished pumpkin should be broad and low with eight cream lobes, a recessed crown, one thick hollow-topped brown stem, and a large three-point sage leaf.
7 Technical Tips
- The sculpting yarn cuts into the surface: make two moderate passes through each groove rather than one extremely tight pass. A narrow strand under excessive tension creates a cord-like indentation instead of the broad channels visible in the reference.
- The eight lobes finish at different widths: place markers around the crown at approximately 45-degree intervals before tightening anything. Correct the spacing after the first eight passes and only then add the second shaping layer.
- The pumpkin remains too spherical: compress the body vertically by approximately 2–3 cm with a separate crown-to-base strand before sculpting the ribs. External grooves alone divide the circumference but do not reliably produce the photographed low profile.
- The base rocks on the table: push the closed bottom center approximately 1 cm upward into the stuffing. A gathering knot or overfilled center that projects below the lobes creates an unstable contact point.
- The brown stem tilts after handling: insert the sewing needle several centimeters into the stuffed body on every attachment pass. Catching only the crown stitches creates a flexible hinge beneath a 6–7 cm stem.
- The sage leaf curls after attachment: block it to approximately 12–14 cm wide before sewing and tack only the lower vein. Stitching the complete perimeter to the pumpkin removes the raised three-lobe structure.
- Fiberfill appears through the cream stitches: switch from a 5 mm to a 4–4.5 mm hook if gaps remain when the body is stretched. Dense single crochet should conceal white stuffing even across the most strongly sculpted lobes.
Published Size and Hook Benchmarks
Crafty Crochet Castle documents three pumpkin sizes made with worsted-weight yarn and a 5 mm hook. Its reported finished measurements are approximately 3 × 3.5 inches for small, 4 × 5 inches for medium, and 5 × 6.5 inches for large.
Laura Brian’s Fall Pumpkins, published in August 2026, also specifies worsted-weight yarn and a 5 mm hook. The published large size is approximately 5 inches across × 3 inches high, demonstrating how post-construction pumpkin shaping can create a substantially wider-than-tall silhouette.
Published 42-Stitch Body Benchmark
A current amigurumi pumpkin reference uses the standard six-stitch expansion sequence from 6 to 42 stitches, followed by eight even rounds before symmetrical decreases.
That arithmetic supports the 42-stitch maximum used in this reconstruction. The photographed pumpkin is broader, so the reconstruction retains the 42-stitch plateau for additional rounds and relies on strong post-stuffing compression to create the low profile.
Published Stem Benchmarks
Jo to the World Creations publishes a stem beginning with 10 half-double crochet stitches, followed by a BLO round and straight single-crochet rounds. The large version continues through six stem rounds.
Marching North uses another tubular approach: 8 sc in a magic ring, one BLO round, then straight rounds through Round 6.
Sarah Maker provides a narrower alternative beginning with 6 double crochet stitches and continuing in front-post double crochet until the desired height is reached.
The photographed stalk is notably thick, so this reconstruction expands to 12 stitches before working the straight tube.
Why the Body Uses a 42-Stitch Plateau
Six-stitch amigurumi expansion produces predictable arithmetic:
6 → 12 → 18 → 24 → 30 → 36 → 42.
Each increase round adds exactly six stitches. The decrease sequence reverses the same progression:
42 → 36 → 30 → 24 → 18 → 12 → 6.
That symmetry keeps the unsculpted shell balanced before the external strands transform it into a pumpkin.
Why the Pumpkin Needs Eight Ribs
The reference image shows a densely segmented body with approximately eight substantial lobes.
Six divisions would create broader sections and expose more uninterrupted single-crochet fabric. Ten divisions would make the lobes considerably narrower.
Eight provides a useful middle ground: each section remains rounded while the repeated valleys create the strong radial pattern visible from above.
Making a Six-Lobe Version
For a simpler silhouette, divide the crown into six positions approximately 60 degrees apart.
Use the same body pattern.
Run six sculpting strands rather than eight and make a second pass through each groove.
The resulting pumpkin will have broader lobes and slightly less compression around the circumference.
Making a Smaller Pumpkin
Stop increasing after 36 stitches.
Work approximately seven or eight even rounds, then reverse the expansion:
36 → 30 → 24 → 18 → 12 → 6.
Reduce the stem to 8–10 stitches and make the leaf approximately 20% smaller.
With worsted yarn and a 4 mm hook, expect a substantially smaller tabletop piece, though final dimensions depend on tension and stuffing density.
Making an Extra-Large Pumpkin
For more width, changing yarn weight is preferable to pushing this particular stitch sequence far beyond 42 stitches.
Use bulky #5 yarn with an appropriately smaller-than-label hook for dense fabric.
Keep the same 42-stitch structure and increase the amount of stuffing proportionally.
A current general pumpkin size reference places bulky-yarn large pumpkins around 14–16 cm diameter at 60–70 g, while larger constructions and heavier yarn can exceed that range substantially.
Stuffing the Lobes Correctly
Add stuffing in small pieces rather than inserting one large wad.
Place most of the fiberfill around the outer circumference.
Keep the exact center slightly less dense so the vertical compression strand can pull the crown and base toward one another.
After sculpting, push small amounts of stuffing sideways with the blunt end of a hook if one lobe looks flatter than its neighbors.
Creating a Deeper Crown
After the eight ribs are complete, thread a separate cream strand through the base center.
Bring it out immediately beside the stem.
Return through the body to the base and pull approximately 1 cm deeper than the surrounding lobe tops.
Knot at the bottom depression.
This secondary compression creates the sunken center required for the stem and leaf assembly.
Creating a Flatter Base
Press the bottom closure upward with your thumb.
If it returns to a rounded position, pass a strand from one lower lobe across the internal center to the opposite lobe.
Repeat at a perpendicular angle.
The two internal support strands hold the bottom depression without adding visible stitches to the exterior.
Changing the Main Color
The same construction works in muted orange, sage, dusty blue, oatmeal, terracotta, or lavender.
Light cream makes the individual stitch texture particularly visible because shadows form clearly inside the eight sculpted valleys.
For dark colors, increase the contrast between the body and leaf so the topper remains distinguishable from normal viewing distance.
Changing the Leaf Color
The reference uses muted gray-green sage.
Olive produces a more traditional autumn palette, while mustard or burnt orange gives stronger contrast against cream.
Keep the stem brown when changing the leaf unless a monochrome topper is intentional. The dark stalk provides a visual center where all eight cream ribs converge.
Making Two Leaves
Make a second leaf approximately 70–75% of the original size.
Place it behind the large leaf and rotate it approximately 35 degrees.
Sew both bases beneath the stem before securing their lower veins.
Do not stack two full-size leaves directly because they can cover most of the upper lobe structure.
Adding a Curled Vine
Join sage yarn beside the stem.
Ch 25.
Starting in the second chain from the hook, work 2 hdc in each chain.
The increased stitch count causes the strip to curl automatically.
Fasten off and attach only the first 2 cm beside the stem, leaving the remaining spiral free.
Using a Cinnamon Stick Instead
Several published pumpkin patterns use natural cinnamon sticks rather than crocheted stems.
For this large body, choose a thick cinnamon piece approximately 6–8 cm long.
Create a small opening at the crown and insert 2–3 cm into the stuffing.
A crocheted stem remains the more practical option when the decoration will be washed or compressed for storage.
Correcting Uneven Lobes
Do not cut the shaping yarn immediately after sculpting.
Place the pumpkin on a flat table and inspect it from directly above.
If one section is too broad, move the adjacent groove slightly toward its center before tightening again.
Small adjustments are easier while the shaping strands remain continuous and accessible.
Correcting a Tall Pumpkin
A body that remains too tall needs stronger central compression, not tighter external ribs.
Run another crown-to-base strand through the internal center.
Reduce the height in increments of approximately 5 mm.
Stop when the widest point sits near the vertical midpoint and the crown no longer appears domed.
Correcting Visible Sculpting Yarn
Use the same cream yarn as the body.
Guide each strand into the lowest point of an existing groove.
If the yarn remains visible, loosen that pass and repeat it rather than pulling harder.
The strand should sink between stuffed lobes instead of resting on top of the single-crochet stitches.
Correcting a Twisted Leaf
Check that all three surface-slip veins begin at the same base junction.
Steam-free wet blocking is appropriate for many cotton and cotton-blend yarns, subject to the manufacturer’s care instructions.
Pin the three tips first, then the valleys.
Do not sew the leaf onto the pumpkin until completely dry.
Correcting a Loose Stem
Remove the stem if it can rotate at the crown.
Run a fresh brown sewing strand through the stem base and deeply into the pumpkin at four evenly spaced positions.
Cross those internal attachment paths beneath the stem.
This distributes the load across the stuffed crown instead of relying on one ring of surface stitches.
Using the Pumpkin as a Centerpiece
The reconstruction target of approximately 20 cm makes the piece large enough to stand alone on a dining table or sideboard.
For a grouped arrangement, make two smaller 36-stitch pumpkins in contrasting colors.
Keep the cream pumpkin as the largest piece and position the sage leaf toward the open side of the display so its three points remain visible.
Care and Storage
Follow the care label for the selected yarn.
Hand washing gives the sculpted ribs the most control because the eight shaping strands can be redistributed before drying.
Press water out without twisting the body.
Reshape every lobe while damp and dry on a flat surface.
For seasonal storage, use a container that does not compress the stem or leaf. Long-term pressure can flatten the stuffing and bend the blocked leaf points.
Sources
Laura Brian — Fall Pumpkins on Ravelry — published August 2026; worsted-weight yarn, 5 mm hook, cinnamon-stick stem, and published sizes of approximately 3.5 × 2 inches and 5 × 3 inches.
Jo to the World Creations — Easy Pumpkins — reference for multiple pumpkin sizes plus a tubular crochet stem beginning with 10 hdc and continuing in straight single-crochet rounds.
Sarah Maker — Free Crochet Pumpkin Pattern: 3 Sizes + Any Yarn — worsted-weight construction with a 4 mm hook, gathered shaping, vertical sculpting stitches, and a six-stitch crocheted stem option.
Marching North — Crochet Stacked Pumpkins — ribbed pumpkin construction plus an 8-stitch continuous-round stem worked through six rounds.
Amigurumi Corner — Amigurumi Pumpkin Crochet Pattern — useful benchmark for a continuous spiral body expanding through 42 stitches before symmetrical decreases and post-stuffing finishing.
Crafty Crochet Castle — Crochet Pumpkin Tutorial — worsted yarn, 5 mm hook, with published finished measurements from approximately 3 × 3.5 inches through 5 × 6.5 inches.
Conclusion
The eight shaping channels determine this pumpkin’s silhouette more than any decorative stitch. Complete the 42-stitch shell first, compress the body vertically, mark all eight rib positions, and tighten the sculpting passes only after their spacing is balanced. Your next step is to crochet the cream body through Round 17 and confirm that the fabric remains dense enough to conceal stuffing before beginning the decreases. Save this large cream crochet pumpkin pattern to Pinterest or share the finished piece on Instagram with #CreamSagePumpkin. Would you keep the single oversized three-lobed sage leaf shown here, or add a smaller second leaf behind the brown stem?









