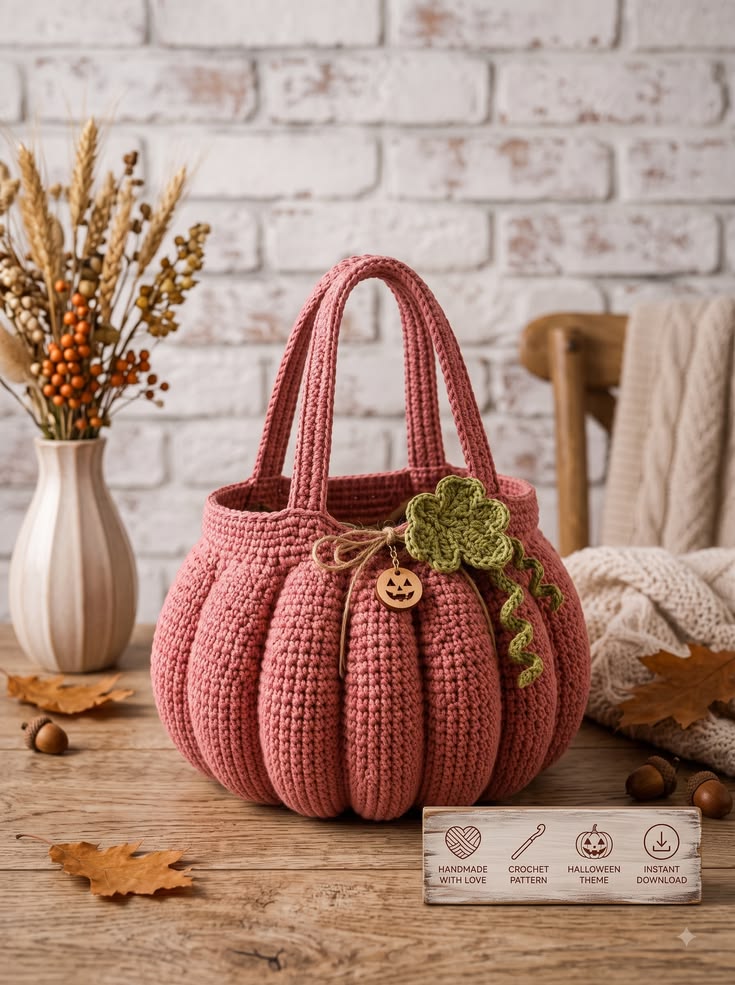
A pumpkin handbag needs its ribs to continue from the rounded base toward the narrow opening; otherwise the body reads as a plain bucket bag. This pink crochet pumpkin bag pattern uses a structured round shell, eight raised pumpkin channels, two reinforced handles, and an olive-green leaf and curling vine. Worked mainly in worsted-weight yarn, the finished handbag targets approximately 28 cm wide and 23 cm high, excluding the handles.
The Design: What Makes This Pumpkin Bag Different
The photographed bag combines a functional handbag opening with the segmented volume of a pumpkin. Eight vertical ribs divide the pink body into rounded sections, while a tighter upper rim controls the opening so the bag does not flare outward. The handles attach across reinforced rim sections rather than directly to individual ribs, distributing the carrying load across more stitches.
The olive leaf and spiral vine provide the pumpkin reference without requiring an orange body. A small tie and charm sit at the front center, but they are decorative rather than structural.
The main construction risk is excessive gathering. Pull the ribs too tightly and the interior capacity collapses; leave them too loose and the pumpkin shape disappears. The channels should create visible valleys while allowing the base to remain broad and stable.
Project Info at a Glance
| Skill Level | Time | Finished Size | Hook | Best For |
|---|---|---|---|---|
| Intermediate | 8–12 hours | Approx. 28 × 23 cm | 4.0 mm | Fall handbag, Halloween accessory, seasonal gift |
Published pumpkin-bag patterns vary considerably in size and construction. Comparable designs use hooks around 4.0–5.5 mm with worsted yarn, while one published pumpkin bag measures about 26 inches around its widest section. The measurements below are targets for recreating the proportions visible in the supplied image rather than measurements taken directly from the photograph.
Materials and Tools
Yarn
- Dusty rose or muted pink worsted-weight yarn — approximately 250–300 g
- Olive-green worsted-weight yarn — approximately 20–30 g
- Natural jute-look or tan yarn — approximately 3–5 g for the front tie
A firm cotton, cotton-acrylic blend, or low-stretch acrylic works better for this bag than a very soft yarn. The body needs enough structure to hold the pumpkin channels after the bag is loaded.
Tools
- 4.0 mm crochet hook
- 3.5 mm crochet hook for the leaf if a firmer fabric is required
- Yarn needle
- Scissors
- 8 locking stitch markers
- Flexible measuring tape
- Optional fabric lining
- Optional lightweight bag interfacing
- Optional decorative charm
Abbreviations
- MR — magic ring
- ch — chain
- sc — single crochet
- hdc — half double crochet
- dc — double crochet
- inc — increase
- dec — decrease
- sl st — slip stitch
- BLO — back loop only
- FLO — front loop only
- st / sts — stitch / stitches
For an invisible decrease, insert the hook through the front loops of the next two stitches, yarn over, draw through both front loops, then complete the single crochet.
Gauge and Finished Measurements
Target approximately 17–18 sc per 10 cm using the 4.0 mm hook. A dense fabric is more important than matching an exact gauge because loose stitches can stretch under the weight of the bag contents.
Before adding the raised channels, target approximately 26–28 cm across the widest part. The body should measure roughly 21–23 cm from base to rim.
Each finished handle should have approximately 34–38 cm of usable length between attachment points, with a handle drop near 15–17 cm.
Pink Crochet Pumpkin Bag Pattern
Bag Base
Use dusty rose yarn. Work in continuous rounds and mark the first stitch.
R1: 8 sc in MR. (8)
R2: Inc ×8. (16)
R3: [Sc, inc] ×8. (24)
R4: [Sc 2, inc] ×8. (32)
R5: [Sc 3, inc] ×8. (40)
R6: [Sc 4, inc] ×8. (48)
R7: [Sc 5, inc] ×8. (56)
R8: [Sc 6, inc] ×8. (64)
R9: [Sc 7, inc] ×8. (72)
R10: [Sc 8, inc] ×8. (80)
R11: [Sc 9, inc] ×8. (88)
R12: [Sc 10, inc] ×8. (96)
Measure the base. It should be approximately 18–20 cm across when lying flat. If your base is considerably larger, change to a smaller hook before continuing.
Turning the Base into the Bag Body
R13: BLO sc around. (96)
R14–R18: Sc around. (96)
The BLO round creates a defined turning line between the base and side wall. Keep the first five body rounds relatively firm because they support the lower pumpkin shape.
Lower Pumpkin Expansion
R19: [Sc 11, inc] ×8. (104)
R20: Sc around. (104)
R21: [Sc 12, inc] ×8. (112)
R22–R27: Sc around. (112)
The 112-stitch section forms the broadest area of the handbag. Place eight markers every 14 stitches around R27. These positions will later guide the pumpkin channels.
Upper Pumpkin Shaping
R28: [Sc 12, dec] ×8. (104)
R29: Sc around. (104)
R30: [Sc 11, dec] ×8. (96)
R31: Sc around. (96)
R32: [Sc 10, dec] ×8. (88)
R33: Sc around. (88)
R34: [Sc 9, dec] ×8. (80)
R35: Sc around. (80)
The opening should now be visibly narrower than the center of the pumpkin. Do not continue decreasing unless the opening is substantially wider than the proportions shown in the reference.
Reinforced Top Rim
R36: BLO sc around. (80)
R37: Sc around. (80)
R38: Sc around. (80)
R39: Sl st loosely around. (80)
Fasten off.
The top rim should remain firm but flexible enough for the bag to open. If the slip-stitch round causes the opening to contract, remove it and finish with another round of single crochet instead.
Creating the Eight Pumpkin Ribs
The channels visible in the photograph can be produced after the main shell is complete. This keeps the bag body structurally simple while allowing precise control over the pumpkin shaping.
Use the eight markers placed around the broadest section as guides.
Thread approximately 80 cm of matching pink yarn onto a yarn needle.
Anchor the yarn securely on the inside near the base.
Run the needle upward through a vertical column of stitches toward the rim, then return down through a neighboring column.
Pull only until a shallow channel forms.
Knot securely on the inside.
Repeat at all eight marked positions.
Each channel should be approximately 1.5–2.5 cm deep at the widest part. Avoid pulling the channels completely closed.
Optional Raised Crochet Ribs
For the pronounced ridges visible in the reference, add surface crochet beside each gathered channel.
Join pink yarn near the base of one channel.
Surface sl st vertically toward the top rim.
Keep the loops relaxed.
Fasten off approximately one round below the rim.
Repeat beside each of the eight channels.
This creates a raised ridge on one side of each indentation and makes the pumpkin segmentation clearer.
Handle 1
Use dusty rose yarn.
Ch 71.
Row 1: Sc in second ch from hook and across. (70)
Row 2: Ch 1, turn, sc across. (70)
Row 3: Ch 1, turn, BLO sc across. (70)
Row 4: Ch 1, turn, sc across. (70)
Row 5: Ch 1, turn, sc across. (70)
Fasten off, leaving a 40 cm tail at both ends if possible.
The handle should measure approximately 38–42 cm before attachment. A shorter handle produces a tighter handbag-style drop; additional rows increase width rather than length.
Handle 2
Repeat the first handle exactly.
Lay both handles together before installation. Their finished lengths should differ by no more than approximately 5 mm.
Handle Reinforcement
Cut two lengths of matching yarn approximately twice the length of each handle.
Thread one strand through the center of each handle from end to end and back again.
Alternatively, crochet over a strong cotton cord while working the final handle row.
The reinforcement should carry part of the load without being visible from the outside.
Attaching the First Handle
Flatten the bag gently and identify the front and back centers.
Position the first handle so its attachment points sit approximately 8–10 cm apart on the front half of the rim.
Insert each handle end approximately 2.5–3 cm below the rim.
Sew through at least three rim rounds.
Work several horizontal stitches and several vertical stitches through each attachment.
Do not attach a handle only to the topmost round.
Attaching the Second Handle
Position the second handle on the back half of the bag.
Match the spacing used for the front handle.
Check that neither handle crosses a deep pumpkin channel.
Sew both ends through the reinforced rim using the same attachment method.
Stand the bag upright and compare the two handle arches before weaving away the tails.
Olive Pumpkin Leaf
Use olive-green yarn and a 3.5–4.0 mm hook.
Ch 5 and join with sl st to form a ring.
R1: Ch 1, work 10 sc into ring, join. (10)
The leaf is formed from five lobes worked around this center.
Leaf Lobe 1
Ch 6.
Starting in second ch: sl st, sc, hdc, dc, tr.
Sl st into the next two center stitches.
Leaf Lobes 2–5
Repeat the same lobe sequence four more times around the center.
For slight variation, make two lobes with ch 7 and add one extra dc before the tr.
After the fifth lobe, work one round of sc around the entire leaf.
At each lobe tip work (sc, ch 2, sc).
Fasten off with a 30 cm tail.
Target a finished leaf approximately 8–10 cm across.
Leaf Veins
Use a slightly darker olive yarn if available.
Surface sl st from the center toward each of the five leaf points.
Stop approximately 5 mm before each tip.
Fasten off on the reverse.
These short lines make the five-lobed leaf structure more visible without adding substantial thickness.
Crochet Pumpkin Vine
Use olive-green yarn.
Ch 46.
Starting in second chain from the hook, work 3 sc in each chain.
The repeated increases force the strip into a spiral.
Fasten off with a 25 cm tail.
The relaxed vine should measure approximately 12–16 cm depending on yarn tension.
For a looser curl, alternate 2 sc and 3 sc per chain instead.
Front Tie
Cut a 50–60 cm length of natural tan yarn, crochet cord, or decorative jute-look fiber.
Thread it through two stitches near the center front of the reinforced rim.
Tie a small bow.
Keep the bow separate from the handle attachment stitches so it can be removed without weakening the bag.
Optional Pumpkin Charm
The reference includes a small pumpkin-face charm beneath the bow.
If using a purchased charm, attach it to the decorative tie or to a separate removable loop rather than directly to a load-bearing crochet stitch.
For a fully crocheted bag, the charm can be omitted without affecting the pumpkin construction.
Optional Fabric Lining
A lining reduces stretch and prevents small objects from working through the crochet fabric.
Measure the interior circumference and depth after all eight pumpkin channels have been formed.
Cut two fabric pieces using those measurements plus approximately 1.5 cm seam allowance.
Sew the lining separately.
Insert it into the bag with the wrong sides facing.
Fold the upper fabric edge inward.
Hand-sew it approximately 1 cm below the crochet rim.
Keep lining stitches away from the handle attachment zones where possible.
Optional Magnetic Closure
A magnetic snap can be installed at the center front and back of a fabric lining.
Reinforce the fabric behind both snap pieces with a small square of interfacing.
Install the hardware before sewing the lining into the crochet shell.
Do not mount a metal magnetic snap directly through unsupported crochet stitches because repeated opening can stretch the rim.
Shaping the Pumpkin
Fill the empty bag loosely with clean towels.
Adjust each of the eight channels so the rounded sections are approximately equal in width.
Measure across neighboring ribs at the widest point.
A difference below approximately 1 cm will be difficult to notice in normal use.
Leave the towels inside for several hours if the yarn needs help holding the rounded shape.
Assembly
- Crochet the 96-stitch circular base and turn the work upward with the BLO round before building the side wall.
- Expand the body to 112 stitches, work the broad middle section, then decrease gradually to the 80-stitch top opening.
- Complete the reinforced rim and mark eight equally spaced vertical positions around the pumpkin body.
- Gather each marked channel from base to rim, keeping the indentation shallow enough to preserve the interior capacity.
- Add optional surface-crochet ridges beside the gathered channels to strengthen the segmented pumpkin appearance.
- Crochet two matching pink handles, reinforce their centers, and attach each end through at least three rim rounds.
- Crochet the five-lobed olive leaf and sew it to the front-right area without covering a handle attachment.
- Make the green spiral vine and secure only its upper end so the lower curls remain free.
- Add the removable tan bow and optional charm at the front center, then install the lining or closure if used.
- Support the empty bag with towels, balance all eight pumpkin sections, inspect every handle seam, and weave remaining tails into matching-color stitches.
The completed handbag should have a broad rounded base, eight visible pumpkin sections, a narrower reinforced opening, two matching handles, one five-lobed green leaf and a free-hanging spiral vine.
7 Technical Tips for a Better Crochet Pumpkin Bag
- Keep the eight channels evenly spaced. With 112 stitches at the widest section, place a marker every 14 stitches before shaping the ribs. Unequal spacing produces one noticeably wider pumpkin segment.
- Limit each channel to roughly 1.5–2.5 cm of indentation. Pulling the gathering yarn harder may create dramatic ribs, but it also reduces usable interior volume. Adjust the channels while the bag is lightly filled.
- Attach each handle through at least three rim rounds. Sewing only through R39 concentrates the load on one line of stitches. Spread the attachment over approximately 2.5–3 cm vertically.
- Match handle lengths within 5 mm. A difference of 1–2 cm causes one handle to carry more load and makes the opening lean. Compare both strips before sewing either one permanently.
- Keep surface crochet loose. Tight vertical slip stitches can shorten one side of a pumpkin segment. The body should remain the same height before and after each raised ridge is added.
- Keep the leaf under about 10 cm across. An oversized appliqué can cover the handle attachment and distort the rim. Position the leaf only after both handles have been sewn in place.
- Test the bag with 1 kg of soft contents before regular use. Lift it a short distance above a padded surface and inspect all four handle attachments. Add reinforcement if the pink stitches around an attachment visibly elongate.
How to Make the Pumpkin Bag Smaller
Stop the base increases after 80 stitches instead of 96.
Work the lower wall directly from that smaller base, then expand the broadest section to approximately 96 stitches.
Reduce the rim to approximately 64–72 stitches.
Shorten each handle foundation chain by 10–15 chains.
This produces a compact pumpkin purse rather than the larger handbag proportions shown in the reference.
How to Make a Larger Pumpkin Tote
Add one or two increase rounds to the base before turning upward.
For example, expand a 96-stitch base to 104 and then 112 stitches while keeping eight evenly distributed increases per round.
The broadest body can then reach 120–128 stitches.
Increase the handle width to six or seven rows and add internal reinforcement before carrying heavier contents.
A larger version benefits strongly from a fabric lining because crochet fabric stretches as the load increases.
Choosing the Pink Yarn
The photographed bag uses a muted dusty rose rather than a bright candy pink. Rosewood, antique rose, clay pink and muted terracotta-pink shades can produce a similar result.
Use a yarn with enough stitch definition to show the vertical channels. A very fuzzy yarn can visually merge adjacent ribs and reduce the pumpkin effect.
For a functional handbag, low stretch is also useful. Cotton and cotton-rich blends generally maintain the base and handle shape better than very elastic fibers.
Alternative Pumpkin Colors
The same construction works in traditional pumpkin orange, cream, mustard, sage, rust or deep burgundy.
For a neutral version, use oatmeal for the body with dark olive accessories. A Halloween version can use black or charcoal with a bright green leaf.
Keep the leaf darker or more contrasting than the bag body. Without that color separation, the botanical detail can disappear against the upper rim.
Keeping the Bag Upright
The circular base should be firm enough to support the empty handbag. If it folds easily, add a second base panel.
Crochet another circle matching R1–R12.
Place the second circle inside the finished bag and sew it around the perimeter of R12.
For more structure, place a washable plastic canvas circle between the two crochet layers before stitching them together.
Do not use cardboard in a bag intended to be washed.
Preventing Handle Stretch
Handle stretch is one of the main functional problems in crocheted handbags.
Use a smaller hook for the handles if their fabric feels noticeably softer than the bag rim. Reinforcement cord can also be enclosed inside the strips.
Check the attachment points after loading the bag. If the top edge begins pulling upward beneath a handle, extend the reinforcement stitches farther down the side wall.
Making the Pumpkin Ribs More Pronounced
Start with the gathering method rather than adding more decreases to the shell.
Thread matching pink yarn through each marked channel and tighten the eight lines gradually. Work around the bag several times instead of finishing one channel completely before moving to the next.
This distributes the compression evenly.
After the shape is balanced, secure every gathering strand independently. If one strand later loosens, the other seven channels will remain intact.
Making the Vine Curl Evenly
The vine curls because several stitches are worked into every foundation chain.
Three sc per chain creates a compact spiral. Two sc per chain produces a gentler wave.
If the first half curls more tightly than the second, your tension changed during the row. Rework the vine while checking that every chain receives the same number of stitches.
Attach the vine only near the leaf base so the lower spiral remains dimensional.
Care Instructions
Follow the washing directions for the selected yarn.
Remove detachable charms and decorative ties before cleaning.
If the bag has a fabric lining or magnetic closure, use the care method appropriate for all materials rather than the yarn alone.
After washing, press out excess water with towels. Do not twist the handles.
Fill the damp bag loosely with clean towels and reshape all eight pumpkin sections.
Arrange both handles in their natural arches and allow the handbag to dry supported.
For storage, place clean tissue or lightweight fabric inside the body. Do not flatten the pumpkin channels beneath heavier objects.
Conclusion
The eight vertical channels are the defining feature of this pink crochet pumpkin bag pattern, but the reinforced rim and handles determine how well it functions as a handbag. Build the round shell first, expand the middle before reducing the opening, and shape the pumpkin ribs only after the body is complete. Attach both handles across several rim rounds, then add the olive leaf, curling vine and removable front decoration. The next practical step is to crochet and measure the 96-stitch base before committing to the full body size. Save the finished bag to Pinterest or share it on Instagram with #PinkCrochetPumpkinBag. Would you keep the olive leaf shown here or replace it with a darker forest-green version? “`0









