Introduction
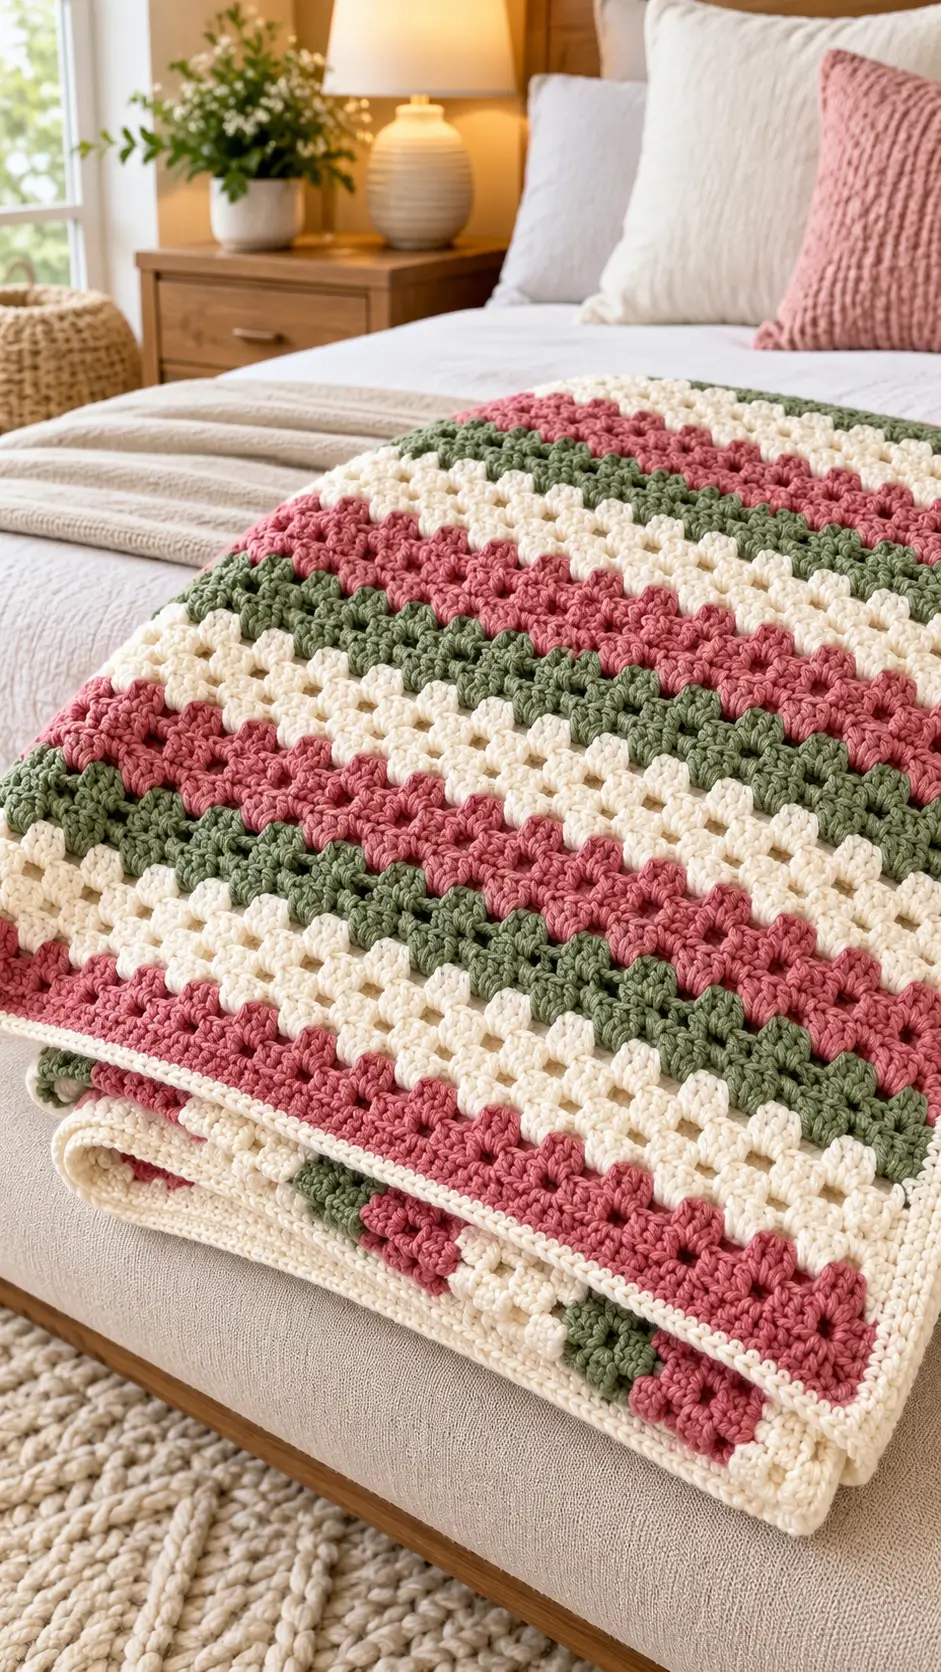
Three alternating rose, sage and cream cluster bands give this blanket its specific bed-end geometry. This granny stripe crochet blanket uses DK yarn, a 4 mm hook and repeated three-double-crochet groups to build a throw around 120 cm wide. The construction is beginner-accessible but requires consistent edge counting. Its short stitch repeat also makes width and length changes practical without redesigning the motif.
The Design: What Makes This Granny Stripe Blanket Different
The photograph depends on three structural decisions. First, dusty rose and sage are separated repeatedly by cream, preventing the two darker colors from merging into a single broad band. Second, each row offsets its clusters into the spaces of the preceding row. That stagger creates the characteristic granny cluster blanket grid rather than solid horizontal double crochet.
A narrow cream perimeter gives the blanket a defined rectangular edge and can cover yarn carried along the sides. Similar border-based construction is common in granny stripe blanket patterns.
The most common mistake in a three color crochet blanket of this type is losing a cluster at an edge. The error may remain unnoticed for several rows, gradually narrowing the fabric. Counting clusters at regular intervals is therefore more useful than counting every individual double crochet.
Project Info at a Glance
| Skill Level | Time | Finished Size | Hook | Best For |
|---|---|---|---|---|
| Beginner / Advanced Beginner | Approx. 10–30+ hours | Approx. 120 × 175 cm | 4 mm | Throw or bed-end blanket |
Materials and Tools
Yarn
For the closest match to the photographed blanket, select smooth DK yarns with similar twist and fiber content.
- Warm cream — DK — dominant color and border — Stylecraft Special DK or comparable yarn
- Dusty rose — DK — contrast stripe color — Stylecraft Special DK or comparable yarn
- Muted sage green — DK — contrast stripe color — Stylecraft Special DK or comparable yarn
For a blanket around 120 × 175 cm, approximately 1,600 g of DK yarn provides a useful planning reference. Actual consumption changes with gauge, yarn construction, stripe distribution and border depth.
Do not divide that amount equally between the three colors. Cream occupies a larger visual area in this design and is also required for the border.
Tools
- 4 mm crochet hook
- Yarn needle
- Scissors
- Locking stitch markers
- Tape measure
- Blocking mats and rust-resistant pins — optional
Abbreviations
- ch — chain
- sc — single crochet
- dc — double crochet
- sp — space
- st / sts — stitch / stitches
- sl st — slip stitch
- RS — right side
- WS — wrong side
Invisible decrease is an amigurumi shaping technique and is not required for this flat rectangular blanket.
Granny Stripe Crochet Blanket Pattern
This blanket is worked flat in turned rows. Each new granny cluster is positioned primarily in the spaces between the clusters of the preceding row, producing the staggered structure visible in the photograph.
Foundation
Yarn: warm cream.
Make a foundation chain in a multiple of 3 until it reaches the required blanket width. For the photo-inspired version, aim for a relaxed foundation measuring approximately 120 cm.
Do not stretch the chain while measuring. A foundation chain measured under tension can produce a finished blanket that is noticeably narrower than planned.
The exact starting chain depends on your yarn, hook and personal tension. Working a gauge sample before making the full foundation is more reliable than copying a fixed chain count from a blanket made with different materials.
Granny Stripe Row 1
With cream, begin the first granny-cluster row.
Work groups of 3 dc at regular intervals across the foundation according to the chosen multiple-of-three foundation method.
The basic structure is:
3 dc cluster, skip the corresponding foundation stitches, 3 dc cluster.
Repeat across the row while maintaining the selected edge treatment.
Count the completed clusters before beginning Row 2. Record this number. It becomes the reference count for checking the width throughout the project.
Granny Stripe Row 2
Turn the work.
Complete the turning-chain or edge treatment used for your foundation method.
Work 3 dc into each space between the clusters of the previous row.
Continue across the blanket.
The clusters in this row should sit between the clusters below rather than directly on top of them. This offset produces the recognizable granny stripe structure.
Granny Stripe Row 3
Turn the work.
Repeat the established cluster structure, placing each group of 3 dc into the appropriate space between the clusters below.
Check both side edges before continuing. The total number of cluster positions should remain stable.
If one edge begins moving inward, inspect the previous row before adding more length. A missing final cluster is a common cause of tapered granny stripe blankets.
Dusty Rose Stripe
Yarn: dusty rose.
Change to dusty rose at the beginning of a new row.
Work the established granny cluster repeat across the blanket:
3 dc into each space between the clusters of the previous row.
Turn and repeat for the desired number of rose rows.
The photograph uses dusty rose as one of its strongest accent bands. Keep these sections relatively compact rather than allowing rose to dominate a large uninterrupted area.
If rose will be used again after only a few rows, the yarn can be carried neatly along the side edge. The cream border can later conceal those carried strands.
Cream Stripe
Yarn: warm cream.
Change to cream at the edge.
Work the same granny-cluster sequence across the row without changing the established cluster count.
Turn and repeat until the cream band reaches the planned depth.
Cream performs an important structural role in the color arrangement. It separates dusty rose from sage, creating clear horizontal bands rather than allowing the two accent colors to meet directly.
Sage Green Stripe
Yarn: muted sage green.
Change to sage at the beginning of the row.
Work 3 dc into each appropriate space across.
Check the first and final cluster positions carefully. Missing an edge cluster during a color change can reduce the blanket width without becoming obvious until several rows later.
Turn and continue the sage section to the required depth.
Change back to cream when the sage band is complete.
Photo-Inspired Color Repeat
For a close interpretation of the photographed blanket, use the following basic sequence:
Dusty Rose → Cream → Sage → Cream
Repeat the sequence throughout the blanket.
The stripe depths do not need to remain identical from top to bottom. Slight variation in the number of rows can create the layered appearance visible in the reference image while the underlying granny stitch remains unchanged.
Continue working until the blanket measures approximately 175 cm long, or stop when it reaches the dimensions required for your bed, sofa or throw.
Cream Border
Yarn: warm cream.
The photographed blanket has a relatively narrow pale border. A compact single-crochet perimeter gives the granny clusters a cleaner rectangular outline without competing with the striped center.
Border Round 1
Join cream at one corner.
Work single crochet evenly along the first side. Continue around all four sides, adding sufficient stitches at each corner to turn without pulling the fabric inward.
When crocheting along row ends, distribute stitches consistently. Do not automatically force one stitch into every visible loop if doing so causes the edge to ripple.
Border Round 2
Work another round of single crochet around the complete blanket.
Maintain the corner increases so each corner remains flat and close to a 90-degree angle.
Optional Border Round 3
Add one additional round of single crochet if the perimeter appears too narrow relative to the finished blanket.
Fasten off.
Leave a long enough yarn tail to weave securely through several neighboring stitches.
Finishing and Assembly
- Lay the finished blanket flat with all four edges completely visible.
- Check the rectangle for sections that have unintentionally narrowed or widened.
- Thread each loose yarn tail onto a blunt yarn needle.
- Weave cream tails through cream stitches only.
- Weave dusty rose tails through matching rose stitches.
- Repeat the process for all sage-green tails.
- Trim each tail only after it has been woven securely back through the fabric.
- Measure the blanket without stretching it and compare opposite edges.
- Block according to the care instructions supplied by the yarn manufacturer, keeping all four corners square.
- Allow the blanket to return to stable dimensions before recording its final width and length.
The completed blanket should have consistent cluster counts, square corners and an uninterrupted cream perimeter.
7 Technical Tips for Cleaner Granny Stripes
- Mark the final cluster position. Place a locking stitch marker at each edge if missing the final cluster is a recurring problem. Losing one cluster repeatedly creates visibly tapered sides.
- Measure the foundation without stretching it. A chain pulled to 120 cm while under tension can relax substantially after the first rows are worked. Measure it flat on a table instead.
- Keep all three yarns in the same weight category. Combining DK cream with a substantially thicker sage yarn changes cluster height. The result can be raised or wavy horizontal bands.
- Make color changes at the row edge. A knot or join positioned several stitches inside the blanket can remain visible through the open spaces between granny clusters.
- Control turning-chain height. Turning chains that consistently stand taller than adjacent double crochets create loops along the side edge. Use the same turning method throughout the entire blanket.
- Check border tension before completing several rounds. A border that cups inward usually needs more stitches along the perimeter. A border that ripples outward generally contains too many.
- Weave yarn tails through matching colors. A dark sage tail passed behind a cream section may remain visible through the open cluster spaces. Keep each tail within stitches of the same or a closely matching color.
Sizing and Yarn Calculations
Granny stripe construction adapts well to different blanket dimensions because width is controlled by the foundation and length is controlled by the number of rows.
The important point is to select one foundation convention and retain it throughout the pattern. Some granny stripe methods use a multiple of 3, while others add one or two stitches because their edge or foundation construction differs.
Do not take the starting-chain calculation from one pattern and combine it with the first row from another pattern. The cluster repeat may be similar, but the edge mathematics can differ.
For a custom width, make a short granny-stripe gauge sample using the actual yarn and 4 mm hook. Measure how many complete clusters fit into 10 cm.
Use that measurement to estimate how many clusters are required for the target blanket width. Then build the foundation according to the chosen granny-stripe method.
Yarn consumption also changes substantially with dimensions and gauge. A small baby blanket and a full bed-end throw cannot use the same yarn estimate simply because both use granny stripes.
For the approximately 120 × 175 cm version described here, around 1,600 g of DK yarn is a practical reference quantity. Purchasing additional cream can be useful because the cream yarn appears repeatedly in the stripe sequence and is also used around the perimeter.
Color Placement for the Rose, Sage and Cream Version
The supplied design uses a restrained three-color palette rather than a traditional multicolor scrap-yarn arrangement.
Cream occupies enough surface area to function as the base color. Dusty rose provides the strongest contrast, while muted sage introduces a darker secondary stripe.
Keeping cream between the two accent colors creates separation:
Rose → Cream → Sage → Cream
This arrangement can be repeated consistently or adjusted by changing the depth of individual bands.
Before starting the full blanket, crochet a small sample containing all three yarns. Compare the colors under neutral daylight. This makes it easier to identify a sage that is too dark, a rose that is too saturated or a cream that appears excessively yellow beside the other colors.
For a closer match to the photograph, use muted rather than highly saturated shades. Bright white, primary green and vivid red will retain the same stitch construction but produce a substantially different visual result.
Gauge and Finished Dimensions
Gauge does not need the same precision required for fitted garments, but it still determines blanket width, yarn consumption and cluster density.
Make a gauge sample containing several complete granny clusters and at least six to eight rows. Measure the sample after it has relaxed.
If the clusters are excessively loose and the spaces appear much larger than those in the reference photograph, reduce the hook size slightly. If the fabric becomes stiff or the clusters are difficult to work into, increase the hook size.
The target dimensions for this version are approximately:
- Width: 120 cm
- Length: 175 cm
These dimensions suit the bed-end throw format shown in the reference photograph. They can be changed without altering the fundamental granny stripe repeat.
Conclusion
Measure a swatch before committing the full yarn quantity to this granny stripe crochet blanket, then record the cluster count so every later row can be checked against the same number. For the photographed palette, arrange warm cream between dusty rose and muted sage and finish the rectangle with a narrow cream border. Save the finished dimensions with the yarn label so the gauge remains reproducible. The next practical step is to crochet a three-color gauge sample. Pin the finished blanket to Pinterest or share the stripe sequence on Instagram with #RoseSageGrannyStripe. Would you keep the sage bands equal to the rose bands, or make the sage sections narrower?










I been crocheting for over 60yrs and I now the difference between the two of them and I now how to pick and change colors .but I knot mine because I don’t like leaving threads loose because it will soon come apart