Introduction
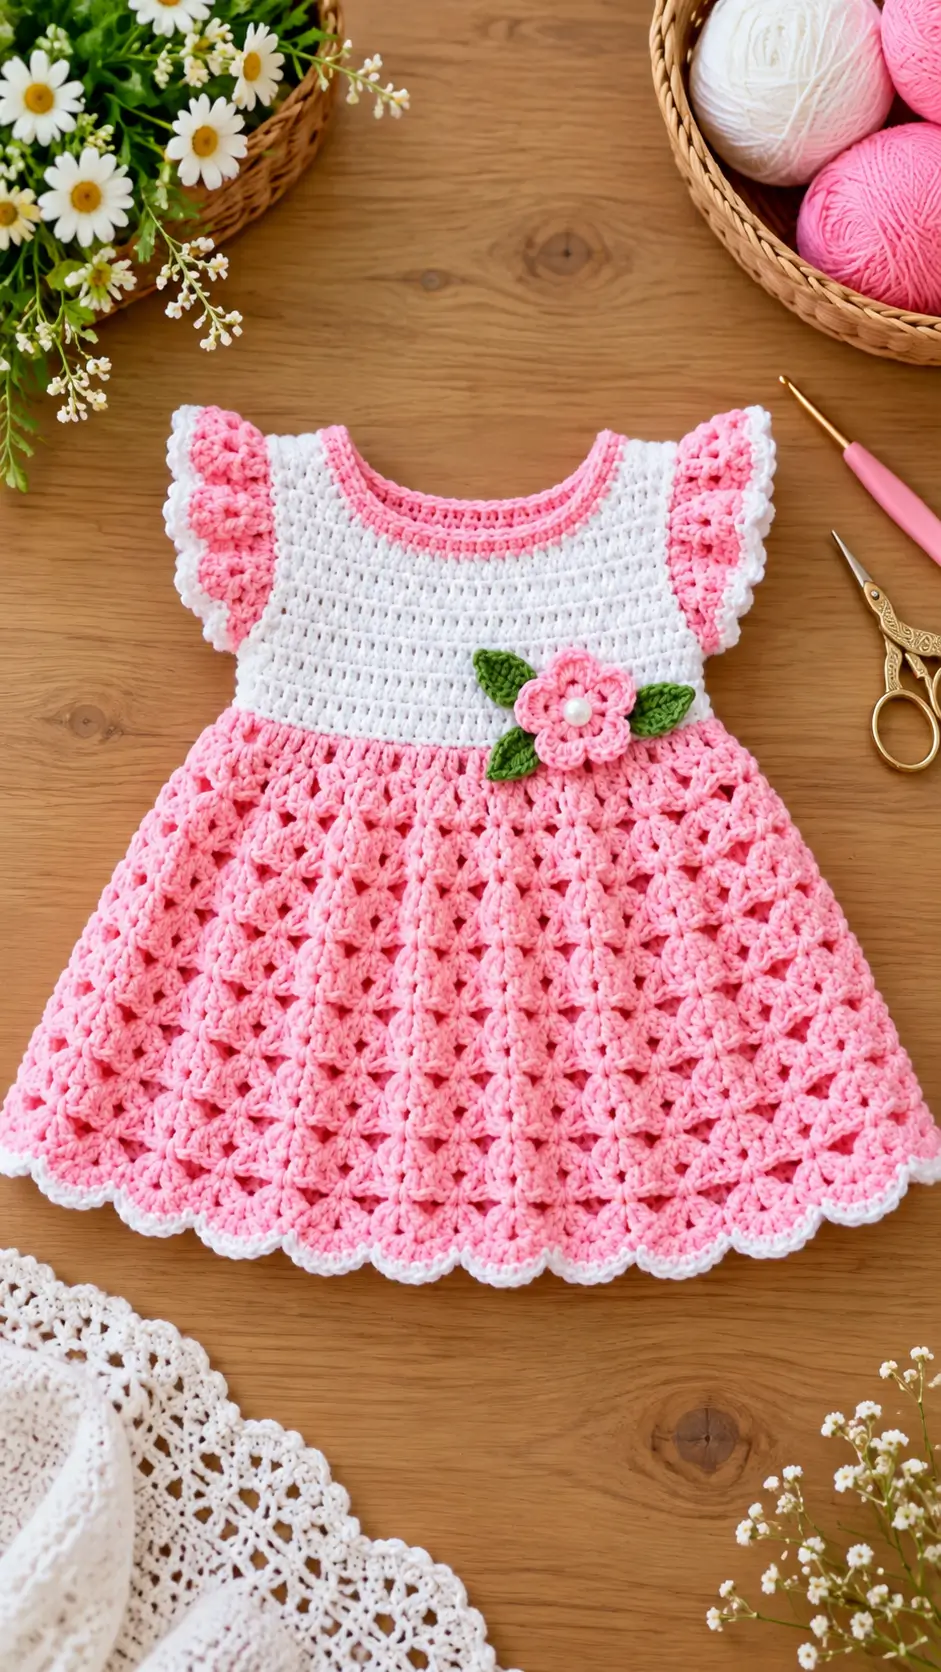
A pink shell skirt needs enough expansion to flare without pulling the white yoke into a bell shape. This crochet baby dress pattern uses a compact round bodice, layered sleeve ruffles, an open shell skirt and a flower-and-leaf waist accent. Work it with light/DK cotton and a 3 mm hook for a target length near 28 cm. The project suits intermediate crochet skills and provides a practical photo or layering garment.
The Design: What Makes This Baby Dress Different
The photographed dress depends on three structural contrasts. First, the white upper section is relatively dense, keeping the neckline and armholes stable while the lower half expands. Second, the pink skirt changes to an open shell structure at the waist. That creates flare without requiring a bulky gathered seam. Third, the ruffle sleeves repeat the skirt color while their white outer edging connects them visually with the bodice.
For this pink crochet baby dress, the skirt repeat must be established only after the bodice circumference is correct. Adding shells before checking circumference is a common mistake; too many repeats produce a heavy ripple at the waist rather than controlled flare. The flower is also structural decoration: its placement disguises the transition between the dense bodice and shell stitch baby dress skirt while keeping the center front visually balanced.
Project Info at a Glance
| Skill Level | Time | Finished Size | Hook | Best For |
|---|---|---|---|---|
| Intermediate | 7–10 hours | Approx. 28 cm long | 3.0 mm | Newborn/0–3 month layering or photography |
The size is a target rather than a substitute for fitting. A comparable newborn floral crochet dress has a finished length of approximately 27.9 cm.
Materials and Tools
Yarn
- White — light/DK cotton or cotton blend — approximately 55–70 g.
- Pink — light/DK cotton or cotton blend — approximately 40–55 g.
- Leaf green — light/DK cotton — approximately 5–10 g.
- Pearl white — one sew-on bead or pearl-style button for the flower center.
Tools
- 3.0 mm crochet hook
- Tapestry needle
- Stitch markers
- Scissors
- Flexible measuring tape
- One small sew-on pearl-style bead or button
For an infant garment, securely sew decorative components and supervise wear. Omit detachable embellishments where they could present a choking hazard.
Abbreviations
- ch — chain
- sc — single crochet
- hdc — half double crochet
- dc — double crochet
- sl st — slip stitch
- st/sts — stitch/stitches
- sp — space
- sk — skip
- rep — repeat
- RS — right side
This garment does not use an invisible decrease because shaped amigurumi decreases are unnecessary in its primary construction.
Gauge and Sizing
Work a washed and dried gauge swatch before starting. Aim for approximately 18 dc × 10 rows = 10 cm, adjusting the hook size until the fabric reaches the intended measurement.
The pattern targets newborn/approximately 0–3 month proportions with a finished length close to 28 cm. Measure the intended wearer over normal clothing when the dress will be layered. The finished circumference needs positive ease rather than a skin-tight fit.
Pattern — Step by Step
Work the yoke in joined rows so a short back opening can be retained. The bodice and skirt are subsequently joined into rounds.
Round Yoke
Yarn: white.
Foundation: Ch 55.
Row 1: Dc in 4th ch from hook and across. Turn.
Row 2: Ch 3, dc across while distributing 12 increases evenly. Turn.
Row 3: Ch 3, dc across, distributing 12 increases evenly. Turn.
Row 4: Repeat Row 3.
Row 5: Ch 3, dc across, distributing 16 increases evenly. Turn.
Row 6: Ch 3, dc across without increasing.
Measure the neckline and yoke rather than forcing the piece to a predetermined count. The yoke should lie flat. A cupped yoke needs additional increases; a rippled yoke has accumulated too much width.
Armhole Separation
Yarn: white.
Lay the yoke flat and mark four division points: left front, first sleeve, back, second sleeve and right front.
Row 7: Ch 3. Dc across the first front section, ch enough stitches to bridge the first underarm, skip the sleeve section, dc across the back, make the second underarm chain, skip the second sleeve section, then dc across the remaining front.
Check that both armholes have identical stitch and chain counts.
Row 8: Ch 3, dc in every dc and underarm ch across. Join the lower back opening with sl st if the neckline opening is already large enough for dressing.
White Bodice
Yarn: white.
From this point, work joined rounds.
Rnd 1: Ch 3, dc in each st around; join.
Rnd 2: Ch 3, dc around; join.
Rnd 3: Repeat Rnd 2.
Rnd 4: Repeat Rnd 2.
Rnd 5: Repeat Rnd 2.
Rnd 6: Repeat Rnd 2 or stop when the white bodice reaches the intended waist position.
Do not add automatic increases here. The bodice shown in the photograph is comparatively straight before the pink skirt expands.
Fasten off white.
Pink Waist Transition
Yarn: pink.
Join pink at the center back.
Rnd 1: Ch 1, sc evenly around; join.
Rnd 2: Ch 3, dc around, adding stitches evenly only as required to reach a multiple suitable for the shell repeat. Join.
The transition round should remain flat. Extra stitches belong in the skirt expansion rather than in a ruffled waist seam.
Lace Shell Skirt
Yarn: pink.
Use a six-stitch repeat.
Rnd 1: Ch 3, 2 dc in same st, ch 1, 3 dc in same st, sk 5 sts; repeat the shell placement evenly around. Join.
Rnd 2: Sl st to first ch-1 space. Ch 3, 2 dc, ch 1, 3 dc in same space; work one identical shell into each ch-1 space around. Join.
Rnd 3: Repeat Rnd 2.
Rnd 4: Work each shell as 3 dc, ch 2, 3 dc to open the lace slightly.
Rnd 5: Repeat Rnd 4.
Rnd 6: Work 4 dc, ch 2, 4 dc in each shell center.
Rnd 7: Repeat Rnd 6.
Continue repeating the established shell round until the dress approaches the target length, increasing shell width gradually rather than adding random extra motifs.
For a fuller lower skirt, change selected shells from 4-dc sides to 5-dc sides at evenly spaced positions. Maintain symmetry around center front and center back.
The skirt should become progressively wider. Expansion should occur through shell width and controlled repeat spacing rather than abrupt gathering.
Scalloped Hem
Yarn: white.
Join white into a shell center.
Rnd 1: Ch 1, sc in first space, *5 dc in next suitable edge space, sc in next space*; repeat around, adjusting the final repeat so scallops remain evenly distributed.
Rnd 2: Optional finer edging: sl st to first scallop, *sc, ch 2, sc* near the crown of each scallop.
Fasten off and weave in the tail.
Ruffle Sleeves — Make 2
Yarn: pink, then white.
Join pink at the underarm.
Rnd 1: Ch 1, sc evenly around the armhole. Join.
Rnd 2: Ch 3, work 2 dc in each st around to create the first ruffle. Join.
Rnd 3: Ch 1, sc around.
For the second visible layer, join pink into the base of Rnd 1.
Layer 2: Ch 3, work repeated groups of 3 dc into alternating stitch bases around the armhole.
Change to white.
Edging: Work small sc/ch-2/sc points or compact scallops evenly along the outside edge.
Fasten off. Repeat on the second sleeve using the same stitch count.
Five-Petal Flower
Yarn: pink.
Ch 4 and join to form a ring.
Rnd 1: Work 10 sc into ring; join. (10)
Rnd 2: *Sl st in next st, ch 2, 3 dc in next st, ch 2, sl st in next st* around to create five petals.
Fasten off, leaving approximately 20 cm of yarn for sewing.
Sew the pearl-style center through both the flower and bodice fabric rather than attaching it only to a loose strand.
Leaves — Make 3
Yarn: green.
Ch 8.
Row 1: Sc in second ch, hdc, dc, 2 dc, dc, hdc; work around the opposite side of the foundation chain with hdc, dc, 2 dc, dc, hdc, sc.
Sl st at the tip.
For a sharper point, ch 2 and sl st back into the first ch before fastening off.
Leave approximately 15 cm of yarn for sewing on each leaf.
Neckline Pink Edging
Yarn: pink.
Join at the back neckline.
Rnd/Row 1: Sc evenly around the neckline.
Rnd/Row 2: Sl st or sc around for a narrow second pink line.
Keep the neckline flat. If the edge begins to flare, skip occasional base stitches. If it contracts, add an extra sc at evenly spaced points.
Fasten off.
Back Neck Closure
If the yoke opening remains open, work a short chain loop at one upper corner and sew a small button securely to the opposite side.
The loop should fit closely around the button rather than hanging away from the neckline. Check the closure before weaving in the final tail.
Assembly
- Block the yoke and skirt to the target measurements without stretching the neckline.
- Place the dress flat and align the center front, center back and both side points.
- Check that the two armholes have matching depth and circumference.
- Position each sleeve ruffle so its fullest section sits over the shoulder rather than under the arm.
- Sew the flower near the waist transition, slightly to one side as shown in the reference design.
- Arrange the three leaves behind the flower with their pointed ends visible.
- Stitch every leaf through multiple fabric points so the tips do not rotate during washing.
- Attach the flower center securely; omit a bead or button where detachable components are unsuitable for the intended wearer.
- Weave each yarn tail through several stitches in different directions, then trim only after checking the seam from the right side.
- Measure the finished neckline, chest, armholes and total length before washing according to the yarn label.
The completed garment should have a stable white upper body, symmetrical ruffles and an evenly flared pink shell skirt.
7 Technical Tips
- Mark the center back before beginning the skirt. Losing the round boundary can shift shell placement diagonally. Keep a stitch marker in the joining stitch for every round.
- Check the bodice circumference before adding lace. A difference of even 2–3 cm can affect infant garment fit. Adding skirt flare cannot correct an undersized chest.
- Keep the white bodice denser than the skirt. If large gaps appear between dc stitches, change the hook size or yarn rather than tightening individual stitches inconsistently.
- Count both sleeve foundations before adding ruffles. A difference of two base stitches becomes much more obvious after each base stitch receives multiple ruffle stitches.
- Measure the yoke depth at both armholes. If one armhole sits 1 cm lower, correct the division before continuing the bodice rather than attempting to disguise it with edging.
- Pin all three leaves before sewing the flower. Sewing the center motif first can trap the leaves at uneven angles and make the appliqué cluster difficult to reposition.
- Secure long tails through at least three direction changes. A tail woven only horizontally can work backward through an open shell fabric during laundering.
Conclusion
Measure the finished bodice before treating the skirt length as final; garment gauge can change after washing even when the stitch pattern remains balanced. For this design, the next concrete step is to make a 10 cm gauge swatch with the selected light/DK yarn and 3 mm hook, wash it, then calculate any required adjustment before chaining the yoke. Save the finished crochet baby dress pattern project to Pinterest or share the completed version on Instagram with #PinkShellBabyDress. Record the yarn, washed gauge and final measurements with the project so the size can be reproduced. Would you keep the three-leaf flower at the waist or replace it with a matching pink crochet bow?









