Introduction
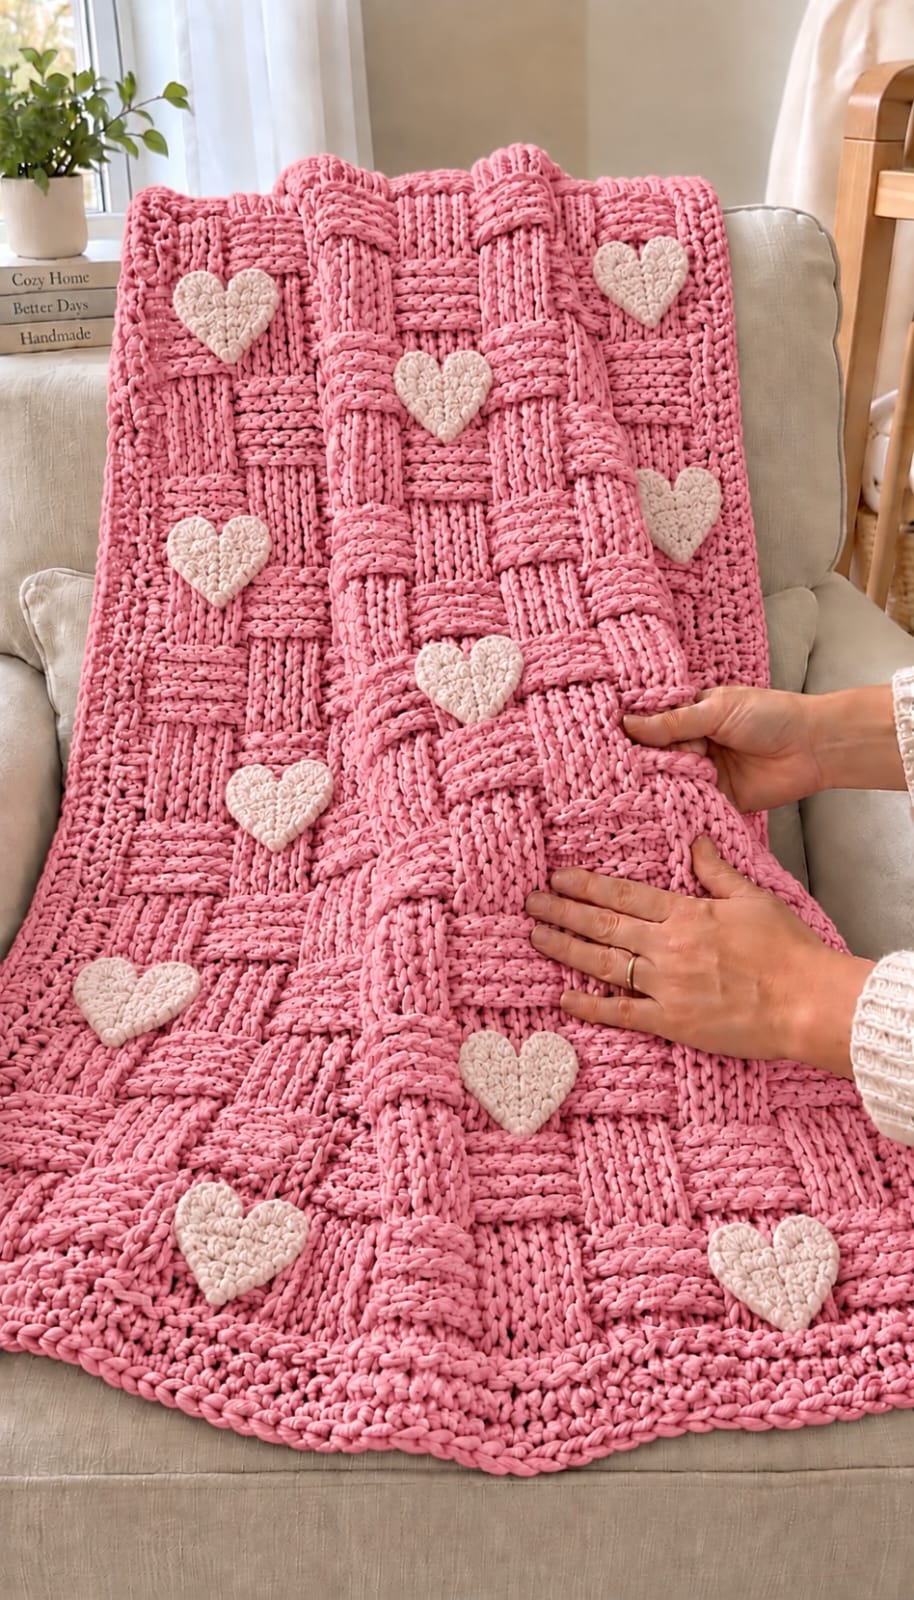
Eleven raised white hearts interrupt the pink woven blocks without hiding the alternating post-stitch structure underneath. This pink chunky basket weave crochet blanket pattern uses super-bulky yarn, a 9 mm hook, 4-stitch basketweave blocks, and separately crocheted heart appliqués. The intermediate reconstruction targets approximately 125 × 150 cm, producing a substantial sofa throw with washable decorative motifs rather than color changes inside the main fabric.
The instructions below are an original photo-inspired reconstruction based on visible structure; published patterns cited later are used only for sizing, gauge, and material benchmarks.
The Design: What Makes This Pink Heart Blanket Different
The photographed throw depends on large 4-stitch basketweave blocks rather than a fine woven texture. Front-post and back-post double crochet create alternating raised bands, while reversing their orientation after four rows makes adjacent blocks appear to pass over and under each other. White hearts are made separately, which preserves the pink texture beneath them and allows their placement to remain irregular. A compact border stabilizes the dense post-stitch fabric without competing with the center. This pink basketweave crochet blanket with hearts also uses fewer appliqués near the edges, keeping the composition from becoming a strict grid. The most common construction error is losing a post stitch at an edge. Even one missing stitch shifts every later 4-stitch block and breaks the woven alignment across the blanket.
Project Info at a Glance
| Skill Level | Time | Finished Size | Hook | Best For |
|---|---|---|---|---|
| Intermediate | Approx. 16–22 hours | Reconstruction target: approx. 125 × 150 cm | 9 mm | Sofa throws, bedroom layers, heart-themed decor |
The 125 × 150 cm measurement is a reconstruction target inferred from the photograph. Yarnspirations publishes a super-bulky basket-weave blanket measuring approximately 127 × 144.5 cm with a 9 mm hook, while Michele Webb’s Chunky Basketweave Blanket measures approximately 114 × 140 cm and uses an 8 mm hook. Those published dimensions place the photographed throw within a practical chunky-blanket range.
Materials and Tools
Yarn
- Dusty rose / medium pink — category 6 super bulky — approximately 1,650–1,800 m
- Warm white / ivory — worsted #4 for flatter hearts — approximately 80–100 g
Yarnspirations specifies approximately 1,573–1,609 m of super-bulky yarn for its 127 × 144.5 cm basket-weave throw. Michele Webb lists approximately 1,335–1,408 m for a 114 × 140 cm version. The slightly larger pink allowance accounts for the reconstruction dimensions, border, swatching, and the heavy yarn consumption of post stitches.
Tools
- 9 mm crochet hook — blanket
- 4–5 mm crochet hook — hearts
- Large tapestry needle
- Stitch markers
- Scissors
- Measuring tape
Abbreviations
- ch — chain
- sc — single crochet
- hdc — half double crochet
- dc — double crochet
- tr — treble crochet
- FPdc — front-post double crochet
- BPdc — back-post double crochet
- sl st — slip stitch
- MR — magic ring
- st/sts — stitch/stitches
- RS — right side
- WS — wrong side
Invisible decreases are not used because both the blanket and heart motifs are worked as flat crochet pieces.
Basketweave Structure
The central field uses 96 textured post stitches plus one plain double crochet at each edge, giving 98 stitches across after the foundation row.
Each textured group contains four stitches:
96 ÷ 4 = 24 blocks across.
Those blocks alternate between raised and recessed orientation. After four textured rows, the orientation reverses. That produces the large checkerboard effect visible in the photograph.
Pattern — Step by Step
Pink Blanket Foundation
Yarn: category 6 super-bulky dusty pink.
Ch 100.
Row 1: Dc in fourth ch from hook and in every chain across. The skipped three chains count as the first dc. (98 dc)
Place a marker on the side you want to use as the visual front of the blanket.
Basketweave Block A
Row 2: Ch 2; the turning chain does not count as a stitch. Dc in first st. Work [4 FPdc, 4 BPdc] ×12 over the next 96 posts. Dc in final st. (98)
Row 3: Ch 2, turn. Dc in first st. Work around the next 96 posts so the same four-stitch sections continue projecting toward the designated right side of the blanket. Dc in final st. (98)
Row 4: Repeat Row 3. (98)
Row 5: Repeat Row 3. (98)
Because the work turns after each row, a block that must remain raised on the blanket’s right side requires the opposite post insertion when you are physically working from the wrong side. Judge FPdc and BPdc relative to the intended blanket face, not simply the side currently facing you.
Basketweave Block B
Row 6: Ch 2, turn. Dc in first st. Reverse every four-stitch group relative to Rows 2–5. The groups that projected toward the right side now recede, while the recessed groups project. Work all 96 post stitches, then dc in final st. (98)
Rows 7–9: Maintain the new right-side orientation established in Row 6. Dc in the first and final stitch of every row. (98)
Continuing the Blanket
Rows 10–13: Repeat the orientation of Rows 2–5. (98 each row)
Rows 14–17: Repeat the orientation of Rows 6–9. (98 each row)
Continue alternating four-row sections until the blanket body measures approximately 142–144 cm long, ending after a complete four-row basketweave block.
Do not stop halfway through a block merely to reach an exact length. A complete woven section gives the top edge the same structural rhythm as the bottom.
Understanding the Post Direction
FPdc and BPdc describe where the hook travels around a stitch post from the crocheter’s current working side. The visual goal is different: four adjacent columns should remain raised toward the blanket’s chosen front for four rows.
When the blanket turns, the insertion needed to preserve that visual orientation changes.
Mark the right side with a locking marker after Row 2. Before every textured row, check the marker and confirm whether the next four-stitch section should project toward or away from that marked face.
Pink Border
The border should stabilize the dense center without becoming wider than the basketweave blocks.
Border R1: With RS facing, sc evenly around the blanket. Work one sc into each stitch across the top and bottom. Along each side, distribute stitches evenly without forcing one stitch into every row-end space. Work 3 sc in each corner.
Lay the blanket flat after this round. If the border ripples, remove side stitches. If it pulls inward, add side stitches before continuing.
Border R2: Ch 1. Sc in every st around, working 3 sc in the center corner stitch at each corner.
Border R3: Ch 1. Hdc in every st around, again working 3 hdc in each corner center stitch.
Fasten off and weave the pink tail through at least 10 cm of border stitches.
White Heart Appliqué — Make 11
Yarn: warm white worsted #4. A 4–5 mm hook keeps the hearts flatter and lighter than making them from the blanket’s super-bulky yarn.
Alyssia Creates publishes a 2026 worsted heart benchmark measuring approximately 2.25 × 2.25 inches / 5.7 × 5.7 cm with a 4 mm hook. Another published worsted heart from Itchin’ for Some Stitchin’ measures approximately 3.25 inches / 8.3 cm with a 5.5 mm hook. For the photographed scale, target approximately 8–10 cm per heart by adjusting yarn thickness or hook size.
Heart Center
R1: Make MR. Ch 3; count this as the first dc. Work 12 dc into MR. Join with sl st to top of ch-3. (13 dc)
Pull the ring closed firmly.
Heart Shaping
R2: Ch 4, then work 5 tr in next st. Work 2 tr in next st, 1 tr in next st, 2 dc in next st, 2 dc in next st. In the next stitch work (dc, 2 tr, dc) to form the bottom point. Work 2 dc in next st, 2 dc in next st, 1 tr in next st, 2 tr in next st, 6 tr in next st. Sl st into the remaining center stitch.
Fasten off with a 35 cm tail.
Use the tail to make one small concealed stitch between the two upper lobes if the center notch spreads during blocking.
Optional Heart Edging
If the heart measures below 8 cm, add one round of single crochet around its outer edge.
Work sc, ch 1, sc into the exact bottom point.
At the center notch, work one slip stitch rather than a single crochet. This pulls the notch downward and keeps the two upper lobes distinct.
Fasten off with a long sewing tail.
Blocking the Hearts
Block all eleven hearts before placing them on the blanket.
Pin the bottom point first.
Next, pin the center notch and both upper lobes.
Match the finished dimensions within approximately 5 mm so one motif does not appear noticeably larger than its neighbors.
Do not stretch the heart until its stitches become open. The white motifs in the photograph remain dense enough to cover the pink basketweave underneath.
Heart Placement
Lay the finished blanket flat with the right side facing upward.
Position the eleven hearts before sewing any of them.
A reconstruction matching the reference can use this approximate distribution:
- 3 hearts across the upper quarter
- 2 hearts through the upper-middle section
- 2 hearts through the center
- 2 hearts through the lower-middle section
- 2 hearts near the lower quarter
Offset neighboring motifs rather than forming vertical columns. Keep each heart at least 8–12 cm from another heart and approximately 7 cm inside the border.
Sewing Hearts to Basketweave Fabric
Use the long white tail and a tapestry needle.
Pass the needle only through the upper surface of the pink post stitches whenever possible.
Sew around the heart approximately 3–4 mm inside its outer edge.
Place attachment stitches every 1–1.5 cm.
Add one stitch at the bottom point and one at the center notch.
Do not pull the sewing yarn tight enough to flatten the basketweave block beneath the motif.
Why the Hearts Use Lighter Yarn
The blanket’s thick chenille-like yarn already produces substantial depth.
Making every heart from the same category 6 yarn would create bulky patches that could obscure several basketweave blocks at once.
Worsted yarn gives a cleaner appliqué edge and reduces added weight.
Published heart appliqué patterns commonly use worsted #4 yarn with hooks around 4–5.5 mm, supporting that material choice for a sewn-on motif.
Why 4 × 4 Blocks Match the Reference
The visible checker pattern is broad rather than finely textured.
Four adjacent post stitches form each vertical band. Maintaining that orientation for four rows gives each block similar visual width and height when worked in thick yarn.
Marly Bird’s basketweave reference also uses groups of 4 FPdc and 4 BPdc with a foundation based on multiples of eight. Yarnspirations describes the same basic four-front/four-back post structure in its basketweave tutorial.
Why the Blanket Uses 98 Stitches
The 98-stitch row has two structural components:
1 edge dc + 96 textured stitches + 1 edge dc = 98 stitches.
The center divides cleanly:
96 ÷ 8 = 12 complete FPdc/BPdc repeats.
That means no partial basketweave block is required near either edge. The plain first and last double crochets provide stable locations for the border.
Published Super-Bulky Blanket Benchmark
Yarnspirations’ Basket Weave Crochet Blanket uses Bernat Blanket Tweeds, category 6 super bulky yarn, and a 9 mm hook.
The published blanket measures approximately 50 × 57 inches / 127 × 144.5 cm.
Its gauge is 8 stitches × 5 rows per 10 cm in pattern, and the listed yarn requirement is approximately 1,573–1,609 m.
Those specifications provide a useful scale benchmark for this pink chunky basket weave crochet blanket pattern, although the stitch counts here are an original reconstruction.
Published 8 mm Chunky Benchmark
Michele Webb’s Chunky Basketweave Blanket uses Bernat Blanket super-bulky yarn and an 8 mm hook.
The finished measurement is approximately 45 × 55 inches / 114 × 140 cm.
The published yarn requirement is approximately 75 ounces, or roughly 1,335–1,408 m.
This demonstrates how hook size, tension, and final dimensions can change material requirements even when two blankets use similar category 6 yarn.
Published 11.5 mm Basketweave Benchmark
Another Yarnspirations basketweave design uses Bernat Forever Fleece Tweeds with an 11.5 mm hook.
Its published gauge is approximately 6.5 stitches × 4 rows per 10 cm.
Eight 250 g balls are specified, totaling approximately 1,102 m.
A larger hook therefore does not automatically mean more yarn; gauge, blanket dimensions, fiber structure, and stitch density all affect consumption.
Published Heart Benchmarks
Alyssia Creates specifies worsted #4 cotton, a 4 mm hook, and approximately 3 g / 5.7 yards for a heart measuring around 2.25 inches / 5.7 cm.
Itchin’ for Some Stitchin’ publishes a larger approximately 3.25-inch / 8.3 cm heart using worsted #4 yarn and a 5.5 mm hook, with about 7 yards per motif.
Eleven hearts at roughly seven yards each require only about 77 yards before adding a margin for sewing tails.
Gauge Swatch
Before chaining 100, make a small basketweave swatch.
Ch 28 and establish a plain double-crochet foundation.
Work enough post-stitch rows to complete one raised block and one reversed block.
Measure the fabric without stretching it.
If the swatch is dramatically wider or narrower than expected, change hook size before beginning the full blanket rather than altering the 4-stitch block structure.
Correcting a Tight Foundation
A tight chain pulls the bottom edge inward before the post stitches begin.
If your chain is noticeably less elastic than the first double-crochet row, make the foundation with a 10 mm hook and return to 9 mm for Row 1.
Do not add random chains to compensate. Extra foundation stitches would disrupt the 96-stitch textured center.
Correcting a Widening Blanket
Count every row.
The blanket must remain at 98 stitches.
Accidental increases usually occur when a crocheter works both around the post and into the top loops of the same stitch.
Each textured post from the previous row receives one post stitch only.
Correcting a Narrowing Blanket
Check the final edge double crochet first.
Thick yarn can hide that stitch beside the last four-stitch post group.
Place a marker in the first and final plain double crochet of every row until the edge structure becomes easy to recognize.
If a row contains 97 stitches, correct it immediately rather than compensating on the following row.
Correcting Broken Basket Blocks
View the blanket from its marked right side after every row.
Each raised band should remain visually raised for four complete rows.
If one group suddenly recedes, the wrong post direction was used from the opposite working side.
Undo that four-stitch section before proceeding. Correcting it later requires removing every row above the mistake.
Correcting a Stiff Blanket
Post stitches consume yarn and create a denser fabric than ordinary double crochet.
If the swatch feels rigid, increase the hook by 1 mm.
Do not deliberately make taller loose post stitches while retaining a small hook because irregular post height produces uneven blocks.
A consistent larger hook gives a more predictable result.
Making a Smaller Lap Blanket
Keep the textured center divisible into complete eight-stitch repeats.
For example, a narrower reconstruction can use 80 textured stitches plus two edge stitches.
Work:
1 edge dc + [4 FPdc, 4 BPdc] ×10 + 1 edge dc.
Maintain the same four-row orientation changes.
Reduce the heart count to approximately seven or eight motifs.
Making a Larger Bed Throw
Add complete eight-stitch repeats to the textured center.
Never add two, three, or five stitches simply to gain width.
Each additional eight-stitch repeat creates one raised and one recessed four-stitch block.
Measure a completed swatch to calculate how much width each repeat adds with your specific yarn.
Increase yarn quantities in proportion to the new surface area.
Changing the Block Size
The photograph is best represented by four-stitch blocks.
Three-stitch groups produce a smaller checker texture.
Six-stitch groups create broad bands and require longer vertical sections to remain visually square.
If the group width changes, recalculate the foundation rather than attempting to fit the final group into leftover stitches.
Using Chenille Yarn
Chenille and blanket yarn can hide stitch tops.
Rely on the post itself when working FPdc and BPdc.
Keep a marker in each edge stitch.
Avoid repeatedly undoing chenille yarn because abrasion can strip the pile from the central core.
Using Wool-Blend Super Bulky Yarn
Wool-blend yarn produces a different basketweave surface from polyester chenille.
The Reclaimed Heirloom demonstrates a basketweave blanket made with Lion Brand Wool-Ease Thick & Quick, a category 6 wool-acrylic blend, using a 16 mm hook.
The documented project measures approximately 4 × 5 feet / 122 × 152 cm.
That construction is a useful alternative benchmark when a less plush, more stitch-defined fabric is preferred.
Changing the Heart Color
Warm white gives the strongest contrast against medium pink.
Pale cream softens the difference.
For a monochromatic version, use blush hearts approximately two shades lighter than the blanket.
Avoid very thick contrasting yarn if the blanket will be folded frequently because bulky appliqués can leave permanent pressure marks in neighboring blocks.
Making Larger Hearts
Use a 5.5 mm hook with worsted yarn or move to category 5 yarn with a suitable hook.
Target approximately 10–11 cm.
Do not enlarge every heart beyond one basketweave block width unless the motif count is reduced.
Oversized hearts conceal the woven texture that defines the blanket.
Making Smaller Hearts
Use a 4 mm hook and smooth worsted cotton.
A published 2026 benchmark with that combination produces a heart approximately 5.7 cm square.
Smaller hearts can be increased to 15–18 motifs without covering excessive basketweave fabric.
Heart Placement for a Cleaner Layout
For a more ordered version, divide the blanket visually into four vertical zones.
Alternate hearts between those zones rather than centering them over every second block.
Maintain at least one completely undecorated basketweave block between neighboring hearts.
This keeps the underlying stitch structure readable from across the room.
Heart Placement for a Random Layout
Cut eleven paper templates matching the blocked heart size.
Arrange the templates over the blanket before sewing.
Photograph the arrangement from directly above.
Look for accidental diagonal lines or clusters of three motifs.
Move only one template at a time until the distribution appears irregular but balanced.
Why Hearts Are Added After the Border
Completing the border first establishes the blanket’s final dimensions.
It also reveals any stretch or contraction introduced by the perimeter stitches.
If hearts are attached earlier, border corrections can shift their apparent spacing from the edges.
Block the finished pink blanket first, then arrange the white motifs on its stable final surface.
Assembly
- Make a basketweave swatch with the selected super-bulky pink yarn and confirm that the post stitches remain flexible with a 9 mm hook.
- Chain 100 and work the first double-crochet row to produce 98 stitches, counting the skipped three foundation chains as the first double crochet.
- Establish the 96-stitch textured center as twelve repeats of four front-facing and four recessed post stitches, with one plain edge double crochet at each side.
- Maintain each visual block orientation for four rows, then reverse all four-stitch groups and continue alternating complete four-row sections to approximately 142–144 cm.
- Work the three-round pink border, correcting any ripple or inward pull during the first single-crochet round rather than carrying distortion into later rounds.
- Block or relax the finished pink blanket according to the yarn label, then measure it before positioning any contrasting motifs.
- Crochet eleven warm-white heart appliqués, targeting approximately 8–10 cm each, and block them so their points, center notches, and upper lobes match within about 5 mm.
- Arrange the hearts irregularly across the right side, keeping neighboring motifs approximately 8–12 cm apart and the outer motifs roughly 7 cm inside the border.
- Sew each heart 3–4 mm inside its perimeter with attachment stitches every 1–1.5 cm, adding secure stitches at both the bottom point and center notch.
- Weave all tails through at least 10 cm of matching fabric, lay the blanket flat, and verify that the appliqués have not compressed or twisted the basketweave blocks beneath them.
The finished reconstruction should have a 4-by-4 pink basketweave field, a compact matching border, and eleven lightweight white hearts distributed across the raised woven texture.
7 Technical Tips
- The basketweave shifts sideways: count exactly 98 stitches after every row, including the two plain edge stitches. Losing one post changes the alignment of all subsequent four-stitch blocks.
- The bottom edge bows inward: make the chain with a hook approximately 1 mm larger if the foundation is tighter than the first row. A foundation shortened by even 3–4 cm remains visible after the dense post-stitch fabric is completed.
- The woven blocks reverse too early: mark the first row of each four-row section with a locking marker. Changing orientation after three or five rows produces rectangular blocks instead of the near-square texture visible in the photograph.
- The blanket becomes rigid: increase the working hook from 9 mm to approximately 10 mm after testing a swatch. Post stitches already create double layers around each stitch, so tight tension compounds stiffness quickly.
- The white hearts pucker the pink fabric: sew approximately every 1–1.5 cm without pulling the white tail taut. The basketweave block underneath must retain its original height after the motif is attached.
- The border develops waves: correct the side-edge stitch distribution during Border Round 1 before adding the hdc round. Evenly spaced excess stitches around a 5 m perimeter can create pronounced rippling.
- Chenille tails work loose: weave each blanket-yarn tail through at least 10 cm and reverse direction once inside matching stitches. Short straight tails can slide out because the plush outer fibers compress during handling.
Published Basketweave Size and Gauge Benchmarks
Yarnspirations’ Basket Weave Crochet Blanket uses Bernat Blanket Tweeds, category 6 super bulky yarn, and a 9 mm hook. The published finished measurement is approximately 127 × 144.5 cm, with a gauge of 8 stitches × 5 rows per 10 cm in pattern.
The pattern lists approximately 1,720–1,760 yards / 1,573–1,609 m. This provides a strong material benchmark because its yarn category, hook, stitch family, and finished dimensions are all close to this reconstruction.
Alternative Chunky Basketweave Benchmark
Michele Webb’s published Chunky Basketweave Blanket uses super-bulky Bernat Blanket and an 8 mm hook. It measures approximately 55 × 45 inches / 140 × 114 cm and specifies about 75 ounces of yarn.
The pattern lists approximately 1,460–1,540 yards / 1,335–1,408 m. The comparison shows why final dimensions should be measured from the actual yarn and gauge rather than predicted from hook size alone.
Basketweave Foundation Math
Marly Bird documents a standard basketweave foundation based on a multiple of eight plus edge allowance, using alternating groups of four FPdc and four BPdc. Yarnspirations likewise explains the common four-front/four-back basketweave structure.
The reconstruction isolates the edge stitches from the textured center:
96 textured stitches = 12 × 8-stitch repeats.
96 + 2 edge stitches = 98 total.
That arithmetic is preserved throughout the complete blanket.
Adjusting the Length
Length changes are simpler than width changes.
Continue complete four-row basketweave sections until the blanket approaches the target measurement.
Remember that the border adds several centimeters.
If the body reaches 145 cm at the end of Row 3 of a block, complete Row 4 rather than stopping early. Consistent block height is more important than matching a reconstruction target to the exact centimeter.
Yarn Planning
Basketweave consumes considerably more yarn than a flat double-crochet fabric because FPdc and BPdc travel around stitch posts.
Buy the pink yarn from one dye lot when possible.
For a 125 × 150 cm reconstruction, keeping approximately 1,650–1,800 m available gives working margin over the published chunky benchmarks.
Reserve a complete skein until the body is finished before deciding how many border rounds to add.
Washing and Blocking
Follow the yarn manufacturer’s care instructions.
Polyester blanket yarn usually requires only gentle reshaping rather than aggressive blocking.
After washing, support the wet blanket rather than lifting it from one corner.
Reshape the border first, then arrange the hearts and woven blocks while the fabric dries flat.
Storage
Fold along spaces between the raised basketweave blocks rather than directly through the heart appliqués.
Avoid placing heavy objects on the folded blanket for long periods because compressed chenille can temporarily lose its loft.
If stored for a season, refold it once so the same raised sections do not remain under pressure continuously.
Sources
Ravelry — Yarnspirations Basket Weave Crochet Blanket — category 6 yarn, 9 mm hook, 127 × 144.5 cm measurement, gauge, and published yardage benchmark.
Ravelry — Chunky Basketweave Blanket by Michele Webb — super-bulky yarn, 8 mm hook, approximately 114 × 140 cm size, and published yarn quantity.
Ravelry — Yarnspirations Basketweave Blanket — Bernat Forever Fleece Tweeds, 11.5 mm hook, 6.5-stitch gauge, and 1,102 m yarn benchmark.
Yarnspirations — Ultimate Guide to Basketweave Crochet — four-FPdc/four-BPdc basketweave structure and foundation guidance.
Marly Bird — Basket Weave Crochet Stitch — multiple-of-eight foundation math and four-stitch post groups.
Jo to the World — Basketweave Stitch Blanket — post-stitch terminology, gauge reference, blanket construction, and border-hook guidance.
Alyssia Creates — Easy Crochet Heart Appliqué — worsted #4 yarn, 4 mm hook, approximately 3 g per heart, and 2.25-inch finished measurement.
Itchin’ for Some Stitchin’ — Crochet Heart Appliqué — worsted yarn, 5.5 mm hook, approximately 3.25-inch finished heart, and seven-yard material benchmark.
Conclusion
Count the 98-stitch row before concentrating on speed; the entire woven effect depends on keeping 96 post stitches divided into exact four-stitch groups. Complete the pink body and border first, then block eleven white hearts to a consistent 8–10 cm scale before deciding their final positions. The concrete next step is a 28-chain basketweave swatch to test post direction, drape, and hook size with your selected yarn. Save this pink chunky basket weave crochet blanket pattern to Pinterest or share the finished throw on Instagram with #PinkHeartBasketweaveBlanket. For this specific design, would you keep all eleven hearts white or alternate ivory and pale blush motifs?









