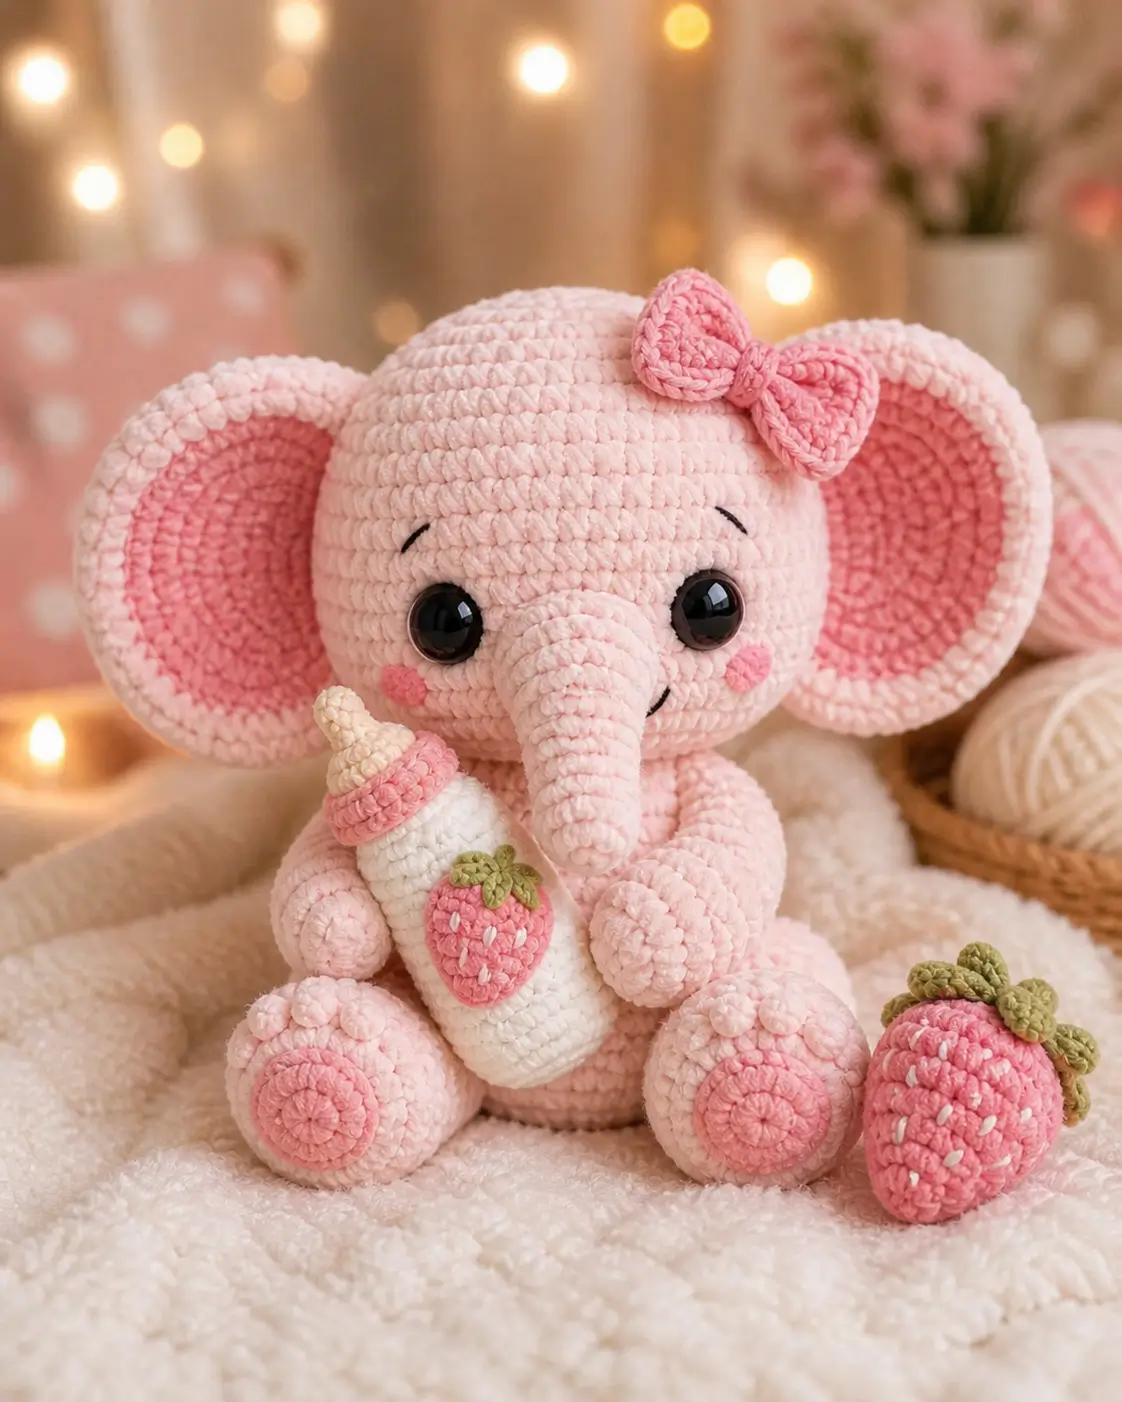
A baby elephant’s trunk has to read before its ears take over the silhouette. This baby elephant amigurumi crochet pattern uses blush chenille yarn, a 5.0 mm hook, and 12 mm eyes to make a sitting toy about 15–16 cm tall. The skill level is intermediate because of the ears, accessories, and face placement. The finished piece works as a nursery shelf sample or photo prop with removable strawberry details.
The Design: What Makes This Elephant Different
This design uses a 36-stitch head plateau rather than a 30-stitch mini base, because the trunk and large ears need a wider face plane. The ears are made as two flat circles per side so the rose inner panel sits inside a pale rim; a single layer would curl under chenille tension. The body stays round and low, with back legs angled forward to hold the bottle. For a pink elephant crochet pattern, the cheek patches must stay small; wide circles push the eyes outward and make the trunk look narrow. A crochet elephant with bow also needs a firm crown area, so the bow is sewn across two rows instead of tied through one stitch. The common mistake is placing ears too high. The plush elephant amigurumi pattern loses balance when ear weight pulls behind the head.
Project Info at a Glance
| Skill Level | Time | Finished Size | Hook | Best For |
|---|---|---|---|---|
| Intermediate | 5–7 hours | 15–16 cm sitting | 5.0 mm | Shelf display, nursery styling, photo prop |
Size and hook are based on published chenille elephant references using 5.0 mm hooks and finished sizes near 15–16 cm.
Materials and Tools
Yarn
- Blush pink — chenille / velvet, 120 m per 100 g — 90–100 g — Himalaya Dolphin Baby or YarnArt Dolce
- Rose pink — chenille / velvet — 25–30 g — inner ears, bow, cheeks, pads, bottle cap, strawberries
- Cream — chenille / velvet — 10–15 g — bottle nipple
- White — chenille / velvet — 10–15 g — bottle body and strawberry seed stitches
- Olive green — chenille / velvet or cotton — 5 g — strawberry leaves
- Black embroidery thread — small length — brows and smile
Tools
- Hook 5.0 mm
- 12 mm black safety eyes
- Polyester stuffing
- Yarn needle
- Stitch markers
- Pins
- Scissors
- Black embroidery needle
- Optional fabric glue for fixed display pieces
Abbreviations
MR = magic ring; sc = single crochet; inc = 2 sc in one stitch; dec = invisible decrease over 2 stitches; sl st = slip stitch; ch = chain; BLO = back loop only; st = stitch; R = round or row. Use the invisible decrease by inserting the hook through the front loops of the next two stitches before drawing up the working loop; this reduces holes at the 36-to-30 and 30-to-24 rounds.
Pattern — Step by Step
Continuous spiral unless noted.
Head
Yarn: blush pink.
R1: 6 sc in MR (6)
R2: inc ×6 (12)
R3: (1 sc, inc) ×6 (18)
R4: (2 sc, inc) ×6 (24)
R5: (3 sc, inc) ×6 (30)
R6: (4 sc, inc) ×6 (36)
R7–R13: sc around (36)
R14: (4 sc, dec) ×6 (30)
R15: (3 sc, dec) ×6 (24)
R16: (2 sc, dec) ×6 (18)
R17: (1 sc, dec) ×6 (12)
R18: dec ×6 (6)
Insert safety eyes between R9 and R10, 7 stitches apart, before closing. Stuff firmly through R16, then add a final small amount before R18.
Fasten off. Leave 20 cm tail for closing.
Body
Yarn: blush pink.
R1: 6 sc in MR (6)
R2: inc ×6 (12)
R3: (1 sc, inc) ×6 (18)
R4: (2 sc, inc) ×6 (24)
R5: (3 sc, inc) ×6 (30)
R6: (4 sc, inc) ×6 (36)
R7–R11: sc around (36)
R12: (4 sc, dec) ×6 (30)
R13–R14: sc around (30)
R15: (3 sc, dec) ×6 (24)
R16: (2 sc, dec) ×6 (18)
R17: (1 sc, dec) ×6 (12)
R18: dec ×6 (6)
Stuff the base firmly and the upper body medium-firm so the head can sit low.
Fasten off. Leave 45 cm tail for sewing to the head.
Arms / Front Legs
Yarn: blush pink.
R1: 6 sc in MR (6)
R2: inc ×6 (12)
R3–R4: sc around (12)
R5: dec ×6 (6)
R6–R8: sc around (6)
Stuff only the paw end. Flatten the open top before sewing.
Fasten off. Leave 25 cm tail on each arm.
Back Legs
Yarn: blush pink.
R1: 6 sc in MR (6)
R2: inc ×6 (12)
R3: (1 sc, inc) ×6 (18)
R4–R5: sc around (18)
R6: (1 sc, dec) ×6 (12)
R7: dec ×6 (6)
Stuff firmly. Shape each leg into a low oval before attaching.
Fasten off. Leave 30 cm tail on each leg.
Foot Pads
Yarn: rose pink.
R1: 6 sc in MR (6)
R2: inc ×6 (12)
R3: (1 sc, inc) ×6 (18)
Sl st into next st (18)
Do not stuff. Sew one pad onto the front-facing side of each back leg.
Fasten off. Leave 25 cm tail on each pad.
Ears and Inner Panels
Yarn: blush pink for outer ears, rose pink for inner panels.
Outer ear, make 2:
R1: 6 sc in MR (6)
R2: inc ×6 (12)
R3: (1 sc, inc) ×6 (18)
R4: (2 sc, inc) ×6 (24)
R5: (3 sc, inc) ×6 (30)
R6: (4 sc, inc) ×6 (36)
R7: sc around (36)
Fasten off. Leave 45 cm tail.
Inner panel, make 2:
R1: 6 sc in MR (6)
R2: inc ×6 (12)
R3: (1 sc, inc) ×6 (18)
R4: (2 sc, inc) ×6 (24)
R5: (3 sc, inc) ×6 (30)
Center each inner panel on an outer ear. Sew only through the back loops of the rose panel when possible, so the front stays round.
Fasten off. Leave 35 cm tail.
Trunk
Yarn: blush pink.
R1: 6 sc in MR (6)
R2–R4: sc around (6)
R5: inc ×6 (12)
R6–R8: sc around (12)
R9: (1 sc, inc) ×6 (18)
R10–R11: sc around (18)
Stuff the base lightly only. Leave the tip soft so it can point downward without stiffness.
Fasten off. Leave 40 cm tail.
Cheek Patches
Yarn: rose pink.
R1: 6 sc in MR (6)
R2: inc ×6 (12)
Sl st into next st (12)
Do not stuff. Place one patch below each eye, slightly outside the trunk line.
Fasten off. Leave 18 cm tail on each patch.
Head Bow
Yarn: rose pink.
Bow loops, make 2:
Ch 8 (8)
Row 1: sc in 2nd ch from hook and across (7)
Row 2: ch 1, turn, sc across (7)
Row 3: ch 1, turn, sc across (7)
Row 4: ch 1, turn, sc across (7)
Row 5: ch 1, turn, sc across (7)
Border: sc 18 evenly around the rectangle (18)
Fasten off. Leave 20 cm tail on each loop.
Center band, make 1:
Ch 5 (5)
Row 1: sc in 2nd ch from hook and across (4)
Row 2: ch 1, turn, sc across (4)
Row 3: ch 1, turn, sc across (4)
Pinch both loops at the center. Wrap the band around the pinched area and stitch the band ends together at the back.
Fasten off. Leave 25 cm tail for attaching to the head.
Bottle Body
Yarn: white.
R1: 6 sc in MR (6)
R2: inc ×6 (12)
R3: (1 sc, inc) ×6 (18)
R4: BLO sc around (18)
R5–R10: sc around (18)
R11: (1 sc, dec) ×6 (12)
R12: sc around (12)
Stuff lightly. Keep the cylinder straight by checking the base after R6.
Fasten off. Leave 25 cm tail.
Bottle Cap and Nipple
Yarn: rose pink for cap, cream for nipple.
Cap:
R1: 6 sc in MR (6)
R2: inc ×6 (12)
R3: (1 sc, inc) ×6 (18)
R4: BLO sc around (18)
R5: sc around (18)
Fasten off. Leave 25 cm tail.
Nipple:
R1: 6 sc in MR (6)
R2: sc around (6)
R3: inc ×6 (12)
R4: sc around (12)
Stuff the nipple with yarn tails only. Sew it to the cap center, then sew the cap to the bottle.
Fasten off. Leave 20 cm tail.
Strawberry Applique for Bottle
Yarn: rose pink, olive green, white embroidery.
Berry:
R1: 6 sc in MR (6)
R2: inc ×6 (12)
R3: (1 sc, inc) ×6 (18)
R4: sc around (18)
Flatten the circle and pinch the top into a strawberry point while sewing.
Fasten off. Leave 25 cm tail.
Leaf crown:
R1: 6 sc in MR (6)
R2: (sl st, ch 3, sc in 2nd ch from hook, sc in next ch, sl st in same base st) ×6 (6 leaves)
Fasten off. Leave 15 cm tail. Embroider 5–7 short white seed stitches on the berry.
Strawberry Prop
Yarn: rose pink, olive green, white embroidery.
R1: 6 sc in MR (6)
R2: inc ×6 (12)
R3: (1 sc, inc) ×6 (18)
R4: (2 sc, inc) ×6 (24)
R5–R7: sc around (24)
R8: (2 sc, dec) ×6 (18)
R9: (1 sc, dec) ×6 (12)
R10: dec ×6 (6)
Stuff firmly before R10. Sew the crown over the closing point.
Fasten off. Leave 20 cm tail for closing.
Leaf crown:
R1: 6 sc in MR (6)
R2: (sl st, ch 4, sc in 2nd ch from hook, hdc in next ch, sc in next ch, sl st in same base st) ×6 (6 leaves)
Fasten off. Leave 25 cm tail. Embroider 10–12 white seed stitches across the strawberry.
Tail
Yarn: blush pink.
Ch 7 (7)
Row 1: sl st in 2nd ch from hook and across (6)
Add two 8 cm strands to the end and trim them to 2 cm after knotting.
Fasten off. Leave 20 cm tail.
Eyebrows and Smile
Yarn: black embroidery thread.
Cut two 6 cm strands for eyebrows. Place each brow one row above the eye, angled outward by one stitch.
Cut one 12 cm strand for the smile. Stitch a shallow curve on the right side of the trunk, beginning one row below the eye line and ending two stitches from the trunk base.
Assembly
- Sew the head closed first, then test the trunk position between the eyes before adding any other part.
- Attach the trunk centered between the eyes, with the base covering R11–R14 of the head.
- Sew the body to the bottom of the head using the 45 cm body tail.
- Attach the ears to the sides of the head across R6–R12, keeping the lower edge level with the eyes.
- Sew the cheek patches below the eyes, 1 stitch away from the trunk on each side.
- Add eyebrows and the smile after the cheeks are fixed, not before.
- Sew the arms to the front of the body at R4–R7, angled inward to hold the bottle.
- Attach the back legs at the base, then sew the foot pads to the forward-facing side.
- Sew the bow above the right eye across two head rows, then attach the tail to the back body center.
- Stitch the bottle into the arms and place the strawberry prop beside one back leg.
The elephant is complete when the head remains upright without rear support.
7 Technical Tips
- Stitch-marker drift: A 36-stitch plateau can shift by one stitch every two rounds in chenille. Move the marker after R6, R10, and R14 when the last stitch starts leaning left.
- Stuffing firmness: A soft head will collapse under two 36-stitch ears. Pack the head to medium-firm density before R16, then add one small stuffing piece through the 12-stitch opening.
- Invisible decrease holes: Chenille can show gaps at the 30-to-24 decrease round. Work each dec through front loops only, then tug the working yarn down before the next sc.
- Eye placement timing: Safety eyes must go in before R15 closes the head. Place 12 mm eyes between R9 and R10 with 7 stitches between posts.
- Velvet tension: Tall loops over 4 mm make the trunk look lumpy. Keep the working loop low on the hook and check R5 after the first increase round.
- Pinning failure: Large ears slide backward if pinned with only one pin. Use three pins per ear: top, center, and lower edge, then view the head from the front before sewing.
- Tail weaving: Short chenille tails can pull free after handling. Leave at least 20 cm on small parts and weave through three stitch columns before trimming.
Conclusion
This pattern is built around trunk placement, ear width, and accessory balance. Work the head and trunk first, then pin both ears before sewing the bow or cheeks; that single check prevents a tilted face. The bottle and strawberry can be stitched in place for display or left separate for styling photos. For the final pass, compare both ear rims from the front and trim any loose velvet fibers around the cheek patches. Save this baby elephant amigurumi crochet pattern to Pinterest, then share the finished elephant on Instagram with #PinkBabyElephant. Which detail changes the character more on this elephant: the oversized ears or the strawberry bottle?









