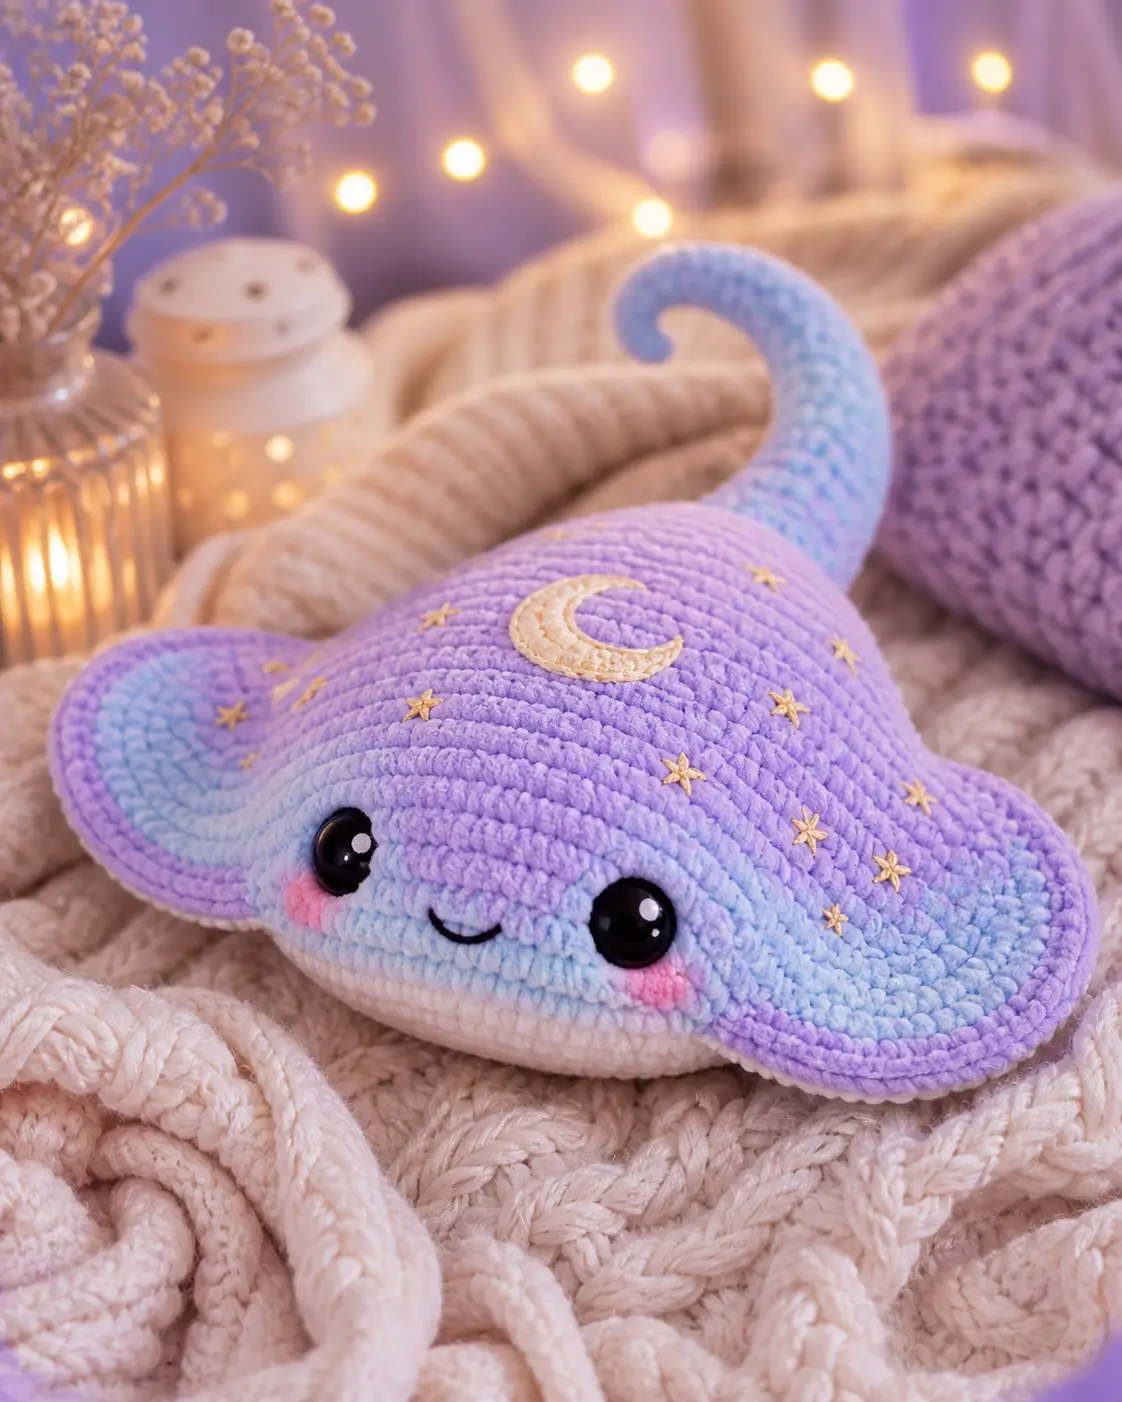
A manta ray is all wing before it is anything else, so the disc has to spread wider than the smile. This manta ray amigurumi crochet pattern uses chunky velvet yarn, a 7 mm hook, 20 mm eyes, and firm flat shaping to finish about 30 cm wide. Skill level: intermediate. Make it when you need a low-sew ocean plush with a stable belly and decorative sky details.
The Design: What Makes This Manta Ray Different
You need width first, not height. The maker then builds a compact head dome and lets the pectoral wings carry the silhouette, which keeps the plush from turning into a round fish. The cream underside is kept shallow because manta rays read visually as flat animals; too much stuffing in the belly removes that profile. Not a pancake. A controlled dome gives room for safety eyes while the stitched mouth remains below the eye line. The curled tail is made separately in blue so it can rise behind the body without pulling the back panel out of shape. For this manta ray crochet pattern, the common mistake is wing thickness. Overstuffed wings look like ears, while thin edged wings keep the crochet stingray pattern recognizable.
Project Info at a Glance
| Skill Level | Time | Finished Size | Hook | Best For |
|---|---|---|---|---|
| Intermediate | 5–6 hours | About 30 cm wide | 7 mm | Plush decor, ocean nursery shelf, photo prop |
Materials and Tools
Yarn
- Lavender / sky blue velvet yarn — bulky #6 — 150 g — suggested: Sweet Snuggles Lite or similar chenille
- Cream velvet yarn — bulky #6 — 45 g — suggested: Bernat Blanket or similar chenille
- Pink velvet yarn — bulky #6 — 5 g — cheeks
- Gold cotton or velvet yarn — DK to worsted — 2–4 g — crescent moon and stars
- Purple velvet yarn — bulky #6 — 10 g — wing edging
Tools
- Hook 7 mm
- 20 mm black safety eyes
- Polyester stuffing
- Yarn needle
- Locking stitch markers
- Embroidery needle
- Black embroidery floss
- Sewing pins
- Optional display-only pipe cleaner for curled tail
For toys made for children under 3, replace safety eyes with embroidered eyes.
Abbreviations
MR = magic ring; sc = single crochet; inc = 2 sc in one stitch; dec = invisible decrease; sl st = slip stitch; ch = chain; BLO = back loop only; FLO = front loop only. Invisible decrease: insert the hook through the front loops of the next two stitches, yarn over, pull through both front loops, yarn over, and pull through two loops.
Pattern — Step by Step
Continuous spiral unless noted. The central dome and body use a large 42-stitch plateau because the photo shows a chunky, broad plush.
Head and Face Dome
Yarn: lavender / sky blue velvet
- R1: 6 sc in MR (6)
- R2: inc ×6 (12)
- R3: (sc, inc) ×6 (18)
- R4: (2 sc, inc) ×6 (24)
- R5: (3 sc, inc) ×6 (30)
- R6: (4 sc, inc) ×6 (36)
- R7: (5 sc, inc) ×6 (42)
- R8: sc around (42)
- R9: sc around (42)
- R10: sc around (42)
- R11: sc around (42)
- R12: sc around (42)
- R13: sc around (42)
- R14: (5 sc, dec) ×6 (36)
- R15: (4 sc, dec) ×6 (30)
- R16: (3 sc, dec) ×6 (24)
- R17: (2 sc, dec) ×6 (18)
- R18: (sc, dec) ×6 (12)
- R19: dec ×6 (6)
Insert safety eyes between R10 and R11, 10 stitches apart. Place them low and wide, not centered on the top dome. Stuff firmly enough that the eye washers do not sink.
Fasten off. Leave a 35 cm tail for sewing.
Body / Cream Underbody
Yarn: cream velvet
- R1: 6 sc in MR (6)
- R2: inc ×6 (12)
- R3: (sc, inc) ×6 (18)
- R4: (2 sc, inc) ×6 (24)
- R5: (3 sc, inc) ×6 (30)
- R6: (4 sc, inc) ×6 (36)
- R7: (5 sc, inc) ×6 (42)
- R8: sc around (42)
- R9: sc around (42)
- R10: sc around (42)
- R11: sc around (42)
- R12: sc around (42)
- R13: sc around (42)
- R14: sc around (42)
- R15: sc around (42)
- R16: (5 sc, dec) ×6 (36)
- R17: (4 sc, dec) ×6 (30)
- R18: (3 sc, dec) ×6 (24)
- R19: (2 sc, dec) ×6 (18)
- R20: (sc, dec) ×6 (12)
- R21: dec ×6 (6)
Stuff lightly. The underside should compress into an oval when pinned to the head dome.
Fasten off. Leave a 40 cm tail.
Side Wings / Pectoral Fins
Make 2. Yarn: lavender / sky blue velvet with purple edging.
- R1: 6 sc in MR (6)
- R2: inc ×6 (12)
- R3: (sc, inc) ×6 (18)
- R4: (2 sc, inc) ×6 (24)
- R5: (3 sc, inc) ×6 (30)
- R6: (4 sc, inc) ×6 (36)
- R7: sc around (36)
- R8: sc around (36)
- R9: sc through both layers across 18 stitches (18)
Flatten the circle into a wing with the color-change edge facing outward. Do not stuff.
Attach purple yarn at the outer tip. Surface sl st around the curved edge for one full pass. Fasten off. Leave a 30 cm tail on each wing.
Front Cephalic Lobes / Small Front Fins
Make 2. Yarn: sky blue velvet.
- R1: 6 sc in MR (6)
- R2: inc ×6 (12)
- R3: sc around (12)
- R4: sc around (12)
- R5: sc around (12)
- R6: sc around (12)
- R7: dec ×6 (6)
- R8: sc around (6)
- R9: sc around (6)
- R10: sc around (6)
Stuff only R1–R5. Flatten the open end. Curve each lobe toward the underside during assembly.
Fasten off and leave a 20 cm tail.
Curled Tail
Yarn: sky blue velvet.
- R1: 6 sc in MR (6)
- R2: inc ×6 (12)
- R3: sc around (12)
- R4: dec ×6 (6)
- R5: sc around (6)
- R6: sc around (6)
- R7: sc around (6)
- R8: sc around (6)
- R9: sc around (6)
- R10: sc around (6)
- R11: sc around (6)
- R12: sc around (6)
- R13: sc around (6)
- R14: sc around (6)
- R15: sc around (6)
- R16: sc around (6)
- R17: sc around (6)
- R18: sc around (6)
- R19: sc around (6)
- R20: sc around (6)
- R21: sc around (6)
- R22: sc around (6)
- R23: sc around (6)
- R24: sc around (6)
Stuff the base only. For a display plush, insert a pipe cleaner into R5–R22 and fold the tip into a soft hook. For a child-safe version, skip the wire and tack the curled shape with three hidden stitches.
Fasten off. Leave a 30 cm tail.
Cheek Patches
Make 2. Yarn: pink velvet.
- R1: 6 sc in MR (6)
- R2: inc ×6 (12)
Sl st to close. Flatten hard with your fingers; do not stuff. Fasten off. Leave a 15 cm tail.
Crescent Moon Applique
Yarn: gold, plus a small lavender mask.
Gold Base
- R1: 6 sc in MR (6)
- R2: inc ×6 (12)
- R3: (sc, inc) ×6 (18)
Fasten off with a 20 cm tail.
Lavender Mask
- R1: 6 sc in MR (6)
- R2: inc ×6 (12)
Sew the lavender mask over the left third of the gold circle so the uncovered gold edge forms a crescent. Fasten off and bury the short tail.
Star Embroidery
Make 7–9 stars. Yarn: gold cotton or split strand of gold DK.
Thread a sharp embroidery needle with gold yarn. For each star, make one vertical stitch, one horizontal stitch, and two diagonal stitches crossing at the center. Keep each star between 1 and 1.5 cm wide so the back does not look crowded.
Smile Embroidery
Yarn: black embroidery floss.
Place the smile between the eyes, one round below the eye bases. Make a shallow U shape across 4 stitches. Anchor each end inside the head so the mouth does not pull tight.
Assembly
- Pin the head dome to the cream underbody with the cream piece slightly visible along the lower front edge.
- Sew around the join with the lavender tail, catching only the inner loops so the seam stays recessed.
- Attach the side wings at R11–R15 of the head/body join, with the purple edging facing forward.
- Sew the wing tips slightly downward so the plush rests flat on a table.
- Place the cephalic lobes under the front face, 4 stitches apart, then curve them inward before sewing.
- Attach the tail at the back center between the wings, angled upward before the first stitch is tightened.
- Sew cheek patches under the outer lower edge of each eye, about 1 stitch below the eye line.
- Stitch the smile after the cheeks are secured so the curve stays centered.
- Sew the crescent moon on the top center of the dome, then add stars unevenly around it.
- Weave in every yarn tail through at least 6 cm of fabric before trimming.
The finished manta ray measures about 30 cm wide when made with bulky velvet yarn and a 7 mm hook.
7 Technical Tips
- Stitch marker drift: If the marker shifts more than 2 stitches by R10, the face will twist off-center. Move the marker back to the true side point at the end of each round.
- Stuffing firmness: A center dome that collapses under light finger pressure needs more stuffing before R17. Wings should contain no stuffing, or they will look like round ears.
- Invisible decrease gaps: Velvet yarn exposes holes when decreases are pulled upward. Work every decrease through front loops only and tighten the following sc before moving on.
- Eye placement timing: Install the 20 mm eyes after R16 of the head, not after closing. The washers need inside access, and the 10-stitch spacing should be checked from the front.
- Velvet tension: Chenille worms out when tails are too short. Leave at least 15 cm on small parts and 30–40 cm on load-bearing parts such as wings and tail.
- Pinning symmetry: Wing angles can shift by 1–2 cm while sewing. Pin both wings first, view the plush from above, then sew only after both tips match.
- Tail weaving: A curled tail fails when the base is attached with only one pass. Sew around the 12-stitch base twice, then tack the curl once to the back dome if no wire is used.
Conclusion
This project works because the structure stays flat where a manta ray needs width and firm where the face needs support. The broad wings, low cream belly, curled blue tail, and gold sky details make the silhouette readable from above, which matters for shelf display and product photos. For the next step, pin the wings before sewing and check the 10-stitch eye spacing against the smile curve. Share the finished manta ray amigurumi crochet pattern on Pinterest and Instagram with #CelestialMantaRay. Would you place the crescent moon centered on the back, or offset it toward one wing like a drifting night-sky mark?









