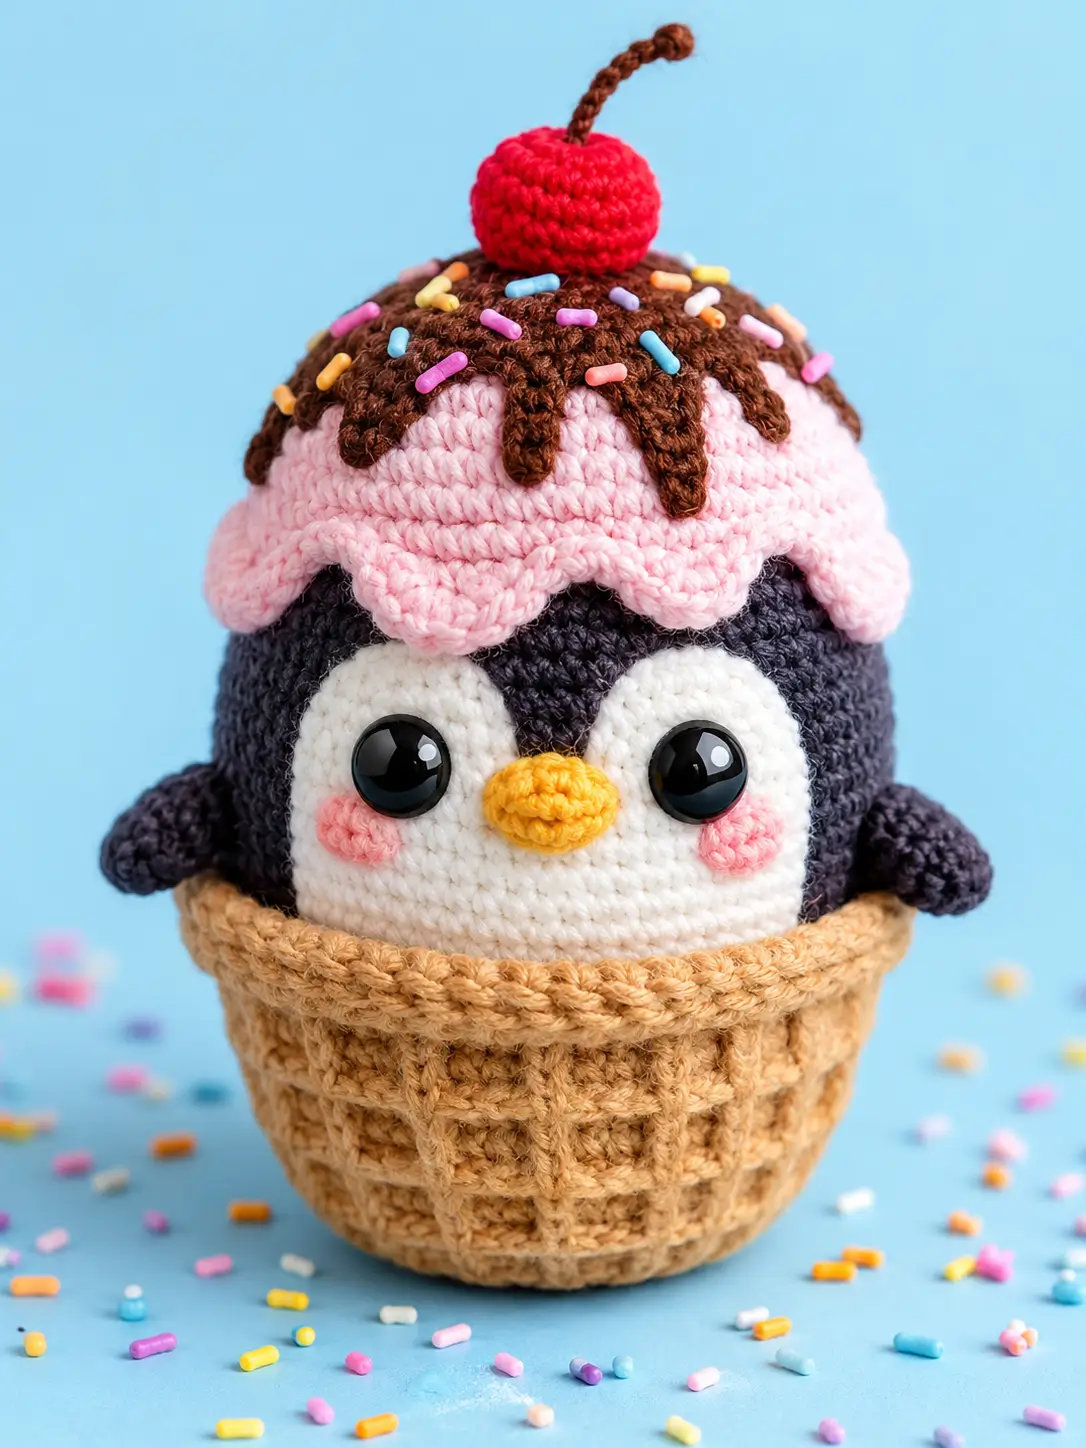
A penguin in a waffle bowl needs flippers that read as wings, not melting scoops. This penguin ice cream amigurumi uses cotton-acrylic yarn, a 2.0 mm hook, 6 mm safety eyes, and medium 36-stitch shaping for a 15 cm display toy. Make it for dessert-themed market stock where the topping, bowl, and face must stay legible from the front.
The Design: What Makes This Dessert Penguin Different
You need the face readable before the toppings are attached. The maker then treats the toy as three stacked forms: a round penguin, a shallow waffle bowl, and a sundae cap. The penguin uses a broad white face panel because black yarn can swallow the eye line. The bowl stays separate so the lower body does not collapse under the rim. The pink drip layer and chocolate sauce use flat disks with chain drips; that keeps the topping thin instead of bulky.
For an ice cream penguin crochet pattern, the common mistake is placing the cherry before the sauce is pinned. That tilts the whole top. This crochet waffle bowl version fixes the order by locking the face, then the bowl, then the toppings.
Project Info at a Glance
| Skill Level | Time | Finished Size | Hook | Best For |
|---|---|---|---|---|
| Intermediate | Not stated by source | 15 cm | 2.0 mm | Summer dessert display, market table, kids-and-adults theme |
Materials and Tools
Yarn
- Tan waffle bowl — fine DK/sport cotton-acrylic — 25 g — Alize Cotton Gold or similar
- Black penguin body — same yarn — 15 g — Alize Cotton Gold or similar
- White face and belly — same yarn — 10 g — Alize Cotton Gold or similar
- Pink drip layer and cheeks — same yarn — 5 g — photo-color adaptation
- Chocolate topping — same yarn — 5 g — photo-color adaptation
- Red cherry — same yarn — 5 g — Alize Cotton Gold or similar
- Yellow beak and hidden feet — same yarn — 2 g — Alize Cotton Gold or similar
- Brown stem and waffle grid — same yarn — 1 g plus scraps — photo-color adaptation
- Multicolor sprinkles — scraps, 10–15 cm per color
Tools
- Hook 2.0 mm
- 6 mm safety eyes
- Polyester stuffing
- Tapestry needle
- Stitch markers
- Pins
- Scissors
Abbreviations
- MR = magic ring
- sc = single crochet
- inc = increase, 2 sc in next stitch
- dec = decrease over 2 stitches
- sl st = slip stitch
- ch = chain
- BLO = back loop only
- FLO = front loop only
- hdc = half double crochet
- dc = double crochet
An invisible decrease is worked through the front loops of the next two stitches so the closure line has less bulk.
Pattern — Step by Step
Continuous spiral unless noted. Counts are written in brackets. This is an original photo-based pattern using verified material data and standard amigurumi math.
Head
Make 1. Yarn: black and white.
R1: 6 sc in MR (6)
R2: inc ×6 (12)
R3: (1 sc, inc) ×6 (18)
R4: (2 sc, inc) ×6 (24)
R5: (3 sc, inc) ×6 (30)
R6: (4 sc, inc) ×6 (36)
R7–R9: sc around in black (36)
R10: 11 sc black, 14 sc white, 11 sc black (36)
R11: 10 sc black, 16 sc white, 10 sc black (36)
R12: 9 sc black, 18 sc white, 9 sc black (36)
R13–R15: repeat R12 (36)
Insert 6 mm eyes between R11 and R12, 8 stitches apart, centered inside the white panel.
R16: (4 sc, dec) ×6 (30)
R17: (3 sc, dec) ×6 (24)
R18: (2 sc, dec) ×6 (18)
Stuff firmly, keeping the white panel flat at the front.
R19: (1 sc, dec) ×6 (12)
R20: dec ×6 (6)
Fasten off. Leave 20 cm tail for closing.
Body
Make 1. Yarn: black and white.
R1: 6 sc in MR (6)
R2: inc ×6 (12)
R3: (1 sc, inc) ×6 (18)
R4: (2 sc, inc) ×6 (24)
R5: (3 sc, inc) ×6 (30)
R6: (4 sc, inc) ×6 (36)
R7–R9: sc around in black (36)
R10: 8 sc black, 20 sc white, 8 sc black (36)
R11–R12: repeat R10 (36)
R13: (4 sc, dec) ×6 (30)
R14: (3 sc, dec) ×6 (24)
Stuff the lower half more firmly than the neck edge so it seats inside the bowl.
R15: (2 sc, dec) ×6 (18)
R16: (1 sc, dec) ×6 (12)
R17: dec ×6 (6)
Fasten off. Leave 25 cm tail.
Wings / Front Flippers
Make 2. Yarn: black.
R1: 6 sc in MR (6)
R2: inc ×6 (12)
R3–R6: sc around (12)
R7: flatten and sc through both layers (6)
Fasten off. Leave 18 cm tail for sewing.
Hidden Feet / Back Legs
Make 2. Yarn: yellow.
R1: 6 sc in MR (6)
R2: inc ×6 (12)
R3: sc around (12)
R4: flatten and sc through both layers (6)
Fasten off. Leave 15 cm tail.
These sit under the body inside the bowl and do not show from the front photo angle.
Beak
Make 1. Yarn: yellow.
R1: 6 sc in MR (6)
R2: sc around (6)
R3: inc ×6 (12)
R4: sc around (12)
R5: dec ×6 (6)
Fasten off. Leave 15 cm tail. Flatten into a short oval.
Cheek Patches
Make 2. Yarn: pink.
R1: 6 sc in MR (6)
R2: inc ×6 (12)
Sl st to first stitch (12)
Fasten off. Leave 12 cm tail. Do not stuff.
Waffle Bowl
Make 1. Yarn: tan.
R1: 6 sc in MR (6)
R2: inc ×6 (12)
R3: (1 sc, inc) ×6 (18)
R4: (2 sc, inc) ×6 (24)
R5: (3 sc, inc) ×6 (30)
R6: (4 sc, inc) ×6 (36)
R7: BLO sc around (36)
R8–R14: sc around (36)
R15: hdc around for rim thickness (36)
R16: sl st around loosely (36)
Fasten off. Leave 30 cm tail.
Waffle grid: with brown yarn, surface sl st 6 vertical lines from R7 to R14 and 3 horizontal lines around R9, R11, and R13. Each vertical line should span 8 rounds; each horizontal line should span 36 visible stitches.
Pink Ice Cream Drip Collar
Make 1. Yarn: pink.
R1: 6 sc in MR (6)
R2: inc ×6 (12)
R3: (1 sc, inc) ×6 (18)
R4: (2 sc, inc) ×6 (24)
R5: (3 sc, inc) ×6 (30)
R6: (4 sc, inc) ×6 (36)
R7: sc, hdc, dc, hdc, sc, sl st; repeat this 6-stitch sequence 6 times (36)
Long drips: at front-left, center-front, and front-right, join pink yarn, ch 5, sc in 2nd ch from hook and next 3 ch, sl st to same edge stitch. Each drip has 4 sc plus 1 sl st.
Fasten off. Leave 25 cm tail.
Chocolate Sauce
Make 1. Yarn: chocolate brown.
R1: 6 sc in MR (6)
R2: inc ×6 (12)
R3: (1 sc, inc) ×6 (18)
R4: (2 sc, inc) ×6 (24)
R5: (3 sc, inc) ×6 (30)
R6: (4 sc, inc) ×6 (36)
R7: sc, hdc, dc, hdc, sc, sl st; repeat this 6-stitch sequence 6 times (36)
Chocolate drips: make 5 uneven chain drips around the front half. Use ch 3, ch 5, ch 4, ch 6, and ch 3; work sc back along each chain and sl st to the sauce edge.
Fasten off. Leave 25 cm tail.
Cherry
Make 1. Yarn: red.
R1: 6 sc in MR (6)
R2: inc ×6 (12)
R3: (1 sc, inc) ×6 (18)
R4–R5: sc around (18)
R6: (1 sc, dec) ×6 (12)
Stuff lightly. A firm cherry sits higher on the sauce disk.
R7: dec ×6 (6)
Fasten off. Leave 15 cm tail. Close opening.
Cherry Stem
Make 1. Yarn: brown.
Row 1: ch 9 (9)
Row 2: sl st in 2nd ch from hook and across (8)
Fasten off. Leave 10 cm tail. Curve slightly before sewing.
Sprinkles
Yarn: assorted scraps.
Make 18 short straight stitches over the chocolate sauce. Each sprinkle should span 1 round high or 2 stitches wide. Place 6 on the left, 6 across the center, and 6 on the right so the cherry remains clear.
Assembly
- Sew the head to the body with the white face panel centered over the white belly panel.
- Set the joined penguin into the waffle bowl and pin the bowl rim just below the cheek line.
- Sew the bowl to the lower body through R15 of the bowl and R8–R10 of the body.
- Sew the beak between the eyes, crossing head R12–R14.
- Sew the cheek patches under the eyes, one patch on each side of the beak.
- Sew the wings to the sides at body R8–R11, angled slightly downward.
- Sew the hidden feet under the body inside the bowl if extra base weight is needed.
- Pin the pink drip collar over the crown, with the longest drip centered above the face.
- Sew the chocolate sauce over the pink collar, then sew the cherry and stem to the sauce center.
- Add sprinkles last, weaving every thread tail under the sauce disk.
The finished toy measures about 15 cm when made with the listed yarn, hook, and eye data.
7 Technical Tips
- Stitch marker drift: If the marker shifts more than 1 stitch by R10 of the head, the white face panel twists. Correct at the back seam only, not inside the 18-stitch white panel.
- Stuffing firmness: Under-stuffing the bowl makes the rim cave inward by more than 5 mm. Pack the lower body firmly, then use lighter stuffing in the head closure.
- Invisible decrease gaps: A normal decrease on black yarn can leave pale stuffing dots near R16–R20. Work every decrease through front loops only and pull the next stitch tight.
- Eye placement timing: Safety eyes must go in before R16 closes the head. Place them between R11 and R12, 8 stitches apart, so the beak fits as a 12-stitch oval.
- Velvet tension warning: Switching this pattern to velvet can add 3–5 cm of height. Use a larger eye size and test the 36-stitch head before making the bowl.
- Pinning failure mode: If the chocolate sauce is sewn before the pink collar is pinned, the drips can stack unevenly over one eye. Pin the pink layer at 12, 3, 6, and 9 o’clock first.
- Tail weaving length: Short tails under 10 cm can pull free inside the waffle grid. Leave 20–30 cm on structural pieces and weave through at least 6 stitches before trimming.
Conclusion
Block the waffle rim before final photos, because the bowl line controls the whole silhouette. Steam is not needed; pin the rim dry, press it flat with your fingers, and let the sewn grid pull it into shape. The next step is to test one chocolate drip at the center front before adding all five. Share the finished penguin on Pinterest with a front-facing crop, then post the side view on Instagram so the bowl depth is visible. Use #PenguinIceCreamAmigurumi. Which topping would you change first on this penguin: the pink drip, the chocolate sauce, or the cherry stem? This penguin ice cream amigurumi is built for that choice.









