Introduction
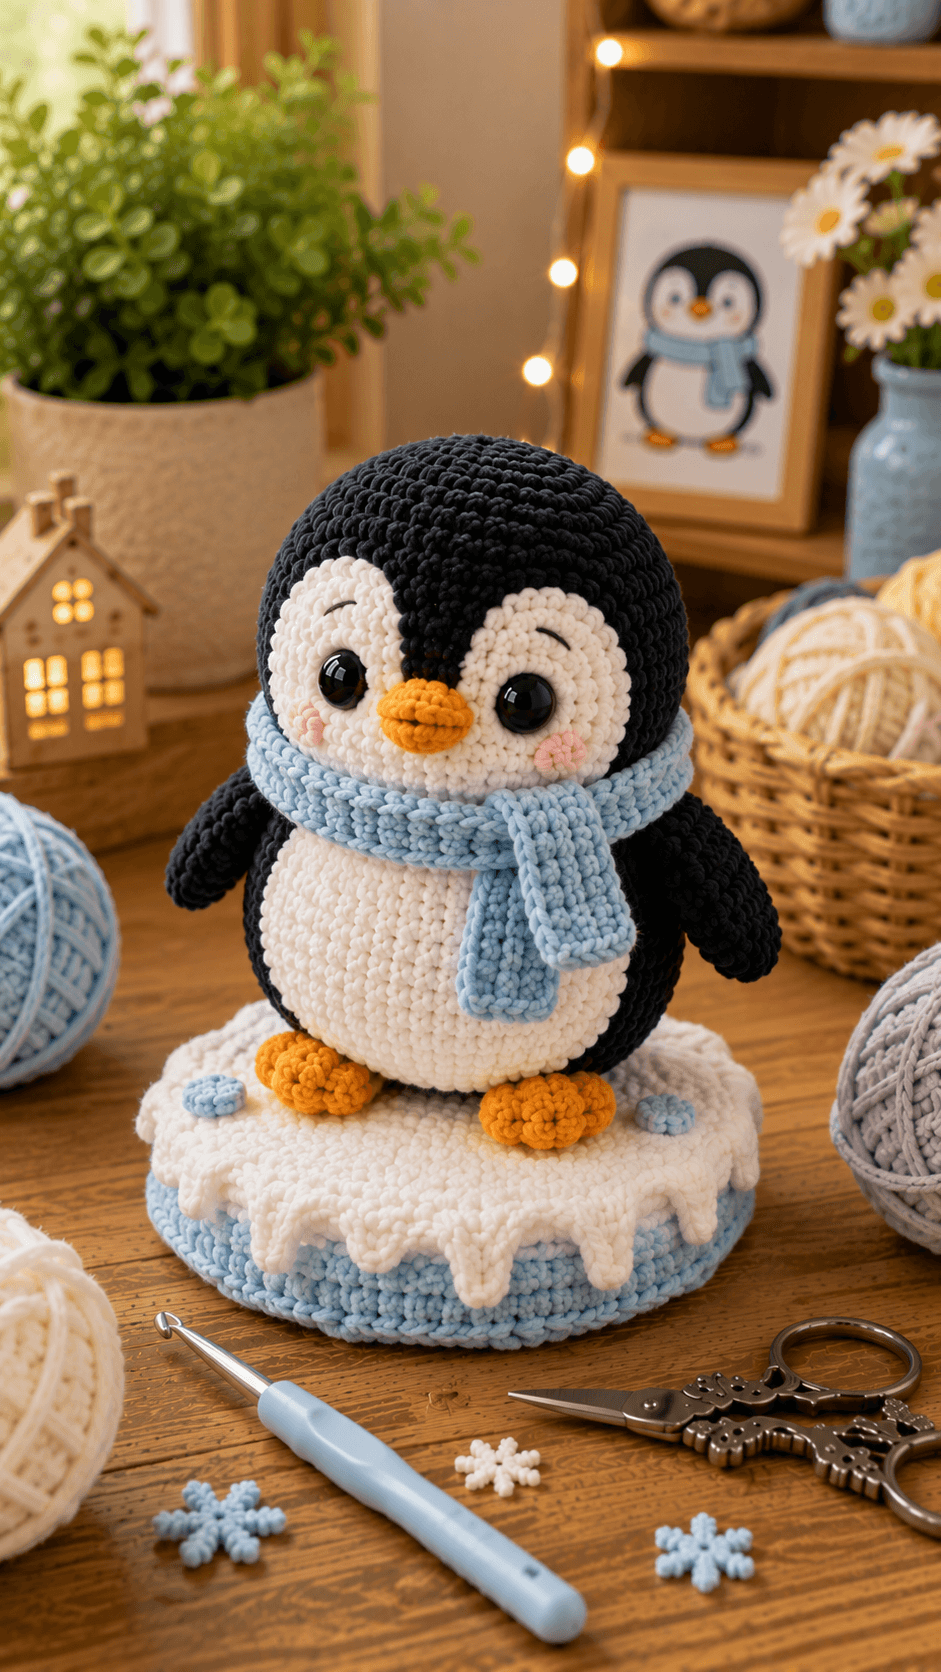
A penguin standing on ice needs feet wide enough to remain visible above the snow edge rather than disappearing into it. This penguin amigurumi crochet pattern uses chunky chenille, a 5 mm hook and 15 mm safety eyes for a penguin approximately 30–34 cm tall. Black-and-white facial shaping, an orange beak, blue scarf and separate padded ice platform make the project intermediate.
The Design: What Makes This Winter Penguin Different
The head expands to 42 stitches because the two white face patches and large safety eyes need substantial width beneath the black crown. A separate 36-stitch body creates the rounded pear shape typical of a plush penguin while leaving enough front surface for a broad white belly. The wings stay comparatively narrow and angle downward beside the torso instead of projecting horizontally. Orange feet are built as shallow padded ovals so they remain visible in front of the body when the penguin stands on its ice platform. The winter penguin amigurumi also uses a wide baby-blue scarf, which covers the neck seam and introduces a strong horizontal line between head and body. One common maker error is placing the white face patches too far apart; the inner edges should nearly meet around the beak.
Project Information at a Glance
| Skill Level | Time | Finished Size | Hook | Best For |
|---|---|---|---|---|
| Intermediate | 13–17 hours | Approx. 30–34 cm penguin; 37–41 cm on base | 5.0 mm | Winter displays, nursery shelves and seasonal decor |
Published penguin patterns demonstrate substantial scale variation, from 10 cm cotton toys to 14-inch amigurumi and 12.5-inch super-bulky projects. The photo-matched measurements here place the character between those larger references while adding a separate crochet ice platform.
Materials and Tools
Yarn
- Black — chunky or super-bulky chenille — approximately 150–190 g — head, body sides and wings
- Warm white — matching chenille — approximately 110–140 g — face patches, belly and snow layer
- Orange — matching plush or chunky yarn — approximately 35–45 g — beak and feet
- Baby blue — chunky yarn — approximately 100–130 g — scarf, ice platform and small ice details
- Blush pink — small amount — cheek patches
- Black smooth yarn — small amount — eyebrows and optional facial embroidery
Tools
- 5.0 mm crochet hook
- Two 15 mm black safety eyes
- Polyester toy stuffing
- Large-eye yarn needle
- Locking stitch markers
- Dressmaking pins
- Scissors
- Optional plastic canvas circle for a firmer ice base
Work the stuffed sections at dense amigurumi tension. If white stuffing shows through black chenille after filling, move down to a 4.5 mm hook without changing the written stitch totals.
Abbreviations
- MR — magic ring
- sc — single crochet
- inc — two single crochet stitches in one stitch
- dec — decrease over two stitches
- sl st — slip stitch
- ch — chain
- hdc — half double crochet
- dc — double crochet
- BLO — back loop only
- FLO — front loop only
An invisible decrease is worked through the front loops of the following two stitches before completing them together as one single crochet.
Pattern — Step by Step
Work all stuffed pieces in continuous spirals unless a section states otherwise. Move a stitch marker at the beginning of each round and check every bracketed stitch count before continuing.
Head
Yarn: black — photo-matched six-stitch amigurumi sphere.
R1: 6 sc in MR (6)
R2: inc × 6 (12)
R3: (sc, inc) × 6 (18)
R4: (2 sc, inc) × 6 (24)
R5: (3 sc, inc) × 6 (30)
R6: (4 sc, inc) × 6 (36)
R7: (5 sc, inc) × 6 (42)
R8–R13: sc around (42)
R14: (5 sc, dec) × 6 (36)
Do not insert the safety eyes yet. Their final position is easier to set after the white face patches have been pinned.
R15: (4 sc, dec) × 6 (30)
R16: (3 sc, dec) × 6 (24)
R17: (2 sc, dec) × 6 (18)
R18: (sc, dec) × 6 (12)
R19: dec × 6 (6)
Stuff firmly after R14. Keep the lower front slightly softer until the face patches are positioned.
Fasten off and close the six remaining stitches.
White Face Patches — Make Two
Yarn: warm white.
R1: 6 sc in MR (6)
R2: inc × 6 (12)
R3: (sc, inc) × 6 (18)
R4: (2 sc, inc) × 6 (24)
Fasten off with a 30 cm sewing tail.
Stretch each circle into a broad oval.
Pin the two patches across the lower half of the face with their inner edges nearly touching.
Insert the 15 mm safety eyes through both the white patch and black head fabric before fitting the washers. Place the eyes approximately eight visible stitches apart.
Sew the full perimeter of each white patch to the head.
Orange Beak
Yarn: orange.
R1: 6 sc in MR (6)
R2: (sc, inc) ×3 (9)
R3: sc around (9)
Fasten off with a 20 cm tail.
Flatten the opening into a horizontal oval rather than closing it as a circle.
Add a very small amount of stuffing.
Pink Cheek Patches — Make Two
Yarn: blush pink.
R1: 6 sc in MR (6)
Fasten off with a 12 cm tail.
Stretch horizontally during attachment.
Eyebrows
Yarn: smooth black embroidery yarn.
Embroider one shallow curved line approximately 1–1.5 cm above each safety eye.
Keep the curves slightly higher at their outer ends.
Body
Yarn: black.
R1: 6 sc in MR (6)
R2: inc ×6 (12)
R3: (sc, inc) ×6 (18)
R4: (2 sc, inc) ×6 (24)
R5: (3 sc, inc) ×6 (30)
R6: (4 sc, inc) ×6 (36)
R7–R13: sc around (36)
R14: (4 sc, dec) ×6 (30)
R15–R16: sc around (30)
R17: (3 sc, dec) ×6 (24)
R18: (2 sc, dec) ×6 (18)
R19: (sc, dec) ×6 (12)
R20: dec ×6 (6)
Stuff the lower belly firmly. Keep the top slightly compressible for the head seam.
Fasten off with a 45 cm sewing tail.
White Belly Panel
Yarn: warm white. Work as an oval.
Ch 10.
R1: starting in second ch, 8 sc, 3 sc in final ch; continue along opposite side with 7 sc, inc (20)
R2: inc, 7 sc, inc ×3, 7 sc, inc ×2 (26)
R3: sc around, distributing 6 increases evenly (32)
R4–R6: sc around (32)
Fasten off with a 40 cm tail.
Stretch the panel lengthwise. The upper edge should begin beneath the scarf and the lower edge should finish above the feet.
Wings — Make Two
Yarn: black.
R1: 6 sc in MR (6)
R2: inc ×6 (12)
R3: (sc, inc) ×6 (18)
R4–R7: sc around (18)
R8: (sc, dec) ×6 (12)
R9–R11: sc around (12)
R12: dec ×6 (6)
Do not stuff heavily.
Flatten the upper opening.
Fasten off with a 35 cm sewing tail.
Orange Feet — Make Two
Yarn: orange.
R1: 6 sc in MR (6)
R2: inc ×6 (12)
R3: (sc, inc) ×6 (18)
R4–R5: sc around (18)
R6: (sc, dec) ×6 (12)
R7: dec ×6 (6)
Stuff lightly. Flatten each finished foot into a broad oval so it sits against the top of the ice platform.
Fasten off with a 30 cm sewing tail.
Baby-Blue Scarf
Yarn: baby blue. Work in turned rows.
Ch 13.
Row 1: starting in second ch, sc across (12)
Rows 2–42: ch 1, turn, sc across (12)
Continue until the scarf measures approximately 50–55 cm.
Fasten off.
The target width is approximately 7–8 cm in chunky yarn. Work more loosely than the stuffed pieces so the scarf drapes rather than standing rigidly.
Scarf Edge
Join blue yarn at one corner.
Sc evenly around all four sides.
Work 2 sc in each outer corner.
Fasten off and weave in the tail.
Ice Platform — Bottom Plate
Yarn: baby blue.
R1: 6 sc in MR (6)
R2: inc ×6 (12)
R3: (sc, inc) ×6 (18)
R4: (2 sc, inc) ×6 (24)
R5: (3 sc, inc) ×6 (30)
R6: (4 sc, inc) ×6 (36)
R7: (5 sc, inc) ×6 (42)
Fasten off.
Ice Platform — Top Plate
Yarn: warm white.
R1: 6 sc in MR (6)
R2: inc ×6 (12)
R3: (sc, inc) ×6 (18)
R4: (2 sc, inc) ×6 (24)
R5: (3 sc, inc) ×6 (30)
R6: (4 sc, inc) ×6 (36)
R7: (5 sc, inc) ×6 (42)
Do not fasten off.
Ice Platform — Blue Side Wall
Using a separate length of baby-blue yarn, join around the bottom plate.
R1: BLO sc around (42)
R2–R5: sc around (42)
Fasten off with a 50 cm joining tail.
Join the Ice Platform
Place the white top plate over the open blue cylinder.
Sc or whip stitch the two 42-stitch edges together.
Add firm polyester stuffing before closing the final 8–10 cm.
For a very flat display base, insert a plastic-canvas disk against the bottom before finishing the stuffing.
White Snow Overhang
Yarn: warm white.
Join to the outer edge of the white top.
R1: sc around (42)
For the next round, alternate short and long hanging points.
Short point:
ch 3, sl st in second ch, sc in next ch, sl st into next base st.
Long point:
ch 6, sl st in second ch, sc, hdc, dc, sc back toward base, sl st into next base st.
Work an irregular sequence of short points, plain sc sections and long points around the front two-thirds of the platform.
Keep the rear edge flatter so the penguin can stand near the center without catching a foot on an icicle.
Blue Ice Pebbles — Make Three
Yarn: baby blue.
R1: 6 sc in MR (6)
Fasten off with a 10 cm tail.
Sew flat to the white snow surface.
Assembly
- Position the two white face patches first, insert the 15 mm safety eyes through both fabric layers and sew the patch edges completely to the head.
- Attach the orange beak between the white patches, then sew the two pink cheeks outside the lower eye line and embroider both eyebrows.
- Sew the white belly panel centrally onto the black body, keeping its top edge approximately 2–3 cm below the final neck seam.
- Join the head to the body with two full passes around the neck. Add stuffing through the seam before closing if the head shifts more than approximately 1 cm sideways.
- Attach both wings high on the body with the tips angled slightly outward and downward. Compare them from the front before tightening the seams.
- Sew both orange feet to the lower front body, leaving approximately 2–3 cm between them so the white belly remains visible.
- Wrap the blue scarf once around the neck and cross one end over the other. Tack the rear wrap to the body with two hidden stitches if the scarf will remain permanent.
- Stuff and close the ice platform, then sew the irregular white snow overhang around the edge and add the small blue surface patches.
- Place the penguin centrally on the platform and sew each orange foot to the white top with several hidden stitches through the lower foot surface.
- Set the finished display on a hard table and check face symmetry, wing angle, scarf position, foot spacing and platform balance before weaving in all remaining tails.
The completed display should stand without rocking, with both orange feet visible above the snow edge and the blue scarf hanging over the center of the white belly.
7 Technical Tips
- Face-patch gap: Leaving more than about 1 cm between the inner white edges makes the beak appear isolated. Pin both patches first and keep their closest edges nearly touching beneath the forehead.
- Head wobble: A 42-stitch chenille head can overpower a softly stuffed upper body. Pack the neck area until lateral head movement stays below approximately 1 cm.
- Wing rotation: A wing attached through fewer than 4 cm of side fabric can twist forward. Flatten the upper opening and distribute the seam across several body stitches.
- Scarf bulk: A scarf wider than roughly 8 cm can cover the eyes when wrapped. Keep the finished width around 7–8 cm and wrap it only once.
- Foot instability: One foot sewn 5 mm farther forward than the other can rotate the penguin on its base. Pin both feet and test the figure before stitching them permanently.
- Platform doming: Excess stuffing in the ice base creates a convex top that makes the feet rock. Pack the wall firmly but keep the center shallow and flat.
- Decrease holes: Chenille can expose white filling through ordinary decreases. Work all head, body and wing reductions as invisible decreases through the front loops.
Shaping the Rounded Penguin Head
The head is wider than many compact no-sew penguins because the supplied character has large white facial patches and oversized eyes. A 42-stitch plateau gives those features room without allowing the beak to crowd the eye line.
Six plain rounds retain the broad crown before decreasing begins. That creates a nearly spherical head rather than a narrow egg shape.
The black forehead should remain clearly visible above both white patches. Pulling the white ovals too high reduces the black crown and changes the character’s proportions.
Building the White Face Patches
Separate appliqués are easier to control than complicated in-round color changes when using thick chenille. Each patch can be stretched into an oval and pinned around the safety eye before the perimeter is sewn.
The two shapes should meet closely beneath the center of the forehead but remain separate. Their outer edges extend toward the cheek area.
Insert the safety eyes through both layers before locking the washers. That physically connects each eye patch to the main stuffed head and reduces movement after sewing.
Positioning the Orange Beak
The beak sits directly at the junction between the white face patches. Keep it wider than it is tall.
Only a small amount of filling is needed. Overstuffing produces a round orange ball instead of the shallow projecting beak visible in the photograph.
Pin the beak after the eyes have been fixed. Its horizontal center should remain aligned with the midpoint between the two safety eyes.
Constructing the White Belly
The belly is a separate oval rather than a large color-change section inside the black body. That method allows the border to remain clean and lets the maker adjust the visible white area after stuffing.
Stretch the finished panel vertically before pinning. Its widest section belongs around the lower middle torso.
Stop the upper edge below the scarf. Leaving a narrow strip of black between belly and head preserves the visual neck even after the accessory is wrapped.
Making the Black Wings
Penguin wings need to look like tapered flippers rather than cylindrical arms. The pattern therefore expands to 18 stitches, works several plain rounds and narrows again before attachment.
Use very little stuffing or none at all near the tip. A heavily stuffed wing becomes round and points away from the body.
Angle the lower tips outward by roughly 10–15 degrees. Both wings should still hang predominantly downward.
Constructing the Orange Feet
The feet remain shallow and broad because their purpose is partly structural. They create the visible color break between the black body and white ice surface.
Flatten the finished pieces after stuffing and test them against the base. The widest dimension should run from left to right rather than front to back.
Secure the feet to both the penguin and platform if the project will be displayed permanently. That prevents the character from rotating when the scarf or wings are adjusted.
Making the Baby-Blue Scarf
The scarf is comparatively wide, covering most of the neck seam while leaving the face completely clear. Twelve single crochets across produces the right proportion in many chunky yarns.
Use relaxed tension. The body parts require dense fabric, but the scarf needs enough flexibility to bend around the rounded neck.
Let one end hang farther down the chest than the other. Equal-length ends can create a rigid symmetrical shape not present in the supplied design.
Building the Ice Platform
The platform consists of two flat circular plates connected by a short cylindrical wall. This construction makes the base substantially more stable than a single stuffed disk.
A 42-stitch circumference mirrors the head’s maximum stitch count and produces enough surface for both feet plus visible snow around them.
Keep the height modest. The platform should look like a slice of ice rather than a large cushion underneath the penguin.
Adding the Snow and Icicles
The white top continues beyond the blue side wall through irregular crocheted points. Varying the chain length produces the melting-snow effect shown around the front edge.
Do not repeat one identical icicle sequence around the entire platform. Alternate short tips, plain sections and longer drops.
Leave the rear edge comparatively smooth. Long points behind the penguin add bulk without contributing much to the front-facing display.
Choosing Yarn, Hook and Eye Size
Published penguins demonstrate wide scaling possibilities. Small cotton versions may measure around 10 cm with 6 mm eyes, while larger designs reach 14 inches and use 15 mm eyes. Super-bulky patterns also exist around 12.5 inches.
For the supplied chunky texture, a 5 mm hook is a practical project specification. The final hook should still be small enough to prevent filling from showing.
Test 15 mm eyes against the pinned white face patches before locking them in place. Different chenille brands can shift the apparent scale even with identical stitch counts.
Planning Yarn Quantity
Large published worsted penguins can require substantially more dark yarn than accent colors because the head, body and wings carry the main shade. The same relationship applies here despite the heavier chenille.
Complete the black head, body and wings before using remaining black yarn for any optional details. Reserve enough white for the face, belly and platform top because those pieces occupy considerable area.
The blue allocation needs to cover both scarf and platform. Work the scarf first if an exact color match between accessory and base matters.
Adjusting Finished Size
Changing yarn thickness is the simplest way to resize this penguin amigurumi crochet pattern without rewriting its geometry. Lighter yarn produces a smaller figure while retaining the same facial proportions.
If using worsted yarn, reduce the hook and eye size together. The ice base should also be scaled from the same yarn family so the feet do not appear oversized against it.
For blanket yarn, keep the written stitch counts and choose a hook that creates firm fabric rather than adding extra increase rounds.
Finishing Checks
Set the platform on a level surface and press lightly on opposite sides. It should remain flat without rocking or collapsing through the center.
View the penguin directly from the front. Both eyes should sit at comparable heights, the white patches should balance around the beak and the orange feet should remain visible beneath the belly.
Check the scarf and snow last. The hanging blue scarf end should remain centered over the torso, while the longest white icicles should clear the table surface instead of folding underneath the platform.
Conclusion
Measure the completed penguin separately from the ice platform and record the platform diameter before storing the project notes. Those dimensions make another penguin amigurumi crochet pattern easier to scale with a different chenille yarn. Photograph the display from the front and three-quarter side to check facial symmetry, wing angle, scarf drape and base thickness. Save the project to Pinterest and share the finished penguin on Instagram with #IceScarfPenguin. Reshape the beak and scarf before taking the final photograph. Would you keep the baby-blue ice details or change the next platform to pale lavender?
Sources
- Jess Huff — Peter the Penguin: 14-inch penguin, 3.5 mm hook, 15 mm safety eyes and published color yardage.
- Lion Brand — Polar Penguin Amigurumi: super-bulky polyester yarn and approximately 12.5-inch finished height.
- Spin a Yarn Crochet — Penguin Amigurumi: approximately 18 cm, 3.25 mm hook and 12 mm safety eyes.
- Ravelry — Pippo the Little Penguin: approximately 10 cm, 2.5 mm hook and 6 mm safety eyes.
- Ravelry — Penguin by Loops and Love Crochet: super-bulky yarn, scarf accent and published color yardage.
- One Dog Woof — Baby Penguin Amigurumi: separate side-fin construction and 8–10 inch finished versions.
- Sweet Softies, Etsy and Ravelry — current scarf penguin, no-sew penguin and winter penguin competition references.









