Introduction
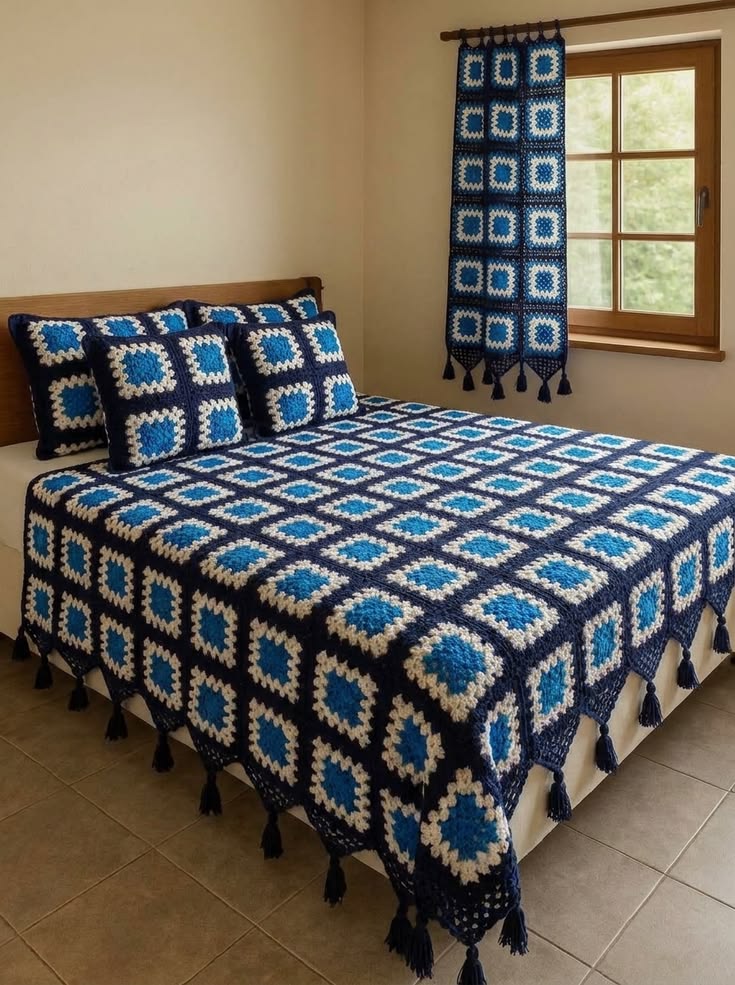
Three blue-and-cream bands have to meet at every seam without letting one crooked square break the entire navy grid. This blue granny square bedspread crochet pattern uses DK or light-worsted yarn with a 4.5 mm hook and 14–16 cm blocks. Approximately 120 motifs create the bedspread field, while matching pillows, a window panel and tassels extend the same construction across the room.
The Design: What Makes This Blue Granny Square Set Different
The color order never changes: turquoise establishes the visual center, cream creates a light separating band, and navy expands into the outer frame. That fixed sequence lets the navy joining seams merge with the final motif round, producing the strong dark grid visible across the bed. The blue and white granny square blanket therefore reads as one geometric surface rather than a collection of unrelated blocks. Another structural decision is scale. Squares are kept near 14–16 cm so the bedspread contains many repeated centers without making the motifs visually coarse. Long navy tassels continue the dark outer color beyond the border. The same square also appears on the cushions and narrow window panel. A common failure is changing tension between colors; even a 5 mm size difference becomes obvious when several navy frames meet in one seam.
Project Information at a Glance
| Skill Level | Time | Finished Size | Hook | Best For |
|---|---|---|---|---|
| Intermediate | 55–75 hours for full set | Approx. 165–180 × 205–225 cm | 4.5 mm | Bedspreads, coordinated bedroom sets and modular home decor |
A current granny-square sizing guide uses 15 cm squares as a practical blanket-planning example, while current hook guidance places DK yarn around 3.75–4.5 mm. Those references support the 14–16 cm motif and 4.5 mm project specification used here. :contentReference[oaicite:15]{index=15}
Materials and Tools
Yarn
- Turquoise blue — DK/light-worsted acrylic or cotton-acrylic — approximately 700–850 g — square centers
- Warm cream/ivory — matching yarn — approximately 800–950 g — middle motif rounds
- Deep navy — matching yarn — approximately 1,500–1,800 g — outer rounds, joining, border and tassels
Tools
- 4.5 mm crochet hook
- Large-eye yarn needle
- Locking stitch markers
- Blocking mats
- Rust-resistant pins
- Scissors
- Measuring tape
- Cardboard tassel template approximately 18 cm long
Acrylic gives the large finished project lower weight and simpler laundering, while cotton-acrylic offers firmer stitch definition. Use the same fiber family for all three colors so the squares respond similarly during blocking.
Abbreviations
- MR — magic ring
- ch — chain
- sl st — slip stitch
- sc — single crochet
- hdc — half double crochet
- dc — double crochet
- sp — space
- ch-sp — chain space
- RS — right side
- WS — wrong side
Keep corner chain spaces relaxed; tightening those chains shortens the diagonal distance between adjacent sides and can make the blocked square curl.
Pattern — Step by Step
Make one complete square first. Block it before starting production and record the exact finished measurement. The target is approximately 14–16 cm.
Three-Color Granny Square — Make Approximately 120
Start with turquoise blue.
R1: MR, ch 3, 2 dc, ch 2, *3 dc, ch 2* ×3; join with sl st to top of beginning ch 3.
You now have four 3-dc groups and four corner ch-2 spaces.
Turquoise Round 2
Sl st into the first corner.
R2: ch 3, 2 dc, ch 2, 3 dc in same corner; *ch 1, (3 dc, ch 2, 3 dc) in next corner* ×3; ch 1, join.
Fasten off turquoise.
Cream Round 3
Join cream in any corner.
R3: (ch 3, 2 dc, ch 2, 3 dc) in first corner; *ch 1, 3 dc in next side ch-1 sp, ch 1, (3 dc, ch 2, 3 dc) in corner* around.
Join and continue in cream.
Cream Round 4
R4: sl st to corner, (ch 3, 2 dc, ch 2, 3 dc) in corner; *ch 1, 3 dc in each side ch-1 sp, ch 1, (3 dc, ch 2, 3 dc) in next corner* around.
Fasten off cream.
Navy Round 5
Join navy in any corner.
R5: work (3 dc, ch 2, 3 dc) in every corner and one 3-dc cluster in every ch-1 side space, separated by ch 1.
Join and fasten off.
Measure the square after blocking. Add one additional navy granny round only if the motif remains under 14 cm.
Optional Navy Stabilizing Round
If the squares will receive a dense slip-stitch seam, add:
R6: ch 1, sc in every dc and every ch-1 sp; work (2 sc, ch 2, 2 sc) in each corner.
Fasten off.
This round gives the joining needle or hook a continuous navy edge.
Blocking the Squares
Pin every square to the same 14–16 cm template.
Place pins in all four corners first.
Add one pin at the midpoint of each side.
Allow the motifs to dry fully before stacking.
A modern sizing guide recommends calculating blanket dimensions from the blocked square measurement, not from the fresh motif. For example, 15 cm squares can be multiplied directly by the number of blocks across and down. :contentReference[oaicite:16]{index=16}
Bedspread Layout
Arrange 10 squares across and 12 squares down for approximately 120 motifs.
With 15 cm blocked squares, the unbordered field measures approximately 150 × 180 cm before seams and edging.
If a wider mattress requires more side drop, increase to 11 squares across rather than enlarging individual motifs.
Navy Horizontal Joining
Yarn: deep navy.
Place two motifs WS together.
Working through corresponding outer loops, sl st from one corner to the opposite corner.
Do not pull the seam tighter than the blocked side length.
Continue joining individual squares into complete rows.
Navy Vertical Joining
Arrange the joined rows in final order.
Use the same navy slip-stitch seam across each vertical line.
At four-square intersections, pass through the corner loops without adding extra chain stitches.
The dark seam should remain narrow and nearly merge with the navy frame surrounding each motif.
Bedspread Border — Round 1
Yarn: navy.
Join in any outer corner.
R1: sc evenly around the full perimeter. Work 3 sc in each corner.
Place the same number of stitches along opposite edges.
Bedspread Border — Round 2
R2: ch 3, dc in every sc around; work (2 dc, ch 2, 2 dc) in each corner.
Bedspread Border — Openwork Round
R3: ch 4, skip 1 st, dc in next st; *ch 1, skip 1, dc in next* around. Work (dc, ch 2, dc) into each corner.
Bedspread Border — Final Navy Round
R4: ch 1, sc into each dc and ch-1 space; work 3 sc in each corner.
Fasten off.
Navy Tassels — Make Approximately 30–38
Wrap navy yarn around an 18 cm cardboard template approximately 20–24 times.
Cut across one edge.
Fold the strands in half.
Tie approximately 2 cm below the fold.
Wrap a separate navy strand six to eight times around the tassel neck.
Trim to approximately 14–16 cm.
Attach the tassels at regular intervals along the lower edge and lower portions of both sides.
Daisy Farm Crafts recommends spacing tassels by repeated stitch or chain intervals rather than attaching one to every stitch, which matches the separated fringe visible in the reference. :contentReference[oaicite:17]{index=17}
Matching Pillow Front — Make Four
For each pillow, arrange 3 × 3 standard granny squares.
Join the nine motifs with navy seams.
Add one navy sc round around the complete panel.
Target finished front size: approximately 42–46 cm depending on square gauge.
Pillow Back Panels
Yarn: navy.
Ch enough stitches to match the finished pillow width.
Row 1: dc in fourth ch from hook and across.
Rows 2 onward: ch 3, turn, dc across.
Make two overlapping panels per cushion, each covering roughly two-thirds of the pillow height.
Overlap them by approximately 10–12 cm to create an envelope opening.
Assemble the Pillow Covers
Place the granny-square front RS outward.
Position both navy back pieces behind it with the overlap centered.
Sc around all four sides through both front and back layers.
Work 3 sc in each corner.
Fasten off.
Window Panel Squares — Make 18
Make the same turquoise, cream and navy square used for the bedspread.
Arrange three squares across × six squares long.
Join all motifs with navy slip-stitch seams.
The blocked panel should measure approximately 45 cm wide × 90 cm long before the upper loops and lower decorative extension.
Window Panel Side Extension
Yarn: navy.
Work one sc round around the joined 3 × 6 panel.
Continue with:
R2: dc around.
R3: *dc, ch 1, skip 1* around.
R4: sc around.
Fasten off.
Curtain Hanging Loops
Make approximately six loops across the top.
Join navy at the top edge.
Ch 14–18 depending on the diameter of the curtain rod.
Sl st back into the same upper edge point.
Move evenly across the top and repeat until six loops are complete.
Check that every loop is equal before placing the panel on the rod.
Window Panel Tassels — Make Six to Eight
Make navy tassels using the same method as the bedspread fringe.
Attach one beneath each lower motif division and one near each lower corner.
Trim all tassels to the same 14–16 cm length.
Assembly
- Block every turquoise, cream and navy square to one fixed 14–16 cm template before arranging any bedspread rows.
- Lay approximately 120 motifs in a 10 × 12 grid and check the turquoise centers from across the room for obvious size or dye-lot variation.
- Join the squares horizontally in navy, keeping each seam the same length as the blocked motif edge.
- Connect the completed rows vertically and check all four-square intersections before weaving in the joining tails.
- Work four navy border rounds around the complete bedspread and compare opposite side stitch counts before beginning the tassels.
- Attach approximately 30–38 navy tassels at equal intervals along the lower edge and side drops, then trim them against one 14–16 cm guide.
- Join nine squares for each pillow front and add the navy envelope back panels.
- Join eighteen squares into the 3 × 6 window panel, then work its navy border and six upper hanging loops.
- Add six to eight matching tassels to the bottom of the window panel, aligning them with the vertical motif divisions.
- Place the full set in position and record the blocked square size, bedspread dimensions, pillow dimensions and window-panel length for future reproductions.
The completed set should repeat the same turquoise-center, cream-band and navy-frame motif across the bedspread, cushions and hanging panel, with the dark joining lines forming one consistent grid.
7 Technical Tips
- Square-size drift: A difference greater than approximately 5 mm becomes obvious where four navy corners meet. Block every motif to one reusable 14–16 cm template.
- Twisted centers: Working every round from the same direction can cause the turquoise center to lean diagonally. Turn the motif between rounds if your personal tension produces visible spiral rotation.
- Tight navy seams: A joining row shortened by even 1 cm can gather an entire blanket strip. Compare each completed seam against one unjoined blocked side.
- Border ruffling: Adding too many stitches along joined edges creates waves. Count stitches on opposite sides and keep those totals equal before R2.
- Tassel variation: A 2 cm difference is conspicuous across a straight bed edge. Wrap every tassel on the same 18 cm cardboard guide and trim the finished fringe together.
- Pillow distortion: A backing panel smaller than the blocked 3 × 3 front pulls the granny grid backward. Match the back width to within approximately 5 mm before assembly.
- Curtain sagging: Fewer than about six hanging loops can place excessive load on individual top motifs. Spread six equal loops across a three-square-wide panel.
Controlling the Three-Color Sequence
The turquoise center needs to remain approximately the same diameter on every motif. If one center becomes larger, the cream band appears narrower even when the final square measurement matches.
Work all turquoise centers as one production batch, then all cream rounds, then all navy frames. That method makes tension differences easier to spot before dozens of motifs are complete.
Keep the cream visually warm rather than stark blue-white if you want to match the supplied image closely. The softer neutral separates turquoise from navy without producing excessive contrast.
Why the Navy Joining Grid Matters
The dark seams are part of the design rather than a hidden construction detail. Because every square already finishes in navy, navy joining yarn visually extends each frame into the neighboring motif.
A cream seam would divide the outer round and create a second pale grid that is not present in the reference.
Keep joins flat. Raised seams add another dark ridge and can become uncomfortable on a bed covering.
Planning the Bedspread Size
A current 2026 granny-square size chart recommends dividing the desired blanket dimension by the blocked square measurement. Its worked example uses 15 cm squares: 120 cm divided by 15 gives eight motifs across, while 150 cm divided by 15 gives ten motifs down. :contentReference[oaicite:18]{index=18}
Apply the same method here. Ten 15 cm blocks produce a 150 cm main field before the border. Eleven produce approximately 165 cm.
Choose the motif count after measuring the mattress and desired side drop rather than adding extra rounds to every square.
Choosing Yarn and Hook Size
Current hook guidance places DK granny squares around 3.75–4.5 mm and worsted squares around 5–6 mm. A 4.5 mm hook therefore sits at the upper DK range and gives this bedspread a moderate drape without excessively large chain spaces. :contentReference[oaicite:19]{index=19}
If using true worsted yarn, test a 5 mm hook. Keep the square measurement as the controlling variable.
Do not mix a fine cream yarn with heavy navy yarn. Different yarn diameters can make the navy frame contract around the lighter center.
Estimating Yarn for the Full Set
Large granny-square projects consume substantial border and joining yarn. A documented continuous granny blanket uses hundreds of yards in individual colors, and its border alone adds a large additional quantity. :contentReference[oaicite:20]{index=20}
The navy allocation is highest here because it appears in every square, every seam, the full bedspread border, pillow backs, curtain edging and all tassels.
Make and weigh one completed blocked square. Multiply that number by the planned motif total, then weigh one sample pillow back and one tassel before final yarn purchasing.
Making the Border Lie Flat
Border problems usually begin in the first stabilizing round. If the sc round already ripples, later openwork cannot correct it cleanly.
Count stitches across matching opposite edges. Corners should turn without pulling upward or forming loose fans.
Existing granny-square border tutorials also begin from a stabilizing perimeter before adding more decorative chain-space rounds, matching the construction used here. :contentReference[oaicite:21]{index=21}
Making Matching Granny Square Pillows
The photograph uses several cushions rather than one oversized pillow. Repeating nine standard motifs on each front keeps the square scale consistent with the bedspread.
Navy envelope backs reduce the number of additional motifs required and repeat the dominant outer color.
For a smaller pillow, use a 2 × 2 grid and add navy border rounds until the front matches the insert.
Building the Matching Window Panel
The hanging panel is narrower than the bedspread but uses the same modular logic. Three motifs across reproduce the visible proportions without making the panel wider than the window.
Use the dark navy border as both reinforcement and visual frame. The hanging loops should connect to the strengthened top edge rather than directly to individual granny clusters.
Tassels at the bottom repeat the bedspread fringe and visually finish the narrow vertical panel.
Finishing Checks
Spread the bedspread completely flat and inspect the navy grid from several meters away. Horizontal and vertical joins should remain straight without noticeable narrowing between rows.
Compare turquoise centers next. Every blue center should occupy approximately the same percentage of its cream-and-navy frame.
Hang the window panel last. Its three columns should remain vertical, and all lower tassels should clear the window sill or surrounding furniture.
Conclusion
Measure one blocked motif, the joined bedspread field and the finished border separately before recording the project dimensions. Those numbers make a future blue granny square bedspread crochet pattern easier to resize without altering the three-color motif. Photograph the bed from directly above to check the navy grid, then include the pillows and window panel in a second wider image. Save the project to Pinterest and share the finished set on Instagram with #BlueGrannyBedroomSet. Trim all tassels only after the pieces are hanging naturally. Would you keep the bright turquoise centers shown here or replace them with a softer denim blue?
Sources
- Daisy Cottage Designs — 2024 granny-square blanket tutorial with adjustable blanket sizing and four corner spaces per round. :contentReference[oaicite:22]{index=22}
- Maria’s Blue Crayon — free granny-square blanket pattern published November 2024. :contentReference[oaicite:23]{index=23}
- Haak Maar Raak — 2026 granny-square size chart using 15 cm squares for blanket planning. :contentReference[oaicite:24]{index=24}
- KnitPro — 2025 granny-square hook guide listing 3.75–4.5 mm for DK and 5–6 mm for worsted yarn. :contentReference[oaicite:25]{index=25}
- The Spruce Crafts — four-round granny-square construction and guidance for extending square size. :contentReference[oaicite:26]{index=26}
- The Crochet Swirl — blue blanket made from 25 granny squares joined with a join-as-you-go method. :contentReference[oaicite:27]{index=27}
- Daisy Farm Crafts — blanket tassel spacing and trimming method. :contentReference[oaicite:28]{index=28}
- Etsy and Pinterest — current blue-and-white granny-square blanket competition and visual-interest references. :contentReference[oaicite:29]{index=29}









