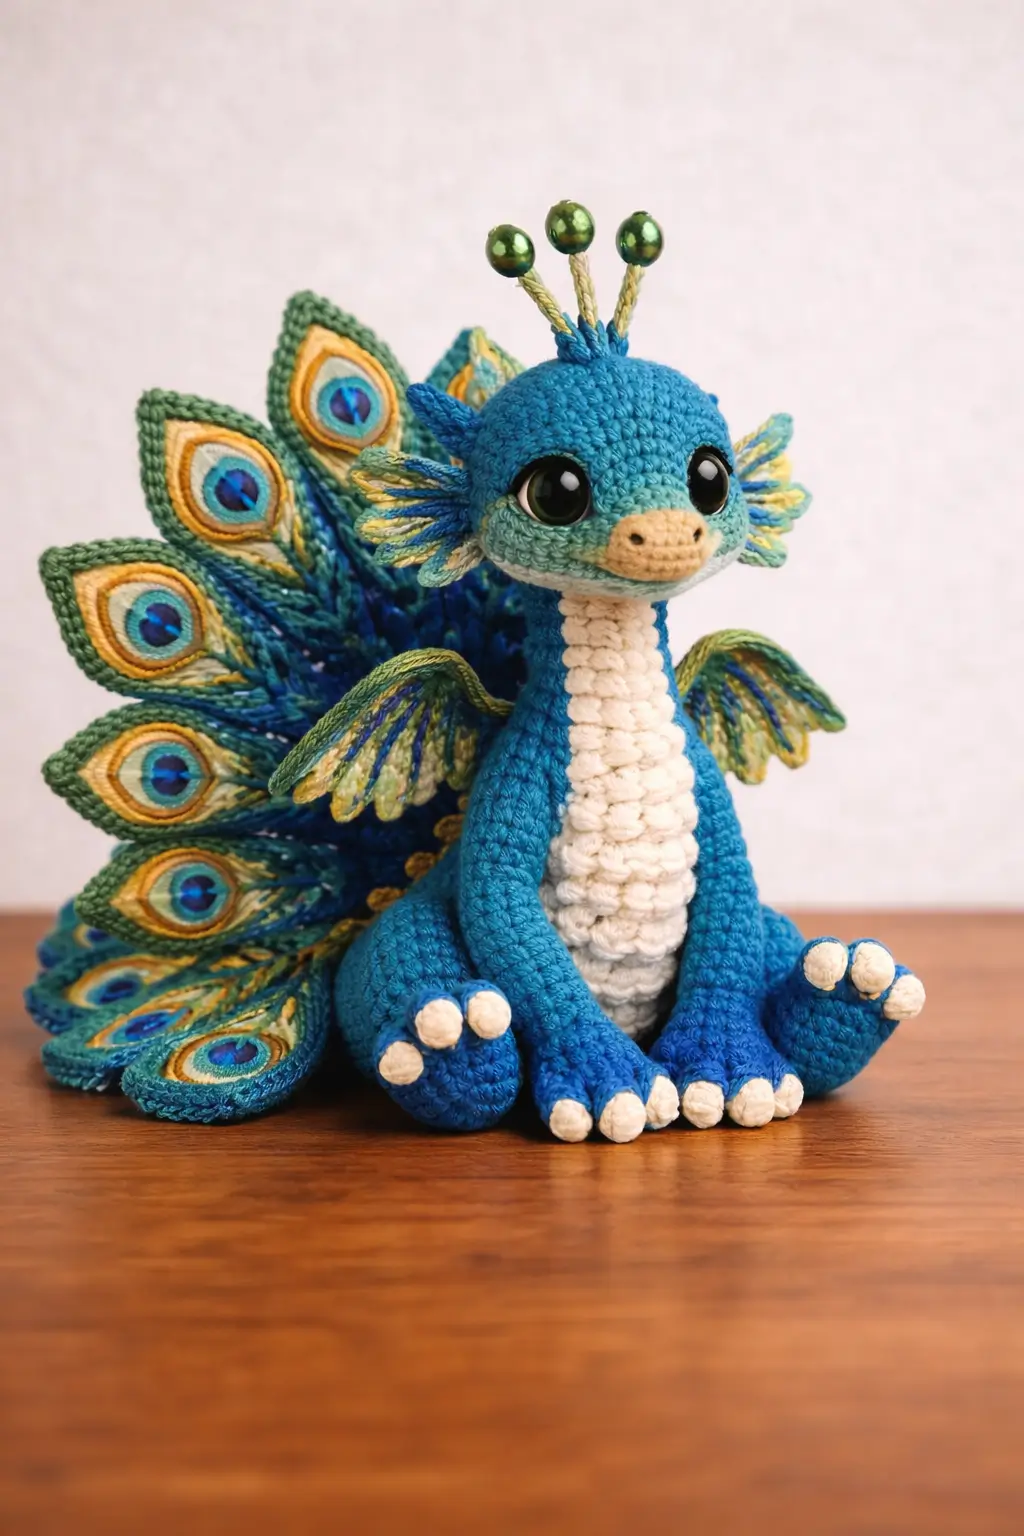
A peacock dragon needs tail eyespots and forewings on the same silhouette. That is the build problem this peacock dragon amigurumi crochet pattern solves with DK yarn, a 3 mm hook, an 18 cm target size benchmark, and intermediate shaping. The result works as shelf decor because the broad rear fan counterbalances the long neck and seated front-heavy pose.
The Design: What Makes This Peacock Dragon Different
The body is not bird-shaped. It sits closer to a compact dragon with four separate legs, a heavier haunch, and a neck that rises from the front third of the torso. That choice matters because a true peacock body would disappear under the train, while this form keeps the head visible from the front. The wings are short and lateral, not flight-scale, because the tail fan already carries most of the visual width. Oversized wings would compete with the eyespots and make assembly unstable.
The second decision is the split tail system: one stuffed tail base plus flat feather panels. A standard peacock amigurumi pattern often spreads the train behind a bird body, but this hybrid needs the fan to frame a seated spine. The third decision is the cheek-frill treatment. It borrows from fantasy-dragon gill fins rather than bird plumage, which gives the face more side volume and a cleaner transition into the snout. A common error in a fantasy dragon crochet pattern like this is placing the fan too low, which makes the toy tip backward.
Project Info at a Glance
| Skill Level | Time | Finished Size | Hook | Best For |
|---|---|---|---|---|
| Intermediate | 10–14 hours | 18 cm benchmark | 3.0 mm | Display plush, fantasy-animal decor |
Finished size, hook, and yarn weight are benchmarked from comparable peacock patterns rather than a direct indexed peacock-dragon source.
Materials and Tools
Yarn
- Peacock blue — DK — about 35–45 g — YarnArt Jeans or similar cotton blend
- Cream/off-white — DK — about 15–20 g — for belly and neck front
- Mint — DK — about 10 g — for face shading
- Sage green — DK — about 15 g — for feather edging and wings
- Teal/dark blue — DK — about 10 g each — for feather eyespots and wing detail
- Golden yellow — DK — about 5 g — for feather rings and beak
- Tan/beige — DK — about 5 g — for snout
Tools
- Hook 3.0 mm
- 16 mm safety eyes
- Polyfill stuffing
- Yarn needle
- Stitch markers
- Three small green beads or pearl beads
- Optional floral wire for feather support
Abbreviations
MR = magic ring, sc = single crochet, inc = increase, dec = invisible decrease, sl st = slip stitch, ch = chain, BLO = back loop only, FLO = front loop only. Use the invisible decrease on all shaping rounds that close the head, body, and limbs so the surface stays smooth instead of forming diagonal notches.
Pattern — Step by Step
Continuous spiral unless noted.
Head (Make 1)
Yarn: peacock blue. Source: Standard amigurumi math.
R1: 6 sc in MR (6)
R2: inc x6 (12)
R3: (sc, inc) x6 (18)
R4: (2 sc, inc) x6 (24)
R5: (3 sc, inc) x6 (30)
R6: (4 sc, inc) x6 (36)
R7-R12: sc around (36)
R13: (4 sc, dec) x6 (30)
R14: (3 sc, dec) x6 (24)
R15: sc around (24)
Insert safety eyes between R10 and R11, 8 sts apart. Stuff firmly at the forehead, lighter at the lower muzzle line.
Fasten off. Leave 20 cm tail.
Snout (Make 1)
Yarn: tan/beige. Source: Standard amigurumi math.
R1: 6 sc in MR (6)
R2: inc x6 (12)
R3-R4: sc around (12)
R5: (4 sc, dec) x2 (10)
R6: sc around (10)
Lightly stuff. Flatten and stitch centered between the eyes and the chin line.
Fasten off. Leave 18 cm tail.
Cheek Patches (Make 2)
Yarn: mint. Source: Standard amigurumi math.
R1: 6 sc in MR (6)
R2: inc x6 (12)
R3: (sc, inc) x6 (18)
Fasten off. Leave 12 cm tail.
Cheek Frills (Make 2)
Yarn: alternating mint, blue, sage. Source: Photo-derived shaping.
Ch 11. Starting in second ch from hook:
Row 1: sl st, sc, hdc, dc, tr, dc, hdc, sc, sl st, sl st.
Fasten off.
Make 4 strands per side. Layer behind each cheek patch before sewing.
Crest Stalks (Make 3)
Yarn: cream. Source: Photo-derived shaping.
Ch 7. Starting in second ch from hook, sl st back down (6).
Thread bead at tip and secure with knot or stitching.
Fasten off. Leave 10 cm tail.
Small Horns/Ear Nubs (Make 2)
Yarn: peacock blue. Source: Standard amigurumi math.
R1: 4 sc in MR (4)
R2: sc around (4)
R3: (sc, inc) x2 (6)
R4: sc around (6)
Do not stuff. Flatten lightly.
Fasten off. Leave 10 cm tail.
Neck Front Panel (Make 1)
Yarn: cream. Source: Photo-derived shaping.
Ch 7.
Row 1: sc in second ch and across (6)
Row 2-R12: ch 1, turn, sc across (6)
Fasten off. Leave 20 cm tail.
Body (Make 1)
Yarn: peacock blue. Source: Standard amigurumi math.
R1: 6 sc in MR (6)
R2: inc x6 (12)
R3: (sc, inc) x6 (18)
R4: (2 sc, inc) x6 (24)
R5: (3 sc, inc) x6 (30)
R6: (4 sc, inc) x6 (36)
R7-R10: sc around (36)
R11: (10 sc, dec) x3 (33)
R12: sc around (33)
R13: (9 sc, dec) x3 (30)
R14-R16: sc around (30)
R17: (3 sc, dec) x6 (24)
R18: sc around (24)
R19: (2 sc, dec) x6 (18)
Stuff the back half firmly. Keep the chest softer so the neck seam sits flat.
Fasten off. Leave 25 cm tail.
Front Legs (Make 2)
Yarn: peacock blue. Source: Standard amigurumi math.
R1: 6 sc in MR (6)
R2: inc x6 (12)
R3-R4: sc around (12)
R5: (4 sc, dec) x2 (10)
R6-R9: sc around (10)
Flatten top opening. Sc through both layers for 5 sts to close.
Add extra stuffing at the paw only.
Fasten off. Leave 20 cm tail.
Back Legs (Make 2)
Yarn: peacock blue. Source: Standard amigurumi math.
R1: 6 sc in MR (6)
R2: inc x6 (12)
R3: (sc, inc) x6 (18)
R4-R5: sc around (18)
R6: (4 sc, dec) x3 (15)
R7-R9: sc around (15)
R10: (3 sc, dec) x3 (12)
Flatten top opening. Sc through both layers for 6 sts to close.
Fasten off. Leave 20 cm tail.
Toe Caps / Claws (Make 14)
Yarn: cream. Source: Photo-derived shaping.
R1: 4 sc in MR (4)
R2: sc around (4)
Fasten off. Leave 8 cm tail.
Wings (Make 2)
Yarn: sage green with teal surface embroidery optional. Source: Photo-derived shaping.
Ch 10.
Row 1: sc in second ch, sc 2, hdc 2, dc 2, hdc, sc (9)
Row 2: ch 1, turn, sc 3, hdc 2, dc 2, hdc, sc (9)
Row 3: ch 1, do not turn fully; work 5 scallops along lower edge: (sl st, ch 2, sl st in next st) x5
Fasten off. Leave 18 cm tail.
Tail Base (Make 1)
Yarn: peacock blue. Source: Standard amigurumi math.
R1: 6 sc in MR (6)
R2: inc x6 (12)
R3: (sc, inc) x6 (18)
R4: (2 sc, inc) x6 (24)
R5-R7: sc around (24)
R8: (2 sc, dec) x6 (18)
Stuff lightly and flatten into a wedge.
Fasten off. Leave 20 cm tail.
Tail Feathers (Make 8)
Yarn: sage outer edge, then gold, cream, teal, blue eyespot layers. Source: Separate feather construction is supported by indexed peacock references; this exact feather is original.
With sage:
Ch 9.
Round 1: starting in second ch, sc 7, 3 sc in last ch, work opposite side sc 6, inc in last st (18)
Round 2: sc 7, inc x3, sc 7, inc (22)
Round 3: sc around (22)
Fasten off outer feather.
Embroider concentric almond shapes on one side only:
- gold ring
- cream ring
- teal ring
- dark blue center
- small black vertical slit
Leave tail for stitching.
Belly Gusset (Make 1)
Yarn: cream. Source: Photo-derived shaping.
Ch 8.
Row 1: sc in second ch and across (7)
Row 2-R10: ch 1, turn, sc across (7)
Fasten off. Leave 20 cm tail.
Assembly
- Sew the head to the front top of the body with the chin angled slightly down.
- Attach the snout centered below the eyes. Add two small nostril stitches.
- Sew the cheek patches under the eyes, then anchor the layered cheek frills behind them.
- Stitch the cream neck front panel from the chin to the upper chest.
- Sew the front legs to the lower chest so the paws project forward.
- Attach the back legs low on the body sides, angled outward for a seated pose.
- Sew the wings just behind the neck seam, tilted slightly downward.
- Attach the two horn nubs behind the head frills.
- Sew the tail base at the back, then arrange and stitch the eight feathers in a fan from low outer edge to high center.
- Add all toe caps, then attach the three bead-tipped crest stalks between the horn nubs.
The finished toy should sit upright with the fan acting as a rear visual frame rather than a floor prop.
7 Technical Tips
- Mark the first stitch of every round on the head and body. Losing one increase point on a 36-st round throws the muzzle line off by one full stitch repeat.
- Stuff the forehead harder than the jaw. Soft lower-face stuffing prevents the 16 mm eyes from tipping inward after assembly.
- Work invisible decreases only on visible shaping rounds. Standard decs leave little ridges that become obvious across blue cotton yarn.
- Install the eyes before closing the head past 24 sts. After that point, washer placement becomes awkward and can distort the snout axis.
- Pin the wings one round higher than you think. Low placement makes the shoulders look birdlike instead of dragonlike.
- Fan the tail feathers before sewing any permanent seam. A 1 cm difference in feather spacing changes the whole rear silhouette.
- Weave claw tails back through the paw twice. Single-pass anchoring lets small toe caps twist after handling.
Conclusion
This peacock dragon amigurumi crochet pattern works because the structure stays disciplined: medium stitch plateaus, short wings, four stable limbs, and a tail fan built as separate visual units. Crochet the body first, pin the full silhouette next, then commit to the final feather spacing only after testing the seated angle. Share the finished piece on Pinterest and Instagram with one front view and one three-quarter side view so the train and wings read clearly. Use #PeacockDragonPattern when posting. One build question matters more than the rest: did you place the center tail feather directly behind the neck, or slightly off axis for a more natural spread?









