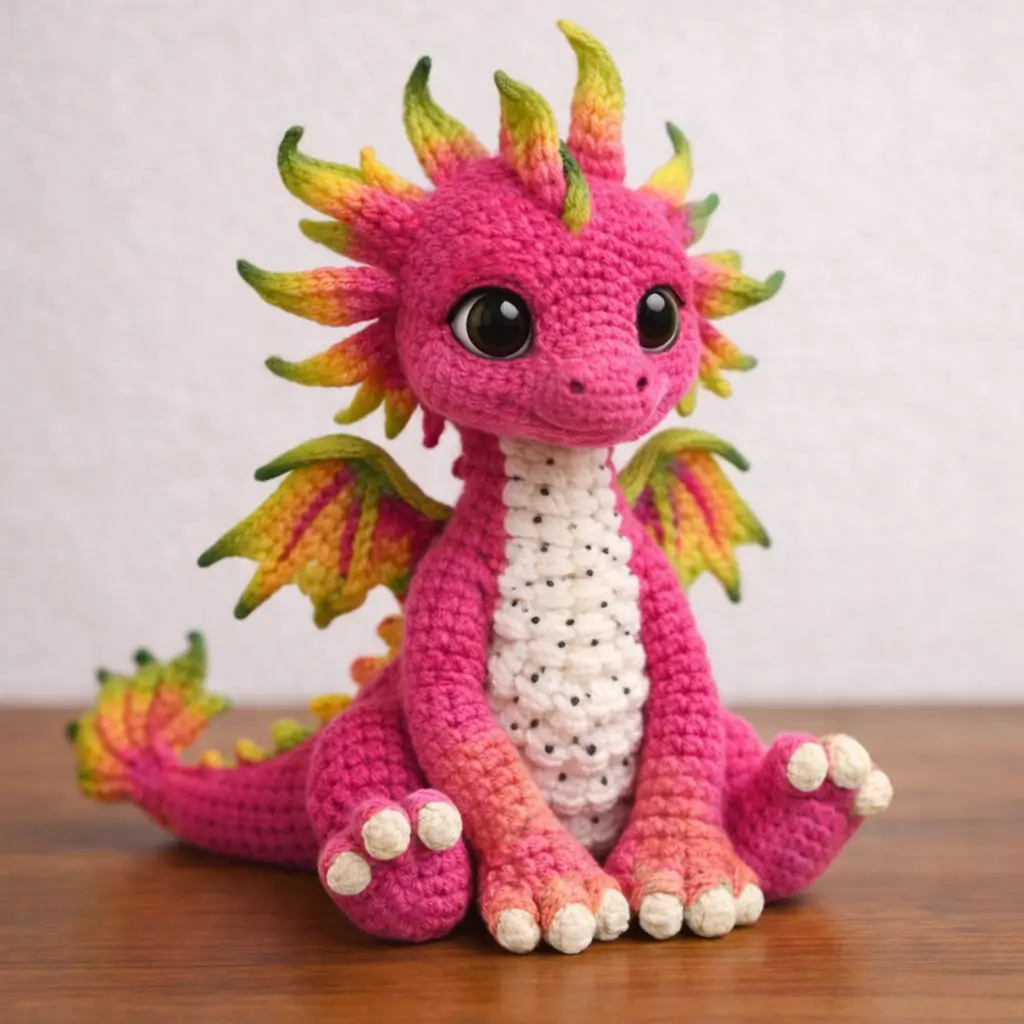
A dragon with a frilled crown and bat wings fails at the neck before it fails anywhere else. This dragon amigurumi crochet pattern builds that support first, then adds the oversized head, rainbow spines, and seated limbs. Use sport or light worsted yarn, a small hook, and firm stuffing to make a display toy that holds its pose on a shelf or market table.
The Design: What Makes This Dragon Different
You are not shaping a generic lizard. The head is broad, the snout projects forward, and the body sits back on the haunches instead of leaning over the front feet. That changes the pattern immediately.
First, the neck must stay narrower than the head but denser than the tail. A loose neck makes the eyes tilt downward and the snout sag. Second, the wings sit high and slightly forward, not flat on the spine, because that placement keeps the silhouette readable from the front. The dragon looks finished even before the tail is pinned on. Third, the crown spines matter more than horns here. They frame the face and carry the color story. In many sitting dragon amigurumi patterns, makers place them too evenly, which turns the crown into a sunburst instead of a reptile frill. That is the common miss. A better result comes from varying angle, height, and spacing while keeping both sides balanced. This also improves an amigurumi dragon wings layout because the head remains the first visual anchor.
Project Info at a Glance
| Skill Level | Time | Finished Size | Hook | Best For |
|---|---|---|---|---|
| Intermediate | 8–12 hours | 20 cm | 2.5 mm | Shelf display, fantasy gift, craft fair sample |
Materials and Tools
Yarn
- Hot pink — sport weight cotton — about 140 g total if worked at the referenced size — brand style comparable to Yarn and Colors Must Have or similar cotton
- White or cream — sport weight cotton — about 6 g for belly and claws
- Lime green — sport weight cotton — about 15 g
- Yellow-green / chartreuse — sport weight cotton — small amount
- Peach / coral — sport weight cotton — small amount
- Optional variegated rainbow yarn — for spines and wing color transitions
Tools
- Hook 2.5 mm
- 12 mm safety eyes
- Polyester stuffing
- Tapestry needle
- Stitch markers
- Pins
- Black embroidery thread for nostrils and mouth detail
Abbreviations
MR / sc / inc / dec / sl st / ch / BLO / hdc
Use the invisible decrease, not a standard two-stitch pull-through, on visible shaping rounds because the snout, belly edge, and limb fronts show every gap.
Pattern — Step by Step
Continuous spiral unless noted.
Head (Make 1)
Yarn: hot pink — Standard amigurumi math adapted to the photo
R1: 6 sc in MR (6)
R2: inc x6 (12)
R3: (sc, inc) x6 (18)
R4: (2 sc, inc) x6 (24)
R5: (3 sc, inc) x6 (30)
R6: (4 sc, inc) x6 (36)
R7: (5 sc, inc) x6 (42)
R8-R13: sc around (42)
Place safety eyes between R9 and R10 with 8 stitches between them.
R14: (5 sc, dec) x6 (36)
R15: (4 sc, dec) x6 (30)
R16: (3 sc, dec) x6 (24)
Stuff firmly, especially the forehead and lower cheeks.
R17: (2 sc, dec) x6 (18)
R18: (sc, dec) x6 (12)
R19: dec x6 (6)
Fasten off. Leave a 20 cm tail.
Snout (Make 1)
Yarn: hot pink — Standard amigurumi math adapted to the photo
R1: 6 sc in MR (6)
R2: inc x6 (12)
R3: (sc, inc) x6 (18)
R4: (2 sc, inc) x6 (24)
R5-R7: sc around (24)
R8: (2 sc, dec) x6 (18)
Lightly stuff. Embroider two nostrils before sewing if preferred.
Fasten off. Leave a 20 cm tail.
Body (Make 1)
Yarn: hot pink — Standard amigurumi math adapted to the photo
R1: 6 sc in MR (6)
R2: inc x6 (12)
R3: (sc, inc) x6 (18)
R4: (2 sc, inc) x6 (24)
R5: (3 sc, inc) x6 (30)
R6: (4 sc, inc) x6 (36)
R7-R12: sc around (36)
R13: (4 sc, dec) x6 (30)
R14-R16: sc around (30)
R17: (3 sc, dec) x6 (24)
R18-R20: sc around (24)
Stuff firmly at the base and medium-firm through the chest.
R21: (2 sc, dec) x6 (18)
R22: sc around (18)
Fasten off. Leave a 25 cm tail.
Belly Panel (Make 1)
Yarn: white — Standard amigurumi math adapted to the photo
Ch 7. Work in rows.
Row 1: sc in 2nd ch from hook and next 5 (6)
Row 2: inc, 4 sc, inc, ch 1, turn (8)
Row 3: inc, 6 sc, inc, ch 1, turn (10)
Row 4: 10 sc, ch 1, turn (10)
Row 5: inc, 8 sc, inc, ch 1, turn (12)
Row 6: 12 sc, ch 1, turn (12)
Row 7: inc, 10 sc, inc, ch 1, turn (14)
Row 8: 14 sc, ch 1, turn (14)
Row 9: dec, 10 sc, dec, ch 1, turn (12)
Row 10: dec, 8 sc, dec, ch 1, turn (10)
Row 11: dec, 6 sc, dec (8)
Fasten off. Leave a 25 cm tail.
Front Legs (Make 2)
Yarn: hot pink, fade to peach at the paw if desired — Standard amigurumi math
R1: 6 sc in MR (6)
R2: inc x6 (12)
R3: (sc, inc) x6 (18)
R4-R5: sc around (18)
R6: (sc, dec) x6 (12)
R7-R12: sc around (12)
Stuff the paw firmly and the upper limb lightly.
R13: flatten and sc through both sides across 6 sts (6)
Fasten off. Leave a 20 cm tail.
Back Legs (Make 2)
Yarn: hot pink — Standard amigurumi math
R1: 6 sc in MR (6)
R2: inc x6 (12)
R3: (sc, inc) x6 (18)
R4: (2 sc, inc) x6 (24)
R5-R6: sc around (24)
R7: (2 sc, dec) x6 (18)
R8: (sc, dec) x6 (12)
R9-R11: sc around (12)
Stuff the foot firmly and the top lightly so it can flatten under the body.
R12: flatten and sc through both sides across 6 sts (6)
Fasten off. Leave a 22 cm tail.
Wings (Make 2)
Yarn: hot pink for frame, yellow/lime/green for membrane
Wing Frame
R1: 4 sc in MR (4)
R2: (sc, inc) x2 (6)
R3-R10: sc around (6)
Fasten off first branch.
Make second branch the same, but do not fasten off. Hold both branches together.
Join and sc around both pieces: 6 sc on branch 1, 6 sc on branch 2, 6 sc on opposite side of branch 2, 6 sc on opposite side of branch 1 (24)
R12-R13: sc around (24)
Fasten off.
Wing Membrane
Row 1: ch 10
Row 2: sc in 2nd ch from hook and across (9), ch 1, turn
Row 3: dec, 5 sc, dec (7), ch 1, turn
Row 4: 7 sc, ch 1, turn (7)
Row 5: dec, 3 sc, dec (5), ch 1, turn
Row 6: 5 sc
Fasten off.
Sew one membrane into each frame. Angle the outer edge downward to copy the photo.
Horn / Crown Spikes (Make 10–12)
Yarn: start hot pink or coral, then yellow, then lime/green at the tip — Standard cone shaping adapted to the photo
R1: 4 sc in MR (4)
R2: sc around (4)
R3: (sc, inc) x2 (6)
R4-R5: sc around (6)
R6: (2 sc, inc) x2 (8)
R7: sc around (8)
Fasten off. Leave a 15 cm tail.
Make 3 taller spikes by adding two extra rounds of 8 sc. Place tallest spikes on the crown, shorter spikes around the cheek line and tail tip.
Tail (Make 1)
Yarn: hot pink — Standard amigurumi math adapted to the photo
R1: 4 sc in MR (4)
R2: sc around (4)
R3: (sc, inc) x2 (6)
R4-R6: sc around (6)
R7: (2 sc, inc) x2 (8)
R8-R10: sc around (8)
R11: (3 sc, inc) x2 (10)
R12-R15: sc around (10)
R16: (4 sc, inc) x2 (12)
R17-R22: sc around (12)
Stuff lightly near the base only. Keep the far end soft so it curves.
Fasten off. Leave a 25 cm tail.
Tail Flame / Tail Spikes (Make 3)
Yarn: yellow, lime, green — Standard cone shaping
R1: 4 sc in MR (4)
R2: (sc, inc) x2 (6)
R3-R4: sc around (6)
Fasten off. Leave a tail for sewing.
Cheek Patches (Make 2)
Yarn: pale pink or peach — Standard flat circle
R1: 6 sc in MR (6)
R2: inc x6 (12)
Fasten off. Leave a 12 cm tail.
Claws / Toe Caps
Yarn: white — Standard mini caps
For front feet, make 8.
For back feet, make 6.
R1: 4 sc in MR (4)
R2: sc around (4)
Fasten off. Leave a small tail.
Neck Underside Accent (Make 1, optional)
Yarn: white with black speckle effect if available — Photo-based accent
Ch 5.
Row 1: sc in 2nd ch from hook and across (4), ch 1, turn
Row 2-R6: 4 sc
Fasten off.
Assembly
- Sew the snout to the lower front of the head, centered under the eyes.
- Add embroidered nostrils and a short mouth line before closing the last seam if access is tight.
- Sew the head to the body with the body opening centered slightly forward, not directly under the head midpoint.
- Attach the belly panel from the lower snout area down the front body.
- Sew the back legs low on the body so the dragon sits on them instead of over them.
- Attach the front legs at the chest, angled inward so the paws rest near the center line.
- Pin and sew the wings high on the back, with the top edge just behind the neck.
- Sew the tail to the lower back and curve it to one side before locking the last stitches.
- Add crown spikes around the head, then smaller spikes on the tail tip, keeping left and right spacing visually balanced.
- Sew on claws and cheek patches, then stitch the neck underside accent in place if used.
The piece is complete when it can sit without the head tipping forward.
7 Technical Tips
- Mark the center front of the head before eye placement. One missed stitch here shifts the snout and both pupils will read off-axis.
- Stuff the neck harder than the upper body. A neck that compresses by more than 1 cm under finger pressure will drop the head after assembly.
- Use invisible decreases on the snout and limb fronts. Standard decreases leave slots that show stuffing and break the smooth reptile surface.
- Insert safety eyes before the final third of head decreases. Waiting past that point makes washer placement difficult and distorts the eye line.
- Keep wing membranes one hook-half looser than the wing frame if you use cotton. Tight membranes cup inward and drag the wing tips down.
- Pin each back leg so the paw base touches the table flat for at least 3 cm. If only the heel touches, the dragon will rock backward.
- Weave every spike tail in two directions. A single straight weave works loose because those crown points get handled first.
Conclusion
This dragon amigurumi crochet pattern is really a structure problem disguised as a color project. The seated pose, narrow neck, forward snout, and high wing placement need to work before the rainbow crown goes on. Once the body sits flat and the head stays level, the rest is controlled detail. Follow the assembly order, photograph the finished dragon from the front and side, then pin it to Pinterest and post it on Instagram with #RainbowSpineDragon. For the next revision, adjust only one variable at a time. Did you place your tallest crown spikes directly above the eyes, or slightly behind them?









