Introduction
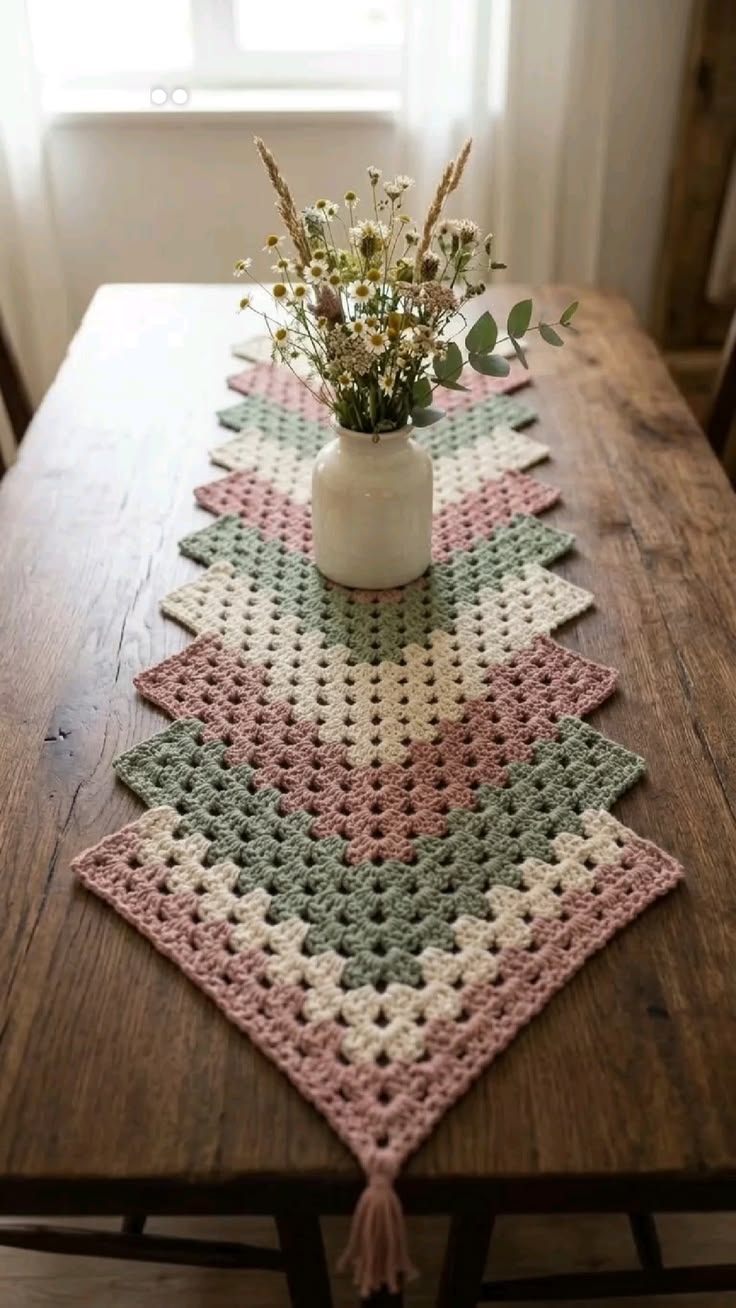
Rotating square points create this runner’s zigzag silhouette, so one misaligned motif is visible from the opposite end of the table. This granny square crochet table runner pattern uses DK cotton, a 4 mm hook, dusty pink, sage green, and cream yarn, plus two end tassels. The intermediate runner finishes at approximately 135 × 31 cm and can be shortened one square at a time.
The Design: What Makes This Granny Square Table Runner Different
The photographed runner does not place conventional granny squares edge-to-edge as a rectangular strip. Instead, large squares are rotated 45 degrees so their corners project outward and create a rhythmic zigzag perimeter. Each motif uses broad color bands rather than changing shade every round: dusty pink, muted sage, and warm cream repeat in different positions so adjacent squares remain related without becoming identical. The narrow joining area keeps the pointed silhouette visible instead of filling the spaces between motifs.
This construction also makes a pastel crochet table runner easy to resize because complete squares determine the length. Published granny-square runners range from approximately 79 × 31 cm to 135 × 31 cm, with DK, Aran, and cotton yarn all represented. A frequent mistake is joining unblocked motifs. Small diagonal differences accumulate quickly and produce a curved centerline.
Project Info at a Glance
| Skill Level | Time | Finished Size | Hook | Best For |
|---|---|---|---|---|
| Intermediate | Approx. 8–12 hours | Approx. 135 × 31 cm | 4 mm | Dining tables, consoles, sideboards |
A published Ravelry Hip Granny Square Table Runner uses DK cotton with a 3.5 mm hook and finishes at approximately 135 × 31 cm after blocking. Another free Ravelry granny-square runner published in March 2024 uses a 4.5 mm hook, Aran cotton-blend yarn, and finishes at approximately 78.75 × 31.11 cm. These provide useful size and hook benchmarks for the photographed project.
Materials and Tools
Yarn
- Dusty rose pink — DK #3 cotton or cotton blend — approximately 120–150 g
- Muted sage green — DK #3 cotton or cotton blend — approximately 120–150 g
- Warm cream — DK #3 cotton or cotton blend — approximately 100–130 g
- Extra dusty pink for tassels — approximately 10–15 g
Keep approximately 600–750 m total yarn available for the long version. A published DK cotton granny-square runner measuring 135 × 31 cm lists 947 m, while smaller and less densely constructed runners require considerably less. The open traditional granny stitch used here reduces yarn consumption compared with denser textured motifs.
Tools
- 4 mm crochet hook
- Tapestry needle
- Scissors
- Locking stitch markers
- Blocking mats
- Rust-resistant pins
- Tape measure
- Small piece of cardboard approximately 10 cm long for tassels
Abbreviations
- MR — magic ring
- ch — chain
- sc — single crochet
- hdc — half double crochet
- dc — double crochet
- sl st — slip stitch
- sp — space
- st/sts — stitch/stitches
An invisible decrease is not used because the runner consists of flat expanding squares with no decrease rounds.
Gauge and Motif Size
Gauge is controlled by finished square dimensions rather than a conventional stitch swatch.
Target each completed six-round granny square at approximately 20 × 20 cm after blocking.
Its corner-to-corner diagonal will measure approximately 28 cm.
The photographed squares overlap or join through relatively short sections, so the runner’s finished length is substantially less than the sum of every full diagonal.
Make one complete test square before preparing the remaining motifs. If it measures below 19 cm, increase to a 4.5 mm hook. If it exceeds 21 cm, test a 3.5 mm hook.
Pattern — Step by Step
Use US crochet terminology. Each square uses the standard 3-double-crochet granny cluster structure. Turning chains count as one double crochet only where stated.
Color Planning
Make approximately 9 large squares for the 135 cm runner.
Use three main color sequences:
- Square A: sage center, cream middle, dusty pink outer rounds
- Square B: dusty pink center, sage middle, cream outer rounds
- Square C: cream center, dusty pink middle, sage outer rounds
Repeat A, B, and C through the runner, but rotate individual motifs before joining so identical color bands do not always meet.
Traditional Granny Square — Round 1
Use the first color in the selected sequence.
Make MR.
R1: Ch 3, 2 dc in MR, ch 2, *3 dc in MR, ch 2* ×3.
Join with sl st to top of beginning ch 3.
Count: 12 dc, 4 ch-2 corner spaces.
Pull the magic ring firmly closed.
Round 2
Sl st across to first ch-2 corner space.
Ch 3, 2 dc, ch 2, 3 dc in same corner.
Ch 1.
In each remaining corner work:
3 dc, ch 2, 3 dc.
Ch 1 between corners.
Join.
Count: 24 dc, 4 ch-2 corners, 4 ch-1 side spaces.
Round 3
Change to the second color.
Join in any corner.
Work:
3 dc, ch 2, 3 dc in the corner.
Ch 1.
Work 3 dc in the next side ch-1 space.
Ch 1.
Repeat the corner sequence.
Continue around.
Join.
Count: 36 dc, 4 corner spaces, 8 side spaces.
Round 4
Continue with the second color.
Sl st to corner.
Work 3 dc, ch 2, 3 dc in the corner.
Ch 1.
Work 3 dc into each ch-1 side space, placing ch 1 between clusters.
Repeat around.
Join.
Count: 48 dc, 4 corner spaces, 12 side spaces.
Round 5
Change to the third color.
Work 3 dc, ch 2, 3 dc in each corner.
Across every side, work 3 dc in each ch-1 space with ch 1 between clusters.
Join.
Count: 60 dc, 4 corner spaces, 16 side spaces.
Round 6
Continue in the third color.
Repeat the established granny-square construction.
Work 3 dc, ch 2, 3 dc in every corner.
Work 3 dc in every side space with ch 1 between clusters.
Join and fasten off.
Count: 72 dc, 4 corner spaces, 20 side spaces.
Leave a 25 cm tail if this square will be sewn to the next motif.
Square A — Sage, Cream and Pink
R1–R2: sage green.
R3–R4: warm cream.
R5–R6: dusty pink.
This arrangement creates the broad pink edge visible on several motifs in the reference.
Square B — Pink, Sage and Cream
R1–R2: dusty pink.
R3–R4: sage green.
R5–R6: warm cream.
Use this motif between squares with pink outer rounds so the adjoining points remain distinct.
Square C — Cream, Pink and Sage
R1–R2: warm cream.
R3–R4: dusty pink.
R5–R6: sage green.
This version places the darkest value on the outside and creates a clear edge against a wooden tabletop.
Optional Seven-Round Square
If the six-round motif finishes smaller than the required 20 cm, add one more round rather than aggressively stretching it during blocking.
R7: Join the current outer color in any corner.
Work 3 dc, ch 2, 3 dc in each corner.
Work 3 dc in every side space with ch 1 between clusters.
Join and fasten off.
Make every square with the same number of rounds.
Blocking the Squares
Block all motifs before joining.
Pin the first square to 20 × 20 cm.
Check both diagonals.
The measurements should match within approximately 5 mm.
Pin the remaining squares to the same dimensions.
Do not pull one color band more aggressively than another.
Allow the motifs to dry completely before removing the pins.
Diamond Layout
Rotate every blocked square 45 degrees.
One corner becomes the upper point, one the lower point, and the remaining two project to the sides.
Arrange all nine diamonds in one long row.
The reference uses overlapping visual geometry, so neighboring motifs should connect around their opposing corner sections rather than along an entire 20 cm side.
Pin the complete arrangement on a flat surface before joining.
Joining Two Diamond Motifs
Place two squares right sides up.
Bring the lower corner of the first motif toward the upper corner of the next.
Overlap or align approximately 5–7 cm of the corner edges according to the required finished length.
Thread a matching yarn tail onto the tapestry needle.
Whipstitch through back loops only.
Keep the connection flat.
Do not sew across the full width of either square.
Join-As-You-Go Alternative
The motifs can also be connected during their final rounds.
Work R6 normally until reaching the section that will meet the previous square.
Replace selected ch-1 spaces with:
ch 1, sl st into corresponding space of previous motif, ch 1.
Continue with the next 3-dc cluster.
Join across approximately two or three granny spaces near the diamond point.
This method produces a flatter connection and reduces finishing tails.
Keeping the Centerline Straight
Run a measuring tape down the center of the work surface.
Place the upper and lower points of every square directly over that line.
Pin each motif.
Measure the distance between successive side points.
The spacing should remain consistent from one end to the other.
Join the squares only after all nine centers align.
Outer Stabilizing Edge
The reference keeps the pointed outline rather than filling it into a rectangle.
Join yarn at any outer corner after all motifs are connected.
Ch 1.
Sc evenly along every exposed granny-square edge.
Work 3 sc in every outward-pointing corner.
At inward valleys where two motifs meet, work one sc into each adjoining corner space.
Continue around the complete runner.
Join with sl st.
Second Border Round
Ch 1.
Sc in every stitch.
Work 3 sc in each outward corner.
At an inward valley, skip one stitch if the fabric begins to ruffle.
Join and fasten off.
Use the outer color of the nearest motif or use dusty pink throughout for a continuous frame.
Optional Picot Points
At each outward corner of the second border round, work:
sc, ch 3, sl st into first ch, sc.
The picot sharpens the diamond silhouette.
Do not add picots along every side because the traditional granny openings already provide enough detail.
End Tassel — Make 2
Yarn: dusty rose pink.
Cut a piece of cardboard approximately 10 cm long.
Wrap yarn around the cardboard 25–30 times.
Cut a separate 30 cm strand.
Slide it beneath the wraps at the top and tie firmly.
Cut through all loops at the opposite end.
Remove the cardboard.
Wrap another yarn strand around the tassel approximately 1.5 cm below the top.
Tie securely.
Trim the tassel to approximately 8–9 cm.
Attaching the Tassels
Thread the top tassel ties through the final corner space at one end of the runner.
Knot them on the wrong side.
Weave the ends back through the top of the tassel.
Repeat at the opposite point.
Both tassels should finish at the same length.
Assembly
- Crochet all nine granny squares using the three pink, sage, and cream color sequences and identical round counts.
- Block every motif to approximately 20 × 20 cm and verify that both diagonals match within about 5 mm.
- Rotate each square 45 degrees and arrange all nine motifs in one straight diamond column before joining.
- Adjust the overlap or joining depth at each connection to keep the complete runner near the 135 cm target.
- Join neighboring motifs across matching corner sections with back-loop whipstitch or the join-as-you-go method.
- Check the centerline after every two joins and correct a drifting diamond before adding the next motif.
- Work one stabilizing single-crochet round around every exposed edge, placing three stitches at each outward point.
- Add the second border round while reducing stitches at inward valleys if the joins begin to ruffle.
- Make two matching dusty-pink tassels approximately 8–9 cm long and secure one to each terminal diamond point.
- Weave all remaining tails through matching stitches and block the assembled runner to its final dimensions.
The completed runner should form a straight sequence of pastel diamond motifs with alternating pink, sage, and cream bands and one tassel centered at each end.
7 Technical Tips
- The runner bends to one side: measure both diagonals of every square before joining and keep the difference below approximately 5 mm. Nine slightly skewed motifs can accumulate enough error to curve the entire centerline.
- The granny corners become rounded: retain a full ch-2 space between the two 3-dc corner clusters. Tight ch-1 corners reduce the diagonal length and make the diamond points difficult to block sharply.
- One square finishes larger: compare it with the 20 cm template before joining. Changing hook tension by only a few millimeters per round can produce more than a 1 cm difference across six rounds.
- The motif connection forms a lump: catch back loops only and limit the joined area to approximately 5–7 cm near the meeting points. Sewing full square edges together removes the open zigzag shape visible in the reference.
- The inward valleys ruffle: skip one stitch at selected valleys during the border round. Adding three stitches there treats an inward angle like an outside corner and creates excess circumference.
- The tassel hangs off-center: attach its top tie through the exact ch-2 corner space rather than through a neighboring double crochet. A displacement of one cluster is visible against the runner’s long centerline.
- The cotton runner grows after washing: wet-block one completed square before calculating the final layout. A 5 mm increase per motif can alter a nine-square runner by several centimeters.
Why Traditional Granny Stitch Works for This Runner
The photographed design depends on regularly spaced holes and broad bands of color.
Traditional granny construction provides both.
Each 3-dc cluster creates a solid vertical group while the ch-1 spaces leave small openings between groups.
As rounds expand, every side receives one additional cluster.
The four ch-2 corners maintain the square geometry.
Because the motifs are rotated into diamonds, the familiar granny-square structure reads differently when arranged along a narrow table.
Verified Size Benchmarks
Lynne Samaan’s free Granny Square Table Runner, published in 2024, measures approximately 78.75 × 31.11 cm after blocking. It uses Aran cotton-blend yarn, a 4.5 mm hook, and approximately 146–169 m.
Joanita Theron’s Hip Granny Square Table Runner uses DK cotton with a 3.5 mm hook and finishes at approximately 135 × 31 cm. Its published yarn requirement is approximately 947 m.
Christina Hadderingh’s granny square table runner uses Aran cotton with a 4 mm hook and measures approximately 76 × 45 cm.
These patterns show that width, motif arrangement, and stitch density affect yarn consumption as strongly as overall runner length.
Choosing the Pink
The photographed pink is muted rather than bright.
Useful yarn shade descriptions include dusty rose, antique pink, blush, rosewood, and muted mauve.
A medium-value dusty pink should remain clearly darker than the cream but close enough to the sage in saturation that neither color dominates.
Use the same pink for the two end tassels to visually connect the full length of the runner.
Choosing the Sage Green
Select a gray-green rather than a bright botanical green.
Useful shade names include sage, eucalyptus, lichen, soft moss, and dusty olive.
The green should contrast with the cream while remaining similar in value to the pink.
Highly saturated emerald yarn changes the restrained three-color balance and makes the pink appear comparatively faded.
Choosing the Cream
Use warm ivory, natural cotton, oatmeal, or soft cream.
Bright optical white creates a stronger contrast than the reference.
Natural cotton is particularly suitable because the small flecks sometimes visible in minimally processed yarn can reinforce the muted palette.
Keep all cream sections from the same dye lot if possible because off-white differences become visible when adjacent squares meet.
Why Cotton Is a Practical Choice
Cotton holds the granny openings clearly and blocks into sharp diamond points.
It also gives the runner enough weight to remain flat on a wooden table.
A DK cotton-acrylic blend is lighter and can reduce drying time.
Pure acrylic can also be used, but heat blocking must be handled according to the yarn manufacturer’s instructions.
Whatever fiber is selected, use the same yarn family for all three colors so the squares respond consistently to washing and blocking.
Making a Short Table Runner
Use 5 squares instead of nine.
Keep the same diamond arrangement.
Join each motif by the same measured amount.
Add one tassel to each terminal point.
The exact finished length depends on overlap, but five motifs work well for a coffee table, short console, or small dining table.
Seven-Square Runner
Seven motifs create a medium-length version.
Use the sequence:
A – B – C – A – C – B – A.
This keeps the central motif different from its immediate neighbors.
Lay all seven squares on the actual table before joining so the points do not extend farther than intended.
Making a Longer Runner
Add squares in pairs to preserve a centered motif.
Use 11 squares for a longer dining table.
Use 13 squares for an extended farmhouse table.
Calculate additional yarn from the average weight of one completed blocked square.
Do not estimate from foundation rounds alone because outer rounds consume substantially more yarn.
Changing the Square Size
For smaller motifs, stop after R5.
Block all squares to the same measurement.
More motifs will then be required for the same finished runner length.
For larger motifs, add R7 and R8 using the established granny construction.
Each additional round adds one 3-dc cluster to every side.
Keep all motifs identical in round count even when their color sequences differ.
Creating Wider Color Bands
The reference uses broad color areas rather than narrow one-round stripes.
Work two consecutive rounds in each color as written.
For an even stronger block effect, make an eight-round square using:
R1–R2: Color A.
R3–R5: Color B.
R6–R8: Color C.
Test the resulting motif because the additional rounds significantly increase both width and yarn use.
Creating a Two-Color Version
Replace sage with cream or pink.
One useful arrangement is:
R1–R2: pink.
R3–R4: cream.
R5–R6: pink.
Reverse the colors on the next square.
The diamond construction remains unchanged.
Creating a Scrap-Yarn Version
Traditional granny squares can use small yarn remnants efficiently.
Keep one color consistent across the outer two rounds of every square.
Change the center and middle colors freely.
A repeated outer shade prevents the finished runner from becoming visually fragmented.
Use yarns of the same weight and similar fiber composition so the blocked square dimensions remain consistent.
Calculating Yarn from One Square
Weigh the completed test square on a kitchen scale.
Multiply that weight by the planned number of motifs.
Add approximately 10 percent for joins, borders, and weaving losses.
Add another 10–15 g of the tassel color.
This calculation is more accurate than using a generic runner yardage when the yarn, hook, and square size differ from published patterns.
Keeping Color Changes Clean
Complete the final yarn-over of the last slip stitch with the new color.
Pull the old strand through to the wrong side.
Leave a tail approximately 12–15 cm long.
Do not knot the colors together at the corner.
Weave each tail independently through dense double-crochet clusters after the square is complete.
Reducing the Number of Yarn Tails
When two consecutive rounds use the same color, slip stitch across the top of the first cluster and into the corner space rather than fastening off.
Begin the next round from that corner.
This method keeps the working yarn attached through each two-round color band.
Fasten off only when changing to the next shade.
Fixing a Twisted Granny Square
A square can develop a subtle spiral when every round begins at the same corner and tension is uneven.
Turn the work between selected rounds if your stitches consistently lean in one direction.
Another option is to begin new colors at different corners.
Block the test square before committing to nine motifs.
A mild twist can be corrected; a severely distorted square should be remade before joining.
Fixing Unequal Corners
Each corner must contain:
3 dc, ch 2, 3 dc.
If one corner contains only one cluster, that side will finish one cluster short.
Count the number of side clusters before fastening off every round.
All four sides must match.
Correct the missing cluster immediately rather than attempting to stretch the short side during blocking.
Fixing a Wavy Border
The inward valleys between diamond motifs require less circumference than outward points.
If the stabilizing round waves at a valley, remove one stitch there.
If an outward point cups, add another stitch to the corner group.
Lay the runner flat after the first border round.
Do not proceed to Round 2 until the perimeter rests without visible ripples.
Making Fuller Tassels
Increase the wraps from 25–30 to approximately 40.
Use the same 10 cm cardboard template.
Secure the tassel head tightly because cotton strands are relatively smooth.
Trim the lower edge only after the tassel has hung vertically for several minutes.
Make both tassels from the same wrap count so their visual weight matches.
Making Shorter Tassels
Use a 7 cm cardboard template.
Wrap approximately 25 times.
After tying, trim the finished tassel to approximately 5–6 cm.
Short tassels are useful when the runner remains entirely on the tabletop rather than extending beyond the table ends.
Using the Squares for Matching Placemats
Make four identical six-round granny squares.
Arrange them in a 2 × 2 grid rather than as diamonds.
Join full sides.
Add one or two rounds of single crochet.
Use the same pink, sage, and cream sequence as the runner so the table setting remains coordinated.
Using One Square as a Coaster or Trivet
Stop after R3 or R4 for a coaster.
For a trivet, use cotton yarn and continue to R5 or R6.
Do not use acrylic yarn for a piece intended to contact hot cookware.
Block the motif square and omit the tassels.
Final Blocking
After assembly, dampen the complete runner according to the yarn’s care instructions.
Lay it on blocking mats.
Pin the two end points first.
Run a tape measure through the centerline.
Pin every diamond center to that line.
Next, pin the left and right points of each square.
Target approximately 31 cm maximum width and approximately 135 cm overall length before tassel extension.
Care and Storage
Follow the yarn manufacturer’s washing instructions.
Support wet cotton because its weight increases considerably after soaking.
Reshape the diamond points while damp.
Straighten both tassels before drying.
Dry the runner flat rather than hanging it from one end.
For storage, roll it loosely or fold only at motif joins. Repeatedly folding through the center of the same granny square can create persistent creases.
Conclusion
The diagonal layout is what separates this runner from a conventional strip of joined granny squares. Block every motif to the same 20 cm measurement, rotate the squares into diamonds, and establish a straight centerline before making the first permanent join. Broad two-round color bands reproduce the dusty pink, sage, and cream geometry while the pointed perimeter remains visible instead of being squared into a rectangle. Begin with one six-round test motif and adjust the hook before making the other eight. Save this granny square crochet table runner pattern to Pinterest or share the finished runner on Instagram with #PastelGrannyRunner. Would you place sage or dusty pink on the outer rounds of the center diamond?









