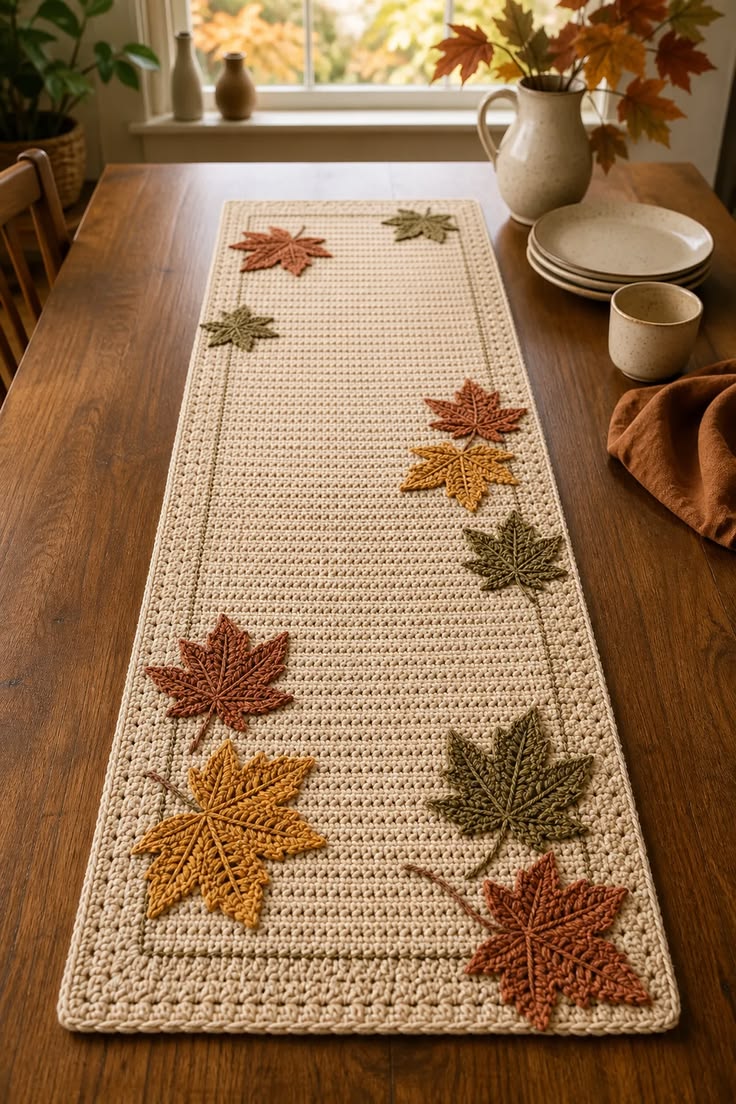
A maple leaf needs five readable points and a pronounced center vein; otherwise the motif quickly becomes a generic autumn leaf. This crochet maple leaf table runner pattern combines a long cream rectangular base with raised maple leaf appliqués in rust, mustard and olive. Worked primarily in medium-weight cotton with a 4 mm hook, the design suits intermediate crochet skills and creates practical seasonal table décor without covering the entire runner in motifs.
The Design: What Makes This Maple Leaf Runner Different
The large cream foundation is deliberately simple. Dense rows create a stable surface for the appliqués, while a narrow raised frame and textured outer border define the rectangle without competing with the leaves.
The maple leaves are made separately. That construction gives each motif sharper points and allows the colors to be distributed asymmetrically across the runner. Individual leaves can also be blocked before attachment, which is important because their narrow points tend to curl.
The third structural decision concerns placement. Instead of forming one central garland, the leaves appear to have fallen naturally across the surface. Large motifs occupy the corners and lower section while smaller leaves balance the open cream areas. A common mistake with a fall crochet table runner is sewing appliqués too tightly, causing the flat foundation to pucker underneath them.
Project Info at a Glance
| Skill Level | Time | Finished Size | Hook | Construction |
|---|---|---|---|---|
| Intermediate | 10–14 hours | Approx. 32 × 100 cm / 12.5 × 39 in | 4 mm | Flat rectangle with separate appliqués |
The dimensions can be changed before the border is added. Published crochet table runners vary considerably in length; one fall runner is designed at 14 × 78 inches, while another harvest runner measures 10.5 × 34 inches. The proportions used here are selected to reproduce the long rectangular shape visible in the reference image.
Materials and Tools
Yarn
- Cream or natural cotton yarn — medium/worsted #4 — approximately 300–350 g for the runner.
- Rust cotton yarn — medium/worsted #4 — approximately 35 g.
- Mustard gold cotton yarn — medium/worsted #4 — approximately 30 g.
- Olive green cotton yarn — medium/worsted #4 — approximately 30 g.
- Muted brown yarn — medium/worsted #4 — approximately 10 g for optional stems and additional shading.
Medium-weight yarn is suitable for clearly defined maple appliqués. Published maple leaf patterns also commonly use worsted yarn; a 4 mm hook produces an appliqué around 10 cm across in one current pattern, while another worsted maple leaf pattern specifies approximately 3.5–3.75 mm.
Tools
- 4 mm crochet hook
- 3.5 mm crochet hook for smaller leaves
- Tapestry needle
- Scissors
- Locking stitch markers
- Measuring tape
- Blocking mat
- Rust-resistant blocking pins
Abbreviations
- MR — magic ring
- ch — chain
- sc — single crochet
- hdc — half double crochet
- dc — double crochet
- tr — treble crochet
- sl st — slip stitch
- st/sts — stitch/stitches
- sp — space
- sk — skip
- inc — increase
- rep — repeat
An invisible decrease is not required for the runner or flat maple leaves because neither component uses stuffed three-dimensional shaping.
Crochet Maple Leaf Table Runner Pattern — Step by Step
The runner consists of one long cream foundation, a narrow inner frame, a textured outer border and separate maple leaf appliqués. Crochet the complete cream section before making the leaves. This allows the number and size of the motifs to be adjusted to the actual blocked dimensions.
Cream Table Runner Foundation
Yarn: cream or natural.
Foundation: Ch 61.
Row 1: Sc in second ch from hook and in each ch across. Turn. (60)
Row 2: Ch 1, sc in each st across. Turn. (60)
Rows 3–145: Repeat Row 2. (60)
Measure the work every 20 rows. The target before the border is approximately 27–29 cm wide and 92–95 cm long, although exact dimensions depend on yarn, hook and tension.
For a longer dining table, continue repeating Row 2. For a shorter runner, stop earlier. Record the final number of rows before proceeding so a second runner can be reproduced accurately.
Do not fasten off.
Foundation Border
Continue with cream yarn.
Round 1: Ch 1. Sc across the upper edge. Work 3 sc in the first corner. Sc evenly down the first long side, placing approximately one sc into each row end. Work 3 sc in the lower corner, sc across the foundation edge, work 3 sc in the next corner, then sc evenly up the remaining long side. Work 2 additional sc into the starting corner. Join with sl st.
Check the runner on a flat surface before continuing.
If the long edges ripple, too many stitches have been added along the row ends. If they pull inward, the side stitch count is too low.
Raised Inner Frame
Round 2: Ch 1, sc in every st around. Work 3 sc in the center stitch of each corner. Join with sl st.
Round 3: Ch 1. Working in BLO, sc in every st around. Place 3 BLO sc in each corner. Join.
The unused front loops create a subtle line around the runner. This produces the framed effect visible between the central field and outer edge.
Round 4: Ch 2, hdc in each st around. Work 3 hdc in each corner. Join.
Round 5: Ch 1, sc in each st around. Work 3 sc in each corner. Join.
Textured Outer Border
Continue with cream.
Round 6: Ch 3, dc in every st around. Work 5 dc into each corner stitch. Join.
Round 7: Ch 1, sc in every st around. Place 3 sc in the center stitch of each corner group. Join.
Round 8: Ch 1, *sc in next st, ch 1, skip next st* around. Adjust the final repeat before each corner when required. At each corner work sc, ch 2, sc.
Round 9: Ch 1, sc in each sc and each ch-1 sp around. Work 3 sc in each corner ch-2 sp.
Fasten off and weave the cream yarn through at least 5 cm of dense border stitches.
Large Crochet Maple Leaf
Make approximately 7–9 large leaves in rust, mustard and olive.
The finished leaf should measure approximately 9–11 cm across after blocking when worked with medium-weight yarn and a 4 mm hook.
R1: Make MR. Ch 3, work 11 dc into MR. Join with sl st. (12)
R2: Ch 1, 2 sc in each st around. Join. (24)
The circular center provides 24 working points for the five lobes.
First Side Point
Sl st in next st.
Ch 5.
Working back along the chain: sl st in second ch from hook, sc in next ch, hdc in next ch, dc in final ch.
Sl st into the next 2 stitches of R2.
First Large Lobe
Ch 8.
Working back along the chain: sl st in second ch, sc in next ch, hdc in next ch, dc in next 2 ch, tr in next ch, dc in final ch.
Sl st into the next 3 stitches of R2.
Central Maple Point
Ch 11.
Working back along the chain: sl st in second ch, sc in next ch, hdc in next ch, dc in next 2 ch, tr in next 3 ch, dc in next ch, hdc in final ch.
Sl st into the next 3 stitches of R2.
This longest point establishes the vertical axis of the leaf.
Second Large Lobe
Ch 8.
Working back: sl st, sc, hdc, dc in next 2 ch, tr, dc.
Sl st into the next 3 stitches of the center.
Second Side Point
Ch 5.
Working back: sl st, sc, hdc, dc.
Sl st into the next 2 stitches.
Leaf Stem
Ch 9.
Sl st in second ch from hook and in every remaining chain.
Sl st back into the leaf center.
Fasten off, leaving a 30 cm tail for attachment.
Adding Veins to the Maple Leaves
The raised veins are important because the reference uses strongly defined center lines rather than flat, untextured leaves.
Thread matching or slightly darker yarn onto a tapestry needle.
Bring the yarn from the base of the stem to the base of the central point. Work a line of surface slip stitches or chain-style embroidery along the center.
Add one diagonal vein toward each major side lobe.
Do not pull these stitches tightly. The leaf should remain flat after the vein is added.
For stronger contrast, use dark rust over orange leaves, brown over mustard leaves and deep olive over green leaves.
Small Crochet Maple Leaf
Make approximately 3–5 small leaves.
Use a 3.5 mm hook with the same medium-weight yarn, or work the shortened instructions below.
R1: Make MR. Ch 3, work 9 dc into MR. Join. (10)
R2: Inc around. Join. (20)
First point: Ch 4. Working back, sl st, sc, hdc. Sl st into next 2 center sts.
First main lobe: Ch 6. Working back, sl st, sc, hdc, dc, tr. Sl st into next 3 center sts.
Center point: Ch 8. Working back, sl st, sc, hdc, dc, tr, tr, dc. Sl st into next 3 center sts.
Second main lobe: Ch 6. Work back as for the first main lobe. Sl st into next 3 center sts.
Final point: Ch 4. Work back as for the first point.
Stem: Ch 6, sl st back down the chain.
Fasten off with a 25 cm tail.
Block the small leaves separately. Their finished size should remain noticeably below that of the primary motifs so the scattered arrangement does not appear mechanically repeated.
Blocking the Maple Leaves
Pinning is especially important for this crochet maple leaf pattern. The long chains used for the points naturally rotate when they come off the hook.
Place each leaf on a blocking mat.
Pin the central point first. Pull it only far enough to make the line straight.
Pin both major side lobes at equal angles. Position the two smaller points slightly downward.
Finally, straighten the stem.
Measure across the widest two points. Large leaves should remain within approximately 9–11 cm if they are intended for the arrangement shown here.
Dampen according to the yarn manufacturer’s care instructions and leave the motifs pinned until completely dry.
Planning the Leaf Arrangement
Do not sew leaves onto the runner as they are completed. Make and block the entire set first.
Lay the runner flat and begin with the four largest motifs. Position one rust leaf near a lower corner, one olive leaf on the opposite lower side, then place two additional leaves farther up the runner.
Add mustard leaves between the darker colors.
Continue toward the opposite end with progressively wider gaps. The reference contains substantial empty cream space, which is part of the design rather than an area that needs filling.
Avoid arranging leaves in straight horizontal pairs. Their stems should also point in different directions.
Keep every leaf at least 1.5–2 cm inside the raised inner frame. Motifs extending across the border can interfere with plates, glasses and other tableware.
Attaching the Maple Leaves
Pin every motif before threading the sewing needle.
Start at the center of a leaf and work outward. Sew several small stitches along the central vein, then secure the bases of the major lobes.
Leave the outer 5–10 mm of each point unattached. That small amount of movement preserves the dimensional edge visible in the finished design.
Do not sew continuously around the complete perimeter.
A fully outlined seam can flatten the leaf and, more importantly, transfer tension into the cream foundation. The table runner should remain flat when lifted and returned to the table.
Secure the stem at two or three points rather than every stitch.
Optional Curved Leaf Stems
The image includes several stems extending beyond the leaves. These can be added separately for a more natural scattered-leaf effect.
Using rust, brown, mustard or olive yarn, ch 8–14 depending on the required stem length.
Sl st in second ch from hook and every chain back to the beginning.
Fasten off with a long sewing tail.
Curve the stem gently before attaching it to the cream background. Sew it every 1–1.5 cm. Avoid stretching the cord while sewing because it will contract when released and gather the foundation underneath.
Assembly
- Block the completed cream runner to approximately 32 × 100 cm, or to the dimensions produced by your gauge.
- Block every maple leaf individually, pinning all five points and the stem into their final positions.
- Place the largest rust, mustard and olive leaves across the runner while maintaining at least 1.5–2 cm clearance from the raised frame.
- Add the smaller leaves to the upper section and any large open areas that require visual balance.
- Rotate the motifs so adjacent maple leaves do not point in the same direction.
- Pin every leaf before sewing and photograph the complete arrangement as a placement reference.
- Sew each leaf through its center vein and major lobe bases while leaving the outer points partly free.
- Attach optional curved stems with small matching stitches without stretching the crochet cords.
- Place the runner flat and correct any appliqué that causes puckering or pulls the inner frame out of line.
- Weave all tails through matching-color stitches and lightly block the completed runner without stretching its length.
The finished runner should form a flat cream rectangle with a clearly defined inner frame, textured border and asymmetrically scattered five-point maple leaves.
7 Technical Tips for Better Maple Leaf Table Runners
- Check the runner width every 20 rows. A variation greater than approximately 5 mm indicates that the working tension has changed. Correct the tension during crochet instead of stretching the narrow section during blocking.
- Mark all four border corners. Missing one corner increase can pull the entire rectangle diagonally. Move the marker into the center corner stitch after completing each round.
- Pin all five leaf points during blocking. An unpinned side lobe can rotate inward as cotton dries. Measure large leaves to approximately 9–11 cm across before leaving them to dry.
- Keep appliqués 1.5–2 cm inside the frame. A leaf overlapping the raised border interrupts the rectangular outline and creates an uneven surface beneath tableware. Test the entire arrangement before attaching the first motif.
- Leave 5–10 mm of each leaf point free. Sewing directly to the tip flattens the point and makes small tension differences visible. Anchor the lobe closer to its base instead.
- Do not stretch crochet stems while sewing. A stretched stem contracts after the sewing tension is released and can gather several centimetres of the cream background. Pin the cord in its relaxed curve first.
- Weave colored tails inside matching stitches. Carrying rust or olive yarn through the cream foundation can show through on the front. Change direction at least twice inside the colored appliqué before trimming the tail.
How to Make the Table Runner Longer
The rectangular construction makes length adjustment simple. Continue the cream foundation rows until the center reaches the required measurement, then begin the border.
Measure the table before deciding on the final length. A runner that remains completely on the tabletop requires different proportions from one designed to extend over both ends.
For approximately every additional 20 cm of length, plan on making one or two extra maple leaves. Do not fill every new section automatically. The scattered composition depends on visible areas of uninterrupted cream crochet.
A significantly longer runner may also need a slightly wider foundation to preserve its proportions. Make a gauge swatch before changing both dimensions at once.
How to Make Smaller Maple Leaves
Changing the hook is the simplest method. The same motif worked with a 3.5 mm hook will generally be smaller and denser than one made with a 4 mm hook, provided the yarn can be worked comfortably at both sizes.
Published maple leaf appliqués demonstrate how much dimensions can vary. One worsted-weight design is approximately 3 × 3 inches with a 3.5 mm hook, while another medium-weight leaf made with a 4 mm hook measures approximately 4 × 4 inches.
For this runner, variation is useful. A few small motifs near the far end reinforce the scattered-leaf appearance, while larger leaves carry the lower section of the composition.
Choosing the Autumn Color Distribution
The runner works because the cream background occupies most of the visual area. The colored leaves should remain accents.
Use rust for approximately one-third of the large leaves. Mustard can account for another third, with olive completing the set. Exact quantities do not need to match.
Avoid placing two large leaves of the same color directly opposite one another. Moving one motif farther along the runner produces a less rigid layout.
For a muted version, replace bright orange with terracotta, yellow with ochre and green with moss. Keep enough contrast between the three colors for individual leaf silhouettes to remain readable against the cream foundation.
Keeping the Runner Flat
A long crochet rectangle can develop waves for three different reasons: changing row tension, excessive border stitches or appliqués attached too tightly.
Identify the cause before blocking.
If the central foundation itself narrows and widens, row tension is responsible. When the center lies flat but the outer edge ripples, reduce the number of side or border stitches. If distortion appears only after a maple leaf is sewn down, remove several attachment stitches and resew that motif more loosely.
Blocking can refine a correctly constructed runner, but it should not be used to compensate for major stitch-count problems.
Care and Storage
Use the washing instructions supplied for the specific yarn. Cotton table linens may tolerate washing well, but colored appliqués can behave differently from the cream base if yarns from different manufacturers are mixed.
Test the rust, mustard and olive yarn for color transfer before attaching the motifs. Dampen a short strand and press it against a white cloth. Any visible dye transfer should be addressed before the colored yarn is permanently sewn onto the cream runner.
Store the runner flat or loosely rolled. Folding directly through the maple leaves can crease their raised center veins and bend the narrow points.
When rolling, place acid-free tissue or clean cotton fabric over the appliqués if the runner will remain stored for an extended period.
Using the Runner for Fall Table Décor
The open center is functional. Plates, serving dishes and decorative objects can occupy the cream areas without covering every maple leaf.
Keep hot cookware off the crochet surface unless an appropriate heat-resistant mat is placed underneath. Ordinary cotton crochet should not be treated as a substitute for equipment designed to protect a table from hot pans.
For a dining arrangement, place larger objects between the leaf clusters. Smaller ceramic pieces can sit near the edges as long as they do not compress the raised appliqués.
The same construction can also be shortened into placemats. Reduce the foundation length, use one large maple leaf in a corner and retain the raised inner frame around the rectangle.
Conclusion
This crochet maple leaf table runner pattern uses a restrained structure: a dense cream foundation, raised rectangular frame, textured border and separately blocked autumn leaves. Make the runner first, establish its final dimensions, then crochet enough rust, mustard and olive motifs to create an irregular arrangement without filling every open section. The next practical step is a single 10 cm maple leaf test motif to confirm hook size and point definition before producing the complete set. Save the finished runner to Pinterest or share the table arrangement on Instagram with #MapleLeafRunner. Which leaf color would you place closest to the lower corner: rust, mustard or olive? “`0









