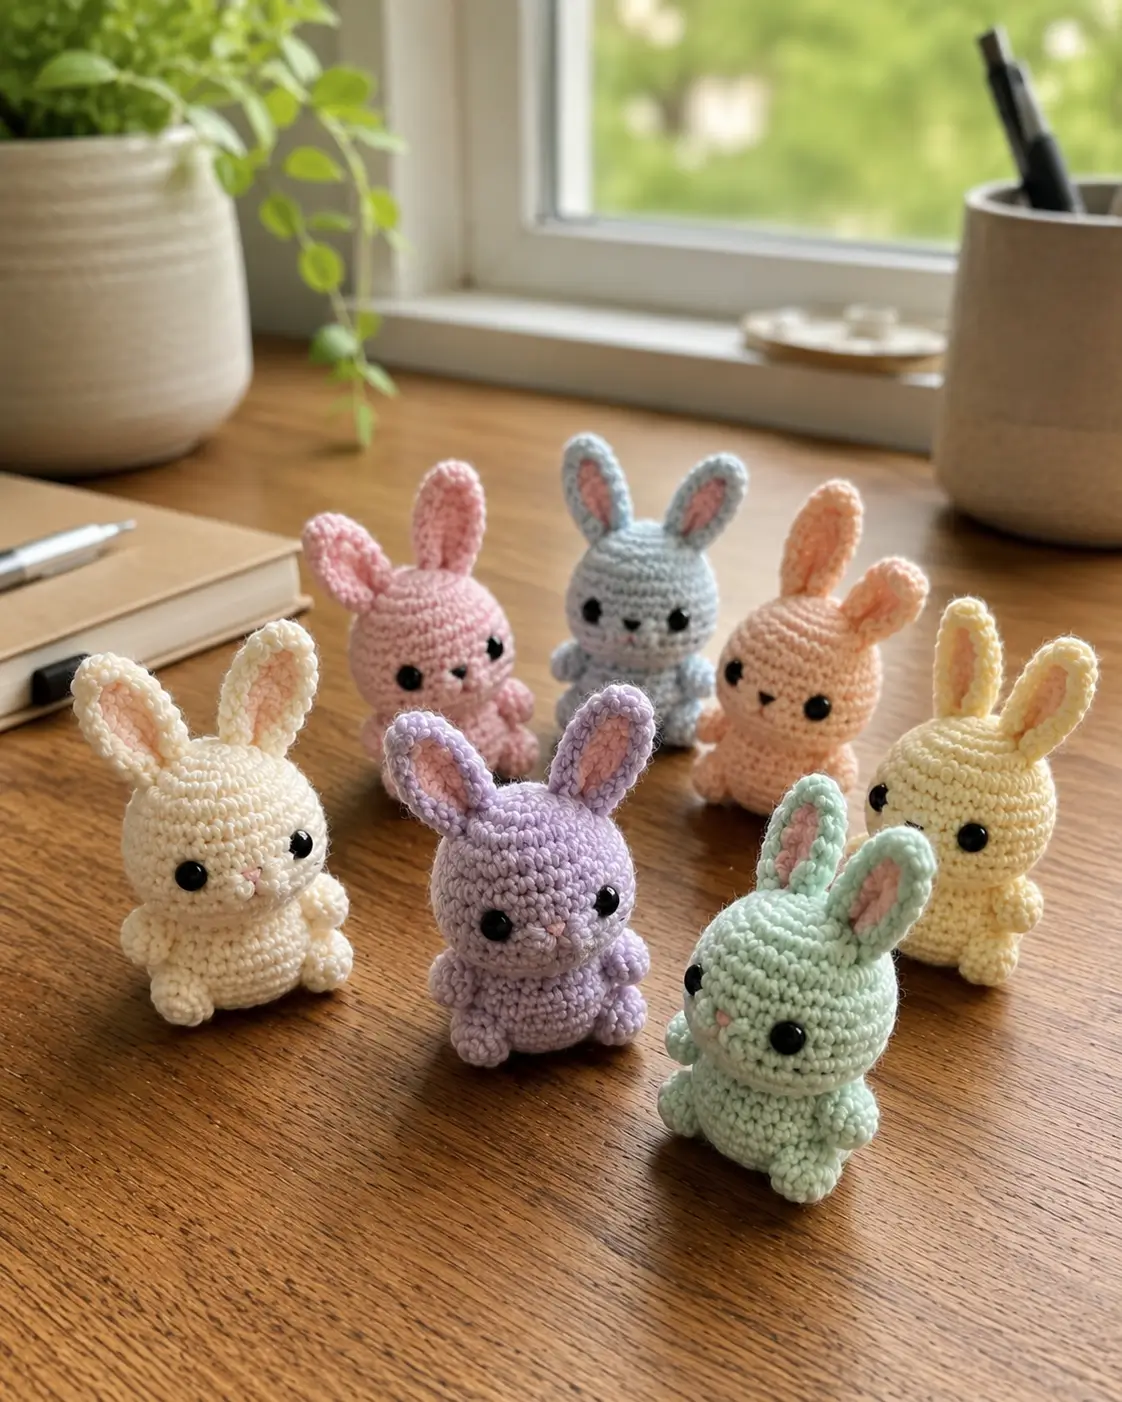
A bunny without upright ears reads as a mouse before the nose is stitched. This bunny amigurumi crochet pattern builds the ears first as a scale check, then uses worsted-weight yarn, a 3.5 mm hook, and 8 mm safety eyes for a 10 cm sitting toy. Use it as a repeatable pastel set for market samples, spring displays, or color testing.
The Design: What Makes This Bunny Different
The photographed bunny works because the ears are tall but narrow, so the toy keeps a rabbit silhouette without tipping forward. A 30-stitch head plateau gives a small amigurumi bunny enough width for 8 mm eyes while keeping the face compact. The body uses the same 30-stitch maximum, but fewer plateau rounds, which lowers the center of gravity. That matters when a pastel crochet rabbit sits without a wire frame.
The common mistake is making the ears too thick at the base; the head then looks crowded and the eyes shift too low. This pattern uses unstuffed ears, flat cheek circles, and a separate muzzle patch so the mini crochet bunny keeps the clean front-facing expression shown in the photo. Comparable sources confirm 10 cm worsted bunnies with 3.5 mm hooks and small bunnies using 8 mm eyes.
Project Info at a Glance
| Skill Level | Time | Finished Size | Hook | Best For |
|---|---|---|---|---|
| Beginner with small parts | 2–3 hours | 10 cm sitting to ear tip | 3.5 mm | Pastel sets, spring tables, color samples |
The finished size, hook, yarn weight, and 8 mm eye choice match a verified 10 cm worsted bunny reference.
Materials and Tools
Yarn
- Main pastel body color — worsted 4-medium — approx. 36 g — Knit Picks Brava Tweed, Paintbox Simply Aran, or similar acrylic/cotton yarn
- Pink inner ear and nose color — worsted 4-medium — approx. 12 g or less — use a soft pink contrast
- Cheek color — worsted scraps — under 2 g — pale blush, peach, or cream
- Black embroidery thread — tiny amount — for mouth detail if safety nose is not used
The gram estimates are calculated from verified yardage data for a 10 cm worsted bunny: 71 m main color and 23 m accent color from a 100 g / 199 m yarn.
Tools
- Hook 3.5 mm
- 8 mm black safety eyes
- Polyester stuffing
- Yarn needle
- Embroidery needle
- Locking stitch markers
- Scissors
- Pins for assembly
Abbreviations
MR = magic ring; sc = single crochet; inc = 2 sc in one stitch; dec = invisible decrease; sl st = slip stitch; ch = chain; BLO = back loop only; FO = fasten off. Use invisible decreases on closed amigurumi rounds because a normal sc2tog leaves a visible bar across the front of the fabric.
Pattern — Step by Step
Continuous spiral unless noted. The photo shows a small bunny, so the head and body both use a 30-stitch maximum.
Ears (Make 2)
Yarn: main pastel color. Leave ears unstuffed and flatten the base.
R1: 6 sc in MR (6)
R2: inc ×6 (12)
R3: (sc, inc) ×6 (18)
R4–R8: sc around (18)
R9: (sc, dec) ×6 (12)
R10–R11: sc around (12)
R12: dec ×6 (6)
R13: sc around (6)
Do not stuff. Flatten the base so the ears sit upright with a narrow footprint.
Fasten off, leaving a 20 cm tail.
Head
Yarn: main pastel color.
R1: 6 sc in MR (6)
R2: inc ×6 (12)
R3: (sc, inc) ×6 (18)
R4: (2 sc, inc) ×6 (24)
R5: (3 sc, inc) ×6 (30)
R6–R10: sc around (30)
R11: (3 sc, dec) ×6 (24)
R12: (2 sc, dec) ×6 (18)
Insert 8 mm safety eyes between R8 and R9, 6 stitches apart. Add the muzzle before the washer backs are pressed on if you want exact centering.
R13: (sc, dec) ×6 (12)
R14: dec ×6 (6)
Stuff firmly, adding fiberfill in small pieces so the face stays round.
Fasten off, leaving a 25 cm tail. Close the final 6 stitches through front loops.
Body
Yarn: main pastel color.
R1: 6 sc in MR (6)
R2: inc ×6 (12)
R3: (sc, inc) ×6 (18)
R4: (2 sc, inc) ×6 (24)
R5: (3 sc, inc) ×6 (30)
R6–R9: sc around (30)
R10: (3 sc, dec) ×6 (24)
R11: sc around (24)
R12: (2 sc, dec) ×6 (18)
R13: sc around (18)
R14: (sc, dec) ×6 (12)
R15: dec ×6 (6)
Stuff the lower half more firmly than the neck end so the bunny sits flat.
Fasten off, leaving a 30 cm tail for sewing to the head.
Arms / Front Legs (Make 2)
Yarn: main pastel color.
R1: 6 sc in MR (6)
R2: inc ×6 (12)
R3–R4: sc around (12)
R5: dec ×6 (6)
R6–R7: sc around (6)
Stuff only the paw end. Leave the top flat for sewing.
Fasten off, leaving a 15 cm tail.
Back Legs (Make 2)
Yarn: main pastel color.
R1: 6 sc in MR (6)
R2: inc ×6 (12)
R3–R5: sc around (12)
R6: dec ×6 (6)
R7: sc around (6)
Stuff lightly. Pin these forward on the lower body so the toy has the seated stance seen in the photo.
Fasten off, leaving a 15 cm tail.
Muzzle / Snout Patch
Yarn: pale body color or pink contrast.
R1: 6 sc in MR (6)
R2: inc ×6 (12)
R3: sl st around loosely (12)
Keep this flat. Embroider a tiny inverted triangle nose across the top center, then one short vertical stitch below it.
Fasten off, leaving a 20 cm tail.
Cheek Patches (Make 2)
Yarn: blush pink or peach.
R1: 6 sc in MR (6)
R2: inc ×6 (12)
Pull the magic ring tight and block each circle flat between fingers before sewing.
Fasten off, leaving a 12 cm tail on each patch.
Tail
Yarn: main pastel color or cream.
R1: 6 sc in MR (6)
R2: inc ×6 (12)
R3: dec ×6 (6)
Stuff with one small pinch of fiberfill. Place this at the lower back only if the bunny will be viewed from the side.
Fasten off, leaving a 15 cm tail.
Inner Ear Embroidery
Yarn: pink accent.
Thread a yarn needle with pink yarn. Work 5–6 long vertical stitches inside each ear, starting two rounds above the base and stopping one round below the tip.
Do not pull hard. Tight embroidery bends the ear forward.
Accessory Status
No attached accessory is visible on the photographed bunnies. Keep the finished toy plain for an accurate photo match.
Assembly
- Sew the head to the body with the head centered over the body’s final round.
- Check that the face points slightly upward before closing the neck seam.
- Sew the muzzle between the eyes, with the top edge crossing R8–R9 of the head.
- Attach the cheek patches one stitch outside each eye and one round lower than the muzzle top.
- Pin both ears on top of the head across R3–R5, leaving 3 stitches between the inner edges.
- Sew around each ear base twice so the ears stay upright.
- Attach the arms to the upper body, one round below the head seam.
- Sew the back legs to the lower front body, angled outward by about 30 degrees.
- Add the tail at the back between body R7 and R9 if a rear view is needed.
- Weave all tails through stuffed sections, trim close, and roll the toy between both palms to round the shape.
The bunny is complete when it sits without support and both ears remain vertical.
7 Technical Tips
- Stitch marker drift: If the marker shifts more than 2 stitches left by head R10, the ear placement will rotate. Correct by pinning the ears against the face, not against the final round join.
- Stuffing firmness: A hard head creates flat cheek corners around the 30-stitch plateau. Add stuffing in pea-size pieces until the head rebounds but does not stretch the stitches.
- Invisible decrease failure: A visible bar across R11 or R12 means the hook caught both loops instead of front loops only. Redo that decrease round before the head is fully stuffed.
- Eye placement timing: Safety eyes must go in before head R13 closes the opening. For this 10 cm bunny, place 8 mm eyes between R8 and R9 with 6 stitches between posts.
- Ear lean: Overstuffed ears make the bunny look top-heavy and mouse-like. Leave the ears empty, flatten the final 6-stitch base, and sew through both layers.
- Pinning symmetry: A 1-round height difference between ears is obvious on a rabbit silhouette. Pin both ears first, then count from the eye posts to each ear base before sewing.
- Tail weaving: Short tails can pull out of worsted acrylic after handling. Leave at least 15 cm on limbs and weave through two stuffed sections before trimming.
Conclusion
This build keeps the rabbit identity in the measurements: tall unstuffed ears, a 30-stitch head, 8 mm eyes, and a body that sits low enough to balance. Work one sample in cream first, then repeat the bunny amigurumi crochet pattern in the pastel colors shown in the photo to check how eye contrast changes across yarn shades. Save one finished bunny as your tension reference before making a full set. Share the finished row on Pinterest and post the front, side, and ear-closeup views on Instagram with #PastelBunnyAmigurumi. Which pastel shade makes the ear embroidery look most centered on this bunny: mint, lavender, cream, or peach?









