Introduction
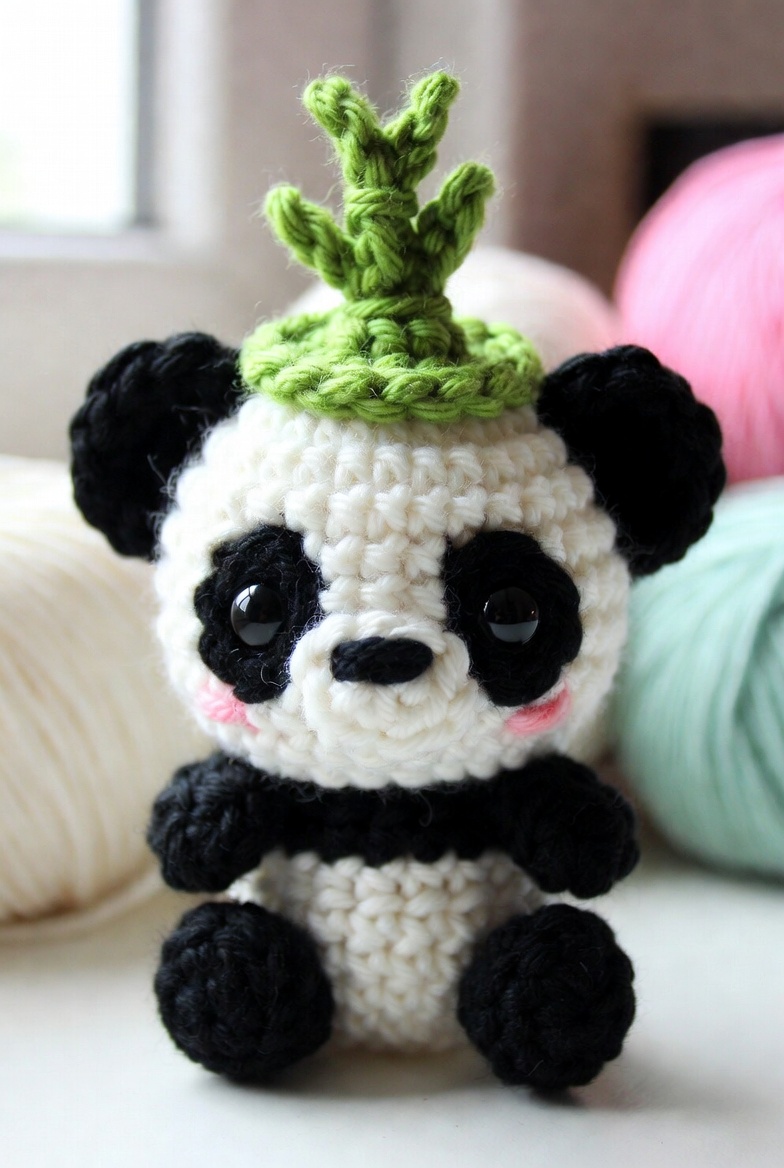
A panda’s eye patches must angle toward the muzzle or the face reads as a generic bear. This panda amigurumi crochet pattern uses DK yarn, a 3.5 mm hook and measured facial placement to produce a sitting figure approximately 16.5 cm tall. The project suits an intermediate beginner who can work continuous rounds, sew shaped pieces and control stuffing. Its removable bamboo-shoot hat also gives the finished panda a practical display feature.
The Design: What Makes This Bamboo Panda Different
The head reaches a 36-stitch plateau, creating enough width for large oval eye patches without turning the face into a flat disc. A smaller 30-stitch body keeps the seated silhouette bottom-heavy, while lightly stuffed back legs form a stable three-point base with the body. The hat uses a flat circular brim rather than a soft cap because the bamboo shoots need a firm platform. Those decisions distinguish this crochet panda with bamboo hat from a standard sitting panda crochet design. A frequent error is placing the eye patches horizontally. Panda markings slope inward near the nose, and correcting that angle changes the entire expression. The muzzle is also sewn over the lower edges of the patches, which joins the facial components into one controlled arrangement rather than several disconnected shapes.
Project Information at a Glance
| Skill Level | Time | Finished Size | Hook | Best For |
|---|---|---|---|---|
| Intermediate beginner | 6–8 hours | About 16.5 cm including hat | 3.5 mm | Display figures and photographed gifts |
A comparable five-ply panda tutorial reports a finished height of 16.5 cm and approximately 50 g of yarn. A DK panda reference pairs DK yarn with a 3.5 mm hook and produces a figure near 13 cm before a tall accessory is added.
Materials and Tools
Yarn
- Cream white — DK/light worsted — approximately 30 g — Paintbox Yarns Cotton DK or similar
- Black — DK/light worsted — approximately 15 g — Paintbox Yarns Cotton DK or similar
- Leaf green — DK/light worsted — approximately 8 g — Paintbox Yarns Cotton DK or similar
- Pale pink — DK/light worsted — less than 2 g — cotton or acrylic scrap yarn
Tools
- 3.5 mm crochet hook
- Two 12 mm black safety eyes with locking washers
- Polyester toy stuffing
- Yarn needle
- Locking stitch markers
- Dressmaking pins
- Scissors
- Small amount of black embroidery thread
Plastic safety eyes are not suitable for an item intended for a baby or a child who may pull or chew small components. Embroider the eyes in that case.
Abbreviations
- MR — magic ring
- sc — single crochet
- inc — two single crochet stitches in one stitch
- dec — decrease over two stitches
- sl st — slip stitch
- ch — chain
- BLO — back loop only
- FO — fasten off
For an invisible decrease, insert the hook through the front loops of the next two stitches, yarn over, draw through both front loops, then complete one single crochet.
Pattern — Step by Step
Work in a continuous spiral unless a section states otherwise. Place a marker in the first stitch of every round and move it after completing each round.
Head
Yarn: cream white. Six-stitch sphere calculation.
R1: 6 sc in MR (6)
R2: inc × 6 (12)
R3: (sc, inc) × 6 (18)
R4: (2 sc, inc) × 6 (24)
R5: (3 sc, inc) × 6 (30)
R6: (4 sc, inc) × 6 (36)
R7–R13: sc around (36)
R14: (4 sc, dec) × 6 (30)
R15: (3 sc, dec) × 6 (24)
R16: (2 sc, dec) × 6 (18)
Attach the eye patches before installing the safety-eye washers. Position the eye stems between R9 and R10 with approximately eight stitches between the stems. Begin stuffing the head firmly, adding small pieces around the eye hardware.
R17: (sc, dec) × 6 (12)
R18: dec × 6 (6)
Fasten off. Thread the tail through the front loops of the final six stitches, pull closed and hide the tail inside the head.
Body
Yarn: cream white, changing to black for the shoulder band.
R1: 6 sc in MR (6)
R2: inc × 6 (12)
R3: (sc, inc) × 6 (18)
R4: (2 sc, inc) × 6 (24)
R5: (3 sc, inc) × 6 (30)
R6–R9: sc around (30)
R10: change to black, sc around (30)
R11: sc around (30)
R12: change to cream white, (3 sc, dec) × 6 (24)
R13–R14: sc around (24)
R15: (2 sc, dec) × 6 (18)
R16: sc around (18)
Stuff the lower half firmly. Keep the top slightly softer so the neck can compress against the head without producing a visible gap.
R17: (sc, dec) × 6 (12)
R18: dec × 6 (6)
Fasten off. Leave a 35 cm tail for attaching the body to the head.
Arms — Make Two
Yarn: black.
R1: 6 sc in MR (6)
R2: inc × 6 (12)
R3–R4: sc around (12)
R5: (2 sc, dec) × 3 (9)
R6–R8: sc around (9)
Stuff only the rounded hand section. Leave the upper half unstuffed so it lies flat against the body.
Flatten the opening and crochet 4 sc through both layers (4). Fasten off. Leave a 25 cm sewing tail.
Back Legs — Make Two
Yarn: black.
R1: 6 sc in MR (6)
R2: inc × 6 (12)
R3: (sc, inc) × 6 (18)
R4–R6: sc around (18)
R7: (sc, dec) × 6 (12)
R8: sc around (12)
Stuff each foot to medium firmness. Press the open edge so the foot projects forward rather than downward.
R9: dec × 6 (6)
Fasten off. Close the opening and leave a 30 cm tail.
Ears — Make Two
Yarn: black.
R1: 6 sc in MR (6)
R2: inc × 6 (12)
R3: (sc, inc) × 6 (18)
R4: sc around (18)
Do not stuff. Fold each circle in half so it forms a thick semicircle.
Work 8 sc through both layers across the curved piece (8). Fasten off. Leave a 25 cm tail.
Eye Patches — Make Two
Yarn: black. Work around both sides of a foundation chain to form an oval.
R1: ch 5. Starting in the second chain from the hook, 3 sc, 3 sc in the final chain; continue along the opposite side with 2 sc, inc in the final chain (10)
R2: inc, 2 sc, inc × 3, 2 sc, inc × 2 (16)
R3: sc around (16)
Slip stitch into the next stitch. Fasten off and leave a 25 cm tail. Flatten and shape each patch into an oval before sewing.
Muzzle
Yarn: cream white.
R1: 6 sc in MR (6)
R2: inc × 6 (12)
R3: (sc, inc) × 6 (18)
R4: sc around (18)
Fasten off and leave a 30 cm tail. Add only a thin layer of stuffing during attachment.
Nose
Yarn: black.
R1: ch 4. Starting in the second chain from the hook, sc, 3 sc in the final chain; continue along the opposite side with sc, inc in the final chain (8)
R2: sc around (8)
Slip stitch into the next stitch. Fasten off and leave a 20 cm tail. Flatten the piece into a horizontal oval.
Cheek Patches — Make Two
Yarn: pale pink. Flat-circle construction.
R1: 6 sc in MR (6)
R2: inc × 6 (12)
Slip stitch into the next stitch. Fasten off and leave a 15 cm tail. Pull each patch gently into a low oval before sewing.
Hat Brim
Yarn: leaf green.
R1: 6 sc in MR (6)
R2: inc × 6 (12)
R3: (sc, inc) × 6 (18)
R4: (2 sc, inc) × 6 (24)
R5: (3 sc, inc) × 6 (30)
Slip stitch into the next stitch. Fasten off and weave in the tail. The finished disc should lie almost flat; light blocking may be used when the edge curls upward.
Central Bamboo Stalk
Yarn: leaf green.
R1: 6 sc in MR (6)
R2–R7: sc around (6)
Insert a narrow strand of stuffing. Keep the stalk flexible enough to bend slightly.
Fasten off and leave a 20 cm tail.
Large Bamboo Shoot
Yarn: leaf green.
R1: 6 sc in MR (6)
R2: sc around (6)
R3: (sc, inc) × 3 (9)
R4–R6: sc around (9)
R7: (sc, dec) × 3 (6)
Add a narrow pinch of stuffing. Flatten the top edge to create a tapered leaf point.
Fasten off and leave a 20 cm tail.
Small Bamboo Shoots — Make Two
Yarn: leaf green.
R1: 6 sc in MR (6)
R2–R4: sc around (6)
R5: (sc, dec) × 2 (4)
Do not add loose stuffing to the final round. Flatten the tip.
Fasten off and leave a 20 cm tail.
Bamboo Side Leaves — Make Two
Yarn: leaf green. Worked in rows.
Row 1: ch 6. Starting in the second chain from the hook, sl st, sc, 2 sc, 3 sc in the final chain; continue along the opposite side with 2 sc, sc, sl st (11)
Fasten off and leave a 15 cm tail. Fold each leaf lengthwise and add one small securing stitch through the base.
Assembly
- Pin the head to the body with the body’s black shoulder band centred beneath the face. Sew twice around the 12-stitch neck opening.
- Position the eye patches diagonally between Head R7 and R13. Their lower inner corners should sit approximately two stitches from the muzzle area.
- Insert the 12 mm safety eyes through the upper-middle section of each patch and the head fabric. Lock the washers before the head opening becomes too small to reach.
- Sew the muzzle across Head R10–R14, overlapping the inner lower edges of both eye patches. Add a thin layer of stuffing before closing the seam.
- Attach the nose horizontally to the centre of the muzzle. Embroider one short vertical line below it and two shallow mouth lines if a defined mouth is required.
- Sew the cheek patches beside the lower eye patches, keeping their inner edges approximately one stitch from the muzzle.
- Attach the ears across Head R4–R8. Leave approximately 11–12 stitches between their inner edges so they remain visible beneath the hat.
- Sew the arms to Body R10–R14 and angle the hands inward. Attach the back legs across Body R4–R9, testing the seated balance before tightening the seams.
- Sew the central stalk to the centre of the green brim. Attach the large and small shoots around it, then add the two side leaves at different heights.
- Place the completed hat between the ears. Tack it to the head at four evenly spaced points, or leave it removable and weave every exposed tail into its matching color section.
The completed panda should sit without support, with the eye patches angled inward and the bamboo crown centred over the head.
7 Technical Tips
- Stitch-marker drift: A misplaced marker shifts every facial reference point by one or more stitches. Count each 36-stitch head round before moving the marker.
- Understuffed neck: A soft neck allows the oversized head to lean after assembly. Pack the final 12-stitch area firmly enough that thumb pressure leaves only a shallow indentation.
- Visible decrease ridges: Standard decreases create horizontal bars across the cream head. Work all head and body reductions through front loops only.
- Late eye placement: Locked washers cannot be fitted after the head closes to 12 stitches. Install both eyes before completing Head R16.
- Loose yarn tension: Gaps larger than 1 mm expose stuffing around the face and bamboo stalk. Move down to a 3.25 mm hook when the fabric opens under light stretching.
- Unpinned facial parts: Sewing one patch without comparing the second often produces different angles. Pin both patches, the muzzle and both cheeks at the same time before making a permanent stitch.
- Short woven tails: A 5 cm tail can work loose from heavily handled limbs. Leave at least 20–30 cm for structural seams and weave the remainder through three different stitch directions.
Finishing and Shape Control
Check the panda from the front, both sides and above before hiding the final sewing tails. The ears should project beyond the head but remain partly covered by the brim. Move the hat slightly backward when the bamboo crown causes the figure to tip forward. A single hidden tack behind each ear can hold the brim at the required angle.
The back legs need equal contact with the work surface. When one foot sits higher, reshape its stuffing with the blunt end of the crochet hook rather than pulling the attachment thread tighter. Excess thread tension distorts the body and may create a diagonal crease through the cream section.
Brush stray fibers away from the safety eyes and nose with a clean yarn needle. Do not cut structural loops that appear fuzzy. On the finished panda plush pattern, the strongest visual line runs from the inner corners of the eye patches through the nose, so every component in that area should remain centred.
Conclusion
Measure the finished panda from the base of the body to the tallest bamboo tip and record any difference from the 16.5 cm reference size. That measurement will help you select a smaller or larger hook for a second version without changing the stitch counts. Photograph the figure at eye level so the angled patches, seated legs and bamboo crown remain visible. Save the finished panda amigurumi crochet pattern to Pinterest, then share the completed project on Instagram with #BambooHatPanda. Before making another version, decide one structural change: should the next panda’s bamboo crown have three shoots, as pictured here, or a single taller stalk?









