Introduction
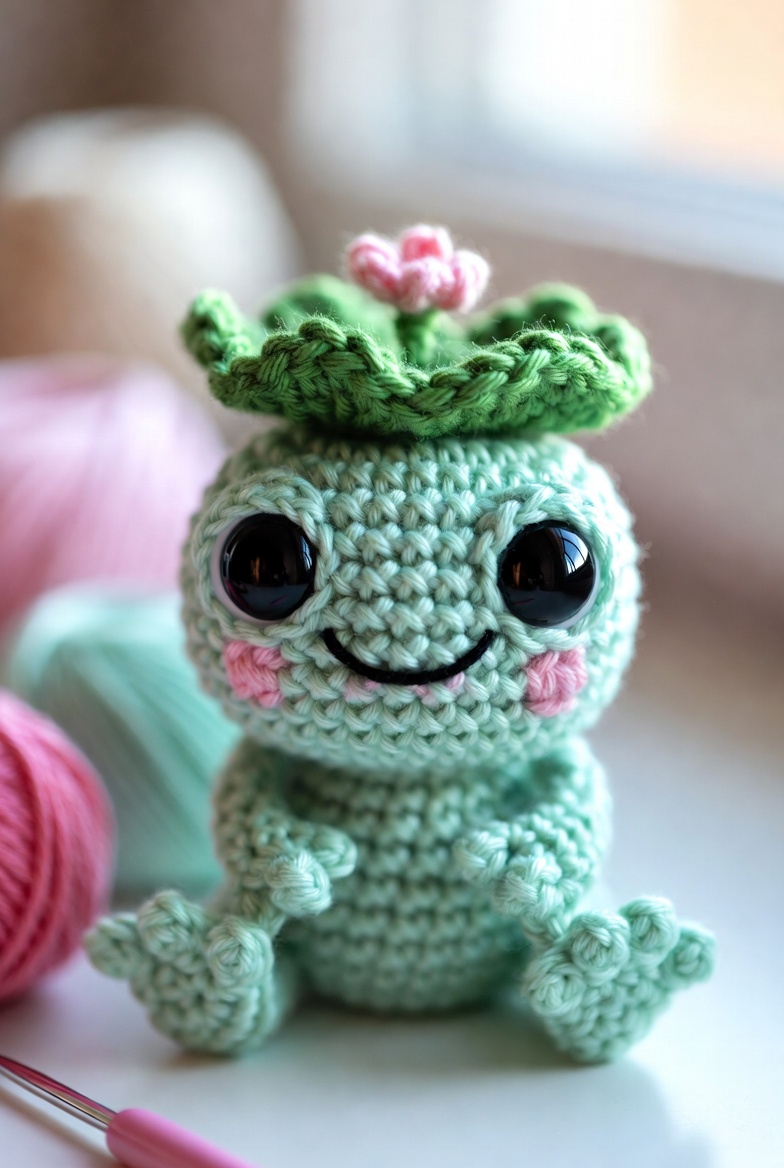
A cactus does not have a forehead, so this doll’s leafy crown must create one without flattening the oversized eyes. This cactus amigurumi crochet pattern uses DK cotton, a 2.5 mm hook and 12 mm safety eyes to produce a seated figure about 14 cm tall. The project suits an intermediate maker and creates a stable desk display that does not require a separate pot.
The Design: What Makes the Flower Crown Cactus Different
The head is worked as a separate 36-stitch sphere because the wide face needs more horizontal space than a conventional column-shaped cactus. A narrower cylindrical body keeps the finished crochet cactus doll upright while allowing the head to remain visually dominant. The back legs are larger than the arms and are attached low on the body, forming a three-point seated base with the lower torso. Its dark-green crown is a shallow disc with a raised edge rather than a loose ring, so it retains its shape after sewing. A frequent mistake in a cute cactus amigurumi is placing the eyes too close to the crown. That compresses the forehead and leaves no clean area for the mouth. This flowering cactus crochet pattern reserves two full rounds between the eye line and the top attachment seam.
Project Info at a Glance
| Skill Level | Time | Finished Size | Hook | Best For |
|---|---|---|---|---|
| Intermediate | 5–7 hours | About 14 cm without flower | 2.5 mm | Desk display, plant-themed collection or photographed product sample |
Materials and Tools
Yarn
- Pale mint green — DK cotton or cotton blend — approximately 40–45 g — Paintbox Yarns Cotton DK or a comparable tightly spun yarn.
- Dark leaf green — DK cotton — approximately 10–15 g — use a shade at least two values darker than the body.
- Pink — DK cotton — approximately 5–8 g — needed for cheeks and flower petals.
- Black — embroidery floss or thin cotton — less than 1 g — needed for the curved mouth.
Tools
- 2.5 mm crochet hook
- 12 mm safety eyes; use 14 mm only when the stitches are dense enough to hold the washers
- Polyester stuffing, approximately 20–25 g
- Yarn needle
- Locking stitch markers
- Dressmaking pins
- Embroidery needle
- Scissors
Abbreviations
- MR — magic ring
- sc — single crochet
- inc — two single crochet stitches in one stitch
- dec — invisible single crochet decrease
- sl st — slip stitch
- ch — chain
- hdc — half double crochet
- dc — double crochet
- BLO — back loop only
- FLO — front loop only
An invisible decrease is made through the front loops of the next two stitches before completing one single crochet through both loops.
Pattern — Step by Step
Work in a continuous spiral unless a joined round is stated. Mark the first stitch of every round and move the marker upward after each completed round.
Head
Yarn: pale mint green — Original six-stitch amigurumi sphere math.
R1: 6 sc in MR (6)
R2: inc ×6 (12)
R3: (sc, inc) ×6 (18)
R4: (2 sc, inc) ×6 (24)
R5: (3 sc, inc) ×6 (30)
R6: (4 sc, inc) ×6 (36)
R7–R12: sc around (36)
R13: (4 sc, dec) ×6 (30)
R14: (3 sc, dec) ×6 (24)
R15: (2 sc, dec) ×6 (18)
R16: (sc, dec) ×6 (12)
R17: dec ×6 (6)
Insert the eyes between R9 and R10 with nine visible stitches between the posts. Begin firm stuffing after R13, adding small pieces around the eye washers before closing.
Fasten off. Leave a 20 cm tail and draw it through the remaining six front loops.
Body
Yarn: pale mint green — Original six-stitch amigurumi cylinder math.
R1: 6 sc in MR (6)
R2: inc ×6 (12)
R3: (sc, inc) ×6 (18)
R4: (2 sc, inc) ×6 (24)
R5: (3 sc, inc) ×6 (30)
R6: (4 sc, inc) ×6 (36)
R7–R12: sc around (36)
R13: (4 sc, dec) ×6 (30)
R14–R15: sc around (30)
R16: (3 sc, dec) ×6 (24)
R17: (2 sc, dec) ×6 (18)
R18: (sc, dec) ×6 (12)
R19: dec ×6 (6)
Stuff the base firmly through R10, then reduce the stuffing density near the upper body so the head can sit close to the torso.
Fasten off. Leave a 25 cm sewing tail and close the final opening.
Arms (Make 2)
Yarn: pale mint green — Standard amigurumi limb math.
R1: 6 sc in MR (6)
R2: inc ×6 (12)
R3–R5: sc around (12)
R6: dec ×6 (6)
Place a small amount of stuffing in the rounded hand only. Keep the upper half flat so it can lie against the body.
Fasten off. Leave an 18 cm tail for sewing.
Back Legs and Feet (Make 2)
Yarn: pale mint green — Standard amigurumi oval-foot shaping.
R1: 6 sc in MR (6)
R2: inc ×6 (12)
R3: (sc, inc) ×6 (18)
R4–R6: sc around (18)
R7: (sc, dec) ×6 (12)
R8: sc around (12)
Stuff the toe section to a depth of about 2 cm. Flatten the final opening so the foot points forward when attached.
Fasten off. Leave a 25 cm tail for sewing.
Toe Bumps (Make 6)
Yarn: pale mint green — Three bumps are attached to each foot.
R1: 6 sc in MR (6)
R2: sc around (6)
Do not stuff. Flatten each piece into a small rounded tab.
Fasten off. Leave a 12 cm tail on every bump.
Cheek Patches (Make 2)
Yarn: pink — Flat-circle construction.
R1: 6 sc in MR (6)
R2: inc ×6 (12)
Join with a sl st. Fasten off and leave a 15 cm sewing tail.
Leaf Crown Base
Yarn: dark leaf green — Original flat-disc and raised-rim construction.
R1: 6 sc in MR (6)
R2: inc ×6 (12)
R3: (sc, inc) ×6 (18)
R4: (2 sc, inc) ×6 (24)
R5: BLO sc around (24)
Check the disc against the top of the head. It should cover the closing point without extending below the upper third of the forehead.
Do not fasten off before working the scalloped edge.
Crown Scallops
Continue with dark leaf green.
Edge round: Repeat (sl st in next stitch, 5 dc in next stitch, sl st in next stitch) eight times around the 24-stitch rim.
Push each five-double-crochet group outward with the yarn needle tip after the round is complete.
Fasten off. Leave a 25 cm tail for attaching the crown to the head.
Top Flower
Yarn: pink — Six-petal surface flower.
Center R1: 6 sc in MR (6)
Petal round: In each stitch work (sl st, ch 3, 2 dc, ch 3, sl st), creating six petals.
Keep the magic ring partly open until all six petals have been worked, then pull the center closed.
Fasten off. Leave a 20 cm tail for sewing the flower to the crown.
Mouth
Thread an embroidery needle with black floss. No crochet rounds are required.
Bring the needle out two rounds below the eye line and two stitches inside the left eye. Take a shallow curved stitch across six stitches, anchoring the midpoint one round lower to create the smile. Repeat the same path once so the line remains visible against the mint yarn.
Fasten the floss inside the head with two small knots and bury the ends in the stuffing.
Assembly
- Place the head directly above the body and align the head’s closing point with the body’s upper center.
- Sew the head to the body with small mattress stitches, passing through one head stitch and one body stitch at a time.
- Pin the cheek patches one round below the mouth ends, leaving approximately four stitches between each cheek and the nearest eye.
- Sew the cheeks flat with pink yarn, catching only the outer loops so the circles retain a clean edge.
- Attach the arms between body R10 and R13, angling the rounded ends slightly toward the center front.
- Pin the back legs across body R4 to R8. Position them wide enough that both feet and the lower body touch the work surface.
- Sew three toe bumps to the front edge of each foot, placing the center bump about 3 mm farther forward than the outer bumps.
- Center the leaf crown over the head’s closing round, rotate it until the scallops sit evenly and sew through the crown base rather than through the outer points.
- Attach the pink flower at the crown center with four passes through the flower ring and the crown disc.
- Weave every yarn tail through at least 3 cm of dense fabric, change direction once and trim the end after it retracts beneath the stitches.
The completed figure should remain seated without support and the crown should not cover the eye washers or distort the forehead.
7 Technical Tips
- Stitch-marker drift: A misplaced marker can rotate the decreases and create a diagonal seam across the head. Count all 36 stitches at the end of R12 before beginning the first decrease round.
- Soft lower body: Loose stuffing causes the figure to lean backward after the feet are attached. Pack the first 3 cm of the body firmly enough that thumb pressure leaves only a shallow temporary dent.
- Visible decrease gaps: A standard two-stitch decrease exposes stuffing along R13–R17 of the head. Work every decrease through the two front loops and keep the hook parallel to the fabric.
- Incorrect eye timing: Closing the head before fitting the washers makes secure eye installation impossible. Fit both eyes after R12 and confirm the nine-stitch spacing before R13 reduces the opening.
- Uneven cotton tension: Pulling the working yarn too tightly on the increase rounds can turn the 36-stitch head into a pointed dome. The R6 diameter should measure approximately 6.5–7 cm when laid flat without stretching.
- Twisted limb placement: Sewing without pins can leave one foot higher than the other and remove the seated balance. Pin both feet first, place the doll on a flat surface and compare the toe tips before making permanent stitches.
- Escaping yarn tails: A tail woven in a single direction can work back out through firm stuffing. Pass each tail for 3 cm, reverse through a neighboring row and cut only after the yarn retracts into the fabric.
Conclusion
Measure the completed head before attaching the crown; a finished diameter near 7 cm keeps the scalloped edge clear of the eyes. The next practical step is to pin every component in place and photograph the front, side and seated views before sewing. That record exposes uneven feet, rotated cheeks and a crown that sits off center. Add the finished cactus amigurumi crochet pattern project to Pinterest with a clear vertical image, then share the front view on Instagram using #FlowerCrownCactus. Will the crown’s largest scallop sit directly above the flower, or will you rotate the leaf points to frame the eyes?









