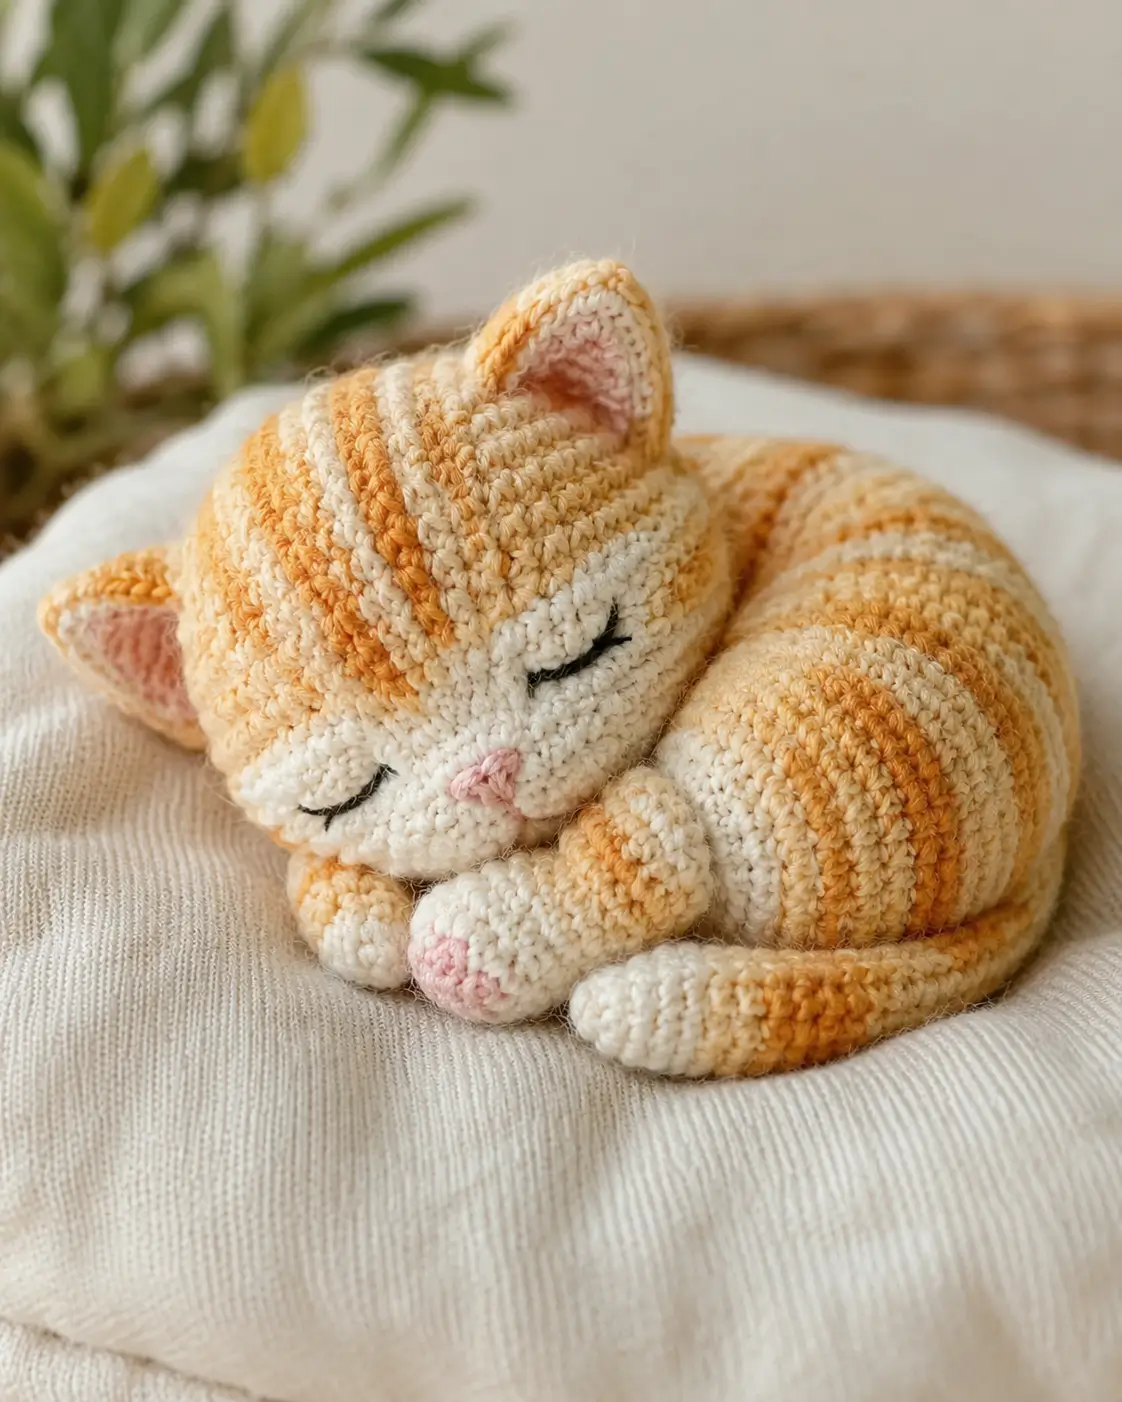
Sleeping tabbies fold the face into the paws, so forehead stripe placement becomes the first shaping problem to solve. This orange tabby cat amigurumi uses DK cotton yarn, a 2.5 mm hook, embroidered eyes, and compact shaping to build a curled plush with intermediate assembly. The finished piece works as shelf decor, nursery display, or a desk accessory that stays stable in a resting pose.
The Design: What Makes This Cat Different
This cat is not built like a standing plush. The head is oversized on purpose, because the sleeping pose hides the neck seam and lets the cheek line rest against the forepaws. The body stays short and rounded instead of elongated, which keeps the curl compact and stops the toy from reading like a different animal. Stripe placement matters too. A tabby reads correctly only when the head stripe runs front to back and the tail repeats that rhythm.
One common mistake with a sleeping cat crochet pattern is placing the eyes too high. Closed embroidered eyes should sit low on the face so the muzzle looks tucked, not alert. Another error is sewing the paws too far apart, which breaks the loafed silhouette and weakens the curled-cat profile.
Project Info at a Glance
| Skill Level | Time | Finished Size | Hook | Best For |
|---|---|---|---|---|
| Intermediate | 5–7 hours | Approx. 17 cm long × 10 cm tall | 2.5 mm | Decor, gifting, photo styling |
Materials and Tools
Yarn
- Cream/soft white — DK cotton or cotton-blend — 35–40 g — Schachenmayr Catania or similar
- Warm orange — DK cotton or cotton-blend — 20–25 g — Schachenmayr Catania or similar
- Light pink — DK scrap — under 3 g — any matching cotton
- Black — embroidery floss or fine cotton scrap — under 2 g — any matching thread
Tools
- Hook 2.5 mm
- Embroidery thread for sleepy eyes
- Stuffing
- Tapestry needle
- Stitch markers
- Pins
- Scissors
Abbreviations
MR = magic ring
sc = single crochet
inc = increase
dec = decrease
sl st = slip stitch
ch = chain
BLO = back loop only
FO = fasten off
Use invisible decrease for all closing rounds so the striped surface stays cleaner at the cheek, hip, and tail base.
Pattern — Step by Step
Continuous spiral unless noted.
Head (Make 1)
Yarn: cream with orange stripes
R1: 6 sc in MR (6)
R2: inc ×6 (12)
R3: (sc, inc) ×6 (18)
R4: (2 sc, inc) ×6 (24)
R5: (3 sc, inc) ×6 (30)
R6: (4 sc, inc) ×6 (36)
R7–R13: sc around (36)
R14: (4 sc, dec) ×6 (30)
R15: (3 sc, dec) ×6 (24)
R16: (2 sc, dec) ×6 (18)
Embroider closed eyes between R10 and R11. Add the muzzle before final stuffing. Place orange forehead stripes across R6–R12.
R17: (sc, dec) ×6 (12)
Stuff firmly at the crown and lightly at the cheeks.
R18: dec ×6 (6)
Fasten off. Leave a 25 cm tail.
Body (Make 1)
Yarn: cream with orange stripes
R1: 6 sc in MR (6)
R2: inc ×6 (12)
R3: (sc, inc) ×6 (18)
R4: (2 sc, inc) ×6 (24)
R5: (3 sc, inc) ×6 (30)
R6: (4 sc, inc) ×6 (36)
R7–R14: sc around (36)
R15: (4 sc, dec) ×6 (30)
R16: (3 sc, dec) ×6 (24)
R17: (2 sc, dec) ×6 (18)
Work stripe changes over R7–R14 to echo the photo. Keep the lower belly mostly cream.
R18: (sc, dec) ×6 (12)
Stuff the back half firmly and the chest half lightly so the body can curl.
R19: dec ×6 (6)
Fasten off. Leave a 25 cm tail.
Front Legs (Make 2)
Yarn: cream with orange stripe cap
R1: 6 sc in MR (6)
R2: inc ×6 (12)
R3–R5: sc around (12)
Add a pink paw pad detail at the front of R2–R3 with duplicate stitch or surface embroidery.
R6: dec ×6 (6)
R7–R9: sc around (6)
Fasten off. Leave a 20 cm tail. Stuff only the paw end.
Back Legs (Make 2)
Yarn: cream with orange stripe cap
R1: 6 sc in MR (6)
R2: inc ×6 (12)
R3: (sc, inc) ×6 (18)
R4–R5: sc around (18)
R6: (sc, dec) ×6 (12)
R7–R9: sc around (12)
Add pink paw pad detail on the lower front edge.
Fasten off. Leave a 22 cm tail. Stuff lightly and flatten the upper edge before sewing.
Ears (Make 2)
Yarn: outer orange/cream, inner pale pink
R1: 6 sc in MR (6)
R2: inc ×6 (12)
R3: sc around (12)
Fasten off. Fold into a shallow triangle and stitch the base closed. Embroider or line the center with pale pink.
Tail (Make 1)
Yarn: cream and orange stripes
R1: 6 sc in MR (6)
R2: inc ×6 (12)
R3–R13: sc around (12)
R14: dec ×6 (6)
R15–R18: sc around (6)
Fasten off. Leave a 24 cm tail. Stuff lightly through R13 only; keep the tip softer so it bends around the body.
Muzzle (Make 1)
Yarn: cream
R1: 6 sc in MR (6)
R2: inc ×6 (12)
R3: sc around (12)
Fasten off. Leave a 20 cm tail. Flatten into a soft oval before sewing.
Cheek Patches (Make 2)
Yarn: cream
R1: 6 sc in MR (6)
R2: inc ×6 (12)
sl st to join (12)
Fasten off. Leave a 12 cm tail.
Nose Detail (Make 1)
Yarn: pale pink
Embroider a small upside-down triangle centered on the muzzle, then bring one short vertical stitch down into a tiny split line.
Assembly
- Sew the head closed and massage the stuffing so the forehead stays rounded, not square.
- Sew the muzzle low on the head, centered between the eye lines.
- Attach the cheek patches at the lower outer edge of the muzzle to build the puffed sleeping face.
- Embroider the closed eyes in black with a short downward lash at the outer corner.
- Sew the ears to the top sides of the head so the inner edges angle slightly inward.
- Shape the body into a curve with your hands, then sew the head to the front third of the body with the chin angled down.
- Attach the front legs under the cheek line so both paws meet at the center.
- Sew the back legs to the lower sides of the body, slightly tucked beneath the belly.
- Attach the tail at the rear and wrap it along the outer curve toward the paws.
- Pin, adjust, and tack the body curl with two hidden stitches if needed so the sleeping pose holds.
The finished piece should rest on its side without rolling open.
7 Technical Tips
- Mark stripe starts every round. Drift of even 1 stitch per round will push the forehead stripe off center by R10 and the cat will look twisted from the front.
- Do not overfill the muzzle. A hard muzzle lifts the nose outward and breaks the tucked-face effect that sleeping cats need.
- Close the eye arcs at 6 to 8 stitches wide. Longer than that, and the face starts to read as a smile line instead of a shut eyelid.
- Stuff the body in zones, not all at once. A dense rear half and lighter chest half gives you a cleaner curl than uniform stuffing.
- Pin both front paws before sewing. Even a 3 mm height mismatch becomes obvious because the paws sit directly below the face.
- Use invisible decrease on all visible orange rounds. Standard decrease leaves brighter, wider pinch points that interrupt narrow tabby stripes.
- Weave the tail end back through at least 4 stitches. A short weave loosens when the tail is bent around the body for display.
Conclusion
This orange tabby cat amigurumi depends on proportion more than novelty. Keep the head broad, the body compact, the front paws touching, and the tail wrapped tight to the curve. That sequence gives the toy its sleeping read at first glance. Swatch your cream and orange stripes on a 12-stitch tube before starting the full build so the color rhythm stays narrow and even. After finishing, post one overhead photo for Pinterest and one side-profile photo for Instagram. Use #OrangeTabbyCatAmigurumi. Which stripe layout worked better on your version: a single forehead band or three narrow tabby lines?









