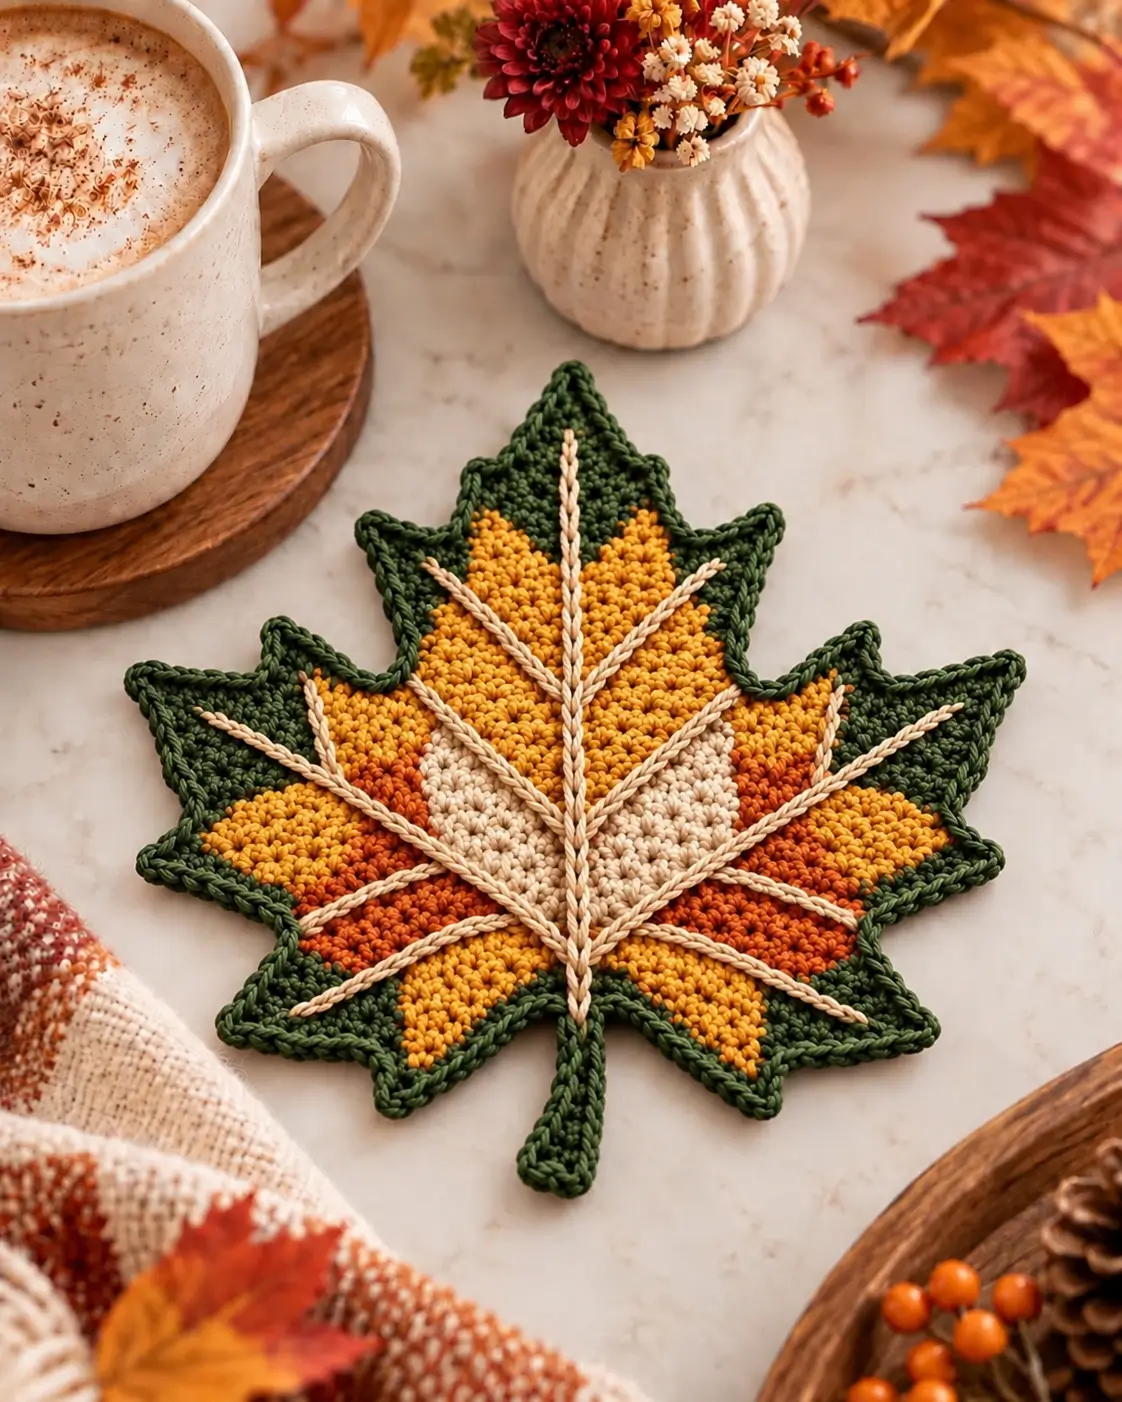
A cream vein crossing mustard, rust, and green sections has to stay straight even when every color block pulls at the fabric differently. This crochet maple leaf placemat pattern recreates that structure with five unequal lobes, a dark-green perimeter, four autumn colors, raised branch veins, and an aligned stem. Work it in firm worsted cotton with a 3.5–4 mm hook for an intermediate-level autumn table mat.
The Design: What Makes This Maple Leaf Different
The central lobe establishes the entire silhouette. It rises above the two upper side lobes, while the lower pair stays shorter and angles toward the stem. Those proportions matter more than perfect bilateral symmetry. A maker should compare the points from the center axis rather than trying to make five identical wedges.
Color blocking provides the second structural layer. Mustard dominates the upper interior, cream anchors the center, rust concentrates through the lower sides, and forest green encloses the entire composition. The raised cream veins then cross those color boundaries without changing direction.
The most common failure with a multicolor crochet maple leaf is treating every point equally. That turns an otherwise detailed fall crochet placemat into a star-shaped motif.
Project Info at a Glance
| Skill Level | Construction | Reference Size | Hook | Best For |
|---|---|---|---|---|
| Intermediate | Flat sectional motif with surface crochet | Approx. 25.5 × 23 cm | 3.5–4 mm | Placemats, centerpieces, fall table décor |
A published worsted-cotton maple leaf provides a useful benchmark at approximately 25.5 × 23 cm. A larger Aran placemat reference measures about 36.8 × 38.1 cm. The photographed piece has no dependable physical scale, so those measurements are reference dimensions rather than claims about the image.
Materials and Tools
Yarn
- Mustard-gold worsted cotton — dominant upper and side sections.
- Burnt-orange/rust worsted cotton — lower side color blocks.
- Natural cream worsted cotton — central section and raised veins.
- Forest-green worsted cotton — lobe tips, perimeter and stem.
Use the same yarn family for all four colors. Different strand diameters can make one section expand faster than another even when every yarn label states the same nominal weight.
Tools
- 3.5–4 mm crochet hook
- Yarn needle
- Scissors
- Locking stitch markers
- Tape measure
- Blocking mat
- Rustproof pins
Abbreviations
- ch — chain
- sl st — slip stitch
- sc — single crochet
- hdc — half double crochet
- dc — double crochet
- tr — treble crochet
- sc2tog — single crochet two stitches together
- st/sts — stitch/stitches
- RS — right side
- WS — wrong side
An invisible decrease is unnecessary for most of this flat construction; decreases are used only where a color section needs controlled tapering.
Crochet Maple Leaf Placemat Pattern — Step by Step
Build the interior before adding the forest-green perimeter or cream veins. Surface crochet should be the final structural treatment because it can distort a section if worked too tightly.
Cream Center — Lower Section
Yarn: natural cream.
Row 1: Ch 5. Beginning in the second chain from the hook, sc across. Turn. (4)
Row 2: Ch 1, 2 sc in first st, sc in next 2 sts, 2 sc in final st. Turn. (6)
Row 3: Ch 1, 2 sc in first st, sc across to final st, 2 sc in final st. Turn. (8)
Row 4: Ch 1, sc across. Turn. (8)
Row 5: Ch 1, 2 sc in first st, sc across to final st, 2 sc in final st. Turn. (10)
Row 6: Ch 1, sc across. Turn. (10)
The cream section should now form a widening wedge rather than a rectangle.
Cream Center — Upper Taper
Row 7: Sl st in first st, sc across to final st, leaving final st unworked. Turn. (8)
Row 8: Ch 1, sc across. Turn. (8)
Row 9: Sl st in first st, sc across to final st, leaving final st unworked. Turn. (6)
Row 10: Ch 1, sc across. Turn. (6)
Row 11: Sl st in first st, sc across to final st, leaving final st unworked. (4)
Fasten off.
This wedge establishes the lower portion of the center axis. The tall mustard-and-green lobe will extend above it later.
Lower-Left Rust Section
Yarn: burnt orange.
Join rust along the lower-left side of the cream wedge.
Row 1: Pick up 5 sc evenly along the edge. Turn. (5)
Row 2: Ch 1, 2 sc in first st, sc across, 2 sc in final st. Turn. (7)
Row 3: Ch 1, sc across. Turn. (7)
Row 4: Ch 1, 2 sc in first st, sc across to final st, 2 sc in final st. Turn. (9)
Row 5: Ch 1, sc across. Turn. (9)
Fasten off.
Lower-Right Rust Section
Repeat the same five-row construction on the opposite side of the cream center.
Compare both sections from the vertical center axis before proceeding. Their widths should be close, although the final color boundaries do not need to be perfectly mirrored.
Left Mustard Section
Yarn: mustard gold.
Join mustard above the left rust section.
Row 1: Pick up 7 sc along the available edge. Turn. (7)
Row 2: Ch 1, 2 sc in first st, sc across, 2 sc in final st. Turn. (9)
Row 3: Ch 1, sc across. Turn. (9)
Row 4: Ch 1, 2 sc in first st, sc across, 2 sc in final st. Turn. (11)
Row 5: Ch 1, sc across. Turn. (11)
Row 6: Ch 1, sc2tog, sc across to final 2 sts, sc2tog. Turn. (9)
Row 7: Ch 1, sc across. (9)
Fasten off.
Right Mustard Section
Repeat the seven-row mustard construction on the right side.
Lay the work flat after Row 7. If one side extends more than approximately 5 mm beyond the other, correct the wider section before beginning the lobes.
Center Lobe
Begin with mustard and finish with forest green.
Join mustard across the top of the cream center.
Row 1: Work 11 sc evenly across the available edge. Turn. (11)
Row 2: Ch 1, sc across. Turn. (11)
Row 3: Ch 1, sc2tog, sc in next 7 sts, sc2tog. Turn. (9)
Row 4: Ch 1, sc across. Turn. (9)
Row 5: Ch 1, sc2tog, sc in next 5 sts, sc2tog. Turn. (7)
Change to forest green.
Row 6: Ch 1, sc across. Turn. (7)
Row 7: Ch 1, sc2tog, sc in next 3 sts, sc2tog. Turn. (5)
Row 8: Ch 1, sc2tog, sc, sc2tog. Turn. (3)
Row 9: Ch 1, sc3tog. (1)
Ch 2 and sl st into the second chain from the hook to sharpen the tip.
Fasten off.
Upper-Left Lobe
Join mustard to the upper-left body edge.
Row 1: Pick up 9 sc. Turn. (9)
Row 2: Ch 1, 2 sc in first st, sc across, 2 sc in final st. Turn. (11)
Row 3: Ch 1, sc across. Turn. (11)
Row 4: Ch 1, sc2tog, sc in next 7 sts, sc2tog. Turn. (9)
Change to forest green.
Row 5: Ch 1, sc across. Turn. (9)
Row 6: Ch 1, sc2tog, sc in next 5 sts, sc2tog. Turn. (7)
Row 7: Ch 1, sc2tog, sc in next 3 sts, sc2tog. Turn. (5)
Row 8: Ch 1, sc2tog, sc, sc2tog. Turn. (3)
Row 9: Sc3tog, ch 2, sl st in second chain from hook. (1)
Fasten off.
Upper-Right Lobe
Repeat the upper-left lobe construction on the opposite side.
Before fastening off, compare the two points to the center lobe. Both side tips should finish below the center tip.
Lower-Left Lobe
Join rust along the lower-left body edge.
Row 1: Pick up 7 sc. Turn. (7)
Row 2: Ch 1, 2 sc in first st, sc across, 2 sc in final st. Turn. (9)
Row 3: Ch 1, sc across. Turn. (9)
Change to forest green.
Row 4: Ch 1, sc2tog, sc in next 5 sts, sc2tog. Turn. (7)
Row 5: Ch 1, sc2tog, sc in next 3 sts, sc2tog. Turn. (5)
Row 6: Ch 1, sc2tog, sc, sc2tog. Turn. (3)
Row 7: Sc3tog, ch 2, sl st in second chain from hook. (1)
Fasten off.
Lower-Right Lobe
Repeat the lower-left lobe on the opposite side.
The two lower lobes should remain noticeably shorter than the upper pair.
Adding the Secondary Points
Join forest green along an outside lobe edge.
Work sc toward the position of the first small point.
At that position work:
(sc, hdc, ch 2, sl st in second chain from hook, hdc, sc).
Continue in sc toward the next valley.
Add one or two secondary points to each broad upper side lobe.
Add no more than one secondary point to each lower lobe.
The secondary points should remain shorter than the five principal tips.
Forest-Green Perimeter
Join forest green beside the future stem position.
Work sc evenly along the first lower edge.
At a principal tip work:
(sc, hdc, ch 3, sl st in first chain, hdc, sc).
At a secondary point work:
(sc, ch 2, sl st in second chain from hook, sc).
Work sl st in every major valley.
Continue around the entire leaf.
Do not force the same number of stitches onto differently sized edges. The objective is a flat perimeter rather than mathematical repetition.
Forest-Green Stem
Join forest green at the lower center.
Ch 13.
Beginning in the second chain from the hook, work 12 sc back toward the leaf.
Rotate the stem.
Work sl st along the opposite side of the foundation chain.
Join securely at the lower center.
Fasten off.
The stem should line up directly with the tallest center lobe.
Raised Cream Central Vein
Join cream where the stem enters the leaf.
Insert the hook through the fabric and pull up a loop.
Surface sl st upward through the exact center of the leaf.
Continue through the cream section, mustard center, and toward the forest-green tip.
Stop approximately 1 cm before the outside perimeter.
Fasten off on the wrong side.
Upper-Left Vein
Join cream approximately halfway up the central midrib.
Surface sl st diagonally toward the upper-left lobe.
Keep the line centered within the lobe.
Stop approximately 1 cm before its green perimeter.
Fasten off.
Upper-Right Vein
Repeat the branch on the opposite side.
Check both upper branches from directly above. Their starting positions should be similar even if the underlying color boundaries differ.
Lower-Left Vein
Join cream lower on the midrib.
Surface sl st diagonally through the rust section toward the lower-left lobe.
Stop before the forest-green edging.
Fasten off.
Lower-Right Vein
Repeat on the opposite side.
Keep the tension loose enough that the rust section remains flat after the final stitch.
Secondary Cream Veins
Add shorter branches from the four principal side veins toward selected secondary points.
Each secondary line should begin on an existing branch rather than floating independently across the fabric.
Stop every line before the dark-green border.
Use fewer secondary veins near the lower lobes than around the broad upper sections.
Assembly and Finishing
- Complete the cream center and mark a straight vertical axis through its middle.
- Add the paired rust sections and compare them from the center axis before proceeding.
- Build the mustard interior areas while keeping their outside boundaries clear of the future green perimeter.
- Make the center lobe first, then the two upper lobes and shorter lower pair.
- Add the forest-green secondary points and work one continuous perimeter around the complete leaf.
- Crochet the green stem directly below the tallest center lobe.
- Surface-crochet the cream central vein from the stem toward the center point.
- Add four primary side veins followed by selected shorter branches.
- Weave contrasting tails through 4–5 cm of matching-color fabric on the wrong side.
- Wet-block the finished placemat with separate pins at every principal point, secondary point, valley, and stem.
The finished maple leaf should lie flat with one dominant center point, two balanced upper lobes, two shorter lower lobes, a continuous forest-green silhouette, an aligned stem, and cream veins branching across the mustard, rust, and cream interior.
7 Technical Tips
- Keep the center lobe approximately 10–20% longer than either upper side lobe. If all five points finish at equal distance from the center, the motif reads as a star rather than a maple leaf.
- Compare the paired upper tips within about 5 mm. A 1 cm mismatch is visually obvious on a placemat measuring roughly 25–30 cm.
- Stop every cream vein about 1 cm before the green perimeter. Carrying cream through the border breaks the continuous dark outline visible in the reference.
- Use a slip stitch in each of the four principal valleys. Filling those recesses with hdc or dc makes neighboring lobes merge into one rounded edge.
- Lay the leaf flat after completing each surface-crochet branch. A branch worked tighter than the fabric beneath it acts like a drawstring and lifts one quadrant.
- Pin the five principal tips before the smaller points during blocking. Positioning secondary teeth first can pull the main lobes away from their intended angles.
- Hide each contrasting tail through at least 4–5 cm of its own color. A forest-green strand carried behind the cream center can remain visible through tightly worked cotton.
Why the Five Maple Lobes Need Different Proportions
The five major points perform different jobs. The center lobe establishes height and the central axis. The upper-left and upper-right lobes establish width. The lower pair connects the broad body to the narrow stem.
Making all five identical removes that hierarchy.
Measure each principal point from the center of the leaf rather than comparing row counts alone. The center should be longest, the upper pair slightly shorter, and the lower pair shorter again.
The valleys also need different depths. Recesses beside the center lobe can be deeper than those immediately above the lower pair. This variation produces a more convincing maple silhouette.
Planning the Four-Color Placement
Draw the leaf outline before beginning a full-size version.
Mark the vertical midrib first. Add four diagonal primary veins. Those lines create a useful map for the color sections.
Place cream around the lower center.
Let mustard occupy most of the upper interior.
Concentrate rust around the lower side lobes and transitional areas.
Reserve forest green for the outside points, perimeter, and stem.
Avoid dividing the leaf into four equal geometric wedges. The irregular color distribution visible in the reference is part of what makes the design botanical rather than quilt-like.
Working Clean Color Changes
Change colors during the final yarn-over of the stitch before the new section begins.
For adjacent blocks, keep the inactive strand on the wrong side only for a very short distance.
Cut and rejoin yarn when the next use is farther away.
This is particularly important with forest green beside cream. A dark float behind a pale section can show through the front.
Inspect the reverse side periodically. Because this project functions as a table mat, long loose floats can also catch on tableware.
Why Surface Crochet Works for the Veins
The vein network needs to remain visually separate from the background stitches. Surface slip stitches provide that raised line without requiring the cream strand to be incorporated while every color section is being made.
That separation also allows the vein path to cross mustard, cream, and rust without disturbing the color-change structure.
Tension is critical. Pull only enough yarn through to form the next surface stitch.
After every major branch, place the leaf on a hard surface. If the fabric rises beside the vein, remove the branch and work it again more loosely.
Choosing Yarn and Hook Size
Worsted cotton is a practical choice for a placemat because it combines stitch definition with enough weight to remain flat.
A published worsted-cotton maple leaf measures approximately 25.5 × 23 cm with a 3.5 mm hook. That makes a 3.5–4 mm hook a useful starting range for the photographed style.
For a larger centerpiece, an Aran-weight reference measures approximately 36.8 × 38.1 cm using a 5 mm hook.
Do not switch only one color to a heavier yarn. A thicker mustard section, for example, can expand beyond the corresponding rust section and pull the center vein off axis.
Calculating Yarn for a Set
A published 25.5 × 23 cm worsted-cotton maple leaf uses approximately 85–91 m in total. The four-color distribution in this reconstruction will not divide that yardage equally.
Weigh each ball before starting the first placemat.
Finish the entire leaf, including the forest-green edging, stem, cream midrib, and all branch veins.
Weigh each color again.
Record the difference separately.
For four placemats, multiply each measured amount by four and add a modest allowance for tails, tension differences, and corrections.
This measured approach is more useful than assuming each color accounts for 25% of the total yarn.
Keeping the Placemat Flat
Check the work after every major section.
Ruffling indicates excess fabric along an outside edge. Cupping usually indicates insufficient edge width or excessive tension.
Color changes can create another problem: one yarn may be pulled tighter than its neighbor. If only one quadrant curls, inspect its joins before changing the entire pattern.
Complete the leaf body and green perimeter before adding the cream veins. The background should already lie flat at that stage.
Surface crochet should add definition, not correct shaping problems.
Blocking the Finished Maple Leaf
Dampen the leaf according to the yarn manufacturer’s care instructions.
Place the stem on a straight vertical line.
Pin the center point first.
Position the upper-left and upper-right points at equal distances from the center axis.
Pin both lower lobes next.
Push each major valley inward and secure it separately.
Add pins to the smaller perimeter points only after the main silhouette is stable.
Arrange the cream veins with the fingers. Avoid pulling them while the fabric is wet.
Leave the placemat pinned until fully dry.
Making Coordinated Autumn Placemats
Complete one master leaf before beginning a set.
Record its blocked width, height, hook size, yarn weight, and consumption by color.
Use those measurements for every later placemat.
The internal color distribution can change while the structure remains consistent. One version can emphasize mustard, another rust, and another cream.
Keep the forest-green perimeter and cream vein network unchanged across the set. Those two repeated features provide visual continuity even when the interior color blocks differ.
For a smaller matching accent, use the same construction in DK yarn with an appropriately smaller hook rather than removing individual lobes.
Conclusion
The continuous green outline and branching cream veins give this crochet maple leaf placemat pattern its strongest visual structure. Build the five unequal lobes first, check that the tallest point aligns with the stem, and confirm the complete background lies flat before adding surface crochet. Make one master leaf next and record its blocked dimensions plus yarn consumption by color before producing a coordinated table set. Photograph the finished autumn arrangement for Pinterest or Instagram with #RaisedVeinMapleLeaf. For this specific four-color layout, would you keep the cream center shown here or replace that central section with burnt orange while retaining the cream veins?









