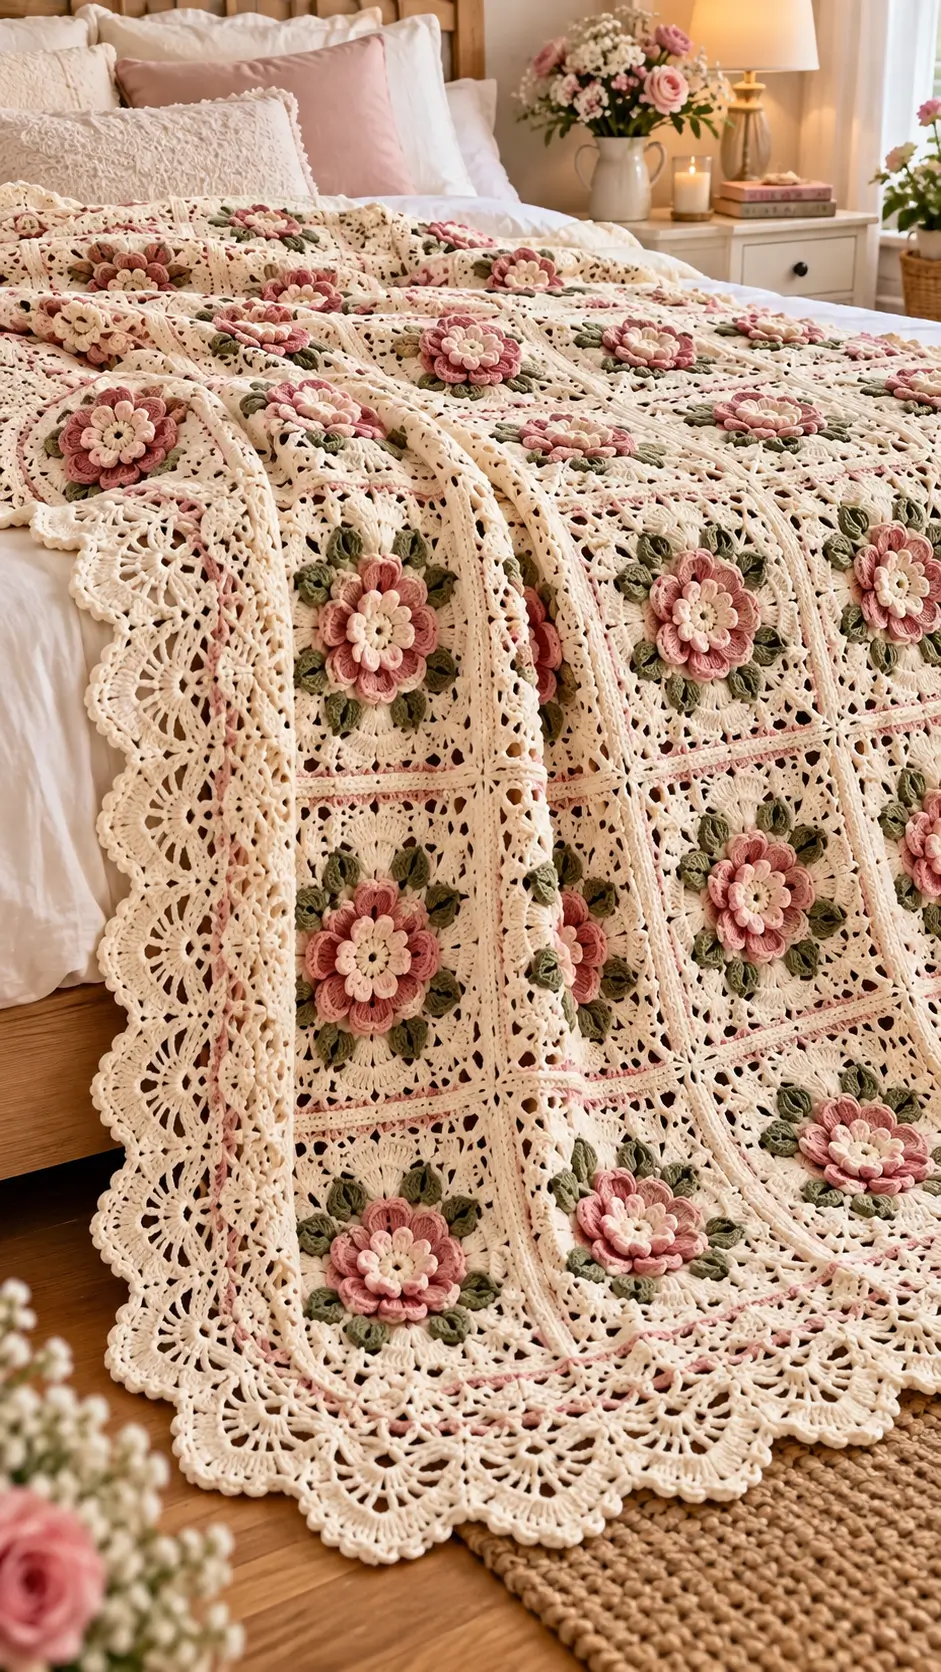
A raised flower changes the engineering of a crochet blanket because every petal adds thickness above the square beneath it. This 3D flower crochet blanket design uses cream openwork motifs, layered dusty-pink flowers, olive-green leaves, pink joining details, and a deep scalloped border. The photographed piece appears suitable for an intermediate crocheter and is designed as a decorative bedspread rather than an amigurumi project.
The Design: What Makes This Floral Blanket Different
The strongest feature of this floral crochet blanket is the contrast between an open lace background and heavily dimensional flower centers. Instead of relying on color changes alone, the design builds height with several petal layers. That construction keeps each flower visually separate from the cream square beneath it.
Green leaves form a transition between the pink flowers and cream background. Their placement also increases the apparent diameter of each floral cluster without requiring a much larger flower center. Pink joining or decorative rows then divide the cream motifs into a visible grid.
The border is another structural feature. A wide scalloped crochet edging gives the outside of the bedspread considerably more detail than a basic single-crochet border. One common mistake with a 3D flower granny square blanket is attaching flowers before the individual squares have been blocked. Uneven squares can make the finished grid pull diagonally.
Project Information at a Glance
| Skill Level | Construction | Finished Size | Hook | Best For |
|---|---|---|---|---|
| Intermediate | Joined floral motifs | Adjustable by motif count | Match to selected yarn | Bedspread or decorative blanket |
Important: the exact finished dimensions, hook size, yarn weight, and yarn quantities cannot be verified from the photograph alone. Published dimensional flower blankets vary considerably in these specifications, so a gauge swatch and completed test motif should be measured before calculating a full bed-size blanket.
Materials and Tools
Yarn
- Cream or ivory yarn — main color for the openwork squares, joining sections, and border.
- Dusty pink yarn — main flower petals and decorative details.
- Blush pink yarn — inner flower petals and lighter floral accents.
- Muted olive or sage yarn — dimensional leaves around each flower.
A smooth DK or light-worsted yarn can produce a similar visual structure. The photograph alone cannot establish the original yarn fiber or weight, so these specifications should be treated as construction guidance rather than identification of the original materials.
Tools
- Crochet hook appropriate for the chosen yarn and required gauge
- Tapestry needle for joining and weaving yarn tails
- Stitch markers for marking motif sections and repeats
- Blocking pins for shaping completed squares
- Blocking mats large enough to keep motifs at identical dimensions
- Scissors
- Measuring tape
Abbreviations
- MR — magic ring
- ch — chain
- sl st — slip stitch
- sc — single crochet
- hdc — half double crochet
- dc — double crochet
- tr — treble crochet
- st/sts — stitch/stitches
- sp — space
- ch-sp — chain space
- rep — repeat
Because this is a lace and motif project rather than amigurumi, invisible decreases are generally unnecessary in the main blanket construction.
How the 3D Flower Crochet Blanket Is Constructed
The photographed bedspread appears to use a modular construction. Individual cream squares create the foundation, dimensional flowers occupy the centers, and green leaves surround the floral sections. The completed units are arranged into rows before being joined into a larger rectangular fabric.
This method has an important advantage: the final dimensions can be changed by adding or removing complete motif rows. It is therefore more useful to calculate the project from the blocked dimensions of one square than to rely on a fixed blanket measurement.
Step 1: Make a Test Flower
Start with the dimensional flower rather than producing dozens of background squares immediately. The flower determines how much weight and thickness will sit at the center of each motif.
The photographed flowers contain multiple visible petal layers. A smaller pale center sits above larger blush and dusty-pink petals. This stacked arrangement produces the pronounced three-dimensional appearance.
Work each petal layer independently around its supporting round. Petals should lie close enough to overlap slightly without folding sharply over one another. If the petals cup excessively, the stitch count or hook-to-yarn ratio requires adjustment.
Step 2: Add the Green Leaves
The leaves form a ring around the dimensional flower. They are not simply decorative color changes: their raised shape expands the floral cluster and separates the pink petals from the cream lace background.
Use muted olive or sage yarn to reproduce the color relationship visible in the photograph. Keep the leaves consistent in length. Even a small difference becomes obvious after identical motifs are arranged side by side.
When working a separate leaf component, leave enough yarn for secure attachment. If the leaves are crocheted directly into the floral foundation, check that each attachment point corresponds to the same position around every flower.
Step 3: Build the Cream Square Around the Flower
The flower-and-leaf cluster needs to transition into a square before the motifs can form an even blanket grid. This is achieved by distributing stitches differently at the four corner positions.
The photographed background is substantially more open than a solid granny square. Chain spaces and taller stitches create lace openings while the corner groups establish the square geometry.
Measure across the motif after completing the cream section. Record this measurement only after blocking. That figure becomes the basis for calculating the width and length of the complete bedspread.
Step 4: Block Every Motif to the Same Measurement
Blocking is particularly important for this design because openwork squares can stretch differently depending on tension. Pin each square to the same width and height rather than stretching individual motifs until they merely appear square.
Keep all four corners at 90-degree angles. Measure both diagonals as well. If one diagonal is longer, the motif has been pinned out of square and can create a visible diagonal pull after joining.
Allow the motifs to dry completely before removing the pins. The dimensional flowers themselves should not be flattened heavily during blocking.
Step 5: Arrange the Floral Squares
Lay the blocked squares on a flat surface before joining. Keep every flower facing in the same orientation if the leaf arrangement has a directional structure.
The photograph shows repeated floral motifs distributed across the bedspread rather than a single central floral panel. This repetition makes consistent spacing critical. A flower positioned several millimeters off-center can become conspicuous once surrounded by a regular grid.
Calculate the final dimensions from the motif layout before joining. Multiply the blocked width of one motif by the number of motifs across, then account for the width added or removed by the joining method and border.
Step 6: Join the Crochet Squares
The photograph includes visible pink linear details between sections. A comparable construction can use a contrasting decorative joining round or a narrow accent row between cream sections.
Test the joining method on two motifs first. The seam should hold both squares at their blocked dimensions without pulling their edges inward.
A join that is too tight causes the blanket to develop ridges. An excessively loose join creates gaps larger than those already present in the lace pattern. Match the seam tension to the relaxed width of the motif edges.
Step 7: Add the Pink Accent Detail
A narrow dusty-pink line can reproduce the grid effect visible in the reference photograph. Keep this detail proportionally smaller than the main flower color areas.
The accent works because it repeats the flower color without competing with the raised petals. Thickening this section substantially would change the visual balance and make the blanket appear divided into separate panels rather than one continuous lace bedspread.
Step 8: Prepare the Outer Border
Before beginning the decorative lace edging, work an even foundation around the complete blanket. Count the available stitches or repeat spaces on every side.
Corner placement matters. Each corner needs sufficient increases to allow the border to turn through 90 degrees without cupping upward or producing excessive fabric.
Do not begin a complex shell repeat until the foundation round lies flat. Any distortion present in that round will become larger as additional border rounds are added.
Step 9: Crochet the Wide Scalloped Lace Border
The border in the photograph is deep, open, and strongly scalloped. Large fan-like sections alternate with narrow connection points, producing repeated rounded projections along the outside edge.
A similar border can be developed through progressively larger chain spaces and groups of tall stitches. Each repeat needs the same number of foundation stitches. Mark repeat boundaries before completing an entire side.
Work a test section containing at least three complete scallops. Lay it flat without stretching. If the scallops overlap, the outer rounds contain too much fabric; if the edge curls inward, additional stitches or chain space are required.
Step 10: Finish and Block the Complete Bedspread
Weave yarn tails through structurally dense areas rather than across open chain spaces. Flower and leaf tails require particular attention because dimensional elements are handled more frequently than flat background stitches.
Block the completed blanket according to the fiber used. Concentrate on aligning the motif grid and shaping the border rather than compressing the raised flowers.
Measure the final blanket after it has completely dried. Record that dimension with the yarn, hook, motif size, and number of squares so the project can be reproduced accurately.
How to Calculate the Blanket Size
A modular floral blanket should be sized from a completed test square. Suppose one blocked motif measures 20 cm across. Eight motifs across would produce approximately 160 cm before accounting for joining and the outer border.
The same calculation applies vertically. Ten 20 cm motifs would provide approximately 200 cm before border adjustments.
Do not assume that a published pattern made with a different yarn will produce the same measurement. Yarn thickness, hook diameter, stitch height, blocking, and individual tension can alter the dimensions of every square. Those differences multiply across a large bedspread.
Yarn Quantity Planning
The cream yarn will normally represent the largest share of the project because it forms the square backgrounds, joins, and wide border. Pink yarn consumption depends on the number and thickness of the petal layers. Green yarn usage is lower but repeats on every floral motif.
Make one complete motif before purchasing or calculating final quantities whenever possible. Weigh the finished motif on a digital scale, separating yarn consumption by color during the sample stage if accurate calculations are required.
For example, if one finished motif consumes 30 g of yarn and the layout requires 48 motifs, the motifs alone require approximately 1,440 g. Add the separately calculated joining and border quantities plus a reserve from the same dye lots.
7 Technical Tips for a Raised Flower Crochet Blanket
- Mark every corner. Losing one corner position can turn a square motif into a skewed shape by the next round. Keep four removable stitch markers in place until the geometry is visually obvious.
- Measure blocked squares in millimeters or centimeters. A 5 mm difference repeated across ten motifs creates a potential 5 cm discrepancy. Reject or rework motifs that fall materially outside the target measurement.
- Control flower height. Overly loose petals can collapse sideways and cover neighboring lace sections. Keep the flower center firm enough for the petal layers to remain stacked.
- Do not flatten the flowers during blocking. Heavy pinning across the petals removes part of the dimensional structure. Pin the square perimeter and manipulate the petals separately.
- Test two joined squares before assembling the blanket. A tight seam can create ridges across an entire row. The two-sample test should lie flat without pulling either motif inward.
- Pin border repeats before committing to the final round. Incorrect repeat spacing produces compressed scallops near a corner. Mark each repeat boundary so every side distributes the fans evenly.
- Weave flower tails through dense stitches. A tail carried through an open chain space can become visible or work loose. Change direction at least once inside a substantial petal or foundation section.
Color Placement
The photographed blanket uses a restrained four-color hierarchy. Cream occupies most of the surface. Dusty pink supplies the strongest repeated accent, blush creates separation between flower layers, and olive green identifies the leaves.
Keeping the background neutral is important when the flowers are already three-dimensional. Adding several strong colors to the lace squares would compete with the raised motifs and reduce the distinction between the floral centers and their background.
For a close visual interpretation, keep the darkest green confined mainly to the leaves. Repeat pink sparingly in the joining or border detail so that it connects the individual floral motifs across the complete bedspread.
Assembly Order
- Make one complete flower sample and check its diameter.
- Add or test the green leaf arrangement around the flower.
- Complete one cream lace square around the floral center.
- Block the test motif and record its exact dimensions.
- Calculate the required number of motifs for the target bedspread dimensions.
- Crochet the remaining motifs using the test square as the measurement standard.
- Block all motifs to identical dimensions and arrange them in the final grid.
- Join the squares and add the narrow pink decorative details where required.
- Work the foundation and scalloped lace border around the complete blanket.
- Weave in all remaining yarn tails, complete the final blocking, and record the finished measurements.
The completed construction should form a flat rectangular motif grid with raised flowers and an evenly distributed scalloped perimeter.
Conclusion
A successful 3D flower crochet blanket depends more on repeat accuracy than on copying the apparent dimensions of a photograph. Make and block one complete floral square first, record its measurement and yarn consumption, then calculate the bedspread from that sample. Keep the cream lace squares consistent, center the layered pink flowers, distribute the green leaves evenly, and test the scalloped border before working the complete perimeter. Save the finished project to Pinterest or share the motif layout on Instagram with #3DFlowerCrochetBlanket. For your own version, would you keep the dusty-pink flowers shown here or change the petals to another color?









