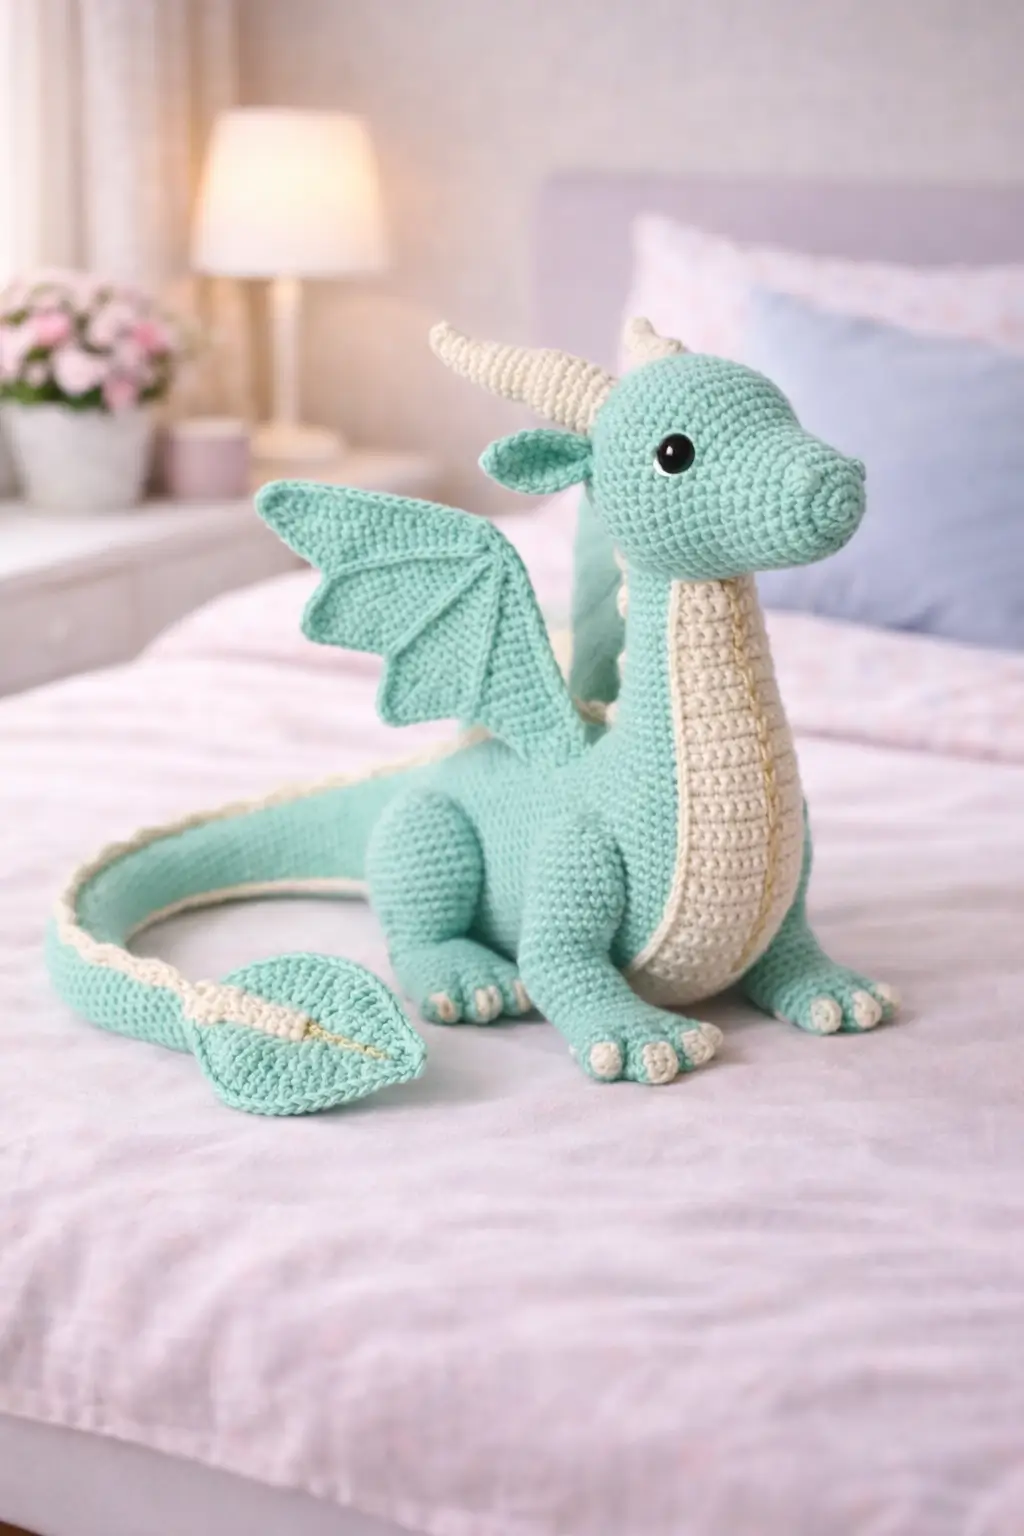
A dragon this slim fails in the neck before it fails anywhere else. That is the core engineering problem. This mint dragon amigurumi crochet pattern is shaped for the exact look in the photo: long neck, cream belly panel, curved cream horns, small upright wings, broad feet, and a long tail that loops around the body instead of trailing behind it.
Why This Dragon Design Works
This plush reads as soft and modern because the proportions stay restrained. The head is rounded, the snout is moderate, and the body sits low rather than rising into a heavy chest. Good decision. A bulkier torso would fight the clean line running from the nose through the neck and down the back.
The cream belly panel matters more than it first appears. It creates a clear front view, lengthens the neck visually, and separates the head from the forelegs. Without that contrast, the whole front section would collapse into one mint silhouette. The horns do similar work at the top. They are long enough to define the character, but narrow enough to keep the dragon looking gentle rather than aggressive.
The tail is doing real compositional work. It curves in a wide arc around the plush, then closes with a leaf-shaped tip detail. That shape makes the dragon feel finished from the side. The wings also stay small and narrow, which is exactly right here. Larger wings would crowd the neck line and shrink the face visually.
Project Snapshot
| Item | Pattern Target |
|---|---|
| Character type | Pastel sitting dragon |
| Skill level | Intermediate |
| Yarn | DK cotton or light worsted cotton blend |
| Hook size | 2.75 mm to 3.25 mm |
| Safety eyes | 10 mm to 12 mm |
| Finished size | Approx. 28–34 cm long including tail |
Materials and Tools
- Main yarn: mint green DK cotton or light worsted yarn
- Accent yarn: cream for belly panel, horns, claws, and tail stripe
- Detail yarn: black for nostrils if desired
- Hook: 2.75 mm for firmer shaping or 3.25 mm for slightly softer fabric
- Safety eyes: 10 mm or 12 mm
- Stuffing: polyester fiberfill
- Tapestry needle
- Stitch markers
- Straight pins
Abbreviations
MR = magic ring
sc = single crochet
inc = increase
dec = invisible decrease
sl st = slip stitch
ch = chain
hdc = half double crochet
dc = double crochet
st = stitch
Use invisible decrease throughout. Standard decreases leave a visible ridge along the long neck and belly edge, which stands out immediately on pale yarn.
Character Breakdown From the Photo
- rounded dragon head
- medium snout
- two long cream horns
- small center head crest
- two side ears
- long narrow neck
- cream belly panel from chin to lower torso
- two small wings
- front legs with broad feet
- back legs in a seated pose
- cream toe tips
- long curved tail
- leaf-shaped tail tip detail
Step-by-Step Mint Dragon Pattern
This custom pattern is written to match the photographed plush and uses standard amigurumi shaping for a slim seated dragon.
Head (Make 1)
Yarn: Mint
Source: Standard amigurumi math
R1: 6 sc in MR (6)
R2: inc x6 (12)
R3: (sc 1, inc) x6 (18)
R4: (sc 2, inc) x6 (24)
R5: (sc 3, inc) x6 (30)
R6: (sc 4, inc) x6 (36)
R7-R11: sc around (36)
R12: (sc 4, dec) x6 (30)
R13: sc around (30)
Insert eyes between R8 and R9, spaced 7 stitches apart.
R14: (sc 3, dec) x6 (24)
Stuff firmly, keeping the snout rounded.
R15: (sc 2, dec) x6 (18)
R16: (sc 1, dec) x6 (12)
R17: dec x6 (6)
Fasten off. Leave 25 cm tail.
Snout Extension (Optional Sculpting)
Yarn: Mint
Source: Standard shaping detail
Use a short length of mint yarn to lightly sculpt the snout and define the nostril area if you want a more pronounced front profile. Keep the shaping shallow. Deep sculpting makes the face look too sharp for this design.
Ears (Make 2)
Yarn: Mint
Source: Standard amigurumi math
R1: 4 sc in MR (4)
R2: inc x4 (8)
R3: (sc 1, inc) x4 (12)
R4: sc around (12)
Flatten lightly.
Fasten off. Leave 15 cm tail.
Horns (Make 2)
Yarn: Cream
Source: Standard amigurumi math
R1: 4 sc in MR (4)
R2: inc x4 (8)
R3-R6: sc around (8)
R7: (sc 2, dec) x2 (6)
R8-R14: sc around (6)
Stuff lightly and curve during sewing.
Fasten off. Leave 20 cm tail.
Center Crest (Make 1)
Yarn: Cream
Source: Standard amigurumi math
R1: 4 sc in MR (4)
R2: sc around (4)
R3: (sc 1, inc) x2 (6)
R4-R5: sc around (6)
Fasten off.
Neck (Make 1)
Yarn: Mint
Source: Standard amigurumi math
R1: 6 sc in MR (6)
R2: inc x6 (12)
R3-R20: sc around (12)
R21: (sc 1, inc) x6 (18)
R22-R24: sc around (18)
Stuff very firmly.
Fasten off. Leave 30 cm tail.
Body (Make 1)
Yarn: Mint
Source: Standard amigurumi math
R1: 6 sc in MR (6)
R2: inc x6 (12)
R3: (sc 1, inc) x6 (18)
R4: (sc 2, inc) x6 (24)
R5: (sc 3, inc) x6 (30)
R6: (sc 4, inc) x6 (36)
R7-R11: sc around (36)
R12: (sc 4, dec) x6 (30)
R13-R16: sc around (30)
R17: (sc 3, dec) x6 (24)
R18: sc around (24)
Stuff firmly through the belly and hip area.
Fasten off. Leave 30 cm tail.
Belly Panel (Make 1)
Yarn: Cream
Source: Standard amigurumi math
R1: ch 8, starting in 2nd ch from hook sc 7, ch 1, turn (7)
R2-R26: sc across, ch 1, turn (7)
R27: dec, sc 3, dec, ch 1, turn (5)
R28-R30: sc across (5)
Fasten off. Leave 25 cm tail.
This strip should run from the lower jaw to the lower body. Surface-stitch a fine line down the center if you want the same subtle ridge seen in the photo.
Front Legs (Make 2)
Yarn: Mint
Source: Standard amigurumi math
R1: 6 sc in MR (6)
R2: inc x6 (12)
R3-R5: sc around (12)
R6: (sc 1, dec) x4 (8)
R7-R11: sc around (8)
Stuff the foot firmly and the upper leg lightly.
Flatten and fasten off. Leave 18 cm tail.
Back Legs (Make 2)
Yarn: Mint
Source: Standard amigurumi math
R1: 6 sc in MR (6)
R2: inc x6 (12)
R3: (sc 1, inc) x6 (18)
R4-R6: sc around (18)
R7: (sc 1, dec) x6 (12)
R8-R11: sc around (12)
Stuff firmly and shape into seated haunches.
Fasten off. Leave 20 cm tail.
Toe Tips (Make 16 small pieces)
Yarn: Cream
Source: Standard amigurumi math
R1: 4 sc in MR (4)
sl st to close
Fasten off.
Attach four to each visible foot for the same rounded claw look as the photo.
Wings (Make 2)
Yarn: Mint
Source: Standard amigurumi math
R1: ch 2, 2 sc in 2nd ch from hook (2)
R2: inc x2, ch 1, turn (4)
R3: inc, sc 2, inc, ch 1, turn (6)
R4: inc, sc 4, inc, ch 1, turn (8)
R5: inc, sc 6, inc, ch 1, turn (10)
R6: inc, sc 8, inc, ch 1, turn (12)
R7: sc across, ch 1, turn (12)
R8: sl st 1, sc 2, hdc 3, dc 3, hdc 2, sc 1 (12)
Fasten off. Leave 18 cm tail.
Surface-crochet two inner support lines on each wing to match the membrane structure in the photo.
Tail (Make 1)
Yarn: Mint
Source: Standard amigurumi math
R1: 4 sc in MR (4)
R2: inc x4 (8)
R3-R7: sc around (8)
R8: (sc 3, inc) x2 (10)
R9-R28: sc around (10)
Stuff firmly at the base, lightly through the middle, and leave the last third soft enough to curve.
Fasten off. Leave 30 cm tail.
Tail Stripe (Make 1)
Yarn: Cream
Source: Standard amigurumi math
R1: ch 22, starting in 2nd ch from hook sc 21
Fasten off. Leave 18 cm tail.
Sew this strip along the upper or inner tail curve depending on your preferred finish.
Leaf Tail Tip (Make 2 panels)
Yarn: Mint with cream center detail
Source: Standard amigurumi math
R1: ch 7, starting in 2nd ch from hook sc 5, 3 sc in last ch, working on opposite side sc 4, inc in final st (14)
R2: inc, sc 4, inc x3, sc 4, inc x2 (20)
R3: sc around (20)
Fasten off.
Make two panels, add a narrow cream embroidered center vein, then sew together lightly stuffed at the tail end.
Assembly
- Sew the horns and center crest to the top of the head before attaching the ears.
- Attach the ears low and slightly outward behind the horns.
- Join the head to the neck and reinforce the seam with a second pass.
- Sew the cream belly panel from the lower jaw down the neck and onto the body front.
- Attach the neck to the front top of the body, checking the head angle before closing the seam.
- Sew the front legs low and forward so the dragon sits upright without leaning.
- Attach the back legs wide enough to support the seated pose.
- Sew the toe tips onto each visible foot.
- Attach the wings at the upper back, angled slightly outward and upward.
- Sew the tail behind the body, curve it around the dragon, then attach the tail stripe and leaf-shaped tip.
Technical Tips That Actually Matter
Neck firmness:
Stuff the neck harder than the head. A soft neck bends forward under the head weight and ruins the clean side profile.
Horn symmetry:
Pin both horns before sewing either one. Even a 4 to 5 mm difference in angle is obvious from the front.
Belly panel alignment:
Center the cream strip before attaching the front legs. If the panel drifts, the whole dragon looks twisted.
Wing placement:
Keep the wings behind the shoulder line. Too far forward and the neck silhouette gets crowded immediately.
Tail curve:
Leave the last third of the tail underfilled. A fully stuffed tail fights the looped pose and lifts off the surface.
Toe spacing:
Attach all toe tips with pins first. Uneven spacing shows clearly on pale feet, especially in front-facing photos.
Leaf tip scale:
Do not oversize the tail fin. A tip that is too large pulls attention away from the head and makes the tail look heavy.
SEO Notes and Search Positioning
This design fits a strong pastel fantasy plush niche. The best target phrase is mint dragon amigurumi crochet pattern, supported by terms like dragon crochet pattern pdf, pastel dragon amigurumi, long tail dragon crochet pattern, and baby dragon amigurumi. Use those naturally in image alt text, product descriptions, and FAQ sections. The slim neck, cream belly, and looped tail already make the page specific enough to stand apart.
Conclusion
This mint dragon amigurumi crochet pattern works because the silhouette stays disciplined. The neck is long but supported, the belly panel sharpens the front view, the wings stay secondary, and the tail finishes the composition instead of trailing away. Keep the seams centered, match the horns carefully, and treat the tail curve as a structural feature rather than decoration. Share the finished dragon on Pinterest and Instagram with #MintDragonPattern.
Question for the post comments: would you keep the leaf-shaped tail tip, or swap it for a classic pointed dragon tail on the same mint body?










Want to join inner circle
renner.donna@yahoo.com