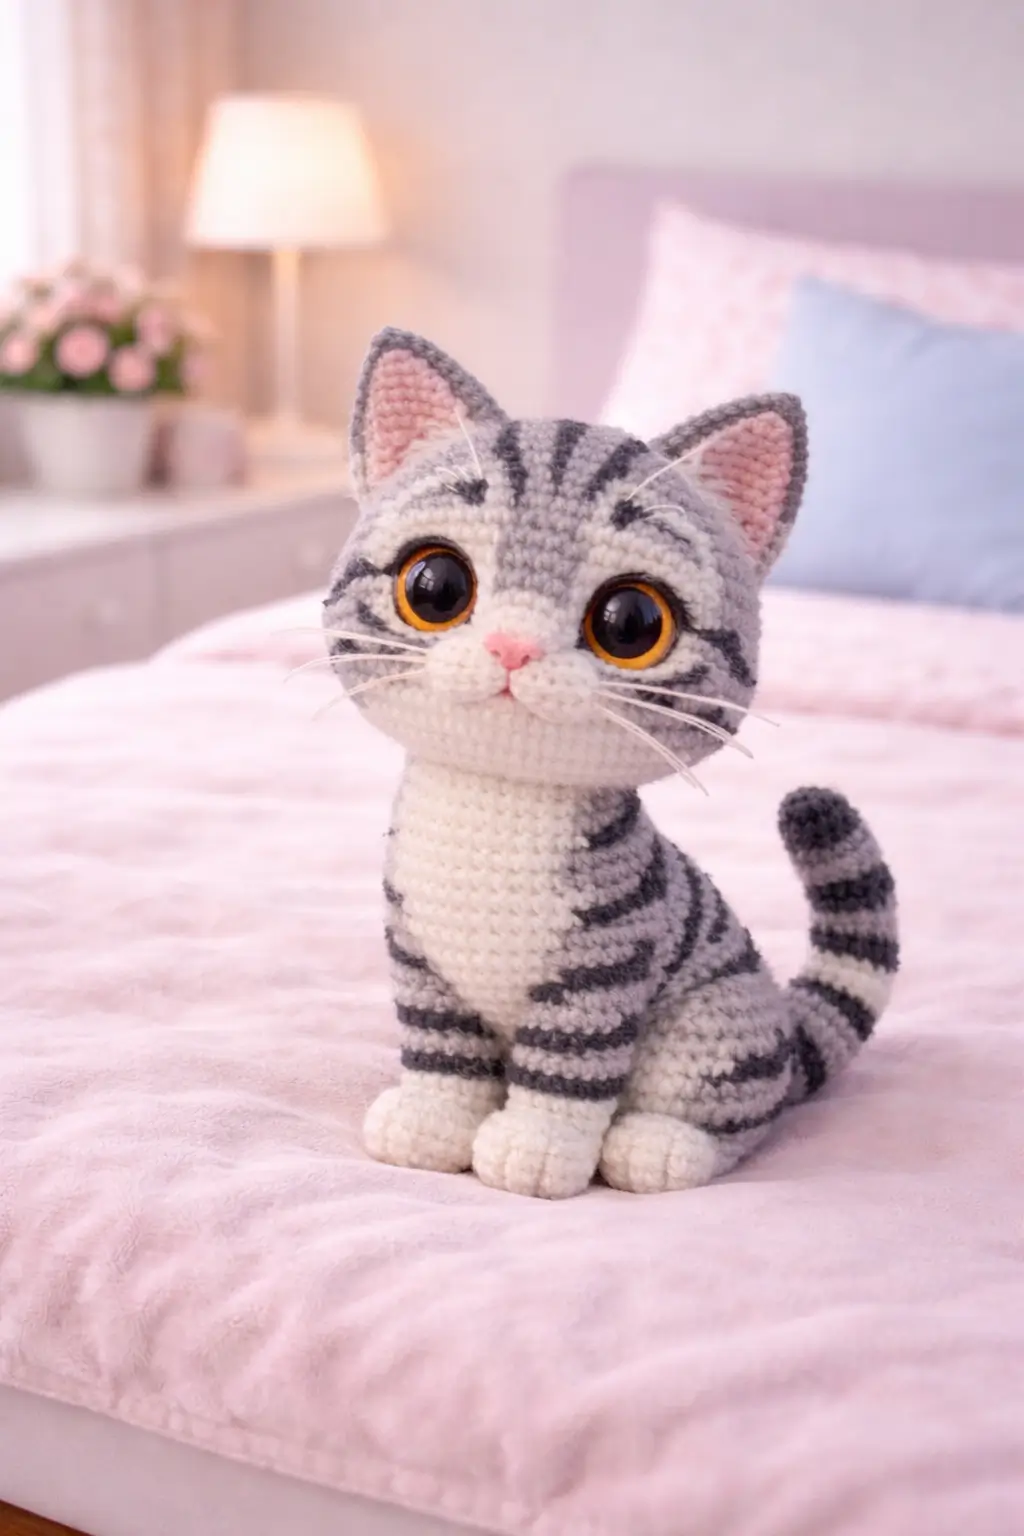
A tabby cat like this fails in one place first: stripe placement. Not the ears. Not the tail. The stripes. This gray tabby cat amigurumi crochet pattern is shaped for the exact plush style in the photo, with a rounded head, oversized safety eyes, cream muzzle and chest, upright ears, short legs, and a curved striped tail that finishes the silhouette cleanly.
Why This Tabby Cat Design Works
This plush reads as a kitten because the proportions stay compressed. The head is large, the neck is almost absent, and the body is short and upright instead of long and realistic. Good decision. A longer torso would pull the design toward a standing pet portrait, which is not what this photo is doing.
The cream front panel matters more than it first appears. It separates the face from the stripes, frames the eyes, and gives the whole toy a centered front view. Without that lighter section, the muzzle would blend into the cheek markings and the expression would flatten. Same issue with the whiskers. Thin, light whiskers add contrast without adding bulk.
The stripe map does most of the species work. Forehead lines, cheek stripes, shoulder bands, and tail rings are enough. More than that becomes noisy. Less than that and the cat stops reading as a tabby immediately.
Project Snapshot
| Item | Pattern Target |
|---|---|
| Character type | Gray tabby kitten plush |
| Skill level | Intermediate |
| Yarn | DK cotton or light worsted cotton blend |
| Hook size | 2.75 mm to 3.25 mm |
| Safety eyes | 16 mm to 20 mm |
| Finished size | Approx. 22–26 cm tall seated |
Materials and Tools
- Main yarn: light gray DK cotton or light worsted yarn
- Accent yarn: cream or white for muzzle, chest, and paws
- Stripe yarn: charcoal gray or black for tabby markings
- Detail yarn: soft pink for nose and inner ears
- Hook: 2.75 mm for tighter shaping or 3.25 mm for slightly softer fabric
- Safety eyes: 18 mm works well for the oversized look in the photo
- Stuffing: polyester fiberfill
- Tapestry needle
- Stitch markers
- Straight pins
- Nylon thread or stiff white thread for whiskers
Abbreviations
MR = magic ring
sc = single crochet
inc = increase
dec = invisible decrease
sl st = slip stitch
ch = chain
hdc = half double crochet
st = stitch
Use invisible decrease throughout. Standard decreases leave diagonal dents across the cream muzzle and chest panel, and those show clearly in front-facing photos.
Character Breakdown From the Photo
- large rounded kitten head
- cream muzzle and lower face
- oversized round safety eyes
- pink nose
- white whiskers
- two upright ears with pink inner detail
- forehead and cheek tabby stripes
- cream chest and front body
- short front legs with cream paws
- seated back legs
- gray striped body
- curved striped tail
Step-by-Step Gray Tabby Cat Pattern
This custom pattern is written to match the photographed plush and uses standard amigurumi shaping. The tabby stripes can be embroidered after assembly or worked as planned color changes if you prefer a cleaner integrated finish.
Head (Make 1)
Yarn: Start in cream for muzzle area, continue in gray
Source: Standard amigurumi math
R1: 6 sc in MR (6)
R2: inc x6 (12)
R3: (sc 1, inc) x6 (18)
R4: (sc 2, inc) x6 (24)
R5: (sc 3, inc) x6 (30)
R6: (sc 4, inc) x6 (36)
R7: (sc 5, inc) x6 (42)
R8-R12: sc around (42)
Change the lower front section to cream or add a cream face patch later.
R13: (sc 5, dec) x6 (36)
R14: sc around (36)
Insert eyes between R9 and R10, spaced 8 stitches apart.
R15: (sc 4, dec) x6 (30)
R16: (sc 3, dec) x6 (24)
Stuff firmly, especially the cheeks.
R17: (sc 2, dec) x6 (18)
R18: (sc 1, dec) x6 (12)
R19: dec x6 (6)
Fasten off. Leave 25 cm tail.
Muzzle Patch (Optional Overlay, Make 1)
Yarn: Cream
Source: Standard amigurumi math
R1: ch 7, starting in 2nd ch from hook sc 5, 3 sc in last ch, working on opposite side sc 4, inc in final st (14)
R2: inc, sc 4, inc x3, sc 4, inc x2 (20)
R3: sc around (20)
Fasten off. Leave 20 cm tail.
Sew centered under the eyes if you want sharper contrast between the muzzle and gray cheek stripes.
Ears (Make 2)
Yarn: Gray outer, pink inner detail
Source: Standard amigurumi math
R1: 4 sc in MR (4)
R2: inc x4 (8)
R3: (sc 1, inc) x4 (12)
R4-R5: sc around (12)
Flatten lightly.
Fasten off. Leave 15 cm tail.
Embroider or sew a small pink inner triangle before attaching.
Body (Make 1)
Yarn: Gray with cream front section
Source: Standard amigurumi math
R1: 6 sc in MR (6)
R2: inc x6 (12)
R3: (sc 1, inc) x6 (18)
R4: (sc 2, inc) x6 (24)
R5: (sc 3, inc) x6 (30)
R6: (sc 4, inc) x6 (36)
R7-R11: sc around (36)
Keep the front center cream if you want the same chest panel as the photo.
R12: (sc 4, dec) x6 (30)
R13-R15: sc around (30)
R16: (sc 3, dec) x6 (24)
R17: sc around (24)
Stuff firmly through the center and lower body.
Fasten off. Leave 30 cm tail.
Front Legs (Make 2)
Yarn: Cream paw section, gray upper section
Source: Standard amigurumi math
R1: 6 sc in MR (6)
R2: inc x6 (12)
R3-R4: sc around (12)
Change to gray.
R5: (sc 1, dec) x4 (8)
R6-R10: sc around (8)
Stuff the paw firmly and upper section lightly.
Flatten and fasten off. Leave 18 cm tail.
Back Legs (Make 2)
Yarn: Gray with cream paw base if desired
Source: Standard amigurumi math
R1: 6 sc in MR (6)
R2: inc x6 (12)
R3: (sc 1, inc) x6 (18)
R4-R6: sc around (18)
R7: (sc 1, dec) x6 (12)
R8-R11: sc around (12)
Stuff firmly and shape into seated haunches.
Fasten off. Leave 20 cm tail.
Tail (Make 1)
Yarn: Gray with embroidered or changed-color stripes
Source: Standard amigurumi math
R1: 4 sc in MR (4)
R2: inc x4 (8)
R3-R6: sc around (8)
R7: (sc 3, inc) x2 (10)
R8-R22: sc around (10)
Stuff firmly at the base and lightly through the upper curve.
Fasten off. Leave 25 cm tail.
Curve the tail upward during assembly so it frames the right side of the body like the photo.
Face Embroidery
Materials: pink yarn, charcoal yarn, white whisker thread
Embroider a small pink triangular nose between the eyes and muzzle center. Add short forehead stripes, cheek stripes, and two tiny brow marks. Insert 3 whiskers on each side. Keep them thin and evenly fanned.
Body Stripes
Material: charcoal gray yarn
Embroider curved horizontal stripes across the shoulders, sides, and tail. Use short tapered lines instead of long straight bands. Tabby stripes that end in blunt blocks look heavy on a small plush.
Assembly
- Sew the muzzle patch to the lower front of the head if using it.
- Insert the eyes before final closure and check symmetry from the front.
- Embroider the pink nose, forehead stripes, cheek stripes, and brows.
- Attach the ears high on the head, angled slightly outward.
- Add the whiskers after all face embroidery is done.
- Sew the head to the body with the chin slightly forward.
- Attach the front legs low and close together for the upright kitten pose.
- Sew the back legs wider apart to support the seated body.
- Attach the tail high at the back and curve it upward before closing the final stitches.
- Finish the body and tail stripes last so the pattern flows cleanly across the full silhouette.
Technical Tips That Actually Matter
Stripe mapping:
Pin or sketch the forehead stripes before stitching them. One misplaced center stripe changes the whole expression.
Eye spacing:
Check both eyes from straight on, not only from above. A 2 mm mismatch is obvious on a cat face with large round eyes.
Muzzle contrast:
Keep the cream muzzle broad enough to sit outside the nose area. A narrow patch makes the face look pinched.
Whisker stiffness:
Use firm thread, not soft yarn, for the whiskers. Soft strands droop and lose the clean side profile fast.
Front leg distance:
Do not set the front legs too wide. Wide spacing makes the kitten look squat instead of upright.
Tail curve:
Underfill the last third of the tail slightly. A fully packed tail resists the upward bend and sticks outward.
Ear angle:
Set both ears before sewing either one permanently. Even a small tilt difference changes the kitten from curious to uneven-looking.
SEO Notes and Search Positioning
This design fits a strong pet-plush niche. The best target phrase is gray tabby cat amigurumi crochet pattern, supported by terms like cat crochet pattern pdf, tabby cat amigurumi, crochet kitten pattern, and striped cat crochet pattern. Use those naturally in image alt text, product descriptions, and FAQ sections. The oversized eyes, cream muzzle, and tabby striping already make the page specific enough to rank on a narrower intent set.
Conclusion
This gray tabby cat amigurumi crochet pattern works because the structure stays simple while the markings do the species work. The head remains broad, the muzzle stays bright, the body stays compact, and the curved tail finishes the pose without cluttering it. Keep the stripe map restrained, match the eyes carefully, and add the whiskers only after the face is fully centered. Share the finished kitten on Pinterest and Instagram with #GrayTabbyCatPattern.
Question for the post comments: would you keep this silver tabby palette, or turn the same kitten into a warm brown tabby version with darker stripes?










perfecta explicación. muy fiable . gracias por el trabajo