Introduction
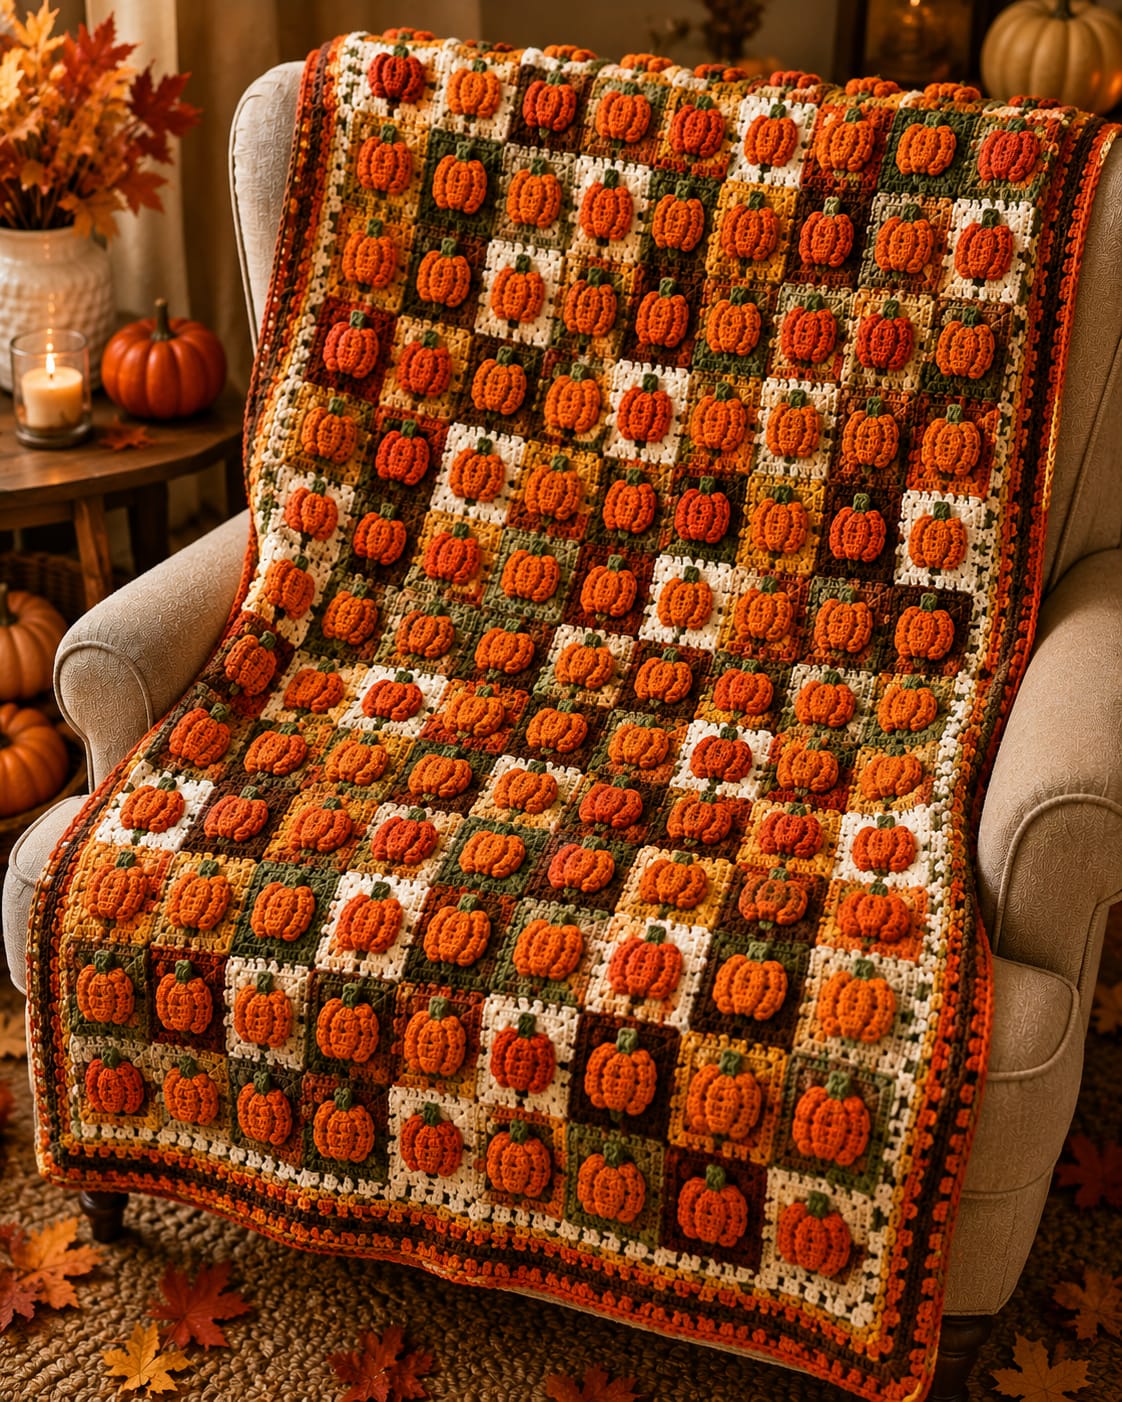
One hundred eight pumpkin stems turn a five-millimeter square error into a visible diagonal by the bottom border. This mini pumpkin granny square blanket pattern uses worsted yarn with 4 mm and 3.5 mm hooks to make an approximately 105 × 138 cm throw. Small raised pumpkins, four fall background colors and a dark joining grid create an intermediate modular project built for controlled batch production.
The Design: What Makes This Pumpkin Blanket Different
The scale is the defining decision. Each block finishes near 10.5 cm, so nine columns and twelve rows can fit more than one hundred pumpkins into a standard throw without making the motifs overlap. Cream, moss, mustard and brown squares rotate through the field, while one consistent orange pumpkin ties the entire patchwork together. The pumpkins are shallow dimensional appliqués rather than flat graphics; six half-double-crochet stitches create the height, and fourteen back-loop rows produce the narrow vertical ribs. Dark joining yarn frames every block and stops neighboring background colors from visually merging. A common mistake with a small pumpkin granny square blanket is accepting slightly different square sizes because each error appears minor. Across nine columns, even a 4 mm difference can create several centimeters of row-width drift.
Project Info at a Glance
| Skill Level | Time | Finished Size | Hooks | Best For |
|---|---|---|---|---|
| Intermediate | 45–60 hours | Approx. 105 × 138 cm | 4.0 mm squares / 3.5 mm pumpkins | Fall throws, patchwork blankets and high-repeat motif projects |
Materials and Tools
Yarn
- Warm cream — worsted / Aran #4 — approximately 330–400 g — 27 background squares and border.
- Moss / olive green — worsted / Aran #4 — approximately 300–360 g — 27 background squares, pumpkin stems and border.
- Mustard gold — worsted / Aran #4 — approximately 260–320 g — 27 background squares and border accents.
- Rust / chocolate brown — worsted / Aran #4 — approximately 330–390 g — 27 background squares, visible joins and border.
- Pumpkin orange — worsted / Aran #4 — approximately 420–500 g — 108 raised pumpkins and border accent.
Use yarns with similar twist and thickness. One softer color can grow several millimeters larger during blocking even when every square contains identical rounds.
Tools
- 4.0 mm crochet hook for granny squares and border
- 3.5 mm crochet hook for mini pumpkins and stems
- Polyester fiberfill or clean yarn scraps — small amount for shallow pumpkin padding
- Yarn needle
- Stitch markers
- Blocking mats
- Rust-resistant pins
- Scissors
- Measuring tape
Abbreviations
- MR — magic ring
- ch — chain
- sc — single crochet
- hdc — half double crochet
- dc — double crochet
- sl st — slip stitch
- inc — increase
- dec — decrease
- BLO — back loop only
An invisible decrease is worked through the front loops of two neighboring stitches before completing one single crochet through both loops.
Pattern — Step by Step
Make one complete blocked square and one finished pumpkin before beginning the full batch. The working target is 10.5 cm per square and approximately 5.5–6.5 cm per pumpkin.
Mini Granny Square — Make 108
Yarn: cream, olive, mustard or brown — original reconstruction using standard granny-square geometry.
R1: Make an MR. Ch 3, 2 dc, ch 2. Work (3 dc, ch 2) three more times into the ring. Join with sl st.
R2: Sl st into the first corner. Work (3 dc, ch 2, 3 dc) in the corner, ch 1. Repeat in all remaining corners. Join.
R3: Work (3 dc, ch 2, 3 dc) in each corner. Work one 3-dc group into each side space, placing ch 1 between neighboring groups. Join.
R4: Repeat R3, adding one new 3-dc group in every side space created by the preceding round. Join.
Fasten off.
Target before blocking: approximately 9.5–10 cm.
Square Stabilizing Round
Join the same background color in one corner.
Ch 1.
Sc in each dc and once in every ch-1 side space.
At each corner work (sc, ch 1, sc).
Join and fasten off.
Target blocked measurement: 10–11 cm, with 10.5 cm used for the reconstruction.
Background Color Quantities
Make approximately 27 cream squares.
Work another 27 in moss or olive.
Make 27 mustard squares.
Finish the background batch with 27 brown or rust squares.
This produces 108 blocks total.
If one color is intended to dominate, move three to six squares from another shade into that group while preserving the full 108-block count.
Block the Square Batch
Block the first ten squares before crocheting the complete batch.
Pin each to 10.5 cm.
Measure both diagonals.
Keep individual blocks within approximately 3–4 mm of the target.
Once the gauge is stable, continue in batches of twelve.
Do not stretch undersized blocks aggressively because the difference will return after the blanket is washed.
Mini Raised Pumpkin — Make 108
Yarn: pumpkin orange — original shallow BLO pumpkin reconstruction.
Foundation: ch 7.
Row 1: starting in the second chain, hdc across. (6)
Row 2: ch 1, turn, hdc BLO across. (6)
Row 3: ch 1, turn, hdc BLO across. (6)
Row 4: ch 1, turn, hdc BLO across. (6)
Row 5: ch 1, turn, hdc BLO across. (6)
Row 6: ch 1, turn, hdc BLO across. (6)
Row 7: ch 1, turn, hdc BLO across. (6)
Row 8: ch 1, turn, hdc BLO across. (6)
Row 9: ch 1, turn, hdc BLO across. (6)
Row 10: ch 1, turn, hdc BLO across. (6)
Row 11: ch 1, turn, hdc BLO across. (6)
Row 12: ch 1, turn, hdc BLO across. (6)
Row 13: ch 1, turn, hdc BLO across. (6)
Row 14: ch 1, turn, hdc BLO across. (6)
Fasten off with approximately 30 cm of orange yarn.
Target relaxed panel: approximately 4–4.5 cm high × 11–12 cm long.
Seam the Mini Pumpkin
Bring Row 1 and Row 14 together.
Match all six stitch positions.
Use mattress stitch to join the short edges.
Pull only until the edges meet.
A tight seam creates one valley much deeper than the other thirteen ribs.
Gather the Lower Edge
Thread orange yarn through the fourteen row ends.
Pull in two stages.
Pause when the opening measures approximately 12 mm and distribute the folds.
Continue until the hole reaches about 5–6 mm.
Cross the center once.
Add Shallow Padding
Use a pinch of fiberfill or several short orange yarn scraps.
Place most of the material behind the outer ribs.
Leave the center soft.
The appliqué needs only about 5–8 mm of projection after attachment.
A densely stuffed mini pumpkin becomes hard and adds excessive weight when multiplied 108 times.
Gather the Upper Edge
Thread through all fourteen remaining row ends.
Pull to approximately 5–6 mm.
Press the two gathered centers toward one another.
Shape the body into a broad oval approximately 5.5–6.5 cm wide.
Secure on the rear.
Define Three Broad Pumpkin Sections
The back-loop rows create fine ribs automatically.
Add two shallow sculpting strands to divide the pumpkin visually into three broader sections.
Run matching orange yarn from rear center, over a low channel and back through the pumpkin.
Pull only about 2–3 mm deeper than the surrounding ribs.
Repeat on the opposite side.
Tiny Olive Stem — Make 108
Yarn: moss / olive green.
Ch 5.
Starting in the second chain, sl st in each chain. (4)
Fasten off with a 12 cm sewing tail.
Fold the stem slightly and sew approximately 8–10 mm behind the upper pumpkin center.
Batch the Pumpkins Efficiently
Crochet all orange panels first.
Stack them in groups of twelve.
Check the long measurement of each group before seaming.
Next close all tubes.
Gather every lower edge, then pad and close the upper edges in a separate pass.
This production sequence makes dimensional drift easier to detect than completing one pumpkin from start to finish 108 times.
Standardize the Pumpkin Batch
Use one finished pumpkin as the master sample.
Target about 6 cm wide.
Keep every motif within approximately 5 mm of that width.
Compare depth by placing several pumpkins side by side on a table.
Remove padding from any piece that rises more than approximately 3 mm above the group average.
Attach One Pumpkin to Each Square
Place a pumpkin in the center of a blocked square.
Keep approximately 20–22 mm of background visible at each side.
Point the green stem toward the designated top edge.
Pin the pumpkin at four points.
Sew around the rear perimeter with orange yarn.
Leave the raised center unsewn.
Check the Decorated Square
Lay the completed block on a hard surface.
All four corners should remain flat.
If a corner lifts more than approximately 3 mm, the pumpkin attachment is too tight.
Loosen several perimeter stitches before continuing the batch.
Measure the square again after attachment.
Suggested 9 × 12 Color Layout
Use a rotating four-color sequence rather than a strict two-color checkerboard.
Row 1: Cream – Olive – Mustard – Brown – Cream – Olive – Mustard – Brown – Cream.
Row 2: Brown – Cream – Olive – Mustard – Brown – Cream – Olive – Mustard – Brown.
Row 3: Mustard – Brown – Cream – Olive – Mustard – Brown – Cream – Olive – Mustard.
Row 4: Olive – Mustard – Brown – Cream – Olive – Mustard – Brown – Cream – Olive.
Repeat these four rows three times to produce twelve rows total.
This rotation distributes the four background colors across the complete throw instead of forming long vertical color bands.
Lay Out All 108 Blocks
Place nine decorated squares across the first row.
Build twelve horizontal rows.
Check that every stem points toward the same top edge.
Photograph the layout before moving the blocks.
Stack each row separately and label the stacks 1 through 12.
Join the Nine-Square Rows
Yarn: dark chocolate brown.
Place two squares beside each other with right sides facing upward.
Slip stitch through corresponding edge loops.
Keep the seam relaxed.
Add the remaining squares until Row 1 contains nine blocks.
Repeat for all twelve rows.
Measure the Horizontal Strips
Each nine-square strip should finish close to the same width.
Target approximately 94–96 cm before the outer border, depending on join width.
Keep row-width variation below about 10 mm.
A tight seam should be reopened immediately rather than corrected by stretching during final blocking.
Join the Twelve Rows
Place Row 1 above Row 2.
Pin all eight vertical square intersections first.
Slip stitch across in dark brown.
Repeat until all twelve strips are connected.
Check every grid intersection before proceeding to the next row.
Reinforce Grid Intersections
Where four squares meet, inspect the dark join.
If a small opening remains, use one brown reinforcing stitch through the central loops.
Keep the stitch relaxed.
The intersection should lie flat rather than forming a dark knot.
Border Round 1 — Dark Brown
Join dark brown at one corner.
Sc evenly around the full perimeter.
Skip duplicated joining loops.
Work (2 sc, ch 2, 2 sc) in every corner.
Join.
Border Round 2 — Olive
Join olive.
Hdc in every stitch around.
At each corner work (2 hdc, ch 2, 2 hdc).
Join.
Border Round 3 — Cream
Join cream.
Repeat sc, ch 1, skip 1 along each straight edge.
At every corner work (sc, ch 2, sc).
Join.
Border Round 4 — Pumpkin Orange
Join orange into one ch-1 space.
Sc in every sc and every ch-1 space.
Work (sc, ch 2, sc) in each corner.
Join.
Border Round 5 — Dark Brown
Join dark brown.
Hdc evenly around.
Work (2 hdc, ch 2, 2 hdc) in every corner.
Join.
Final Orange Edge
Join pumpkin orange.
Sc once around the complete perimeter.
Work (sc, ch 1, sc) at each corner.
Fasten off.
Assembly
- Crochet 108 four-round granny squares plus their stabilizing rounds, distributing the blocks among cream, olive, mustard and brown.
- Block every square to approximately 10.5 cm and reject or rework blocks that differ from the target by more than about 4 mm.
- Make 108 orange pumpkin panels using 6 hdc across and 14 BLO rows, then seam every panel into a short ribbed tube.
- Gather both ends, add minimal padding and shape each pumpkin to approximately 5.5–6.5 cm wide with only 5–8 mm of projection.
- Crochet 108 tiny olive stems and sew one behind the upper center of every orange pumpkin.
- Center one pumpkin on every background block and attach through its rear perimeter while leaving the dimensional center free.
- Arrange the finished blocks nine across and twelve down, following the four-color rotation and checking that all stems point upward.
- Join nine blocks into each horizontal strip with dark brown slip stitches, then connect all twelve strips while aligning every intersection.
- Work the dark-brown, olive, cream, orange and dark-brown border rounds followed by the final narrow orange edge.
- Block the finished grid from the outer edges and joining lines only, then reshape each pumpkin with your fingers after the blanket is dry.
The completed blanket should show 108 compact raised pumpkins over a dense four-color fall grid with straight dark joins and a narrow multicolor frame.
7 Technical Tips
- Rows become progressively wider: Square-size errors are accumulating across nine blocks. Keep every blocked square within approximately 3–4 mm of the 10.5 cm target before joining.
- Mini pumpkin makes the square cup: Its sewing thread is tighter than the background. Keep attachment points approximately 8–10 mm apart and loosen the seam if a corner rises more than about 3 mm.
- Pumpkins finish at different widths: Fourteen BLO rows are being worked at inconsistent tension. Compare every twelve-panel batch and keep the relaxed panel length within approximately 5 mm.
- Pumpkin blanket becomes excessively heavy: The motifs contain too much fiberfill. Use only enough padding for about 5–8 mm of finished projection.
- Brown joining grid waves: Slip stitches are shorter than the square edges. Join with both blocks lying flat and reopen any seam that shortens a 10.5 cm edge by more than about 3 mm.
- Stems point in different directions: Blocks were stacked without recording orientation. Mark the top edge of every completed square and photograph the nine-by-twelve layout before joining.
- Outer border flares: Extra loops are being counted where dark seams reach the perimeter. Skip duplicated join loops and add stitches only at the stated corner positions.
Why the Small Square Scale Works
The photograph depends on density. A six-inch granny square would reduce the number of pumpkins dramatically and create a completely different visual rhythm.
Blocks around 10–11 cm allow nine motifs to fit across a practical throw width.
That dimension is also well supported by published worsted pumpkin squares, several of which finish around 10–11 cm.
The mini pumpkin then occupies slightly more than half of the block width, leaving enough background color visible to make the four-color patchwork readable.
Why Every Square Gets a Pumpkin
Many pumpkin blankets alternate pumpkin blocks with plain fall-colored squares.
This mini pumpkin granny square blanket pattern uses the opposite strategy.
Every block carries the same orange focal motif.
Variation comes from the background instead.
That decision turns the blanket into a pumpkin patch rather than a checkerboard with occasional seasonal accents.
It also means motif consistency is more important: one oversized pumpkin becomes much easier to spot when surrounded by nearly identical neighbors.
Batching 108 Pumpkins
Do not treat 108 appliqués as 108 independent projects.
Separate the work into manufacturing stages.
First crochet the orange rectangles.
Next seam the rectangles.
Gather all lower edges, then complete padding and upper gathering.
Finish with stems and attachment.
Working twelve motifs per batch provides a useful checkpoint and corresponds naturally to the twelve blanket rows.
Controlling the Four Background Colors
Cream gives the strongest contrast with orange.
Olive connects the squares visually to the stems.
Mustard adds a lighter warm value, while brown creates darker patches that connect to the joining grid.
Rotate the colors rather than building vertical stripes.
The four-row sequence in the pattern moves each color one position on every new row, distributing light and dark blocks through the complete field.
Changing the Blanket Size
For a smaller lap blanket, arrange seven columns by nine rows for 63 blocks. A current published pumpkin blanket uses this exact 7 × 9 block count with larger six-inch squares, although the miniature version here would finish substantially smaller at a 10.5 cm block gauge.
An eight-by-ten layout requires 80 pumpkins.
A ten-by-twelve layout requires 120.
Keep the block dimensions constant when the goal is to preserve the dense pumpkin-patch appearance.
Changing the Pumpkin Size
For a flatter pumpkin, omit padding entirely and press both gathered centers together.
For a slightly larger motif, work 7 hdc across and 16 BLO rows.
Test the larger version on a blocked square before making a batch.
The pumpkin should leave at least about 15–20 mm of visible background near its widest points.
If it reaches the joining seam, the block loses its framed appearance.
Changing the Background Palette
Rust, cream, olive and mustard match the reference closely.
A softer harvest palette can replace dark brown with taupe.
For stronger contrast, substitute deep forest green for moss.
A Halloween version can use cream, black, purple and orange backgrounds while keeping the pumpkin bodies bright orange.
Repeat each selected background color often enough that no shade appears as an isolated square.
Controlling Blanket Weight
More than one hundred appliqués can add significant mass.
Use shallow padding.
Acrylic or light cotton blends also reduce weight compared with dense mercerized cotton.
Keep the dark joining seams flat rather than raised.
The visual depth should come from the pumpkins, not from every structural element at the same time.
Final Blocking
Pin the four blanket corners first.
Mark the midpoint of every side.
Add pins where selected joining lines reach the outer border.
Do not compress the pumpkin centers under a blocking mat or heavy cloth.
Allow the grid to dry flat.
Afterward, lift each ribbed pumpkin surface by hand and check that every olive stem still points toward the same edge.
Conclusion
Standardize the first twelve blocks before committing to the remaining ninety-six because small errors multiply quickly across this grid. Your next step is to block one 10.5 cm square, make a 6 cm pumpkin and test its shallow attachment before batching the project. Keep the appliqués lightly padded and the dark joins relaxed. Share the finished mini pumpkin granny square blanket pattern project on Pinterest with the full nine-by-twelve grid visible, then post a close-up on Instagram using #MiniPumpkinPatchBlanket. For this blanket specifically, would you keep all 108 pumpkins orange or add a few mustard pumpkins?









