Introduction
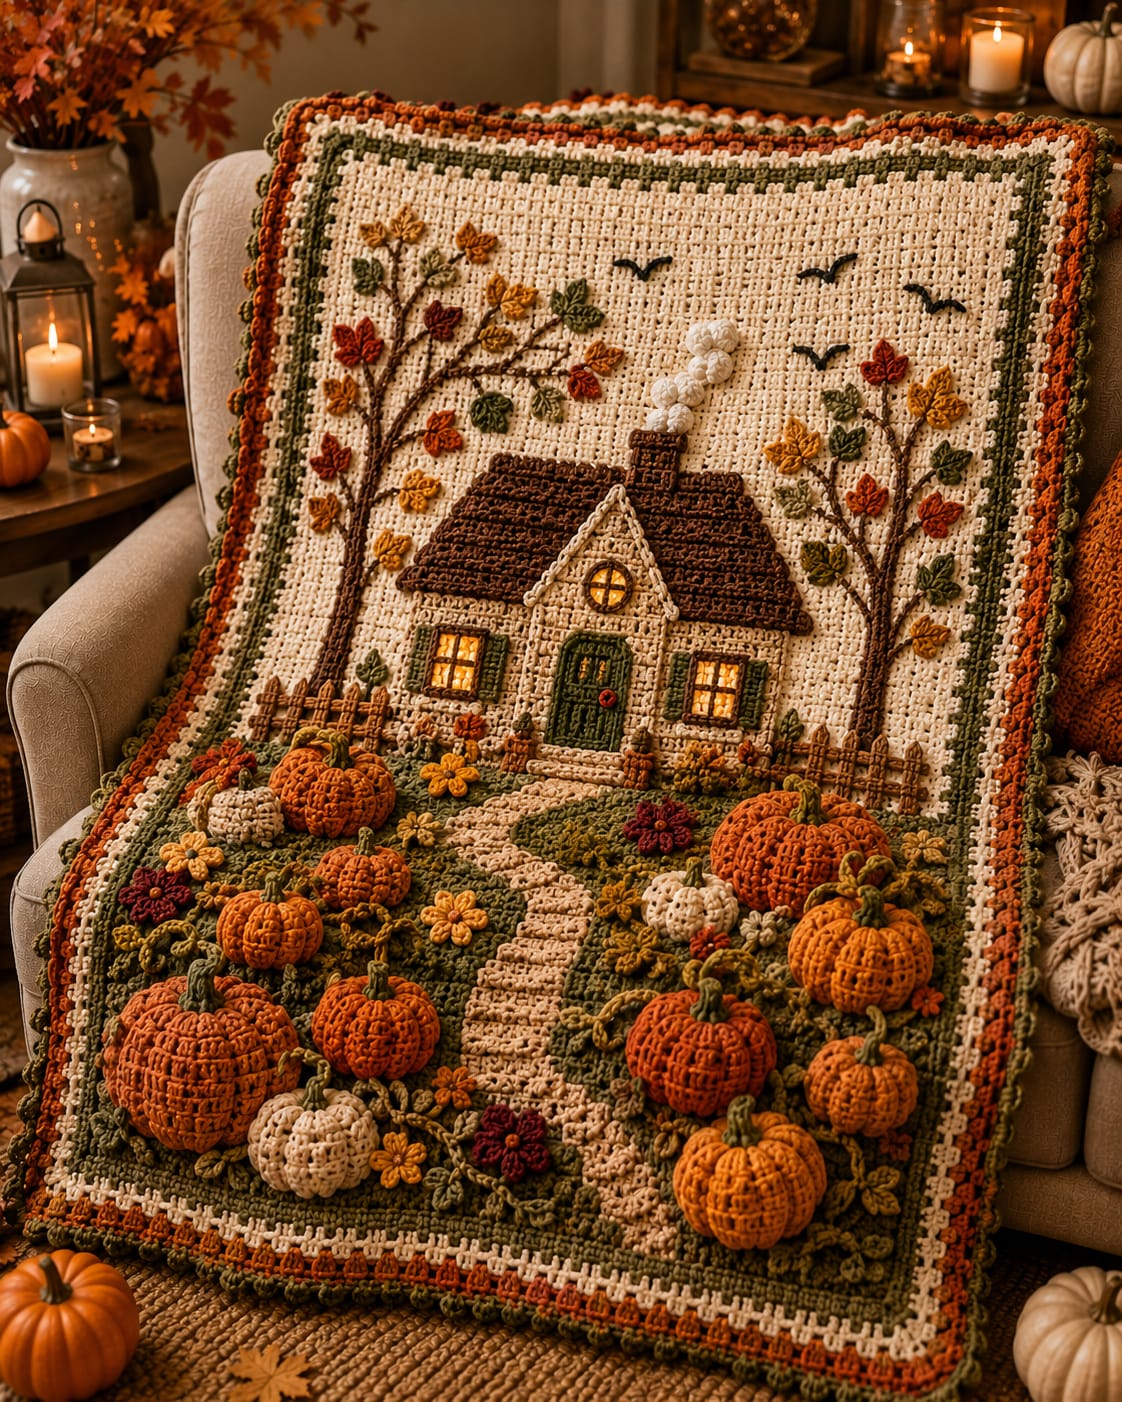
A pumpkin at the bottom of this landscape can project 15 mm, while the cottage roof above it needs to stay almost flat. This autumn cottage crochet blanket pattern uses worsted yarn with 5 mm and 4 mm hooks to make an approximately 115 × 150 cm throw. A cream field, dimensional pumpkin garden, cottage, trees and winding path create an advanced-intermediate appliqué project.
The Design: What Makes This Autumn Cottage Different
The blanket is constructed as one illustrated scene instead of a grid of repeated blocks. A cream upper field gives the cottage, smoke and autumn trees enough negative space, while a moss-green lower garden supports raised pumpkins without making the entire throw three-dimensional. The cream path narrows toward the cottage, creating visual depth through simple changes in appliqué width. Most architectural pieces remain flat, but the pumpkins project about 8–15 mm so the lower garden reads as a separate foreground plane. Two branched trees frame the cottage and stop the roof from appearing isolated against the cream field. A common failure in a pumpkin garden crochet blanket is overfilling every pumpkin. The lower section then becomes substantially heavier than the cottage area and pulls the blanket out of square when it hangs over a chair.
Project Info at a Glance
| Skill Level | Time | Finished Size | Hooks | Best For |
|---|---|---|---|---|
| Advanced Intermediate | 45–60 hours | Approx. 115 × 150 cm | 5.0 mm field / 4.0 mm appliqués | Fall display throws, wall blankets and harvest décor |
Materials and Tools
Yarn
- Warm cream — worsted / Aran #4 — approximately 950–1,100 g — main field, cottage walls, path, smoke and border.
- Moss / olive green — worsted / Aran #4 — approximately 350–430 g — garden ground, door, leaves, vines and border.
- Pumpkin orange / rust — worsted / Aran #4 — approximately 350–430 g — dimensional pumpkins, autumn leaves and border.
- Chocolate brown — worsted / Aran #4 — approximately 250–320 g — roof, chimney, tree branches, fence, window frames and border.
- Mustard gold — worsted / Aran #4 — approximately 60–80 g — autumn leaves, flowers and window glow.
- Brick red / burgundy — worsted / Aran #4 — approximately 40–60 g — leaves and flower accents.
- Black — small quantity — flying birds and optional window detail.
Choose one yarn family for the five main colors. Different yarn thicknesses can distort the long border or make one pumpkin size noticeably heavier than its neighbors.
Tools
- 5.0 mm crochet hook for the blanket field and border
- 4.0 mm crochet hook for cottage pieces, pumpkins, leaves and flowers
- Polyester fiberfill — approximately 100–150 g
- Yarn needle
- Long tapestry needle
- Stitch markers
- Dressmaking pins
- Blocking mats
- Rust-resistant pins
- Scissors
- Measuring tape
Abbreviations
- MR — magic ring
- ch — chain
- sc — single crochet
- hdc — half double crochet
- dc — double crochet
- tr — treble crochet
- inc — increase
- dec — decrease
- sl st — slip stitch
- BLO — back loop only
An invisible decrease is worked through the front loops of two neighboring stitches before completing one single crochet through both loops.
Pattern — Step by Step
Make the cream blanket field first. Block it before adding any landscape section, because every cottage and garden measurement depends on the finished rectangle.
Main Cream Blanket Field
Yarn: warm cream — original reconstruction based on the visible blanket proportions.
Foundation: ch 157.
Row 1: starting in the second chain, sc across. (156)
Row 2: ch 2, turn, hdc across. (156)
Row 3: ch 1, turn, sc across. (156)
Rows 4–184: repeat Rows 2–3.
Fasten off.
Target before border: approximately 105–108 cm wide × 137–141 cm long after blocking.
Block and Mark the Landscape
Pin the cream field to the target dimensions.
Mark a horizontal line approximately 56–60 cm above the lower edge.
This divides the green garden from the cream sky.
Mark the vertical center.
The cottage should sit above the garden line with its door centered approximately 3–5 cm from the blanket midpoint.
Green Garden Overlay
Yarn: moss / olive green.
Ch 157.
Row 1: starting in the second chain, sc across. (156)
Row 2: ch 2, turn, hdc across. (156)
Row 3: ch 1, turn, sc across. (156)
Rows 4–70: repeat Rows 2–3.
Fasten off.
Block to the same width as the cream field.
Sew the bottom and two side edges to the lower blanket section.
Use small relaxed stitches approximately 10–12 mm apart through the upper edge.
Texture the Garden
Use green surface slip stitches to add loose winding lines across the garden.
Keep the paths irregular.
Do not work a continuous dense surface layer.
The raised pumpkins and flowers should supply most of the foreground texture.
Main Cottage Wall
Yarn: warm cream.
Ch 73.
Row 1: starting in second chain, 72 sc. (72)
Rows 2–38: ch 1, turn, sc across. (72)
Fasten off.
Target approximately 52–56 cm wide × 27–30 cm high.
Position the Cottage Wall
Center the wall above the green garden.
The lower wall edge should overlap the garden by approximately 15–20 mm.
Pin all four corners and the midpoint of each side.
Sew around the perimeter with cream yarn.
Left Roof Panel
Yarn: chocolate brown.
Ch 45.
Row 1: 44 hdc. (44)
Rows 2–6: ch 1, turn, 44 hdc. (44)
Row 7: dec, 40 hdc, dec. (42)
Row 8: dec, 38 hdc, dec. (40)
Row 9: dec, 36 hdc, dec. (38)
Row 10: dec, 34 hdc, dec. (36)
Fasten off.
Right Roof Panel
Repeat the left roof panel.
Attach the Main Roof
Overlap the two brown panels slightly at the center.
Allow each outer edge to extend approximately 20–25 mm beyond the cottage wall.
Sew the upper and side edges firmly.
Leave the lower roof edge slightly freer so it casts a shallow dimensional line above the windows.
Center Gable
Yarn: warm cream.
Ch 29.
Row 1: 28 sc. (28)
Row 2: dec, 24 sc, dec. (26)
Continue reducing one stitch at each side every row until 2 stitches remain.
Fasten off.
Pin the triangle over the center roof seam and sew around its outer edges.
Gable Trim
With cream yarn, ch enough to follow both sloping gable edges.
Sl st back through the chain.
Sew the cord over the triangle edges.
Chimney
Yarn: chocolate brown.
Ch 9.
Row 1: starting in second chain, 8 sc. (8)
Rows 2–12: ch 1, turn, 8 sc. (8)
Fasten off.
Sew behind the roof near the center-left area.
Smoke Puff — Make 6
Yarn: warm cream — standard flat-circle math.
R1: 6 sc in MR (6)
R2: inc ×6 (12)
For three of the puffs, add:
R3: (sc, inc) ×6 (18)
Fasten off.
Arrange the circles in a loose rising curve above the chimney.
Rectangular Window Center — Make 2
Yarn: mustard gold.
Ch 13.
Row 1: starting in second chain, 12 sc. (12)
Rows 2–10: ch 1, turn, 12 sc. (12)
Fasten off.
Brown Window Frame — Make 2
Ch enough brown yarn to travel around the yellow rectangle.
Sl st back through the complete chain.
Pin around each window center and sew in place.
Window Crossbars — Make 4
Ch 11 with brown.
Sl st back through 10 chains.
Fasten off.
Use one vertical and one horizontal bar per window.
Green Shutter — Make 4
Yarn: moss green.
Ch 6.
Row 1: 5 sc. (5)
Rows 2–10: ch 1, turn, 5 sc. (5)
Fasten off with a sewing tail.
Sew one shutter to each window side.
Round Gable Window
Yarn: mustard and brown.
With mustard:
R1: 6 sc in MR (6)
R2: inc ×6 (12)
R3: (sc, inc) ×6 (18)
Change to brown.
R4: sc around (18)
Fasten off.
Add one vertical and one horizontal brown surface stitch.
Green Cottage Door
Yarn: dark olive green.
Ch 17.
Row 1: starting in second chain, 16 sc. (16)
Rows 2–17: ch 1, turn, 16 sc. (16)
Row 18: dec, 12 sc, dec. (14)
Row 19: dec, 10 sc, dec. (12)
Row 20: dec, 8 sc, dec. (10)
Row 21: dec, 6 sc, dec. (8)
Fasten off.
Add several vertical surface slip stitches for plank texture.
Door Frame
With cream, ch enough to travel up one side, across the arch and down the other.
Hdc back through the chain.
Fasten off with a long sewing tail.
Sew around the door perimeter.
Door Knob
Work 6 sc in MR using brick red or mustard yarn.
Join and fasten off.
Sew to one side of the door.
Front Step — Make 2
Yarn: tan.
Step 1: ch 19, work 18 sc for 4 rows.
Step 2: ch 25, work 24 sc for 4 rows.
Fasten off.
Layer the smaller step above the larger one.
Cream Garden Path
The path widens toward the lower edge. Make five separate cream pieces so the perspective remains controlled.
Path Section 1
Ch 13.
Work 12 sc for 10 rows.
Path Section 2
Ch 17.
Work 16 sc for 12 rows.
Path Section 3
Ch 21.
Work 20 sc for 12 rows.
Path Section 4
Ch 25.
Work 24 sc for 14 rows.
Path Section 5
Ch 31.
Work 30 sc for 14 rows.
Fasten off all pieces.
Assemble the Path
Start the narrowest section directly beneath the cottage steps.
Angle the sections slightly instead of aligning them as one perfectly straight strip.
Overlap neighboring pieces by approximately 5–8 mm.
Sew through the outer edges only.
Small Dimensional Pumpkin — Make 9
Yarn: pumpkin orange or cream — original shallow BLO reconstruction.
Foundation: ch 8.
Row 1: starting in second chain, hdc across. (7)
Rows 2–16: ch 1, turn, hdc BLO across. (7)
Fasten off with a 35 cm tail.
Seam Row 1 to Row 16.
Gather one end.
Add a small pinch of filling.
Gather the second end.
Compress to approximately 7–8 cm wide × 5–6 cm high.
Large Dimensional Pumpkin — Make 5
Yarn: pumpkin orange or cream.
Foundation: ch 12.
Row 1: starting in second chain, 11 hdc. (11)
Rows 2–22: ch 1, turn, hdc BLO across. (11)
Fasten off with a 50 cm tail.
Seam the first and final rows.
Gather both open ends and add shallow filling.
Compress to approximately 11–13 cm wide × 8–9 cm high.
Pumpkin Stem — Make 14
Yarn: olive green.
R1: 6 sc in MR (6)
R2: sc around (6)
R3: sc around (6)
R4: (2 sc, inc) ×2 (8)
Fasten off with a 15 cm tail.
For the smaller pumpkins, use only R1–R3.
Place the Pumpkin Patch
Put the largest pumpkins near the lower foreground.
Use smaller pumpkins closer to the cottage.
Keep the central path visible from the lower border to the front steps.
Alternate orange and cream pumpkins rather than clustering all pale pieces in one area.
Attach the Pumpkins
Sew through the rear perimeter every 10–12 mm.
Leave the ribbed center raised.
Maximum projection should remain about 8 mm for small pumpkins and 12–15 mm for large ones.
Check the green field after every two or three motifs.
Tree Branches — Make 2
Yarn: chocolate brown.
Use surface slip stitches or chain cords to form two branching trunks.
The left tree should rise approximately 43–48 cm.
The right tree can finish approximately 35–40 cm high.
Use one main trunk and four to six smaller branches per tree.
Autumn Leaf — Make 26 to 34
Yarn: rust, mustard, olive and brick red.
Ch 7.
Starting in the second chain:
sl st, sc, hdc, dc, hdc, sc.
Work 3 sc in the final chain.
Return along the opposite side:
sc, hdc, dc, hdc, sc, sl st.
Fasten off.
Sew leaves along the branches at mixed angles.
Small Garden Flower — Make 18 to 24
Yarn: mustard, burgundy, orange or cream.
Work 10 sc in MR.
Repeat five times:
sl st in next stitch, 3 dc in next stitch.
Join and fasten off.
Small Green Garden Leaf — Make 20 to 28
Ch 6.
Starting in the second chain:
sl st, sc, hdc, dc, sc.
Work 3 sc in the final chain.
Return along the opposite side in mirrored order.
Fasten off.
Fence Picket — Make 24 to 30
Yarn: tan or brown.
Ch 5.
Row 1: starting in second chain, 4 sc. (4)
Rows 2–6: ch 1, turn, 4 sc. (4)
Row 7: dec ×2. (2)
Row 8: dec. (1)
Fasten off.
Assemble the Fence
Place short fence runs at both sides of the cottage rather than crossing the central path.
Use two long brown chain cords as horizontal rails.
Sew each picket to both rails.
Attach the finished fence through the lower rail only so the pointed tops retain slight relief.
Flying Bird — Make 5
Yarn: black.
Ch 7.
Sl st in the fourth chain.
Ch 4.
Sl st back into the same center.
Fasten off.
Pin the two chain arms into a shallow V to create a distant flying-bird silhouette.
Place the Birds
Arrange five birds across the cream sky above and beside the cottage.
Vary the angle of each V by approximately 10–20 degrees.
Keep the lowest bird above the chimney smoke.
Border Round 1 — Olive
Join olive yarn in one corner.
Sc evenly around the blanket.
Work (2 sc, ch 2, 2 sc) in every corner.
Join.
Border Round 2 — Cream
Join cream.
Hdc around.
Work (2 hdc, ch 2, 2 hdc) at each corner.
Border Round 3 — Rust
Join rust.
Repeat sc, ch 1, skip 1 along each side.
Work (sc, ch 2, sc) in every corner.
Border Round 4 — Chocolate Brown
Join brown into a ch-1 space.
Sc in every sc and ch-1 space.
At each corner work (sc, ch 2, sc).
Border Round 5 — Pumpkin Orange
Join orange.
Hdc evenly around.
At each corner work (2 hdc, ch 2, 2 hdc).
Final Olive Textured Edge
Join olive.
Repeat:
sl st in next stitch, ch 3, sc in same stitch, skip 1 stitch.
Continue around the perimeter.
Adjust only near corners when required to keep the edge flat.
Fasten off.
Assembly
- Crochet and block the cream 156-stitch blanket field, then mark the horizon, center line and cottage location.
- Attach the moss-green lower garden overlay, keeping the upper landscape edge flat across the full width.
- Sew on the cream cottage wall, brown roof panels, gable, chimney and smoke puffs before adding small architectural details.
- Attach the two rectangular windows, round gable window, shutters, arched door and layered front steps.
- Build the tapered cream path from five overlapping sections running from the cottage steps toward the lower blanket edge.
- Make approximately fourteen shallow pumpkins in two sizes, attach their olive stems and distribute the largest motifs toward the foreground.
- Add the two brown branch systems, approximately 26–34 autumn leaves, garden flowers and green foliage around the cottage and pumpkin patch.
- Assemble the brown picket fence in separate left and right sections, leaving the cream path open through the center.
- Add five small black bird silhouettes to the cream sky, then work the olive, cream, rust, brown, orange and olive border sequence.
- Block the outer field and border without flattening the pumpkins, then reshape the leaves, flowers, roof edge and garden motifs by hand.
The finished blanket should read as one continuous autumn landscape, with the cottage in the middle distance and the largest dimensional pumpkins concentrated near the lower foreground.
7 Technical Tips
- Lower blanket becomes heavier than the cottage section: The pumpkins contain too much filling. Limit large pumpkin projection to approximately 12–15 mm and small pumpkins to about 8 mm.
- Cottage wall puckers around the roof: Brown roof stitches are being sewn under tension. Pin each panel at five or more points and keep attachment stitches approximately 10–12 mm apart.
- Path looks like one straight stripe: All five pieces are centered on the same axis. Shift neighboring path sections sideways by approximately 10–20 mm and overlap them by 5–8 mm.
- Tree branches pull the cream sky inward: Surface slip stitches are too tight. Work each branch with the blanket lying flat and stop if the surrounding field shortens by more than about 5 mm.
- Pumpkins lose scale perspective: Large motifs are positioned too close to the cottage. Keep 11–13 cm pumpkins in the lower third and use 7–8 cm pumpkins nearer the fence.
- Fence curls away from the garden: Both horizontal rails are shorter than the picket row. Measure each finished fence section flat and tack the lower rail at approximately 15–20 mm intervals.
- Outer border waves: Extra stitches have accumulated along the long side edges. Count stitches in repeated 20 cm sections and remove surplus edge stitches before the rust eyelet round.
Why the Landscape Uses Two Depth Levels
The cottage itself needs to remain relatively flat. Windows, roof and door gain enough definition from stacked crochet layers without stuffing.
The pumpkin patch is different.
Shallow filling moves selected pumpkins into the foreground and gives the lower landscape a stronger visual weight. Using two depth levels makes the autumn cottage crochet blanket pattern read more like an illustrated scene than a collection of unrelated appliqués.
Keep the trees, fence and path between those extremes. They should show surface texture but not project as far as the pumpkins.
Why the Path Widens Toward the Viewer
A constant-width path would flatten the perspective.
Five separate cream sections make controlled width changes possible without complex shaping inside one long piece.
The narrowest section begins at the cottage steps.
Successively wider sections move toward the lower border.
A slight left or right shift between sections prevents the path from looking mechanically straight.
Controlling the Cottage Scale
The cottage should occupy roughly half the usable blanket width.
On a 105–108 cm field, a wall around 52–56 cm wide leaves enough room for trees and sky on both sides.
Making the house much larger removes the branch framing and compresses the pumpkin garden.
Making it smaller creates too much empty cream space above the garden.
Changing the Blanket Size
For a smaller lap throw, reduce the main field to about 126 stitches and 150 rows, then scale the cottage width to approximately 44–46 cm.
A larger bed throw can use 186 stitches or more.
Increase the field before resizing the appliqués.
Maintain the visual ratios: cottage around half the field width, garden near the lower 40 percent and the largest pumpkins in the lowest third.
Changing the Pumpkin Count
The reference supports a dense harvest garden rather than an exact regular grid.
Ten pumpkins create a cleaner scene.
Fourteen gives a close reconstruction.
Eighteen produces a fuller patch but substantially increases weight.
When adding motifs, leave the cream path and door approach open so the foreground does not become one continuous orange mass.
Changing the Autumn Palette
Olive, pumpkin orange, mustard, cream and brown reproduce the image closely.
Sage can replace olive for a lighter garden.
Burgundy leaves create stronger tree contrast.
Deep forest green makes the door and lower field darker.
Repeat every new color in at least two landscape areas; an isolated shade can look unrelated to the rest of the blanket.
Building the Trees
Work branches before attaching leaves.
Start with one main brown trunk, then split it into several smaller chain or surface-crochet branches.
Add leaves in mixed rust, mustard, olive and red.
Leave some branch tips bare.
The uneven distribution gives the trees a late-season appearance and keeps the cream background visible.
Keeping the Garden Readable
Attach large objects first: cottage, path and pumpkins.
Add the fence next.
Flowers, leaves and vines fill the remaining gaps.
This order prevents tiny details from occupying areas later needed by a pumpkin or path section.
Keep several areas of plain green visible between motifs; continuous decoration across the entire garden can obscure the intended depth.
Final Blocking
Pin the four blanket corners first.
Add pins at the side midpoints and along the border.
Do not place pressure over the pumpkins.
Let the cream field, cottage wall and green garden settle flat.
After drying, lift the pumpkin ribs, roof lower edge, leaves and flower petals by hand.
View the blanket from several feet away and correct any pumpkin, tree or fence section that breaks the intended landscape perspective.
Conclusion
Build the cottage and path before making the full pumpkin batch because those two flat structures define how much foreground space remains. Your next step is to block the 156-stitch cream field, mark the green garden line and test one small and one large pumpkin against the planned landscape. Keep the largest motifs near the lower border and the shallow pieces near the house. Share the finished autumn cottage crochet blanket pattern project on Pinterest with the entire landscape visible, then post the cottage-and-path detail on Instagram using #AutumnCottagePumpkinBlanket. For this landscape specifically, would you keep the cream pumpkins or make the whole patch orange?









