Introduction
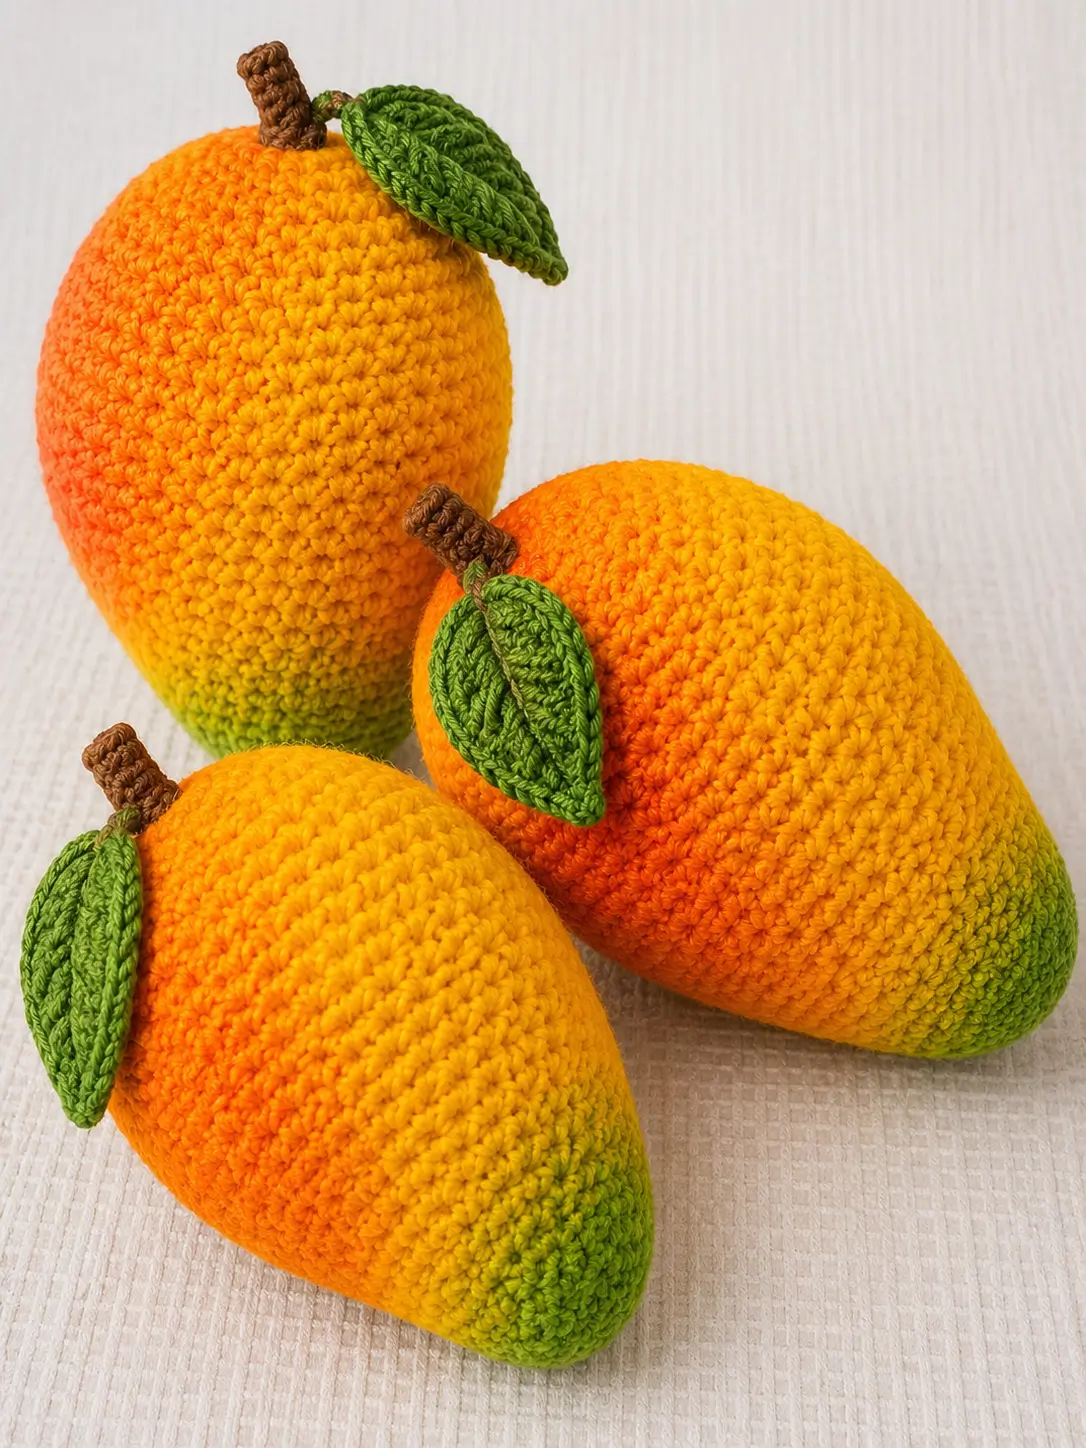
Mangoes taper to an off-center beak, and that asymmetry is the shaping problem this mango amigurumi crochet pattern has to solve. The project uses medium-weight yarn, a 3.5 mm hook, green, yellow, orange, and brown yarn, plus fiberfill; finished height is about 12.7 cm. Skill level is easy. The faceless fruit works as play food or display because there are no detachable eyes.
The Design: What Makes This Mango Different
The body is worked from the green tip upward rather than from the stem down. That choice puts the first increases at the narrow beak and lets the 36-stitch plateau sit across the broadest shoulder, which matches a mango more closely than a sphere.
A second decision is the staged color plan. Green occupies the tapered tip, golden yellow crosses the central rounds, and orange finishes the upper mass. The spiral shifts each boundary slightly, reducing hard horizontal striping.
Finally, the brown stem is a six-stitch tube instead of a flat strip, while the leaf uses mixed-height stitches around a chain to form a pointed blade. A common error in a crochet mango pattern is overstuffing the tip; it rounds off the beak. This amigurumi fruit pattern keeps the lower rounds shaped but not packed solid.
Project Info at a Glance
| Skill Level | Time | Finished Size | Hook | Best For |
|---|---|---|---|---|
| Easy | About 2–3 hours | Approx. 12.7 cm tall | 3.5 mm | Play food, fruit display, kitchen decor |
Materials and Tools
Yarn
Use colors that match the photographed mango:
- Golden yellow — medium #4 — approximately 25 g
- Bright orange — medium #4 — approximately 15 g
- Leaf green — medium #4 — approximately 8 g
- Medium brown — medium #4 — approximately 3 g
A smooth cotton, cotton-blend, or tightly spun acrylic yarn gives the clean stitch definition shown in the photo.
Tools
- 3.5 mm crochet hook
- Polyester fiberfill
- Tapestry needle
- Locking stitch marker
- Straight pins
- Scissors
- Safety eyes: none
Abbreviations
MR — magic ring
sc — single crochet
inc — 2 sc in one stitch
dec — decrease
sl st — slip stitch
ch — chain
BLO — back loop only
FLO — front loop only
hdc — half double crochet
dc — double crochet
st/sts — stitch/stitches
R — round or row
For an invisible decrease, insert the hook through the front loops of the next two stitches, yarn over, pull through both front loops, yarn over again, and complete one sc.
Pattern — Step by Step
Work the mango in a continuous spiral unless otherwise stated. Use a stitch marker to mark the first stitch of each round.
Mango Body — Make 1
Yarn: green, golden yellow, and orange.
Start at the pointed green end.
R1: 6 sc in MR (6)
R2: inc ×6 (12)
R3: sc around (12)
R4: (sc, inc) ×6 (18)
R5: sc around (18)
R6: (2 sc, inc) ×6 (24)
Change to golden yellow after R6.
R7: (3 sc, inc) ×6 (30)
R8: (4 sc, inc) ×6 (36)
R9: sc around (36)
R10: sc around (36)
R11: sc around (36)
R12: sc around (36)
Change gradually to bright orange near the end of R12. Moving the color change several stitches away from the stitch marker produces a more natural diagonal transition.
R13: sc around (36)
R14: sc around (36)
R15: sc around (36)
R16: sc around (36)
R17: sc around (36)
R18: sc around (36)
The 36-stitch plateau creates the widest portion of the mango.
R19: (4 sc, dec) ×6 (30)
R20: sc around (30)
R21: sc around (30)
R22: (3 sc, dec) ×6 (24)
R23: (2 sc, dec) ×6 (18)
Begin stuffing firmly.
Place most of the stuffing through the center and upper section. Use less stuffing at the green end so the tip remains narrow instead of becoming round.
R24: (sc, dec) ×6 (12)
R25: dec ×6 (6)
Add the final stuffing before closing.
Fasten off and leave a 15 cm tail. Thread the tail through the front loops of the final six stitches and pull the opening closed.
Weave the yarn tail inside the body.
After closing, shape the mango by hand. Push slightly more filling toward one upper side to create the uneven natural mango profile visible in the reference photo.
Brown Stem — Make 1
Yarn: brown.
R1: 6 sc in MR (6)
R2: sc around (6)
R3: sc around (6)
R4: sc around (6)
R5: sc around (6)
R6: sc around (6)
R7: sc around (6)
Do not stuff the stem.
Flatten it slightly with your fingers.
Fasten off. Leave a 20 cm tail for sewing.
Green Leaf — Make 1
Yarn: leaf green.
Foundation: ch 13.
Starting in the second chain from the hook:
R1: sl st, sc, hdc, 6 dc, hdc, sc, 3 sc in the final ch.
Continue along the opposite side of the foundation chain:
sc, hdc, 6 dc, hdc, sc, sl st (25 sts).
R2: sl st loosely in each stitch around (25).
Fasten off and leave a 25 cm sewing tail.
Leaf Center Vein
Thread a 30 cm length of green or slightly darker olive-green yarn onto the tapestry needle.
Starting at the leaf base, work a straight line of small backstitches toward the leaf point.
Stop approximately 5 mm before the tip.
This raised line reproduces the prominent center vein visible on the photographed mango leaf.
Color Placement
The photographed design uses four clearly separated color zones.
Start with leaf green at the pointed bottom end. Keep this section relatively short so it occupies approximately the lower 15–20% of the fruit.
Transition next to golden yellow, which forms most of the middle body.
Introduce bright orange across the upper portion. Do not place the transition in one perfectly horizontal round. Shift several stitches before or after the round marker so the boundary angles slightly across the mango.
Use medium brown only for the stem.
The attached leaf returns to leaf green, keeping the green tip and leaf visually connected.
Assembly
- Check that the mango body is completely closed and the final yarn tail is hidden inside.
- Shape the green tip until it forms a narrow point approximately 20–25 mm long.
- Rotate the mango so the widest orange section sits slightly off center.
- Position the brown stem near the top rather than directly in the geometric center.
- Pin the stem in place and sew around its base twice.
- Position the green leaf beside the stem, angling the tip down across one side of the mango.
- Pin the leaf at the base, center, and tip before sewing.
- Sew only the lower 8–12 mm of the leaf to the body so most of the leaf remains raised.
- Pass all sewing tails through the stuffed body in two directions before trimming them.
- Reshape the mango with your hands, keeping the green tip narrow and the orange upper section slightly fuller on one side.
The completed mango consists of one stuffed fruit body, one brown stem, and one green leaf.
7 Technical Tips
- Mark every round. Losing the first stitch during the 36-stitch section can shift the decreases and create a visible spiral ridge along one side of the mango.
- Control the stuffing at the green tip. Keep the final 20 mm slightly softer than the center; excessive filling turns the narrow mango point into a rounded base.
- Use invisible decreases. Standard decreases can create six noticeable gaps around reduction rounds such as R19 and R22, especially with smooth cotton yarn.
- Check the color transition before continuing. If green covers more than roughly one-fifth of the body, the finished fruit can resemble a two-color pear rather than a mango.
- Keep firm tension with smooth yarn. Loose stitches can expose white fiberfill between the 36-stitch plateau rounds, particularly after the mango is fully stuffed.
- Pin the leaf before sewing. Place its base approximately 5–8 mm below the top of the stem so the leaf sits diagonally instead of standing vertically.
- Leave long sewing tails. A minimum tail length of 15 cm gives enough yarn to cross the stuffed body twice before trimming, reducing the chance of the stem or leaf loosening.
Adjusting the Finished Size
The finished size depends on yarn thickness, hook size, stuffing density, and individual tension.
For a smaller mango, use DK yarn with a 2.5–3 mm hook while keeping the same stitch counts.
For a larger version, use chunky yarn with a 4.5–5 mm hook. The same 36-stitch plateau can produce a substantially larger fruit without changing the shaping sequence.
Avoid increasing the body automatically to 42 stitches unless a wider mango is required. Adding six stitches changes the proportions and makes the body noticeably rounder.
Making the Mango More Photo-Accurate
The shape should not be completely symmetrical.
A real mango has a fuller shoulder on one side and a narrow lower end. Reproduce that difference during stuffing rather than changing the stitch counts.
Push additional filling toward one upper side after R23. Hold the opposite side slightly flatter.
The color boundary also matters. Green should remain concentrated around the bottom point, golden yellow should dominate the center, and orange should cover much of the upper fruit.
For the leaf, keep the stitches flat and slightly elongated. A stiff or heavily stuffed leaf would not match the thin blade visible in the reference image.
The stem should remain short, brown, and slightly irregular rather than forming a tall straight cylinder.
Yarn Substitution
Cotton produces the sharpest stitch definition and works well when the mango will be used as display fruit.
A cotton-acrylic blend reduces weight while maintaining visible stitch structure.
Standard acrylic also works, although the surface may appear softer and less defined.
Avoid very fuzzy yarn if the goal is to reproduce the photograph. The individual single crochet stitches are clearly visible in the reference piece.
When substituting yarn, select all four colors from the same yarn line when possible. Differences in yarn thickness between the orange, yellow, and green sections can alter the circumference even when the stitch count stays at 36.
Stuffing and Shape Control
Stuff the mango gradually rather than filling the entire body at the end.
After R18, begin checking the shape even though the main stuffing stage occurs later. This makes it easier to see whether the 36-stitch plateau is forming the broad central section correctly.
Once R23 is complete, add most of the fiberfill.
Keep the middle firm enough that pressing the surface does not create a permanent dent. The lower green portion needs less filling.
Before R25 closes the opening, check the mango from the front and side. One side should look marginally fuller.
After closing, use the blunt end of a crochet hook or the tapestry needle handle to reposition small amounts of stuffing from outside if necessary.
Conclusion
Finish one test mango before cutting yarn for a larger batch, then record its stuffed height and actual yarn use. If the body lands near 12.7 cm, repeat the same hook and tension; if it becomes noticeably wider than expected, adjust stuffing before changing stitch counts. Photograph the completed fruit from the stem side and from the green tip so the asymmetric shaping remains visible. Share the finished project on Pinterest and Instagram with #GradientMangoAmigurumi. The next step is to weigh the completed sample and record the exact color usage for future copies. For this mango amigurumi crochet pattern, would you keep the green tip this short or extend the green section farther up the fruit?









