Introduction
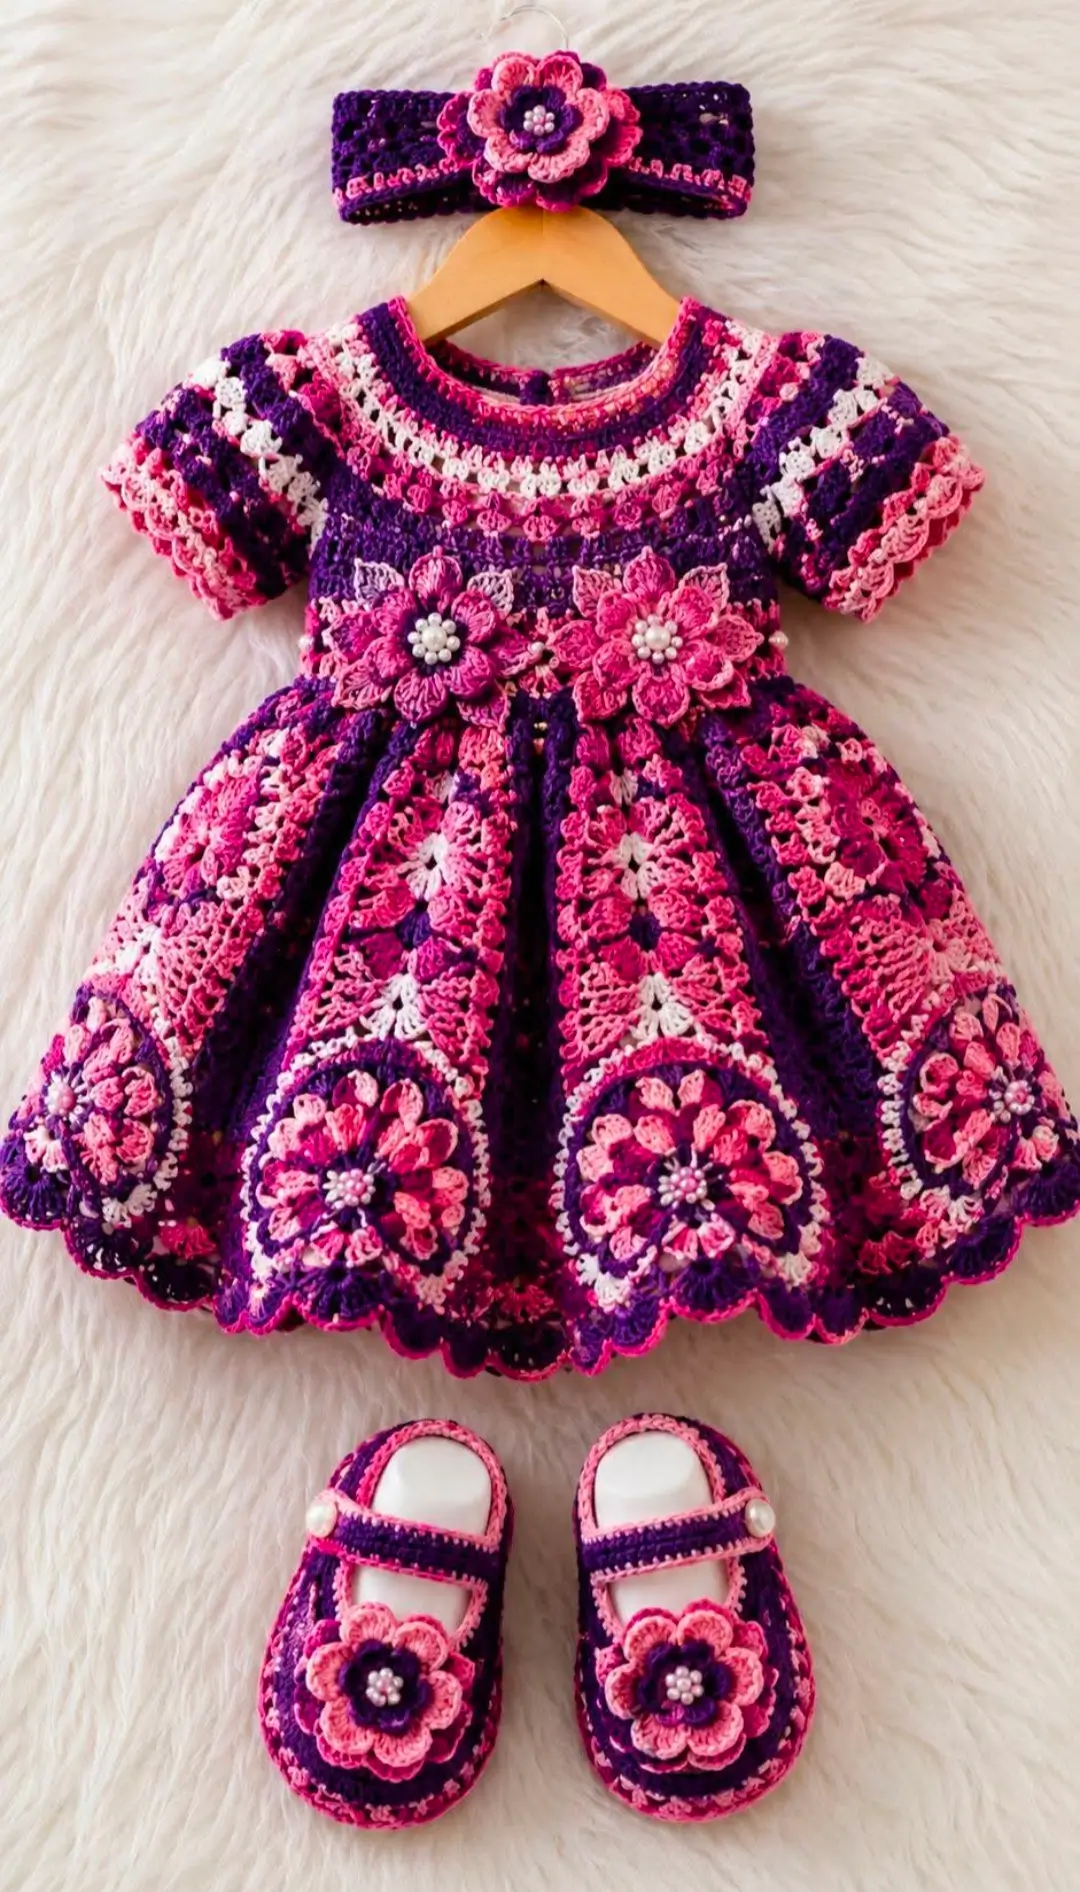
This dress places layered flowers at the waist, skirt, headband, and shoes, so every motif has to sit on the same visual axis. This floral crochet baby dress pattern uses sport-weight cotton, a 4 mm hook, and a 6–12 month reference size of about 48 cm chest by 38 cm shoulder-to-hem. The skill level is intermediate. Modular flowers also make damaged embellishments replaceable without rebuilding the garment.
The Design: What Makes the Floral Set Different
The photographed set relies on three structural decisions. First, the yoke stays compact and relatively dense, which supports a much fuller skirt without stretching the neckline. Second, the puff sleeves carry their volume high on the arm instead of widening at the cuff; that balances the large hem medallions without adding excess fabric near the hand. Third, the skirt acts as a panelled field for appliqués rather than one uninterrupted lace repeat, so flower placement can be corrected after blocking.
A common mistake in a puff sleeve crochet baby dress is adding flare too early. The waist then stretches and the bodice drops. This version keeps 86 body stitches through the waist before expanding the skirt in measured stages. That construction also works well for a crochet baby dress with headband and matching slide sandals because the same flowers can be repeated across all three pieces.
Project Info at a Glance
| Skill Level | Time | Finished Size | Hook | Best For |
|---|---|---|---|---|
| Intermediate | Multi-session project | Approx. 48 cm chest × 38 cm length | 4 mm | 6–12 month reference size |
Gauge
Work 18 dc × 10 rows = approximately 10 cm after light blocking.
Change hook size if your swatch misses the target. Garment dimensions matter more than the hook number printed in the pattern.
Materials and Tools
Yarn
- Deep purple — sport/baby #2 — about 125 g
- Magenta / hot pink — sport/baby #2 — about 70 g
- Pale pink — sport/baby #2 — about 35 g
- White — sport/baby #2 — about 25 g
- Sandal sole yarn — sport #2 held double or DK #3 — about 30–40 g
A smooth baby cotton, tightly spun cotton, or cotton-blend yarn gives the flowers and multicolor rows clear definition. Heavily fuzzy yarn can hide the layered petal edges.
Tools
- 4 mm crochet hook for dress and skirt
- 3–3.5 mm crochet hook for firmer flowers
- 3.5–4 mm crochet hook for sandals
- Yarn needle
- Locking stitch markers
- Measuring tape
- Scissors
- One securely sewn neck button or crochet tie
- Blocking pins and mat
For baby wear, crochet or embroidered flower centers are preferable to loose pearl-style beads. Small detachable embellishments can present a choking risk.
Abbreviations
MR — magic ring
ch — chain
sl st — slip stitch
sc — single crochet
hdc — half double crochet
dc — double crochet
inc — work 2 stitches in one stitch
dc2tog — double crochet 2 stitches together
sc2tog — single crochet 2 stitches together
fsc — foundation single crochet
BLO — back loop only
ch-sp — chain space
st / sts — stitch / stitches
Invisible decrease is not used in this garment; dc2tog produces the controlled sleeve reduction needed for flat fabric shaping.
Pattern — Step by Step
The dress is worked from the neckline downward. The first five yoke rows remain open at the center back for head access, after which the work joins in the round.
Yoke
Yarn: deep purple.
Ch 61.
Row 1: Hdc in second ch from hook and across. Turn. (60)
Row 2: Ch 1, hdc in next 4 sts, 2 hdc in next st ×12. Turn. (72)
Row 3: Ch 1, hdc across. Turn. (72)
Row 4: Ch 1, hdc in next 5 sts, 2 hdc in next st ×12. Turn. (84)
Row 5: Ch 1, hdc across. Turn. (84)
At the end of Row 5, bring the two back edges together without twisting. Join with a sl st.
Round 6: Ch 1, hdc in next 6 sts, 2 hdc in next st ×12. Join. (96)
Round 7: Ch 1, hdc around. Join. (96)
Round 8: Ch 1, hdc in next 7 sts, 2 hdc in next st ×12. Join. (108)
Round 9: Ch 1, hdc around. Join. (108)
Measure from the neckline before splitting. The yoke should lie flat rather than forming a cup.
Separate Body and Sleeves
Place markers after 36 stitches, then after the next 18, next 36, and final 18.
Body Round 1: Hdc in first 36 sts, ch 7, skip next 18 sleeve sts, hdc in next 36 sts, ch 7, skip final 18 sleeve sts. Join. (86 body positions)
The body circumference at gauge is approximately 47.5–48 cm.
Bodice and Waist
Round 2: Hdc in every st and underarm ch. (86)
Round 3: Hdc around. (86)
Round 4: Change to magenta; hdc around. (86)
Round 5: Change to purple; hdc around. (86)
Round 6: Change to pink; sc around. (86)
Round 7: Change to purple; hdc around. (86)
Do not add skirt increases before this point. The fitted waist separates the bodice from the large flower field below.
Puff Sleeves — Make 2
Yarn: purple with pink edging.
Join yarn at the center of one underarm chain. The sleeve opening contains the original 18 yoke stitches plus 7 underarm positions.
Round 1: Sc evenly around. (25)
Round 2: Ch 2, dc in next 4 sts, 2 dc in next st ×5. Join. (30)
Round 3: Dc around. (30)
Round 4: Dc in next 4 sts, dc2tog ×5. (25)
Round 5: Sc in next 11 sts, sc2tog, sc in next 12 sts. (24)
Round 6: Change to pink. Skip 1 st, 5 dc in next st, skip 1 st, sc in next st ×6.
Fasten off.
Repeat for the second sleeve.
The sleeve reaches 30 stitches only at its fullest point. Keeping the cuff at 24 positions prevents the puff from spreading downward.
Flared Skirt
Yarn: alternate deep purple, magenta, pink, and white.
Continue from the 86-stitch waist.
Round 1: Dc in next 7 sts, 2 dc in next st ×10, dc in final 6 sts. (96)
Round 2: Dc around. (96)
Round 3: Dc in next 7 sts, 2 dc in next st ×12. (108)
Round 4: Dc around. (108)
Round 5: Dc in next 8 sts, 2 dc in next st ×12. (120)
Round 6: Dc around. (120)
Round 7: Dc in next 9 sts, 2 dc in next st ×12. (132)
Round 8: Dc around. (132)
Round 9: Dc in next 10 sts, 2 dc in next st ×12. (144)
Round 10: Dc around. (144)
Round 11: Dc in next 11 sts, 2 dc in next st ×12. (156)
Rounds 12–20: Dc around. (156 each round)
Suggested Color Sequence
Rounds 1–2: Purple
Round 3: Pink
Round 4: Purple
Round 5: White
Rounds 6–8: Purple and magenta alternating
Round 9: Pink
Rounds 10–12: Purple
Round 13: White
Round 14: Magenta
Round 15: Purple
Round 16: Pink
Rounds 17–20: Purple with one optional pink stripe
Measure from shoulder to hem before adding the border.
If the dress is shorter than approximately 36 cm, add plain 156-stitch rounds until the target length is reached.
Scalloped Hem
Round 21: Sc around in magenta. (156)
Round 22: Skip 2 sts, 7 dc in next st, skip 2 sts, sc in next st ×26.
The border adds roughly 1.5–2 cm depending on tension.
Target finished shoulder-to-hem length is approximately 38 cm.
Circular Skirt Medallions — Make 6
Use purple, pink, magenta, and white.
These circular backings carry the large layered flowers.
Round 1: 12 dc in MR. Join. (12)
Round 2: 2 dc in each st. (24)
Round 3: Dc in next st, 2 dc in next st ×12. (36)
Round 4: Dc in next 2 sts, 2 dc in next st ×12. (48)
Round 5: Change color. Sc in next st, ch 3, skip next st ×24.
Fasten off with a 25 cm sewing tail.
Alternate purple, pink, and white between rounds to create the high-contrast floral medallion effect shown in the design.
Large Six-Petal Flower — Make 11
Six are used on the skirt medallions, two at the waist, one on the headband, and two on the sandals.
Round 1: 12 sc in MR. Join. (12)
Round 2: Sl st in next st, 7 dc in next st ×6.
Fasten off and leave a sewing tail.
Small Five-Petal Flower — Make 11
These smaller flowers are layered over the six-petal flowers.
Round 1: 10 sc in MR. Join. (10)
Round 2: Sl st in next st, 5 dc in next st ×5.
Fasten off.
Stack one small flower over each large flower. Rotate the top layer so the five petals sit between the six lower petals.
Use tightly worked yarn knots or crochet bobbles for the center.
Waist Flowers — Make 2
Use one large six-petal flower and one small five-petal flower for each waist decoration.
Stack and sew the two layers together.
Place the finished flowers symmetrically on the front waist approximately 6–7 cm apart from center to center.
Pin both flowers before sewing. This prevents one side of the waistband from being pulled higher than the other.
Headband
The reference circumference for the 6–12 month size is approximately 41 cm. Measure the intended wearer when possible because head circumference varies.
Yarn: purple with pink edging.
Foundation: Work 80 fsc, or enough foundation stitches to measure approximately 41 cm without stretching. Join carefully. (80 reference count)
Round 1: Sc around. (80)
Round 2: Dc in next st, ch 1, skip next st ×40. (40 dc + 40 ch-sp)
Round 3: Sc in every dc and ch-sp. (80)
Round 4: Repeat Round 2.
Round 5: Sc in every dc and ch-sp. (80)
Round 6: Change to pink; sc around. (80)
Fasten off.
Attach one layered flower at the center front. Position the flower so the headband join remains hidden behind it.
The finished band should sit flat and should not leave a pressure mark.
Sandal Soles — Make 4
The target sole length for the 6–12 month reference size is approximately 11 cm.
Make four sole pieces so that each sandal has a double-layer sole.
Yarn: sport #2 held double or DK #3.
Ch 15.
Round 1: 2 hdc in second ch from hook, hdc in next 12 ch, 5 hdc in last ch; rotate and work along the opposite side of the foundation chain, hdc in next 12, 3 hdc in the first chain. Join. (34)
Round 2: 2 hdc in each of next 2 sts, hdc in next 12, 2 hdc in each of next 5 sts, hdc in next 12, 2 hdc in each of final 3 sts. (44)
Round 3: Sc around. (44)
Fasten off.
Measure the sole before proceeding. The finished length should be close to 11 cm.
If the difference is greater than approximately 5 mm, change hook size instead of adding random stitches.
Join the Double Soles
Place two sole pieces together with wrong sides touching.
Join purple yarn at the heel.
Round 1: Sc through both layers around. (44)
Fasten off.
Repeat for the second sandal.
Sandal Instep Straps — Make 2
Yarn: purple.
Ch 19.
Row 1: Sc in second ch from hook and across. (18)
Row 2: Ch 1, turn, sc across. (18)
Row 3: Ch 1, turn, sc across. (18)
Row 4: Ch 1, turn, sc across. (18)
Fasten off.
Join pink yarn and work one row of sc along each long edge.
Sew the strap across the upper third of the sandal so the toe remains open.
Attach one layered flower to the center of each strap.
A crochet bobble can be added at the outer side of the strap as a decorative detail.
Assembly
- Block the completed dress lightly and confirm approximately 48 cm chest circumference before adding the large floral appliqués.
- Align the center-back yoke edges and add a small crochet loop with a securely sewn button or yarn tie at the neckline.
- Check both puff sleeves against each other. Each sleeve should reach 30 stitches at its widest point and reduce to 24 cuff positions before the shell border.
- Lay the dress flat and mark the exact center front of the waistband.
- Pin the two waist flowers approximately 6–7 cm center-to-center, then sew through the flower backs while leaving the outer petals free.
- Divide the lower 156-stitch skirt visually into six equal sections. Each section corresponds to approximately 26 stitches around the hem.
- Position one flower medallion in each skirt section and sew securely through the circular backing.
- Center the headband flower directly over the band join and sew through the flower center and backing layer.
- Join both double sandal soles, attach the instep straps at matching positions, and sew one layered flower to each strap.
- Weave each yarn tail through at least three changes of direction before trimming. Check the neckline closure and every attached flower before use.
The completed reference set measures approximately 48 cm at the dress chest, 38 cm from shoulder to hem, 41 cm around the headband, and 11 cm along each sandal sole when gauge matches the stated measurements.
7 Technical Tips
- Gauge drift: If 18 dc measures 11 cm instead of 10 cm, the 86-stitch body can finish roughly 5 cm too wide. Change hook size before starting the full yoke rather than trying to remove excess width at the waist.
- Yoke split error: The separation must read 36 body stitches / 18 sleeve stitches / 36 body stitches / 18 sleeve stitches, with seven underarm chains at each side. Moving even two stitches from one sleeve to the body can make the armholes visibly uneven.
- Back-neck opening: Keep the first five yoke rows open before joining. Joining earlier can reduce head access even when the finished chest circumference is correct.
- Puff-sleeve ballooning: Stop the sleeve expansion at 30 stitches and reduce to 24 before the shell edge. Leaving all 30 stitches at the cuff changes the intended puff into a wider flared sleeve.
- Medallion spacing: Six lower-skirt medallions correspond to approximately 26 hem stitches per section on the 156-stitch skirt. Uneven spacing can make a symmetrical skirt appear twisted or off center.
- Headband sizing: The reference circumference is approximately 41 cm for the selected 6–12 month size. Measure the wearer before fastening off because a substantially smaller band can create excessive pressure.
- Sandal sizing: Check for an 11 cm sole before adding the upper strap. A sole above approximately 11.5 cm may slide, while a shorter sole can place the toe too close to the edge.
Conclusion
Block the dress first, then position the six skirt medallions only after the 48 cm chest and 38 cm length measurements have been checked. That order keeps decoration from hiding a sizing problem. Photograph the finished set flat so the waist flowers, lower motifs, headband flower, and sandal flowers can all be compared for alignment. Save the project to Pinterest and share the finished version on Instagram with #FloralMedallionBabyDress. The next practical step is to crochet one skirt medallion as a color test before committing yarn to all six. For this floral crochet baby dress pattern, would you keep the purple-and-pink palette or replace the white stripe with a third pink tone?









