Introduction
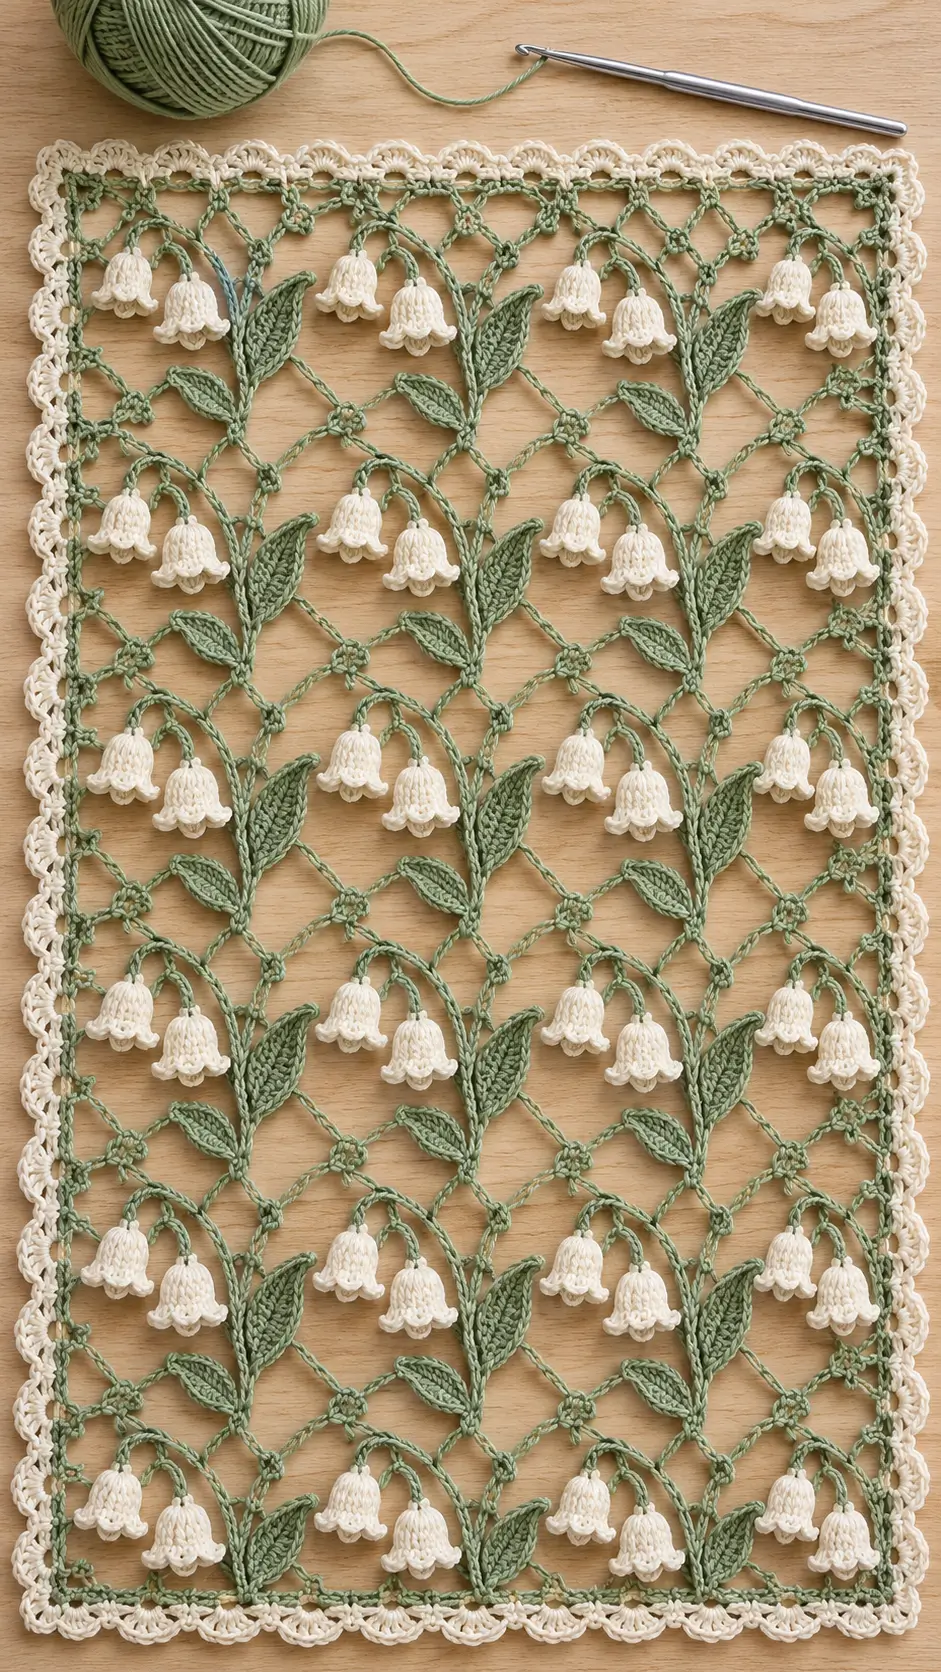
Lily-of-the-valley bells hang downward while their leaves point upward, and this panel has to reproduce both directions without losing its rectangular shape. This lily of the valley crochet pattern uses fine cotton, a 2–2.5 mm hook, open mesh, dimensional bells and leaf motifs. Treat it as an intermediate lace project. The finished panel works as framed textile art, a table insert or a decorative cabinet panel.
The Design: What Makes This Lily of the Valley Different
The flowers cannot be treated as flat appliqués if the photograph is the target. Each ivory bell needs a short cup with a flared lower edge, while the green stem must remain thin enough to read as part of the surrounding mesh. The second decision concerns the leaves: pointed, slightly raised leaf motifs give the vertical stems visual weight without filling the open background.
A third structural choice is the border. The cream edging creates a firm perimeter around the comparatively flexible crochet flower lace, reducing distortion at the outer mesh cells.
A common mistake in botanical crochet panels is making every stem segment independently. That creates too many joins and weak points. Build connected green mesh sections first, then attach or integrate bells where the branching stems meet.
Project Info at a Glance
| Skill Level | Time | Finished Size | Hook | Best For |
|---|---|---|---|---|
| Intermediate | 12–20 hours, depending on dimensions | Custom; photo dimensions not verified | 2.0–2.5 mm | Wall panels, framed lace, table décor |
The hook range is consistent with published botanical lily-of-the-valley patterns using fingering or DK yarn.
Materials and Tools
Yarn
- Sage green — fingering/DK cotton — buy approximately 100 g for swatching and a medium panel — mercerized or tightly spun cotton recommended.
- Ivory/cream — fingering/DK cotton — buy approximately 50 g for bells and border — use the same yarn family where possible.
These quantities are working allowances for this reconstruction rather than measured consumption from the photographed piece. Make a complete motif and weigh it before calculating yarn requirements for a larger panel.
Tools
- 2.0–2.5 mm crochet hook
- Tapestry needle
- Stitch markers
- Sharp scissors
- Blocking pins
- Blocking mat
- Rust-resistant T-pins for holding the rectangular mesh square during drying
No safety eyes, stuffing or florist wire are required for the photographed lace-panel construction.
Abbreviations
- MR — magic ring
- ch — chain
- sc — single crochet
- hdc — half double crochet
- dc — double crochet
- tr — treble crochet
- inc — increase
- dec — decrease
- sl st — slip stitch
- BLO — back loop only
- sp — space
- st/sts — stitch/stitches
An invisible decrease takes the front loops of the next two stitches together and is useful when shaping a dimensional bell because it reduces the visible ridge on the outside.
Pattern — Step by Step
The photograph contains repeated motifs rather than a stuffed amigurumi body. Work the green structure as modular lace units and repeat them until the required panel dimensions are reached.
Bell Flower — Make 30 or as Required
Yarn: ivory. Construction uses six-stitch circular geometry followed by a shaped, flared rim.
R1: 6 sc in MR (6)
R2: inc ×6 (12)
R3: (1 sc, inc) ×6 (18)
R4: 18 sc (18)
R5: 18 sc (18)
R6: 18 sc (18)
R7: (1 sc, dec) ×6 (12)
For the flared rim, stop treating the stitch count as a closed sphere.
R8: sl st in next st, ch 2, 2 dc in next st, ch 2, sl st in same st ×6.
Fasten off. Leave a 12 cm tail when the bell will be sewn to a stem.
Main Pointed Leaf — Make 12 or as Required
Yarn: sage green.
Ch 18.
R1: Beginning in second ch from hook: sl st, sc, hdc, 3 dc, 5 tr, 3 dc, hdc, sc, sl st. Work ch 2 at the tip.
Continue down the unused loops on the opposite side of the foundation chain.
R2: sl st, sc, hdc, 3 dc, 5 tr, 3 dc, hdc, sc, sl st.
Ch 1 and fasten off, leaving a 15 cm tail.
The target is a narrow lance-shaped leaf rather than a rounded leaf. During blocking, pin the tip away from the base so the motif dries with a distinct central axis.
Small Side Leaf — Make 12 or as Required
Yarn: sage green.
Ch 13.
R1: Starting in second ch: sl st, sc, hdc, 2 dc, 3 tr, 2 dc, hdc, sc, sl st. Ch 2 at the point.
R2: Work down the opposite side: sl st, sc, hdc, 2 dc, 3 tr, 2 dc, hdc, sc, sl st.
Fasten off. Leave a 12 cm tail.
Use these shorter leaves beside the main stem so the lace does not become solid across the entire panel.
Forked Flower Stem — Make 30
Yarn: sage green.
Ch 12 for the main stem.
Sl st back through 5 chains. Ch 7 for the first branch. Hold that branch temporarily with a stitch marker.
Return to the fork, ch 9 for the second branch, then sl st back to the junction.
Work sl st down the remaining main-stem chains.
Fasten off with a 15 cm tail.
Sew one bell to each branch tip. The paired bells should hang below the fork rather than project horizontally.
Small Mesh Junction Flower — Make as Required
Yarn: sage green.
R1: 6 sc in MR (6)
R2: (sl st, ch 3, sl st) in next st ×6.
Fasten off.
These small motifs cover structural joins where chain arches meet. Keep them considerably flatter than the ivory bells.
Openwork Mesh Unit
Yarn: sage green.
Ch 9, then sl st into the next established junction.
Ch 9 again and connect to the following junction.
For diagonal sections, alternate chain arches across the row so each new junction sits between two junctions from the preceding row. The resulting openings should resemble elongated diamonds rather than square filet mesh.
Repeat across the intended width.
On the return pass, ch 9 between the offset junctions. Attach a prepared flower stem at selected lower junctions while keeping the main green chains free from twisting.
The photograph does not expose every connection underneath the dimensional flowers, so the exact mesh repeat cannot be confirmed stitch for stitch. Treat nine chains as a swatch starting point. Reduce the arch to seven chains if the mesh collapses; increase it to eleven if the leaves crowd the openings.
Lily-of-the-Valley Motif Unit
Yarn: sage green and ivory.
Place one main pointed leaf vertically.
Position one small leaf diagonally opposite its upper half. Tack only the base and central spine, leaving the outer edges free to preserve the raised structure visible in the design.
Attach one forked stem immediately above the leaf junction.
Sew two ivory bells to the branch tips.
Connect four mesh arches around the unit: lower left, lower right, upper left and upper right.
Repeat the motif in staggered columns. Alternate the vertical position of neighboring flower clusters instead of creating rigid horizontal rows.
Top and Bottom Foundation Edge
Yarn: sage green.
Work a chain long enough to span the blocked width.
R1: sc evenly across, placing one sc at every mesh-junction attachment point.
R2: ch 5, skip the space between junctions, sc at next junction across.
Fasten off.
Repeat along the opposite horizontal edge. These foundation rows give the contrasting border a stable line for attachment.
Side Foundation Edges
Yarn: sage green.
Join at one corner.
Work evenly spaced sc down the side, using the same number of attachment groups on the left and right edges.
At each mesh arch, place enough sc to prevent puckering without adding enough stitches to flare the edge. Record the count from the first side and duplicate it on the second side.
Fasten off.
Ivory Scalloped Border
Yarn: ivory.
Join at any corner.
R1: sc evenly around all four sides, placing 3 sc in each corner.
R2: skip 2 sts, 5 dc in next st, skip 2 sts, sl st in next st around.
Adjust only at the corners. Work a larger 7-dc shell into the center corner stitch when necessary to turn the 90-degree angle without cupping.
R3: For a deeper decorative edge, work ch 3, sl st between the next two dc across each shell.
Fasten off. Weave the ivory tail through at least 5 cm of border stitches before trimming.
Blocking the Complete Panel
Soak or damp-block according to the yarn manufacturer’s care instructions.
Lay the panel on a blocking mat. Pin all four corners first, then establish the center of each side.
Measure both diagonals. Different diagonal measurements indicate that the panel is not rectangular.
Pin the remaining border scallops at equal intervals. Shape each leaf into a narrow point and arrange every bell so its opening faces downward.
Allow the panel to dry completely before removing the pins.
Assembly
- Block the green mesh foundation lightly before adding dimensional pieces if the structure twists severely.
- Attach each main leaf at its base and along its central axis while leaving the outer edges free.
- Position each small leaf diagonally beside the main leaf and maintain the same orientation across repeated units.
- Add the forked stems above the leaf bases, checking that both branches curve downward.
- Sew the ivory bells onto the branch tips with the flared openings facing the bottom edge.
- Add junction flowers where mesh intersections require visual coverage.
- Join the remaining mesh arches while maintaining the staggered diamond arrangement.
- Crochet the green foundation edging around all four sides before changing color.
- Add the ivory scalloped border, matching shell spacing on opposite edges.
- Wet-block the completed rectangle, measure both diagonals and pin every scallop before drying.
The completed piece should form a rectangular openwork field with raised cream bells, pointed green leaves and a continuous ivory perimeter.
7 Technical Tips
- Mesh distortion: Place a stitch marker in every tenth junction while building a long row. Missing one chain arch can shift every subsequent lily stem and pull the finished rectangle diagonally.
- Bell flare: Keep the cup at roughly 18 stitches before narrowing the opening. A substantially wider cup changes the narrow hanging profile associated with lily-of-the-valley flowers.
- Invisible decrease ridges: Work decreases through the front loops when shaping a dimensional bell. Ordinary two-stitch decreases can create a visible diagonal ridge across the small cream surface.
- Leaf curling: Pin each main leaf with its point approximately 1–2 cm beyond its relaxed position during damp blocking. Insufficient stretching can leave the treble-heavy center cupped.
- Stem tension: Chain stems should lie flat without becoming rigid. If one nine-chain mesh arch measures more than 10% shorter than neighboring arches, remake it rather than correcting the difference during final blocking.
- Pinning failure: Measure both diagonals before filling the border with pins. Equal side lengths alone can still produce a skewed panel, while comparing the diagonals provides a stronger check on rectangular alignment.
- Tail security: Weave flower tails through at least 5 cm of green structure and reverse direction once. Short tails can work free because the raised bells receive more handling than the flat mesh.
Finishing the Lily of the Valley Crochet Panel
A successful lily of the valley crochet pattern for this design depends on controlling three different structures: open chain mesh, pointed leaves and dimensional bell flowers. Make one complete motif before committing yarn to the full panel. Measure its blocked width and height, then calculate the number of repeats required for the intended frame, table insert or wall space.
Photograph the blocked sample beside a ruler so later repeats can be checked against it. When the full panel is assembled, complete the final blocking before deciding how it will be displayed. The open mesh needs consistent tension at every edge for the rectangular shape to remain visible.
Share the finished panel on Pinterest or Instagram with #LilyOfTheValleyLacePanel. For this specific design, which detail would you change first: the number of hanging bells or the depth of the ivory scalloped border?









