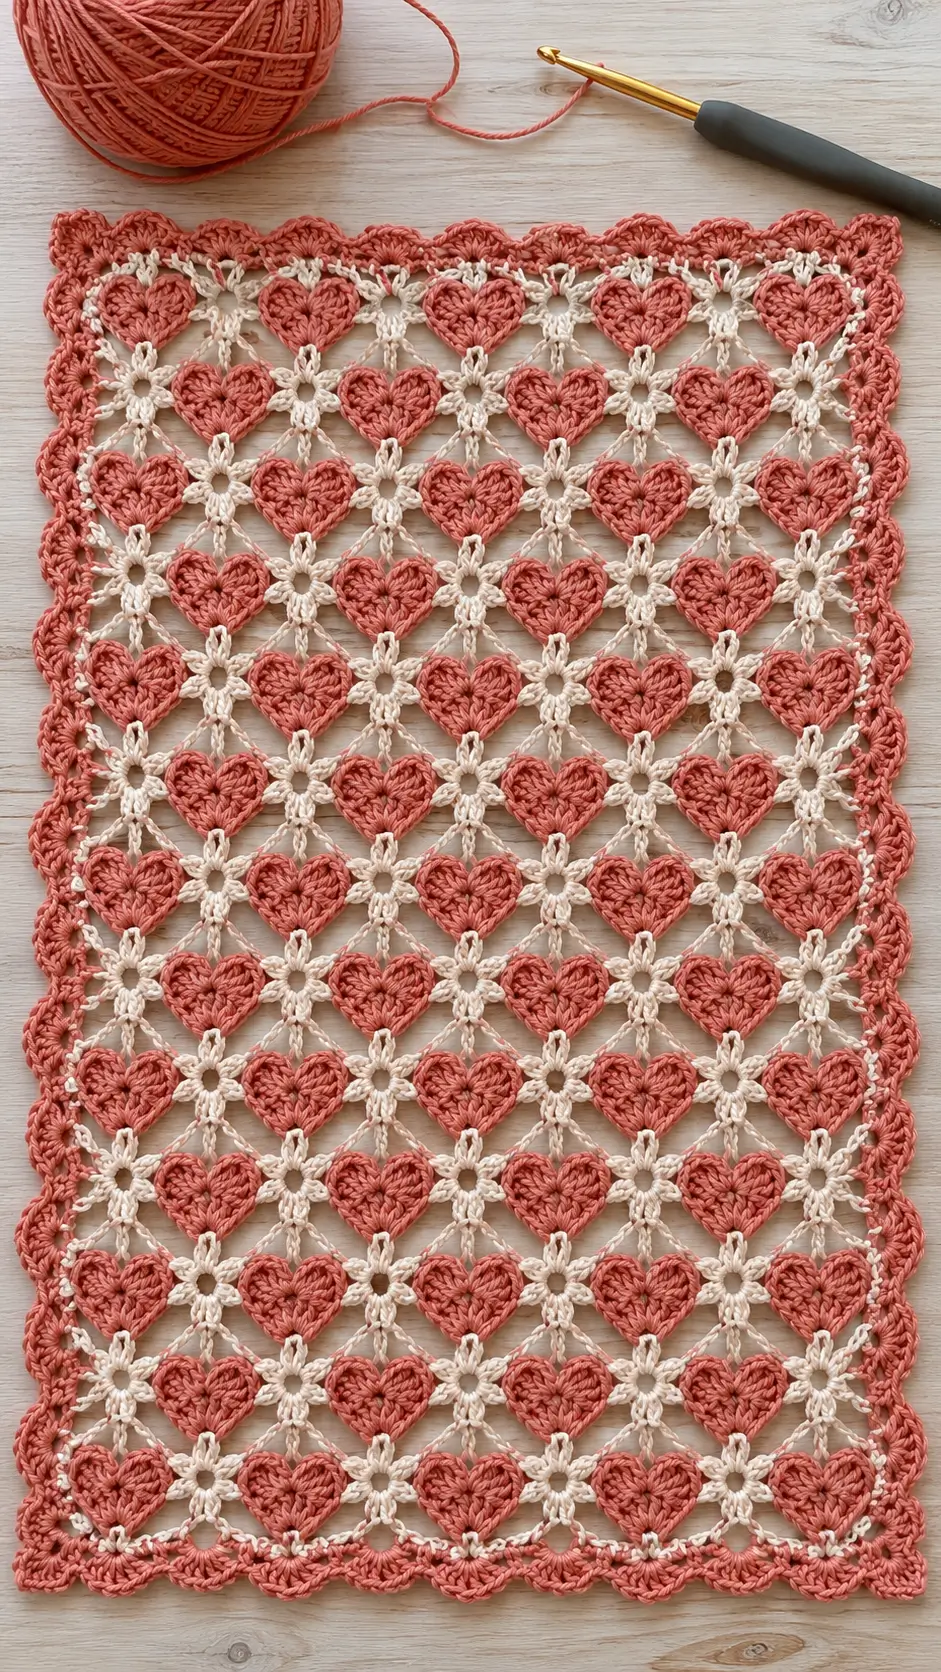
A heart in this panel has to keep two rounded lobes while its pointed base carries the visual weight of an entire diagonal lattice. This crochet heart lace pattern uses DK yarn, a 3.75–4 mm hook, contrasting connectors, and a scalloped border. The project suits intermediate crochet skills. Its modular construction also makes the finished dimensions adjustable without redesigning the complete panel.
The Design: What Makes This Heart Panel Different
The photographed piece does not place hearts inside conventional granny squares. Each coral heart remains visually independent while cream chain spaces connect the motifs diagonally. That distinction matters: enclosing every heart in a solid square would remove much of the negative space responsible for the lace effect.
A second structural decision is the staggered layout. Alternating motif positions breaks up vertical seams and lets the cream connectors form small radial flowers between hearts. Finally, the dense coral border supplies stability to an otherwise open fabric.
The common mistake with a crochet heart motif pattern of this type is treating every component as equally dense. Heavy connectors make the center rigid; excessively loose chains produce distorted diamonds. The heart should remain the dominant solid shape while the joining yarn functions as a lightweight framework.
Project Info at a Glance
| Skill Level | Time | Finished Size | Hook | Best For |
|---|---|---|---|---|
| Intermediate | Variable by panel size | Modular/custom | 3.75–4 mm | Table runners, panels, decorative mats |
Finished measurements remain custom because the original gauge of the photographed piece is unavailable. Make and block one heart before calculating the dimensions of the complete panel.
Materials and Tools
Yarn
- Dusty coral DK cotton — main heart motifs and border — quantity depends on panel dimensions.
- Cream DK cotton — connector and lattice color — quantity depends on panel dimensions.
Choose both colors from the same yarn line when possible. Matching fiber, twist, and meterage reduces differences in stretch between the solid hearts and open connector sections.
Tools
- 3.75 mm or 4.0 mm crochet hook
- Yarn needle
- Locking stitch markers
- Scissors
- Rustproof blocking pins
- Blocking mat
- Tape measure
No stuffing or safety eyes are required for this flat crochet project.
Abbreviations
- MR — magic ring
- ch — chain
- sc — single crochet
- hdc — half double crochet
- dc — double crochet
- tr — treble crochet
- sl st — slip stitch
- sp — space
- st/sts — stitch/stitches
- rep — repeat
- RS — right side
An invisible decrease is an amigurumi shaping technique and is not required for this flat lace construction.
Crochet Heart Lace Pattern — Step by Step
This is a photo-inspired reconstruction designed to reproduce the structure and visual character of the reference piece. It is not presented as a transcription of an unidentified designer’s original pattern.
Coral Heart Motif
Yarn: coral DK cotton. Make the number required for the desired panel width and length.
Round 1: Make an MR. Ch 3, work 15 dc into the ring. Join with sl st to the top of the beginning ch-3. (16 dc)
Do not tighten the center so aggressively that the first round buckles.
Round 2: Ch 2. Work 1 dc in the same st, 4 tr in the next st, 2 dc in the next st, 1 hdc in the next st, and 1 sc in each of the next 3 sts.
Work (1 hdc, 1 dc, ch 1, 1 dc, 1 hdc) into the next st to establish the lower point.
Mirror the shaping across the second half: work 1 sc in each of the next 3 sts, 1 hdc in the next st, 2 dc in the next st, 4 tr in the next st, then shape the remaining upper section and close with a sl st.
The target is two balanced upper lobes, a narrow center indentation, and one clearly defined lower point.
Fasten off. Leave a 12–15 cm tail when the motif will be sewn to a connector. Otherwise, weave in the tail after blocking.
Cream Connector Ring
Yarn: cream DK cotton.
The small cream radial structures between the hearts function as connector rings rather than solid flowers.
Round 1: MR, ch 1, 8 sc in MR. Join with sl st. (8 sc)
Round 2: *Ch 4, sl st in next sc.* Repeat around. (8 chain loops)
Fasten off when making the connectors separately. For join-as-you-go construction, replace the appropriate middle chain with a joining slip stitch through the neighboring motif or connector space.
Make enough connectors to occupy the open intersections in the planned heart grid.
Side Connector
Yarn: cream DK cotton.
Join the cream yarn to a side attachment point of one coral heart.
Row 1: Ch 4, sl st to the corresponding connector loop.
Row 2: Ch 4, sl st to the next heart attachment point.
Fasten off only when the required lattice segment is complete.
Keep every chain bridge the same length. A one-chain difference repeated across multiple motif rows can pull the finished panel out of square.
Vertical Heart Connection
Yarn: cream DK cotton.
Join the cream yarn to the bottom point of the upper heart.
Row 1: Ch 3.
Row 2: Sl st into the upper indentation or designated attachment space of the heart directly below.
Fasten off.
If the gap created by your blocked motifs is larger, use ch 4 instead. Test the connection once, measure it, and use the same chain count throughout the panel.
Radial Flower Connector
Yarn: cream DK cotton.
The cream intersections develop their flower-like appearance because several chain bridges radiate from a small open center.
Round 1: MR, ch 1, 8 sc in the ring. Join with sl st. (8 sc)
Round 2: *Ch 3, sl st into the next sc.* Repeat eight times.
During Round 2, connect alternating loops to the adjacent heart motifs. The remaining loops can accept diagonal chain bridges from neighboring connectors.
Fasten off. Weave the yarn tail through the dense center ring instead of through an exposed chain bridge.
Building the Heart Lace Panel
Lay all required coral motifs on a flat surface before joining them.
Row A: Position the hearts at regular horizontal intervals.
Row B: Offset the next group so the hearts interact with the cream connector structure rather than creating a heavy uninterrupted vertical seam.
Continue alternating the layout across the required length.
Position a cream radial connector at each planned open intersection. Join the connector to the surrounding heart motifs with equal chain lengths. Measure the panel after every two completed rows rather than waiting until the entire center has been assembled.
This joining method keeps the hearts visually separate while creating the open diamond structure required for a crochet heart panel.
Cream Foundation Border
Yarn: cream DK cotton.
Join the cream yarn at any corner of the assembled panel.
Round 1: Work sc evenly around the entire rectangle. Use chain stitches across larger open sections where necessary. Place 3 sc at each corner.
The exact stitch total depends on the number and dimensions of the motifs. Opposite sides should contain matching structural repeats so the border remains balanced.
Join with sl st and fasten off.
Coral Scalloped Border
Yarn: coral DK cotton.
Join the coral yarn at one corner.
Round 1: Ch 1 and work sc evenly around the panel. Place 3 sc in each corner. Join with sl st.
Round 2: *Skip 1 st, 5 dc in the next st, skip 1 st, sl st in the next st.* Repeat across the straight sections.
At each corner, work a larger fan such as 7 dc into the corner space when additional stitches are required to turn the corner without pulling the fabric inward.
Round 3, optional: Work a surface round of sc or sl st if the perimeter requires additional firmness.
Fasten off and weave the yarn tail through the dense border stitches.
The coral edging should be noticeably denser than the cream interior lattice. That contrast gives the open center a stable rectangular frame.
Assembly
- Make and block one coral heart before calculating the complete panel dimensions.
- Make the remaining hearts to match the blocked sample.
- Arrange the first horizontal row on a flat surface with identical gaps.
- Position the second row according to the staggered lattice arrangement.
- Pin the cream radial connectors between the heart motifs.
- Join the hearts to the connector loops with equal chain bridges.
- Add the vertical and diagonal connections between the heart points and neighboring connector spaces.
- Work the cream foundation border around all four sides.
- Add the coral scalloped border, adjusting the corner fans only when necessary.
- Wet-block the completed panel to rectangular measurements and allow it to dry flat.
The completed fabric should lie flat with clearly defined heart points, regular open spaces, balanced cream connectors, and an uninterrupted scalloped perimeter.
7 Technical Tips for Better Results
- Mark every connector orientation. A connector rotated by one loop shifts the diagonal joining line, and the error becomes more visible as additional rows are attached.
- Measure the chain bridges before multiplying the motif. If a bridge stretches from 2 cm to 2.5 cm, repeating that difference across several sections can substantially increase the finished width.
- Do not over-tighten the magic ring. Pulling the center smaller than the natural diameter of the first-round stitches can cause the heart lobes to cup upward.
- Check the lower point before fastening off. A point positioned one foundation stitch away from the center can make the blocked heart appear tilted.
- Maintain the same tension in both colors. Cream connectors worked more tightly than the coral hearts can contract the lattice and produce puckering.
- Pin all four corners at approximately 90 degrees during blocking. Poorly positioned corners can make the ends of the rectangular panel appear narrower than the center.
- Weave yarn tails through solid stitches rather than open chains. A tail hidden inside a chain bridge can remain visible and may alter the bridge tension after trimming.
How to Size the Crochet Heart Panel
The modular construction is more useful than relying on one fixed finished measurement. The actual dimensions depend on the yarn, hook, individual heart size, connector length, motif count, and blocking method.
Make one heart first and block it. Record its width and height, then measure the space required by the cream connector.
For example, if a blocked heart measures 6 cm wide and the effective joining interval adds another 2 cm, six motif positions require roughly 48 cm before the outer border. This is a sizing calculation rather than a measurement of the photographed panel.
Apply the same method vertically. Measure one complete motif repeat from the top of one heart to the equivalent point on the next repeat.
The test motif can also establish yarn consumption. Weigh one finished coral heart, multiply that weight by the required number of hearts, then calculate the cream connectors and border separately. Add a reasonable allowance for joining and swatching rather than depending on an unverified yarn estimate.
Choosing Yarn for the Heart Lace
DK cotton provides enough definition for the heart lobes, pointed bases, cream connector rings, and scalloped edging to remain visually distinct.
Changing yarn weight changes the entire scale of the project. A heavier yarn produces larger motifs and thicker connectors, while a finer yarn creates a lighter lace structure.
Hook size should therefore be selected according to the actual yarn rather than copied without testing. Start around 3.75–4 mm for DK yarn, crochet one heart, and inspect the fabric.
The motif should remain flat without becoming stiff. Large gaps between stitches indicate that the hook may be too large for the selected yarn. A motif that curls or becomes difficult to work can indicate excessively tight tension or an undersized hook.
Adjusting the Crochet Heart Shape
The upper lobes depend on taller stitches. Treble and double crochet add height rapidly, while half double and single crochet bring the sides inward toward the lower point.
If the lobes look narrow, add height near the upper sections rather than adding stitches around the entire motif. If the bottom looks too round, reduce stitch height progressively as the work approaches the point.
The center indentation also needs to remain visible after joining. An overly shallow notch can make the motif resemble an oval once cream connectors are attached around it.
Check symmetry before weaving in the tails. Fold the motif lightly along its vertical centerline and compare the two lobes. Small tension differences can usually be corrected during blocking, but a misplaced group of tall stitches should be corrected in the crochet itself.
Blocking the Finished Lace Panel
Blocking controls the final geometry of this design. Measure the panel before wetting it and decide on the target width and length based on the natural dimensions of the assembled motifs.
Place the damp panel on a blocking surface. Pin the four corners first, followed by the midpoint of each side. Add pins around the perimeter while keeping the scallops evenly distributed.
Move to the interior only after the outer rectangle is stable. Adjust the cream lattice so corresponding openings have similar dimensions. The heart motifs should remain centered rather than being pulled toward one connector.
Allow the panel to dry completely before removing the pins. Releasing it while damp can allow the open chain lattice to contract and reduce the accuracy of the final dimensions.
Conclusion
The key measurement for this crochet heart lace pattern is the blocked motif plus its connector gap, not an assumed finished size taken from a photograph. Make one coral heart and one cream connector first, block both, and use those measurements to calculate the panel. That test also shows whether a 3.75 or 4 mm hook produces the cleaner lattice with your DK cotton. Once the dimensions are fixed, record the required heart count before joining the first full row. Share the finished layout on Pinterest or Instagram with #HeartLacePanel. Which proportion works better for this design: compact coral hearts with wider cream diamonds, or larger hearts with narrower connector spaces?









